Manage workflows
When you configure access requests, you can implement workflows, an end-to-end sequence of Identity Governance actions that result in either approving or rejecting an access request. You can configure workflows using the Advanced Identity Cloud’s workflow editor or REST APIs.
Workflows give complete flexibility over all access request types by allowing you to define custom workflow definitions. For example, when an end user requests access to an application, you can specify the actions Identity Governance takes for the access request to be approved or rejected.
These actions could include:
-
Requiring more than one approval for the request. You could require an end user’s manager and the application owner to approve the request before Identity Governance provisions access to the end user.
-
If the access request is rejected, send an email to the end user stating their access request has been denied.
|
The out-of-the-box Identity Governance workflows do not currently support the approval of
custom request types, like event-based requests.
In this case, you can use workflows with custom scripted nodes that can
handle event-based situations, such as |
Access request types
Identity Governance provides six out-of-the-box workflows for each access request type.
The following table displays the different access request types and out-of-the-box workflows:
| Access request type | Workflow name | Description |
|---|---|---|
Grant Application |
|
Request access to an application. |
Remove Application |
|
Request to remove access to an application for an end user. |
Grant Entitlement |
|
Request access to an entitlement (additional privilege inside an application). |
Remove Entitlement |
|
Request to remove access to an entitlement from an end user. |
Grant Role |
|
Request access to an Advanced Identity Cloud provisioning role. |
Remove Role |
|
Request to remove access to a role from an end user. |
Create workflows using the workflow editor
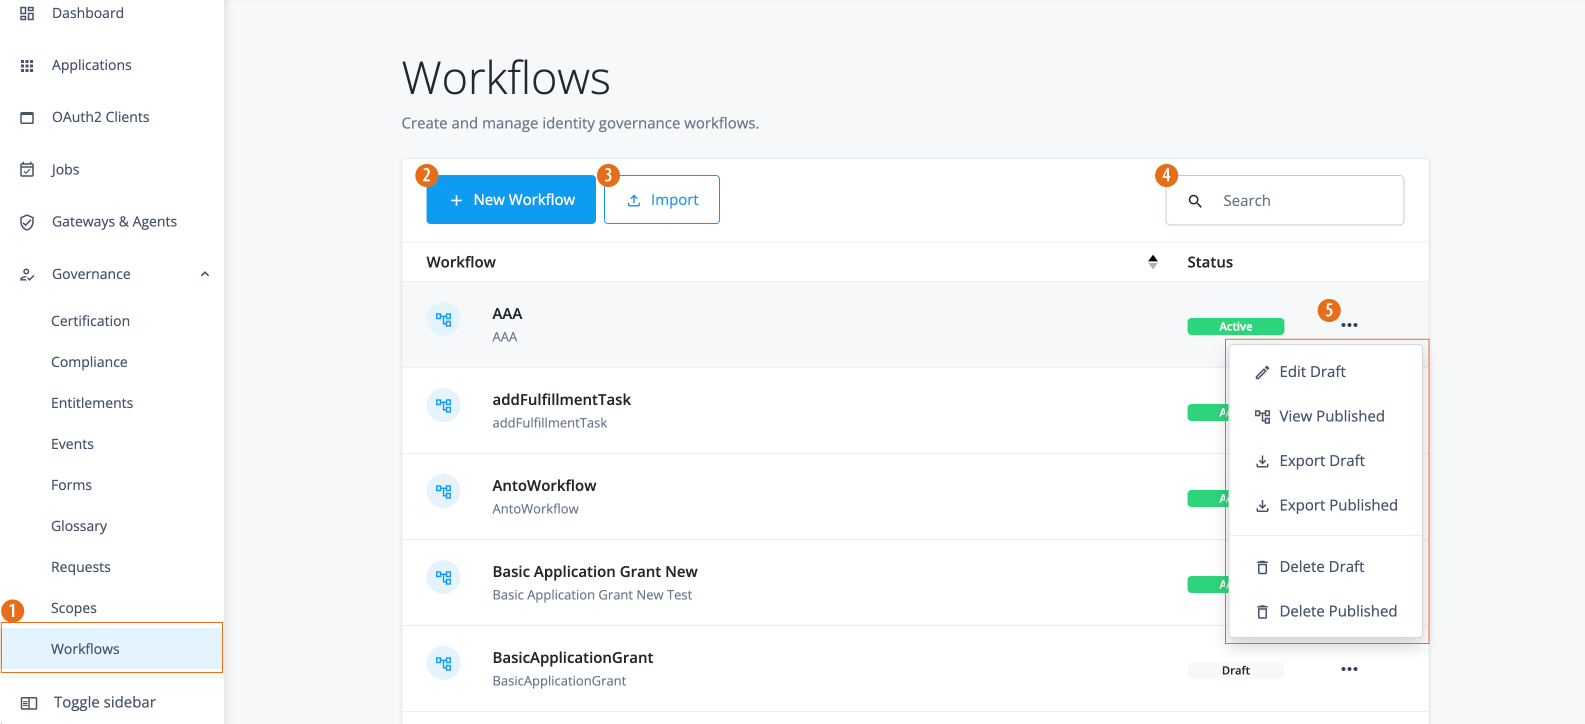
To manage workflows, from the Advanced Identity Cloud admin console, go to Workflows.
There is a default published workflow for each access request type.
-
1 Click Governance > Workflows on the Advanced Identity Cloud end-user UI.
-
2 Click New Workflow to create a workflow.
-
3 Click Import to import a workflow JSON file.
-
4 Enter a workflow in the Search field.
-
5 Click the ellipsis () to do the following tasks depending on the workflow type:
Every workflow has two states: draftandpublished. You can only modify a workflow in thedraftstate.-
Workflow draft only: When a workflow is first created or imported, you get a workflow draft. The following options are available:
-
Edit draft
-
Export draft
-
Delete draft
-
-
Workflow published only: If a workflow draft is published, you will only have a published version. The following options are available:
-
New Draft
-
View published
-
Export published
-
Delete published
-
-
Out-of-the-box workflow: When you publish an out-of-the-box workflow, you will have a published version, which you can view, duplicate, or export. The following options are available:
-
View published
-
Duplicate
-
Export published
-
-
Workflow draft and published: If you have a published workflow, you can create a draft of it. Then, when you edit and save the draft, there will be both a draft and a published version of the workflow. The following options are available:
-
Edit draft
-
View published
-
Export draft
-
Export published
-
Delete draft
-
Delete published
-
-
Workflow editor canvas
When you click a workflow, a blank workflow canvas appears with workflow nodes in the left pane, which you can drag-and-drop onto the canvas.

-
1 Available workflow editor nodes.
-
2 Perform orientation functions:
: Zoom in
: Zoom out
: Toggle fullscreen
: Auto layout nodes on the canvas
: When you select on or more nodes, the delete icon displays.
-
3 Toggle between the
draftandpublishedstates of a workflow. -
4 Click (ellipsis icon) to:
-
View Details: View metadata, such as the
stateandworkflow name. -
Import: Upload a JSON file to create or override an existing draft.
-
Export: Download a JSON file of the workflow state.
-
Delete Draft: Only present when viewing the draft state of a workflow.
-
-
5 Switch between viewing the workflow through the canvas UI or through JSON.
-
6 Save or publish the existing workflow.
-
7 The workflow editor canvas. Drag, drop, and connect nodes in the canvas to create your workflow.
| When you click Publish in a workflow, it overrides the existing published version. Identity Governance prompts you to Download backup. Always download a backup in case of an error. |
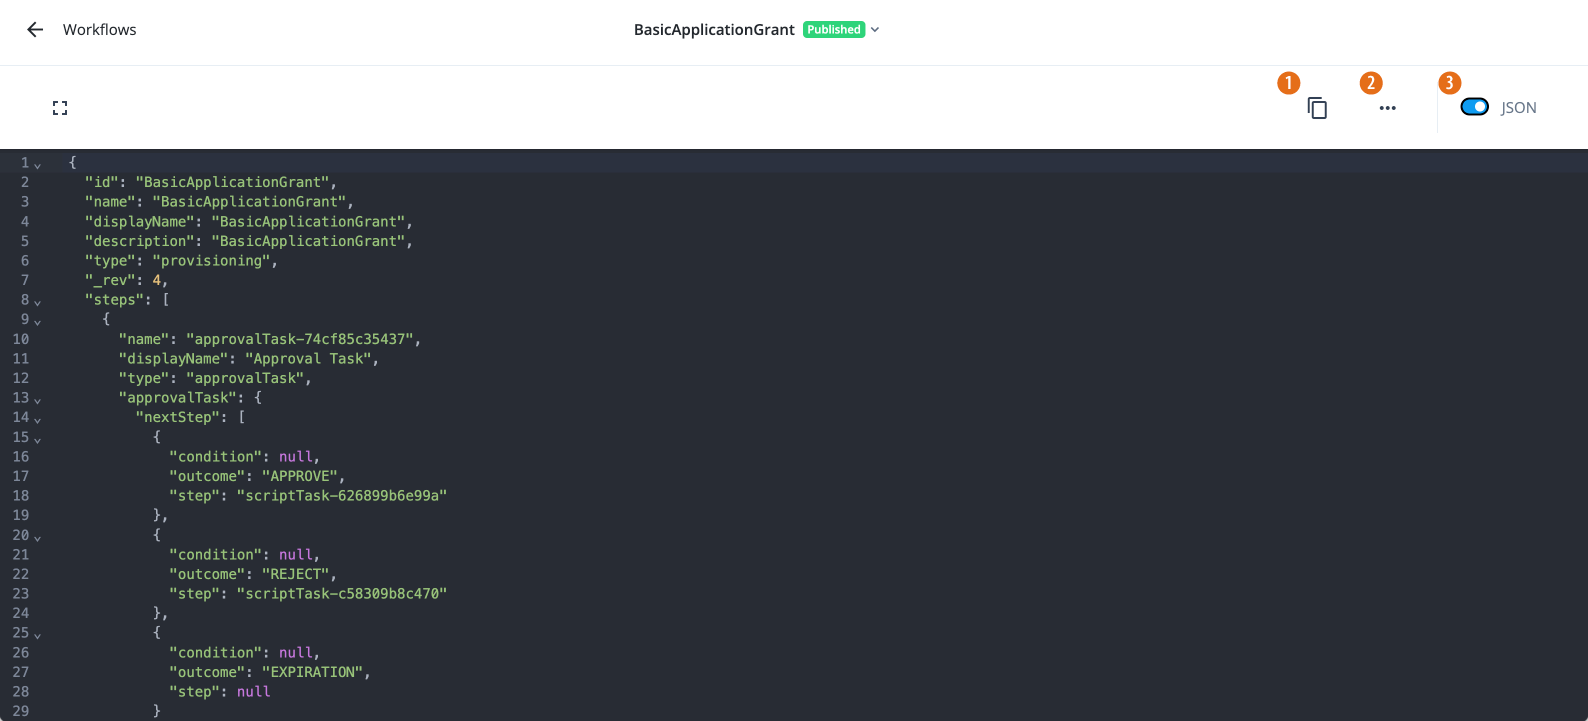
View workflow in JSON
For technical users, Identity Governance provides the ability to view and download workflows using JSON. From the workflow editor canvas, toggle JSON. If you want to export the workflow JSON, click ellipsis (), and then Export. You can make adjustments and re-import the JSON into Identity Governance.
|
If you are exporting an out-of-box workflow, Identity Governance pulls the UUID of the users or roles from the environment and uses it in the JSON file. Make sure to reset or update the approver values in the Approver node in the JSON. |
-
1 Copy the JSON workflow file.
-
2 Click to View Details, Import, and Export the JSON file.
-
3 Toggle to enable or disable JSON view.