Register a custom application
|
The topics in this section are for tenants created on or after January 12, 2023. Learn more in Application management migration FAQ. |
If you can’t find a template for your OpenID Connect (OIDC) or SAML applications, Advanced Identity Cloud lets you create custom applications, where you supply all the configuration information.
| You can’t configure provisioning for custom applications. |
Learn more about OIDC and SAML 2.0 applications in Application management.
To register a custom application:
-
On the Advanced Identity Cloud admin console, go to Applications > Applications, and click + Custom Application.
-
In the Add a Custom Application modal, choose one of the following:
-
OIDC - OpenID Connect
-
SAML
-
Bookmark
-
WS-Fed
Learn more in Custom WS-Fed.
-
-
Click Next.
-
Complete application setup in one of the following applicable sections.
Register an OIDC application
-
Choose the application type you want to register. Learn more in OIDC applications.
-
Native / SPA
-
Web
-
Service
-
-
Click Next.
-
In the Application Details modal, configure the following fields:
-
Name: The name of the application.
-
Description: A description of the application.
-
Application Owners: The owners of the application.
-
App Logo URI: The URL of the application logo.
-
-
Click Next.
-
In the Service Settings modal, configure the following fields:
-
Enter a Client ID to display in the applications list, and if shown, enter a Client Secret. Remember the client secret. If you forget the client secret, you must reset it on the Sign On tab on the edit application page.
-
Enable Use Secret Store for secrets to display the Secret Label Identifier field. Learn how to configure the Secret Label Identifier field in General Settings.
-
-
Click Create Application.
Set up SSO for an OIDC application
-
On the Sign On tab, set or review the following settings:
Client Credentials
Field Description Client ID
Identifier used to register your client application with Advanced Identity Cloud, and when your application authenticates to Advanced Identity Cloud.
(Web and Service) Client Secret
Password used to register your client application with Advanced Identity Cloud, and when your application authenticates to Advanced Identity Cloud.
Discovery URI
The URI where the application retrieves the OpenID Provider information for this realm.
Default:
https://<tenant-env-fqdn>/am/oauth2/realm-name/.well-known/openid-configuration -
For advanced credential settings, click Show advanced settings and configure the following fields:
Details
Field Description OAuth2.0 Authenticate Endpoint
The endpoint for OAuth2.0 authentication.
OAuth2.0 Authorization Endpoint
The endpoint for OAuth2.0 authorization.
OAuth2.0 Token Endpoint
The endpoint the application uses to get an access token or a refresh token.
OAuth2.0 Introspect Endpoint
The endpoint that returns validation information for identifier-based access tokens.
OAuth2.0 Userinfo Endpoint
The endpoint that returns information about an end user.
OAuth2.0 Identity Token Endpoint
The endpoint that returns the identity token.
Access Policy
Configure an authorization policy to restrict which users can authenticate to the application.
General Settings
Field Description Sign-in URLs
Custom URL for handling login. Overrides the default login page.
Sign-out URLs
Custom URL for handling logout. Example:
https://client.example.com:8443/am/XUI/?realm=/#logout.Grant Types
The set of OAuth 2.0 grant types, also known as grant flows, allowed for this client.
Scopes
The scopes presented to the resource owner when requested to authorize client access to protected resources. The
openidscope is required.Use Secret Store for secrets
Enable to display the Secret Label Identifier field.
Secret Label Identifier
Enter a value that represents the
<identifier>part of a secret label for an OAuth 2.0 client. The identifier can only contain alphanumeric charactersa-z,A-Z,0-9, and periods (.). It can’t start or end with a period.Advanced Identity Cloud uses the identifier to generate secret labels in the following format:
- Client Secret Identifier
-
am.applications.oauth2.client.<identifier>.secret - Client JWT Bearer Public Key Identifier
-
am.applications.oauth2.client.<identifier>.jwt.public.key - Client ID Token Public Encryption Key Identifier
-
am.applications.oauth2.client.<identifier>.id.token.enc.public.key - mTLS Self-signed Certificate Identifier
-
am.applications.oauth2.client.<identifier>.mtls.trusted.cert
Learn more in Secret labels.
-
For advanced general settings, click Show advanced settings and configure the following fields:
Access
Field Description Default Scopes
Scopes set automatically when tokens are issued. The
openidscope is required.Response Types
The response type determines how the ID token and access token are returned to the client.
Response type Description codeAuthorization code grant.
tokenImplicit grant; returns a token from the API.
id_tokenReturns an ID token.
code tokenReturns an authorization code, access token, and access token type.
token id_tokenReturns an access token, access token type, and ID token.
code id_tokenReturns an authorization code and ID token.
code token id_tokenReturns an authorization code, access token, access token type, and ID token.
Claims
Claims can be entered as simple strings, such as
name,email,profile, orsub. Or, as a pipe-separated string in the format:scope|locale|localized description. For example,name|en|Full name of end user.Allow wildcard ports in redirect URLs
Whether Advanced Identity Cloud allows wildcards (
*characters) in the redirection URI port to match one or more ports.The URL configured in the redirection URI must be either
localhost,127.0.01, or::1. For example,http://localhost:*/,https://127.0.0.1:80*/, or\https://[::1]:*443/.Enable this setting, for example, for desktop applications that start a web server on a random free port during the OAuth 2.0 flow.
Authentication
Field Description Use a journey to authenticate users to this application
Enable to display a list of journeys. Select a journey to be used in the authentication step of the OAuth 2.0 / OIDC flow. From the list of journeys, you can also perform the following actions:
-
Click the add icon () to create a new journey.
-
Click the edit icon () to edit a journey.
These actions open a journey editor.
Learn more in Journeys and Application journeys.
Token Endpoint Authentication Method
The method that the client uses to authenticate to Advanced Identity Cloud.
Choose one:-
client_secret_basic. Clients authenticate using the HTTP Basic authentication scheme after receiving a client_secret value. -
client_secret_post. Clients authenticate by including the client credentials in the request body after receiving a client_secret value. -
private_key_jwt. Clients sign a JSON web token (JWT) with a registered public key.
Client Type
-
Confidential clients can maintain the confidentiality of their credentials. For example, a web application runs on a server where its credentials are protected.
-
Public clients run the risk of exposing their passwords to a host or user agent. For example, a JavaScript client running in a browser may be accessible to the public at large.
Implied Consent
When enabled, the resource owner won’t be asked for consent during authorization flows. The OAuth2.0 Provider must also be configured to allow clients to skip consent.
OAuth 2.0 Mix-Up Mitigation active
Enable this setting only if this OAuth 2.0 client supports the OAuth 2.0 Mix-Up Mitigation draft, otherwise Advanced Identity Cloud won’t validate access token requests received from this client.
Default ACR values
Default Authentication Context Class Reference values. Specify strings that will be requested as Voluntary Claims by default in all incoming requests.
Request URIs
Specify request_uri values that a dynamic client pre-registers.
Client JWT Bearer + Public Key
A base64-encoded X509 certificate in PEM format used to obtain the client’s JWT bearer public key. The client uses the private key to sign client authentication and access token request JWTs. Advanced Identity Cloud uses the public key for verification.
Subject Type
Default value is public.
-
Choose pairwise if you want each client to receive a different subject value. This prevents correlation between clients.
-
Choose public if you want each client to receive the same subject value.
Default Max Age
Enable this option to enforce a default maximum age of 10 minutes. If the end user session isn’t currently active, and if more than 10 minutes have passed since the end user last authenticated, then the end user must authenticate again.
Use Certificate-Bound Access Tokens
Enable this option if you want access tokens issued to this client to be bound to an X.509 certificate. When enabled, access tokens will use the X.509 certificate to authenticate to the
access_tokenendpoint.Token Lifetimes
Field Description Authorization code lifetime (seconds)
The time an authorization code is valid for.
Default value: 120Access token lifetime (seconds)
The time an access token is valid for, in seconds
If you set the value to 0, the access token will not be valid. A maximum lifetime of 600 seconds is recommended.Default value: 3600
Refresh token lifetime (seconds)
The time a refresh token is valid for.
If this field is set to -1, the refresh token will never expire.Default value: 604800
JWT token lifetime (seconds)
The amount of time the JWT is valid for.
Default value: 3600
Consent Screen
Field Description Display Name
Custom user-facing title. In this example, MyClient.
Display Description
User-facing instruction text. In this example, "This application is requesting the following information:"
Privacy Policy URI
URI containing the client’s privacy policy documentation. The URI is displayed as a link in the consent page.
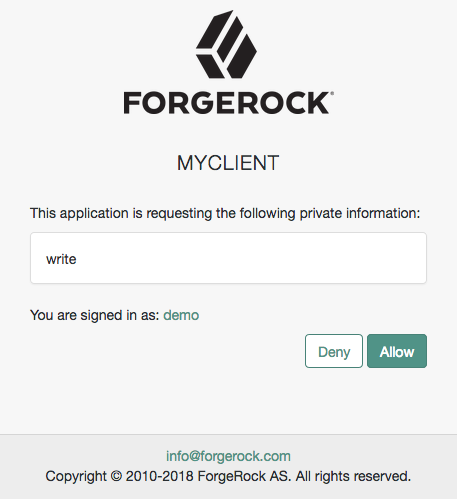 Figure 1. Example consent page
Client Management
Field Description Access Token
Specify the
registration_access_tokenvalue you provided when registering the client, and then subsequently, when reading or updating the client profile.Session Management
Field Description Client Session URI
Specify the relying party (client) URI to which the OpenID Connect Provider sends "session changed" notification. Message is sent using the HTML 5 postMessage API.
Endpoint Response Formats
Field Description User info response format
Specify the output format from the
userinfoendpoint.
The supported output formats are:-
(default) User info JSON response format.
-
User info encrypted JWT response format.
-
User info signed JWT response format.
-
User info signed then encrypted response format.
Token Introspection Response Format
The format of the token introspection response. The possible values for this property are:
-
JSON response format
-
Signed JWT response format
-
Signed then encrypted JWT response format
Even if the client application has configured the response to be JSON-formatted, it can request a signed JWT by adding one of the following headers to the introspection request:
-
Accept: application/jwt(default, for compatibility with older clients) -
Accept: application/token-introspection+jwt(for compatibility with RFC 9701)
Signing and Encryption
Field Description Public key selector
Select the public key for this client, which comes from the JWKs_URI, manual JWKs, or X.509 field.
JSON Web Key URI
The URI that contains the client public keys in JSON web key format.
JSON Web Key
Raw JSON web key value containing the client public keys.
ID Token Encryption Public Key
The RSA public key for encrypting ID tokens in X.509 PEM format. For example:
-----BEGIN PUBLIC KEY-----
......
-----END PUBLIC KEY-----
Enable ID Token Encryption
When enabled, encryption uses the algorithm that the ID token must be encrypted with.
Default algorithm value is RSA1_5 (RSAES-PKCS1-V1_5).
-
-
Click Save.
Register a SAML 2.0 application
-
On the Application Details page, configure the following fields:
-
Name: The name of the application.
-
Description: A description of the application.
-
Application Owners: The owners of the application.
-
App Logo URI: The URl of the location of the application logo.
-
-
Click Create Application.
Set up SSO for a SAML 2.0 application
-
Click the Sign On tab and then Set Up SSO.
-
If you’ve set up multiple domains, select a domain to use for sign-on and click Next.
-
On the first Set Up Single Sign-on page, you can download the metadata to export the Advanced Identity Cloud provider XML.
-
Click Next.
-
Select Upload Metadata or Configure Manually to configure SAML 2.0 for your application.
Browse to the metadata file you downloaded from your application and upload it, or manually configure the SAML 2.0 settings for your application. You must provide a Single Sign-On URL and an Audience URI (SP Entity ID) at a minimum.
-
If the metadata contains an embedded XML signature that Advanced Identity Cloud can’t validate, ensure Skip Metadata Signature Verification is selected.
Use this option only when you trust the metadata source by other means, such as downloading it directly from a known provider’s URL over HTTPS or verifying a checksum before import.
Skipping verification means Advanced Identity Cloud imports the metadata without verifying its origin, authenticity, or integrity.
-
Click Next to display the Sign On settings.
-
In your SAML 2.0 application, use the following Quick Start options to configure Advanced Identity Cloud as the IdP:
-
View IdP Metadata: Displays the IdP metadata in XML format. You can copy and paste the XML into your application, or download it to a file.
-
Download Certificate: Downloads the IdP signing certificate in PEM format. You can use this certificate to verify the signature of SAML assertions from Advanced Identity Cloud.
-
Update Metadata: Upload an updated version of the SP metadata in XML format.
-
-
In the Access Policy section, click Create a Policy to restrict which users can authenticate to the application.
Learn more in Configure an application authorization policy.
-
In the Endpoints section, review or copy the IDP-Initiated Login Endpoint.
-
In the Settings section, configure the following fields:
Settings
Field Description Single Sign On URL
The location where the SAML assertion is sent with an HTTP POST. This is often referred to as the SAML Assertion Consumer Service (ACS) URL for your application.
Audience URI (SP Entity ID)
The application-defined unique identifier that is the intended audience of the SAML assertion. This is most often the SP Entity ID of your application.
Response
Signed or Unsigned.
Assertion Signature
Signed or Unsigned.
Use a journey to authenticate users to this application
Enable to display a list of journeys. Select a journey to be used in the authentication step of the SAML 2.0 federation flow. From the list of journeys, you can also perform the following actions:
-
Click the add icon () to create a new journey.
-
Click the edit icon () to edit a journey.
These actions open a journey editor.
Learn more in Journeys and Application journeys.
-
-
For advanced settings, click Show advanced settings and configure the following fields:
Advanced settings
Field Description Name ID Format
Identifies the SAML processing rules and constraints for the assertion’s subject statement. Use the default value of
Unspecifiedunless the application explicitly requires a specific format.Application Username
Determines the default value for a user’s application username. The application username is used for the assertion’s subject statement. Select from one of the following options:
-
Username
-
Email
-
Custom: Allows you to specify a script that provides the application username. Scroll to select or edit an existing script, or click the plus sign to add a new NameID mapper script.
Assertion Encryption
Encrypted or Unencrypted.
Single Logout
Enable to allow the application to initiate Single Logout. Then in the Single Logout URL field, enter the location where the logout response is sent.
Attribute Statements (optional)
Insert statements into the SAML assertions shared with your application. Set the Name, Name Format, and Value for each statement. Click to add a new statement.
-
-
Click Save.
Register a Bookmark application
You can register a bookmark application such as OneNote, Evernote, Google Bookmarks, or raindrop.io, to direct users to specific URLs. A bookmark application displays shortcut links on dashboards. When you click one of the links, the browser opens a new tab.
-
On the Application Details page, configure the following fields:
-
Name: The name of the application.
-
Description: A description of the application.
-
Application Owners: The owners of the application.
-
URL: The sign-in URL for the application.
-
App Logo URI: The URl of the location of the application logo.
-
-
Click Create Application.