Okta as RP (OIDC)
Description
Estimated time to complete: 20 minutes
In this use case, configure SSO using OIDC with Advanced Identity Cloud as the identity provider (IDP) and Okta as the service provider (SP).
Goals
After completing this use case, you will know how to do the following:
-
Configure Advanced Identity Cloud as an OIDC identity provider
-
Configure Okta as a remote SP
-
Use the hosted account pages application dashboard to federate to Okta
Prerequisites
Before you start, make sure you have the following:
-
A basic understanding of:
-
The Advanced Identity Cloud admin console and hosted pages
-
SSO (Federation)
-
OIDC
-
-
Completed the use case Create test users and roles
-
Access to your test Advanced Identity Cloud environment as an administrator
-
Access to an Okta development environment as an administrator
Tasks
| This use case requires the use of third-party services. Use your environment-specific details where necessary. |
Task 1: Create a custom OIDC application in Advanced Identity Cloud
-
Sign on to the Advanced Identity Cloud admin console.
-
In the Advanced Identity Cloud admin console, go to Applications > Custom Application > OIDC - OpenId Connect > Web.
-
On the Application Details page, add a web application with the following configuration, and then click Next:
Field Value Name
okta_clientDescription
Okta clientOwners
App OwnerApp Logo URI
https://www.okta.com/sites/default/files/Okta_Logo_BrightBlue_Medium-thumbnail.png -
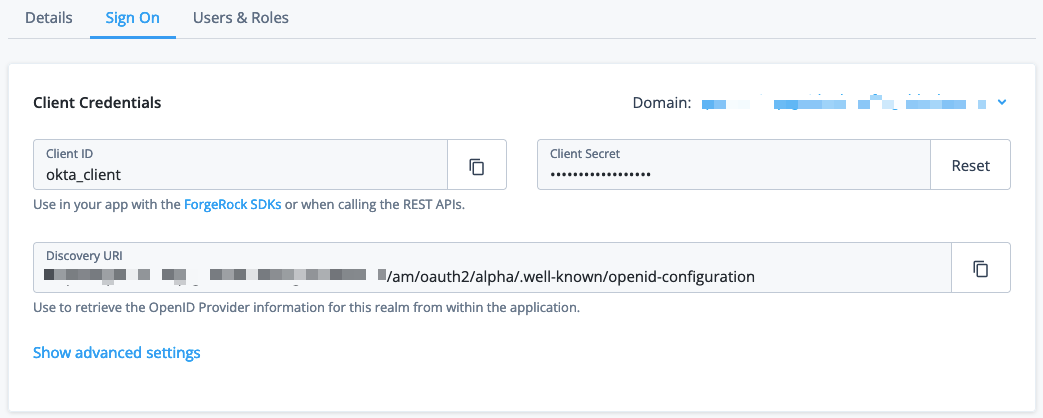
On the Web Settings page, add the following configuration, and then click Create Application:
Field Value Client ID
okta_clientClient Secret
Enter a password for the client. Remember the password because you need it to configure Okta.
The Okta client page is displayed.
-
On the Okta client page, go to the Sign On tab, add the following configuration, and then click Save:
Field Value Sign-in URLs
https://<okta-tenant-env-fqdn>/oauth2/v1/authorize/callbackGrant Types
Authorization CodeScopes
openid,profile,email -
At the end of the General Settings panel, click Show advanced settings, and then Authentication.
-
Set Token Endpoint Authentication Method to
client_secret_postand click Save.The configuration should resemble the following examples:

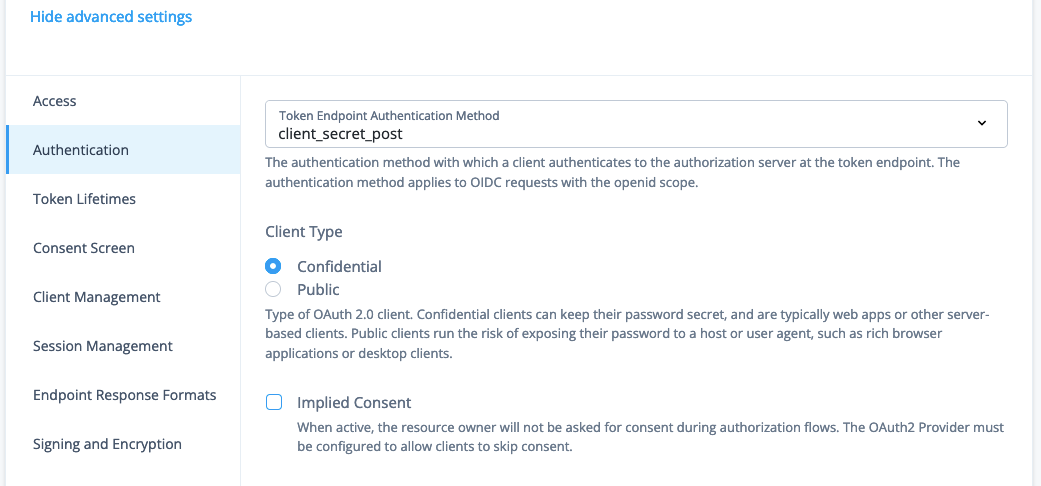
| To require Advanced Identity Cloud to ask for consent to share information during authorization flows, deselect Implied Consent. |
Task 2: Add Advanced Identity Cloud as an IDP in Okta
Refer to Okta’s documentation on how to Create an app at the Identity Provider.
-
Sign on to the administrator interface for your Okta tenant and go to the Dashboard.
-
On the Okta Admin Console, click Directory > People > Add person and create a user with the same configuration as a user in Advanced Identity Cloud. This example uses the following user:
Field Value Username
acruseFirst Name
alexLast Name
cruseEmail Address
alex.cruse@example.comI will set password
Enable
Password
Secret12!User must change password on first login
Disable
-
Select Security > Identity Providers > Add identity providers and add an OpenID Connect IdP provider.
-
On the Configure OpenID Connect IdP page, add the following configuration, and then click Finish. Leave other fields with the default values:
Field Value Name
ForgeRockIdP Usage
SSO onlyScopes
email,openid,profileClient ID
okta_clientAuthentication type
Client secretClient Secret
The password created for
okta_clientin Task 1: Create a custom OIDC application in Advanced Identity CloudIssuer
https://<tenant-env-fqdn>:443/am/oauth2/alphaThe port number is required for this property. Authorization endpoint
https://<tenant-env-fqdn>/am/oauth2/alpha/authorizeToken endpoint
https://<tenant-env-fqdn>/am/oauth2/alpha/access_tokenJWKS endpoint
https://<tenant-env-fqdn>/am/oauth2/alpha/connect/jwk_uriUserinfo endpoint
https://<tenant-env-fqdn>/am/oauth2/alpha/userinfoIf no match is found
Create new user (JIT)Profile Source
Update attributes for existing usersThe ForgeRock identity provider page is displayed.
-
(Optional) Select Edit profile and mappings to change the mapping of attributes from Advanced Identity Cloud to Okta.
-
Enable the ForgeRock identity provider:
-
On the Okta Admin Console, go to Security > Identity Providers.
-
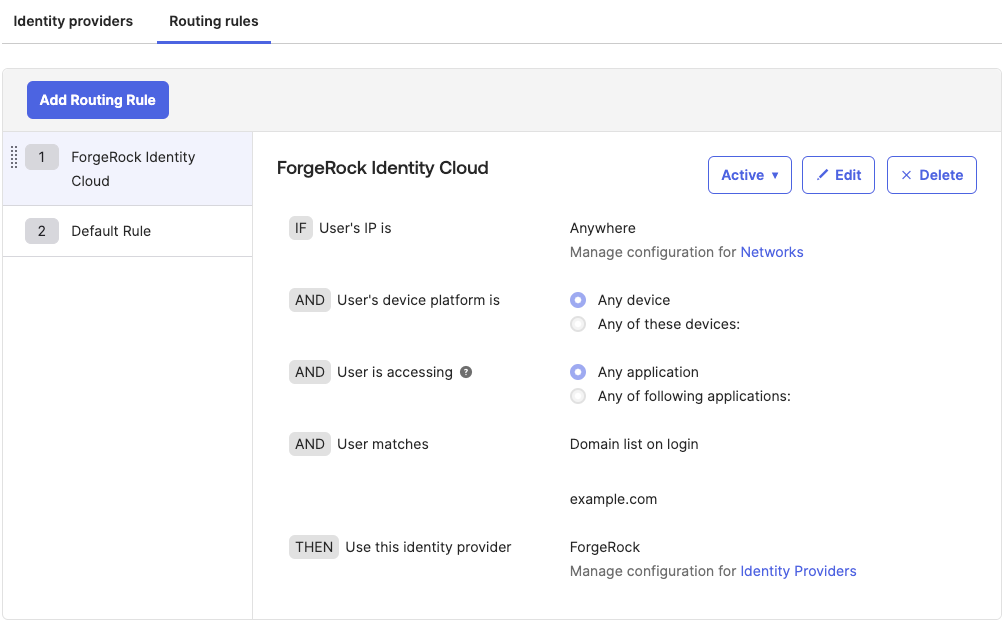
On the Routing Rules tab, click Add Routing Rule to redirect requests that meet defined criteria for authentication with Advanced Identity Cloud. The following rule redirects all requests from the
example.comdomain:Field Value Rule Name
PingOne Advanced Identity CloudIF User’s IP is
AnywhereAND User’s device platform is
Any deviceAND User is accessing
Any applicationAND User matches
Domain list on loginexample.comTHEN Use this identity provider
ForgeRockFor other options, learn more in Okta’s documentation.
-
At the Activate Rule prompt, activate the rule immediately.
-
Validation
Now that you have created and configured a custom OIDC application and configured Okta as the SP, validate the configurations by:
-
Logging in to Okta as an end user
-
Authenticating to Advanced Identity Cloud after redirection
Validate your work with an identity that exists in Advanced Identity Cloud and Okta
-
In your browser’s privacy or incognito mode, go to your Okta tenant.
-
Log in as the user you created in Okta. For example, log in as username
alex.cruse@example.com.Because the username matches the routing rule created in Task 2: Add Advanced Identity Cloud as an IDP in Okta, Okta redirects the request to Advanced Identity Cloud for authentication.
If something is wrong, the authorization response contains error information to help you resolve the issue.
-
Log in to Advanced Identity Cloud as the identity you created in Create test users and roles. This example logs in as username
acrusepasswordSecret12!.If you deselected Implied Consent in Create a custom OIDC application in Advanced Identity Cloud, you are prompted for consent:
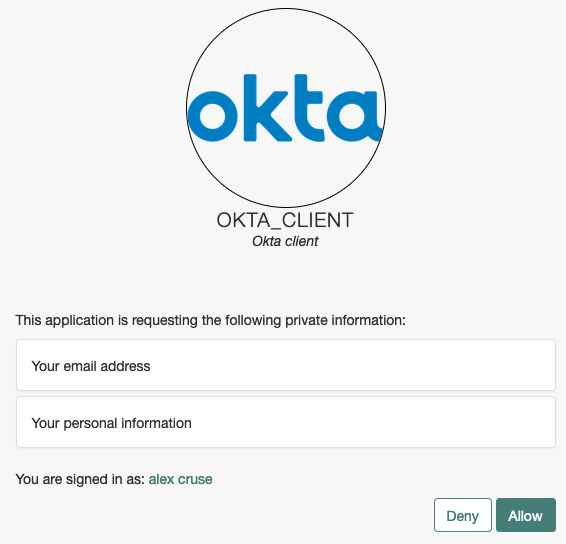
-
Click Allow to give Advanced Identity Cloud consent to access Okta resources.
After consenting, you are signed on to Okta.

Validate your work with an identity that exists in Advanced Identity Cloud but not in Okta
-
In a separate incognito browser, return to your Okta tenant.
-
In the Okta sign-on window, enter the email of a user that exists in Advanced Identity Cloud but not in Okta. For example, enter username
bina.raman@example.comcreated in Create test users and roles.Okta redirects the request to Advanced Identity Cloud for authentication.
-
Log in to Advanced Identity Cloud as a user. For example, log in as username
bramanpasswordSecret12!.After successful authentication, the Okta JIT provisions the user
bramanbased on information in the response and logs them in to Okta. -
On the Okta Admin Console, click Directory > People and see that
braman@example.comhas been provisioned automatically.
Explore further
Reference material
| Reference | Description |
|---|---|
In Okta, manually add users, assign them to apps and groups, and manage their profile. |
|
In Okta, create a client application to use for authenticating and authorizing users. link: |
|
In Okta, configure routing rules for each of your Identity Providers or for different combinations of user criteria. |
|
Set up and manage applications that work with Advanced Identity Cloud. |