Advanced Reporting
Advanced Reporting lets you create custom reports on activity in your Advanced Identity Cloud tenant environment. You can query a number of metrics to create useful reports for your company.
|
Advanced Identity Cloud add-on capability
Contact your Ping Identity representative if you want to add Advanced Reporting to your PingOne Advanced Identity Cloud subscription. Learn more in Add-on capabilities. |
Assign report_viewer group
Advanced Identity Cloud provides a group to which users can be assigned to access custom reports.
| Group | Capability |
|---|---|
report_viewer |
A user with this group can do the following:
|
Add a user to the report_viewer group
-
In the Advanced Identity Cloud admin console, go to Identities > Manage.
-
On the Manage Identities page, click Alpha-name - Groups.
-
Click New Alpha realm - Group.
-
On the New Alpha realm - group modal, enter the following:
-
Name: Enter
report_viewer. -
Description: Enter a general description for the group.
-
Click Next.
-
-
On the Dynamic Alpha realm - group Assignment modal, click A filter for conditionally assigned members if you want to add a filter.
-
Select Any or All conditions that must be met to assign to a user.
-
Select a property, such as
username,first nameor others for your condition. -
Select an operator, such as
contains,does not contain, or others for your condition. -
Enter a property value.
-
Click plus:icon[] to add the condition to your filter.
-
-
Click Save.
Create custom reports using Advanced Reporting
-
In the Advanced Identity Cloud admin console, click New Report.
-
On the New Report modal, enter the following properties, and then click Next:
Field Description Name
Name of the report. Follow the naming conventions established by your company.
Description
Optional. Enter a description describing the report.
Who Can Run
Click to set who can run this report.
Groups:
-
Report Viewer
Users:
-
Select the users who can run this report. To select a user, you must have assigned the
report_viewergroup permissions to the user from the Manage Identity page.
-
-
Next, add a data source or select an existing data source:
-
Click Data Source.
-
On the Add a Data Source modal, select a data source to use in this report, and then click Next:
-
-
Next, select the columns in the report in the right pane for your report result. Each data source can have different attributes. When you click an attribute, the column appears on the main window.
-
Click the plus icon () to define parameters that the end user provides or extracted from the end user profile while running the report:
-
On the Add a Parameter modal, enter the following fields:
Field Description Name
Name of the parameter or profile attribute. Also, the name appears on the filter attribute list.
Parameter Type
User provided parameter or a profile attribute.
Input Label
Label for parameter that appears when you do a reporting run.
Input Type
Options are:
-
String
-
Boolean
-
Integer
-
Float
-
Date
Help Text
Optional. Enter any help text for the parameter.
Multivalued
Click Multivalued to allow the end user to provide multiple values while running the report.
Enumerated Values
Click Enumerated Values if the property is an enumerated value. This property creates a drop-down list for the end user to select a value when running the report.
-
-
Click Save.
-
-
Next, click Filters to specify data source attributes for report filtering:
Click to review the filtering options:
Field Description Any|All
Select
AnyorAllconditions that must be met for the filters.Value
List of attributes in the selected data source, including any custom attributes.
Connectors
Options are:
-
contains
-
does not contain
-
greater than or equal to
-
equals to
-
not equals to
-
less than or equal to
-
less than
-
greater than
-
starts with
-
ends with
-
not starts with
-
not ends with
-
is null
-
is not null
Literal|Variable
Value. End user provided variable. Select a value from the data source attributes or a property value passed by the end user during the report run.
-
Click Save. A
Filter activemessage with a checkmark appears.
-
-
Click Aggregate to define aggregated data counts:
-
On the Add an Aggregate modal, enter the following:
Field Description Name
Enter a descriptive label for the aggregate.
Type
Options are:
-
Count of specific rows
-
Sum of specific rows
-
Distinct count of specific rows
Value
Enter a value for the aggregate.
-
-
Click Save.
-
-
Click Sorting to sort the data tables in the report:
-
On the Sort Data By modal, enter or select the following properties:
Field Description Sort by
Provided a list of attributes from the selected data source.
Sort order
Select the sort order for your data. Options are:
-
Ascending
-
Descending
-
-
Click Save.
-
-
Click Save at the top of the report. Your report draft appears on the Reports page and is only visible to the report template creator.
-
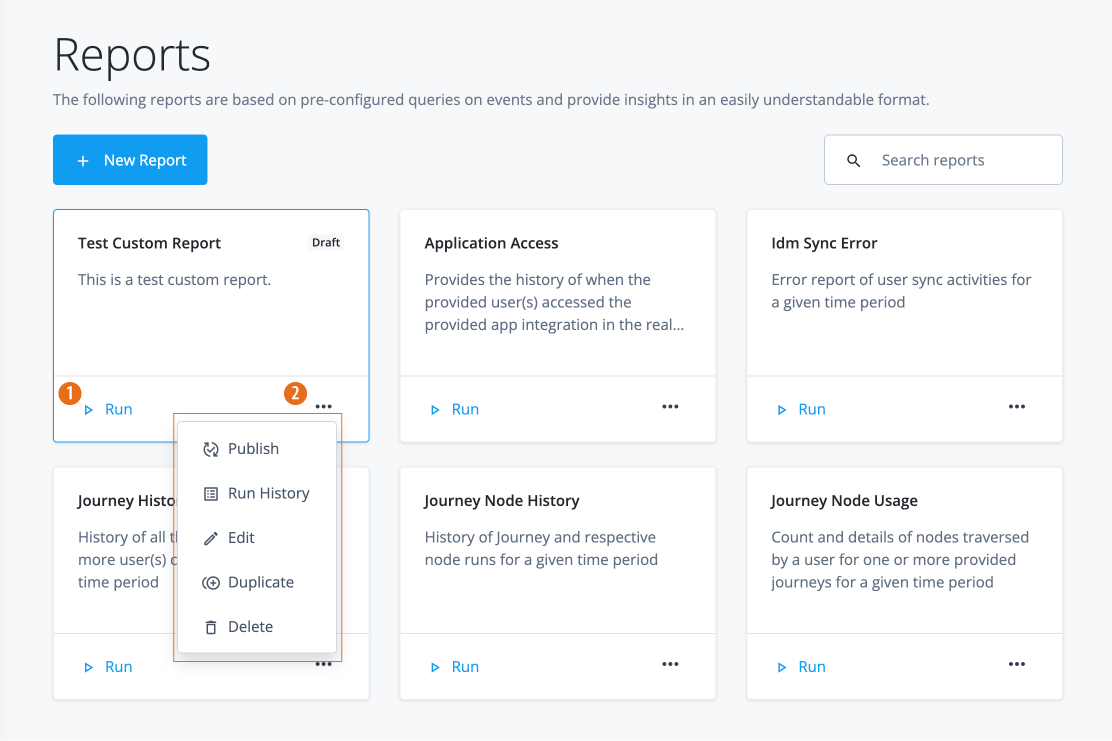
1 Click New Report to create a custom report.
-
2 Search for a report.
-
3 Click Run to generate a reporting run.
-
4 Click ellipsis () to publish the draft, view the reporting run history, edit, duplicate, or delete the draft.
-
Entities and attributes available in advanced reporting
The following entities and attributes are available to tenant administrators when creating advanced reports:
| Entity | Attributes | Query Limited? |
|---|---|---|
Users |
|
N |
Roles |
|
N |
Organizations |
|
N |
Applications |
|
N |
Journeys |
|
Yes |
Nodes |
|
Yes |
AM Access Outcome |
|
Yes |
AM Access Attempt |
|
Yes |
IDM Sync |
|
Yes |
IDM Recon |
|
Yes |
IDM Config |
|
No |
Entitlements |
|
No |
Assignments |
|
No |
Groups |
|
No |
Internal Roles |
|
No |
Accounts |
|
No |
Campaigns |
|
No |
Policy |
|
No |
Policy Rules |
|
No |
Policy Scan |
|
No |
Policy Violation |
|
No |
Account Review Items (Not available as main datasource) |
|
No |
Entitlement Review Items (Not available as main datasource) |
|
No |
Role Membership Review Items (Not available as main datasource) |
|
No |