Rotate SAML 2.0 certificates using ESVs
In many PingOne Advanced Identity Cloud deployments, SAML 2.0 certificates used for signing and encryption are valid for a limited period, requiring them to be rotated periodically.
Advanced Identity Cloud lets you store signing and encryption keys in ESV secrets mapped to secrets labels, as described in Use ESVs for signing and encryption keys. You can use this feature to rotate SAML 2.0 certificates, allowing you to start signing tokens with a new key while continuing to accept tokens signed with an old key.
|
SAML 2.0 certificates for rotation
The following certificates are used in SAML 2.0 flows, where Advanced Identity Cloud acts as the hosted entity provider, and a third party serves as the remote entity provider:
| Certificates | Advanced Identity Cloud role | Third-party role | Advanced Identity Cloud usage | Third-party role |
|---|---|---|---|---|
Hosted IdP signing certificate |
Hosted IdP |
Remote SP |
Signs outbound SAML 2.0 assertions |
Validates inbound signed SAML 2.0 assertions |
Hosted IdP encryption certificate |
Hosted IdP |
Remote SP |
Decrypts inbound encrypted SAML 2.0 requests |
Encrypts outbound SAML 2.0 requests |
Hosted SP signing certificate |
Hosted SP |
Remote IdP |
Signs outbound SAML 2.0 requests |
Validates inbound signed SAML 2.0 requests |
Hosted SP encryption certificate |
Hosted SP |
Remote IdP |
Decrypts inbound SAML 2.0 assertions |
Encrypts outbound SAML 2.0 assertions |
These are the only certificates you can rotate using the provided instructions, as SAML 2.0 secrets only apply to hosted entity providers. Remote counterparts for these certificates are derived from the SAML 2.0 metadata from third parties and are outside the scope of this documentation.
Tasks
Complete the following tasks to rotate SAML 2.0 certificates using ESVs:
Task 1: Generate a CA certificate for signing
A CA certificate is required to sign all the subsequent SAML 2.0 signing and encryption certificates.
-
Generate a new private key for the CA certificate. For example:
$ openssl genrsa -out CA-key.pem 4096 -
Generate the CA certificate using the private key. For example:
$ openssl req -new -x509 -key CA-key.pem -out CA-cert.pem -days 365 -subj /CN=idcloud-ca
Task 2: Create an initial SAML 2.0 signing or encryption certificate
-
Generate a new private key. For example:
$ openssl genrsa -out key1.pem 4096 -
Create a certificate signing request (CSR) using the private key. For example:
$ openssl req -new -key key1.pem -out csr1.csr -subj /CN=idcloud-cert-1 -
Generate a certificate by signing the CSR using the CA key/certificate. For example:
$ openssl x509 -req -in csr1.csr -CA CA-cert.pem -CAkey CA-key.pem -set_serial 01 -days 365 -out cert1.pem -
Combine the private key and certificate you created in steps 1 and 3 into a single certificate file. For example:
$ cat key1.pem cert1.pem > key-cert1.pem -
Encode the resulting certificate file into
Base64. For example:$ openssl enc -base64 -in key-cert1.pem -out key-cert1-base64.pem -
Copy the contents of the
Base64encodedkey-cert1-base64.pemfile as you will need to send it when you create the ESV using REST. You can use a text editor such as vi to view the contents of the pem file.
Task 3: Create an ESV for the certificate and apply it to the entity provider
-
Create an ESV for the certificate containing the value of your new signing or encryption key:
-
Create an access token for the appropriate realm. Learn more in Get an access token.
-
Create the ESV:
$ curl \
--request PUT 'https://<tenant-env-fqdn>/environment/secrets/<esv-name>' \ (1)
--header 'Authorization: Bearer <access-token>' \ (2)
--header 'content-type: application/json' \
--header 'Accept-API-Version: resource=1.0' \
--data-raw '{
   "encoding": "pem",
   "valueBase64": "<base64-encoded-certificate>", (3)
   "useInPlaceholders": false, (4)
   "description": "<key-description>" (5)
}'
1 Replace <esv-name> with an appropriate esv name; for example, esv-saml-idp. You can choose any name provided it complies with the ESV API naming convention.2 Replace <access-token> with the access token. 3 Replace <base64-encoded-certificate> with the Base64 encoded certificate copied from the key-cert1-base64.pemfile.4 Ensure that useInPlaceholdersis set tofalse. Learn more in Control access to secrets.5 Replace <key-description> with a description of the ESV, for example, SAML 2.0 signing or encryption.
-
-
Verify the changes have been applied in Advanced Identity Cloud:
-
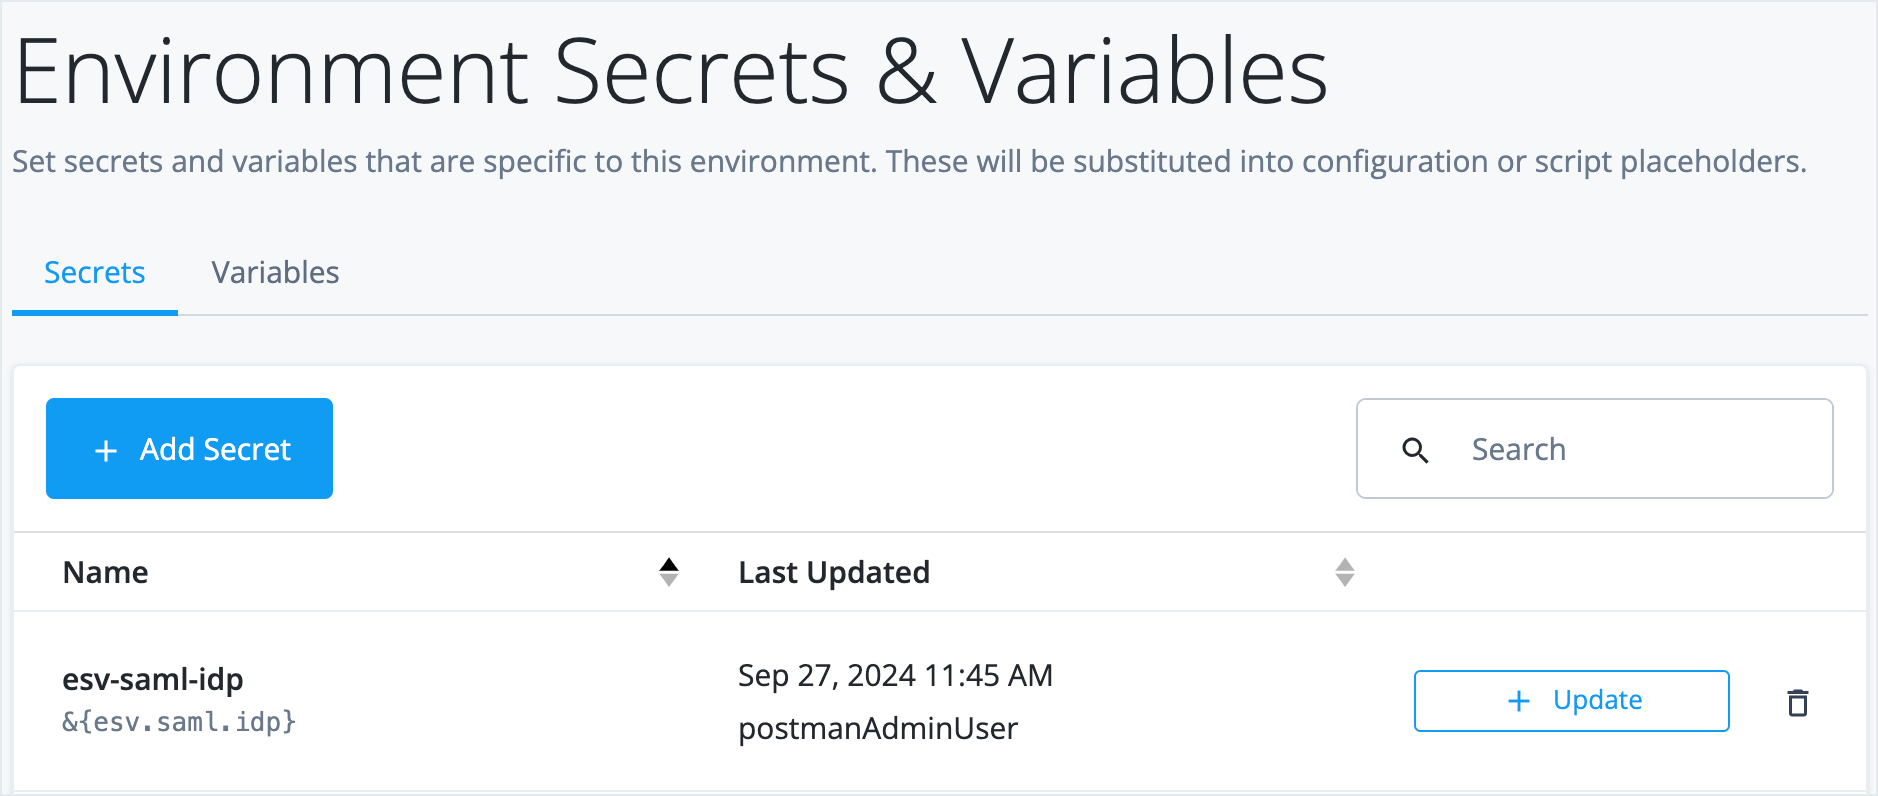
In the Advanced Identity Cloud admin console, go to Tenant Settings > Global Settings > Environment Secrets & Variables.
-
On the Secrets tab, check your secret is there.
-
-
In the Advanced Identity Cloud admin console, go to Native Consoles > Access Management > Applications > Federation > Entity Providers > Hosted IDP Name.
-
On the Assertion Content tab, go to Secret Label And Algorithms.
-
In the Secret Label Identifier field, enter the ID of the secret you want to use for this entity provider. For example,
idpcloud. -
Click Save Changes.
-
-
Go to Realm > Secret Stores.
-
Click the ESV secret store, then click Mappings.
-
Click + Add Mapping, then enter the following information:
Secret Label
Select the secret label.
This is in the format
am.applications.federation.entity.providers.saml2.<secretID>.<purpose>, where<secretID>is the secret label you entered for the entity provider in step 4 and<purpose>is either signing or encryption, depending on what you are using your certificate for.For example, if your secret label is
idpcloudand you are using your certificate for signing, you would selectam.applications.federation.entity.providers.saml2.idpcloud.signing.aliases
Enter the name of the ESV you created in step 1, including the
esv-prefix; for example,esv-saml-idp. Then click Add.Only add a single ESV alias. The UI lets you add additional aliases, but this is a legacy mechanism for key rotation. 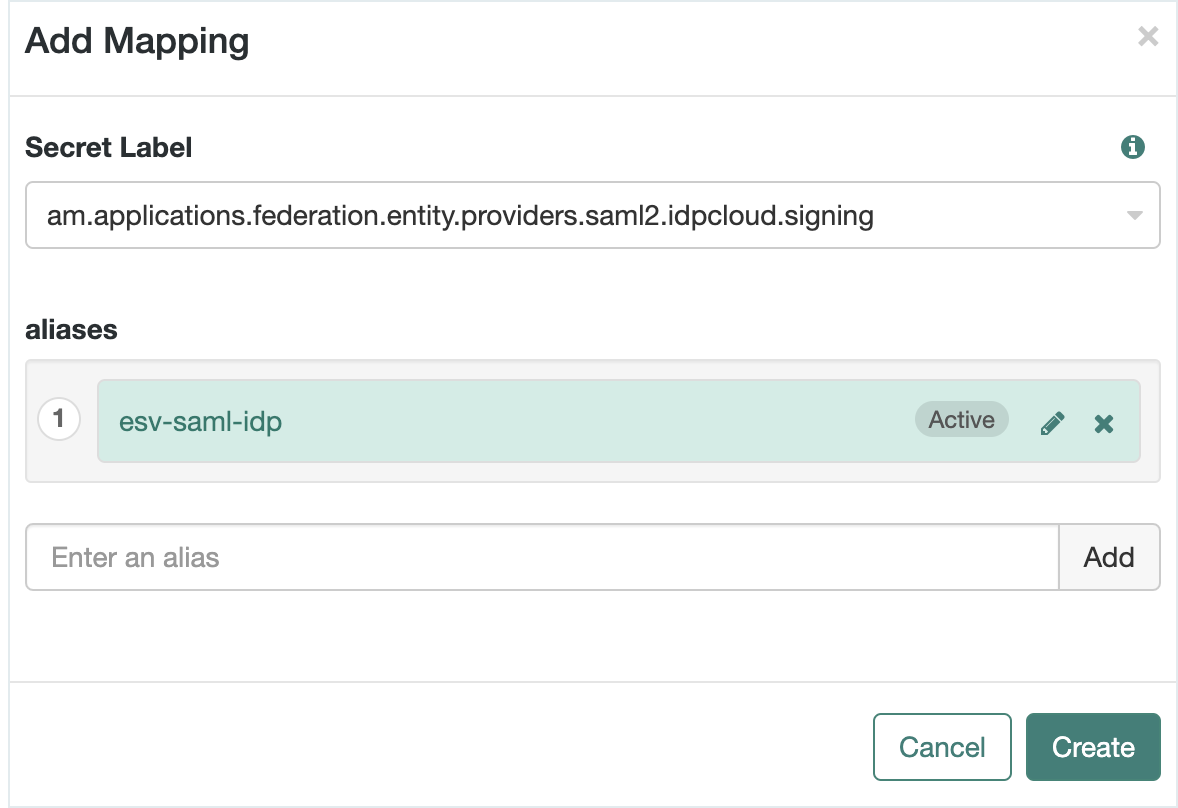
-
Click Create.
Task 4: Test the initial certificate
-
Export the entity provider metadata and exchange it with the remote entity provider. Learn more in am-saml2:saml2-providers-and-cots.adoc#saml2-metadata-export.
-
Test your SAML 2.0 federation flow using the URL or journey you normally use.
-
Verify the certificate in the SAML 2.0 assertion corresponds to the newly created certificate. For example:
$ openssl x509 -in saml_cert.pem -text -noout
Task 5: Create a new SAML 2.0 signing or encryption certificate for rotation
-
Generate a new private key. For example:
$ openssl genrsa -out key2.pem 4096 -
Create a certificate signing request (CSR) using the private key. For example:
$ openssl req -new -key key2.pem -out csr2.csr -subj /CN=idcloud-cert-2 -
Generate a certificate by signing the CSR using the CA key/certificate. For example:
$ openssl x509 -req -in csr2.csr -CA CA-cert.pem -CAkey CA-key.pem -set_serial 01 -days 365 -out cert2.pem -
Combine the private key and certificate you created in steps 1 and 3 into a single certificate file. For example:
$ cat key2.pem cert2.pem > key-cert2.pem -
Encode the resulting certificate file into
Base64. For example:$ openssl enc -base64 -in key-cert2.pem -out key-cert2-base64.pem -
Copy the contents of the
Base64encoded pem file as you will need to send it when you create the ESV using REST. You can use a text editor such as vi to view the contents of the pem file.
Task 6: Update the ESV with the new certificate
-
Update the ESV you created in Task 3 with the new certificate:
-
Get an access token. Learn more in Get an access token.
-
Update the ESV using the REST API:
$ curl \
--location -g --request POST 'https://<tenant-env-fqdn>/environment/secrets/<esv-name>/versions?_action=create' \ (1)
--header 'Authorization: Bearer <access-token>' (2)
--header 'content-type: application/json' \
--header 'Accept-API-Version: resource=1.0' \
--data-raw '{
   "valueBase64": "<base64-encoded-certificate>" (3)
}'
1 Replace <esv-name> with the ESV you created in step 1 of Task 3. 2 Replace <access-token> with the access token. 3 Replace <base64-encoded-certificate> with the Base64 encoded certificate copied from the key-cert2-base64.pemfile.This curl command adds a new secret version, which is enabled immediately; you do not need to make any changes to the entity provider or secret mapping.
-
-
Verify the changes have been applied in Advanced Identity Cloud:
-
In the Advanced Identity Cloud admin console, go to Tenant Settings > Global Settings > Environment Secrets & Variables.
-
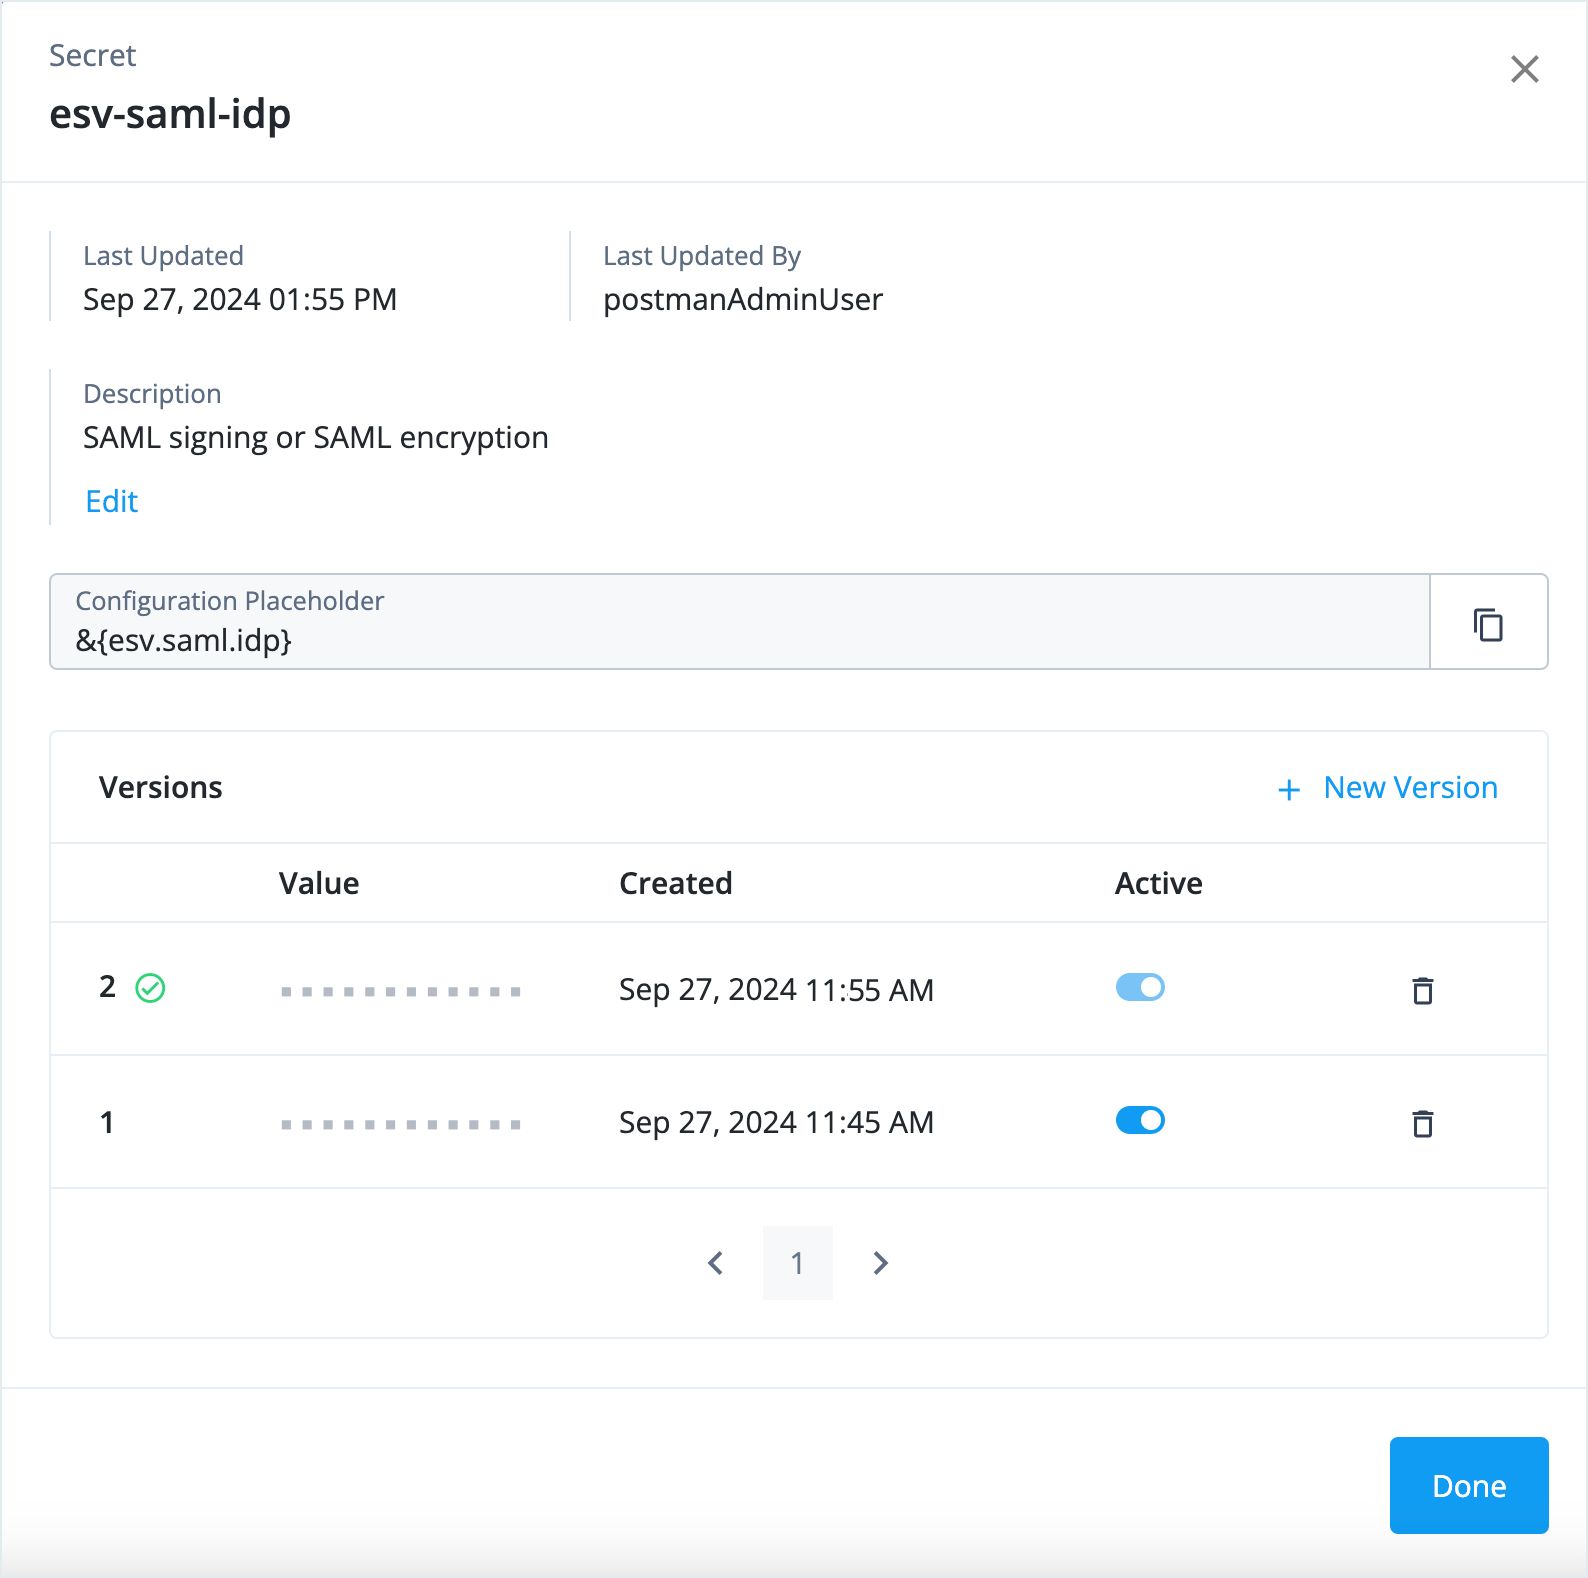
Click Update against the ESV you updated and verify the new version has been created.
-
-
Disable the previous version of the secret in this window when you are ready. Learn more in Secret versions.
Task 7: Test the new certificate
-
Export the entity provider metadata and exchange it with the remote entity provider. Learn more in am-saml2:saml2-providers-and-cots.adoc#saml2-metadata-export.
If you have not disabled the previous secret, the metadata shows both signing or encryption certificates.
-
Test your SAML2 federation flow using the URL or journey you normally use.
-
Verify the certificate in the SAML 2.0 assertion corresponds to the newly created certificate. For example:
$ openssl x509 -in saml_cert.pem -text -noout