Setting up Windows passwordless login
You can use Windows login - passwordless so that users can sign on to their Windows computer without a password.
Before you begin
To set up and use the PingID integration for passwordless Windows login, the following system requirements must be met:
-
Microsoft Active Directory is running on Windows Server 2016 or later
-
Users' computers must be running Windows 10 (64-bit), and must support TPM 2.0.
You must have:
-
Admin rights for the domain controller
-
A PingOne account
-
A PingID account
Users must have the PingID mobile app installed on their devices and must have already paired the device.
Creating a PingOne environment and connecting it to a PingID account
About this task
Create a new environment in PingOne and connect it to an existing PingID account (to allow syncing of the PingID data) or to a newly-created PingID account.
|
You must create a new PingOne environment even if you have an existing environment because you cannot connect a PingID account to an existing PingOne environment. |
Steps
-
In the PingOne admin console, click Add Environment.
-
Select Build your own solution.
-
Hover over the PingOne SSO element and click Select.
-
Hover over the PingID element and click Select.
-
Click Next.
-
When you are presented with the two options for PingID, you can either:
Choose from:
-
Connect to an existing PingID account.
After you select this option, enter the credentials that you use for the PingID account.
-
Create a new PingID account.
-
-
Click Next.
-
Enter a name for the new environment.
-
Select the relevant license.
-
Click Finish.
Configuring identity store provisioners
About this task
To use passwordless Windows login, user attributes must be mapped to attributes in PingOne.
If you have been using PingFederate with the PingID connector for user provisioning, you must make the transition to using PingFederate with the PingOne Provisioning connector for user provisioning.
You can find more information on using this integration in Provisioning connector in the PingOne Integration Kit documentation.
|
When mapping attributes, keep in mind that the |
Creating an issuance certificate in PingOne
About this task
The PingID Windows login - passwordless solution uses certificate-based authentication (CBA), so a certificate is required for each user that will be signing on. This requires that you create an issuance certificate in PingOne and then publish the certificate.
Steps
-
Create an issuance certificate in PingOne.
Learn more in Adding a certificate and key pair in the PingOne documentation.
-
Publish the issuance (CA) certificate to Active Directory (AD):
certutil -dspublish -f <CA certificate filename> NTAuthCA
-
To verify that the certificate was published, run the following command and make sure that you see the CA certificate in the list:
certutil -viewstore "ldap:///CN=NTAuthCertificates,CN=Public Key Services,CN=Services,CN=Configuration,DC=<domain name>"
-
Import the CA certificate in the Group Policy Management Console (GPMC) to publish the CA certificate to end users' computers:
-
Open the Group Policy Management Console (GPMC).
-
Locate the relevant domain.
-
Locate the group policy that you’ll be using.
-
In the Public Key Policies section, select Trusted Root Certification Authorities and import the CA certificate.
-
Creating an authentication policy (Windows passwordless)
Steps
-
In the PingOne admin console, open the environment you are using for Windows login - passwordless.
-
Click the Identities icon.
-
Click Attributes.
-
In the list of attributes, locate the PingOne attribute that you mapped to
ObjectSID. -
Click the Pencil () icon to edit the attribute properties.
-
Select the Enforce Unique Valuescheckbox. Confirm the choice if prompted to do so.
-
Click Save.
-
Click the Experiences icon.
-
Click Authentication Policies.
-
Click Add Policy.
Result:
The policy definition page opens.
-
Enter a name for the policy.
-
For Step Type, select Windows Login Passwordless.
-
In the Match Attributes list, select the attribute that you mapped to
ObjectSID.This list includes any attributes that you have specified as unique by selecting the Enforce Unique Values option.
-
Optional: Select the Offline Mode option if you want to allow users to sign on when PingOne or PingID are not available.
-
Click Save.
Creating and configuring a passwordless Windows login application in PingOne
About this task
After creating the authentication policy, you can now create the application for passwordless Windows login:
Steps
-
Go to the PingOne admin console and open the environment that you are using for Windows login - passwordless.
-
Click the Connections icon.
-
Click Applications.
-
Click the icon to add a new application.
-
For the Application Type, select Native App.
-
Click Configure.
-
Enter a name and description for the application. Click Next.
-
Enter the redirect URL,
winlogin.pingone.com://callbackauth, and then click Save and Continue.You can skip the Grant Resource Access and Attribute Mapping steps.
-
In the Certificated Based Authentication section, click the Enabled toggle.
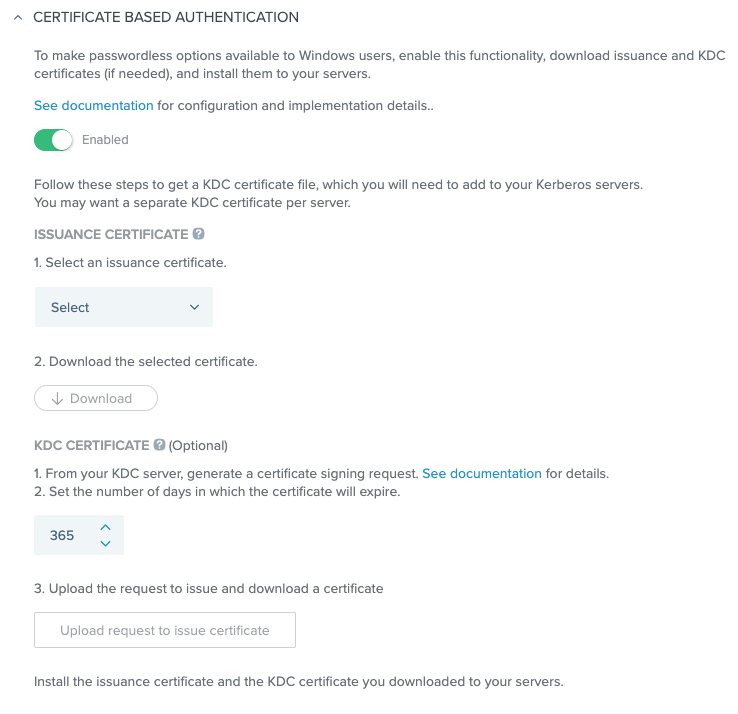
-
Select an existing issuance certificate.
-
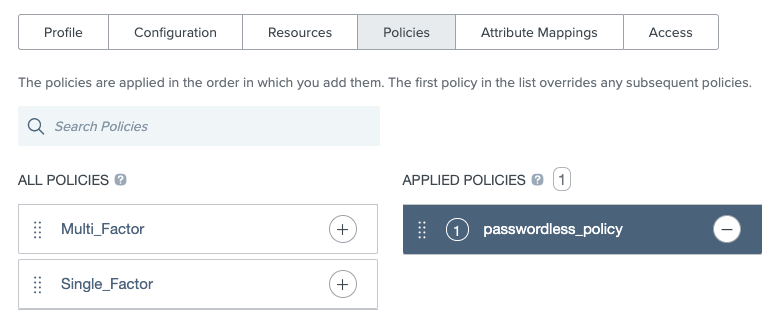
Go to the application’s Policies tab and drag the passwordless policy that you created from the All Policies list to the Applied Policies list.
Generating a KDC certificate
About this task
If there is not yet a certificate for the KDC server that you will be using, you will need to generate one.
|
The KDC certificate is used as part of the Kerberos PKINIT mutual authentication mechanism. If you already have a KDC certificate installed on your Active Directory Domain Controllers, you don’t need to perform this task |
Steps
-
Create an
.inffile containing the following information:[newrequest] subject = "CN=<hostname>" KeyLength = 2048 MachineKeySet = TRUE Exportable = FALSE RequestType = PKCS10 SuppressDefaults = TRUE [Extensions] ;Note 2.5.29.17 is the OID for a SAN extension. 2.5.29.17 = "{text}" continue = "dns=<DNS hostname>"For more information on the contents of
.inffiles for thecertreqcommand, see Certreq in the Microsoft documentation. -
Generate a certificate signing request from your KDC server by running
certreq -new  '<path to the .inf file>'
'kdc.req'
. -
In the PingOne admin console, open the application that you created for passwordless Windows login.
-
Click the Configuration tab of the application.
-
Scroll down to the Certificate Based Authentication section.

-
For the KDC certificate signing request that you created previously with the
certreqcommand:-
Set the number of days until the certificate should expire.
-
Click Upload request and Issue Certificate to have the certificate issued.
The KDC certificate does not have to be signed by the issuance certificate that you created with PingOne. Any valid certification path will work.
-
-
Install the KDC certificate on your server:
certreq -accept -machine -f <KDC certificate filename>
Installing the Windows login - passwordless integration on client computers
Before you begin
-
To use the Windows login - passwordless feature, users' computers must be running Windows 10 and must support TPM 2.0.
-
The first time that a user carries out passwordless Windows login, they must be online and connected to the organizational network because certificate enrollment requires a connection to Active Directory. Afterward, there is no need for a connection to the network, and authentication can be carried out online or offline for as long as the certificate is valid.
About this task
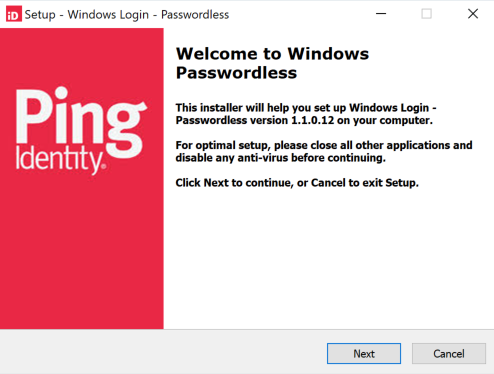
To install the integration for Windows login - passwordless on your users' computers using the UI-based method:
Steps
-
Run the provided executable, and when the welcome page is displayed, click Next.
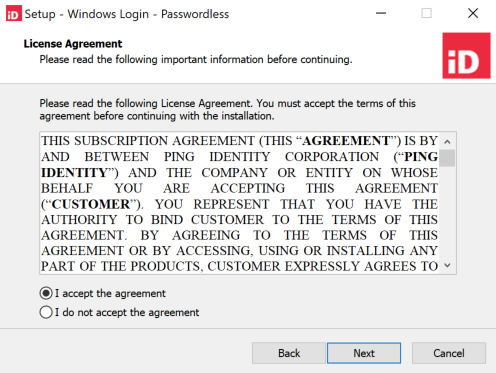
-
Accept the license agreement and click Next.
-
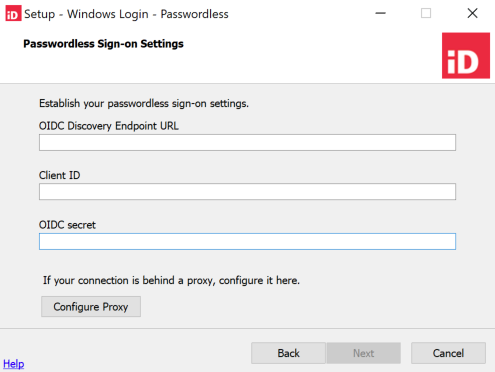
The settings that must be entered on the Passwordless Sign-on Settings page should be copied from the Configuration tab of the application that you created for Windows login - passwordless in PingOne. If your organization uses a proxy, click Configure Proxy. Otherwise, click Next.
-
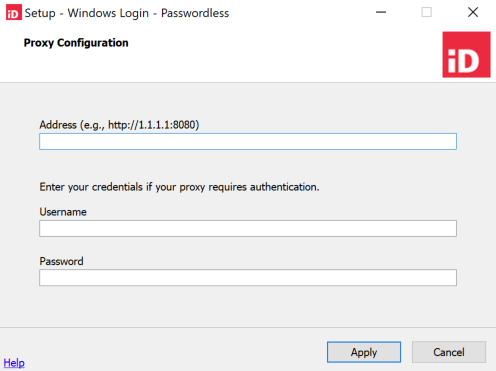
If you clicked Configure Proxy in the previous step, enter the proxy information, click Apply, and when you are returned to the Passwordless Sign-on Settings page, click Next.
-
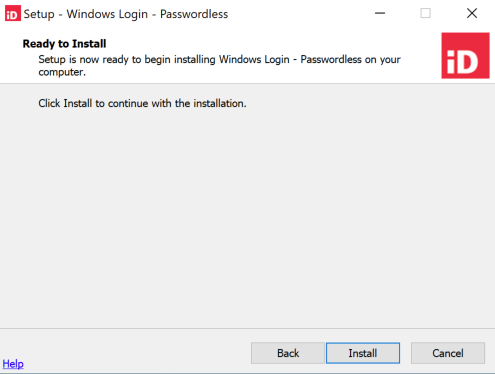
When the Ready to Install page is open, click Install to start the installation.
Using the PowerShell script for setting up Windows login - passwordless
About this task
You can use the Configure-Passwordless.ps1 PowerShell script to quickly perform the steps required to set up Windows login - passwordless.
|
Only use this for purposes such as informal testing or demonstrations. Do not use for a production instance. |
Steps
-
Run
Configure-Passwordless.ps1.The script carries out the following steps:
-
Creates and installs the CA certificate, also to the group policy
-
Sets
externalIdto be a unique attribute -
Creates the authentication policy
-
Creates and configures the passwordless Windows login application
-
Creates a KDC certificate: request creation, issuing of certificate from request, installation of certificate
You can download the script from GitHub.
-
Troubleshooting Windows login - passwordless
If you encounter any issues with Windows login - passwordless, review the information that is recorded in the log files and the event information that is displayed in the Audit window in PingOne.
You can find detailed activity information regarding Windows login - passwordless in the log files that are located in the logs folder under the folder that you specified during installation (the default location is C:\Program Files\Ping Identity\PingID\Windows Passwordless\logs). To include a greater level of detail in the log files, contact customer support for instructions on how to set the logging level to Debug.
|
For some of the log files, there is no mechanism to limit the file size. You shouldn’t leave the logging at Debug level for an extended period of time. |
The Audit window in PingOne includes information on events, such as certificate creation and user authentication. You can find more information in Audit section in the PingOne documentation.