Setting up a login form that validates credentials against AD in PingFederate
Configure a login form in PingFederate that validates credentials against Active Directory (AD).
After completing these steps, the HTML form adapter is ready to use in either an Authentication Policy (page 242) or an SP connection (page 398).
Configuring the datastore
Configure a datastore in PingFederate.
Before you begin
-
Install and run PingFederate.
-
Install Active Directory (AD).
-
Ensure the AD service account has permissions in all domains in that forest to read and access user data in all domains to which the agent connects.
Steps
-
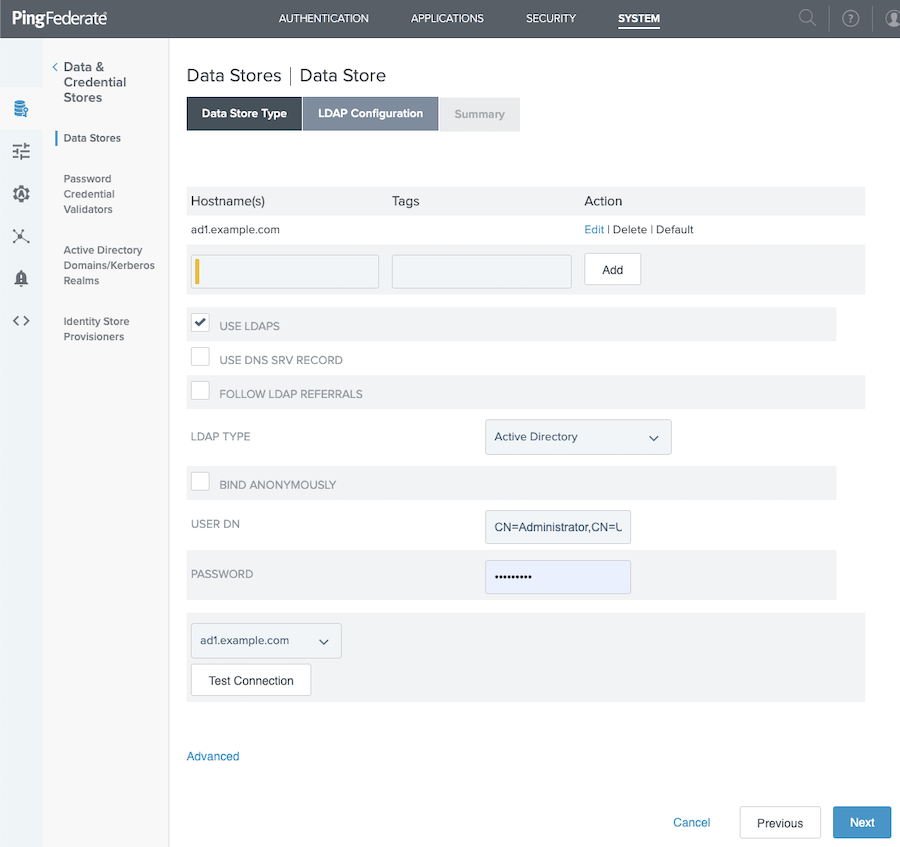
In the PingFederate administrative console, go to System > Data & Credential Stores > Data Stores.
-
Click Add new Data Store.
-
On the Data Store Type tab, in the Name field, enter a name.
-
In the Type list, select Directory (LDAP). Click Next.

-
On the LDAP Configuration tab, in the Hostname(s) field, enter a name.
-
From the LDAP Type list, select Active Directory.
-
In the User DN and Password fields, enter the desired user distinguished name (DN) and password.
-
Select the Use LDAPS checkbox.
Ping recommends that all LDAP connections be secured using LDAPS.
To enable the password changes, password reset, or account unlock features in the HTML form adapter against Microsoft AD, you must secure the connection to your directory server using LDAPS. AD requires this level of security to allow password changes.
-
Complete any other fields that can help configure the datastore connection according to your current architect posture.
-
To test the connection, click Test Connection.
-
Click Next.
-
On the Summary tab, review your entries, and then click Save.
Configuring the password credential validator
Configure a password credential validator (PCV) in PingFederate.
Before you begin
-
Install and run PingFederate.
-
Install Active Directory (AD).
-
Ensure the AD service account has permissions in all domains in that forest to read and access user data in all domains to which the agent connects.
Steps
-
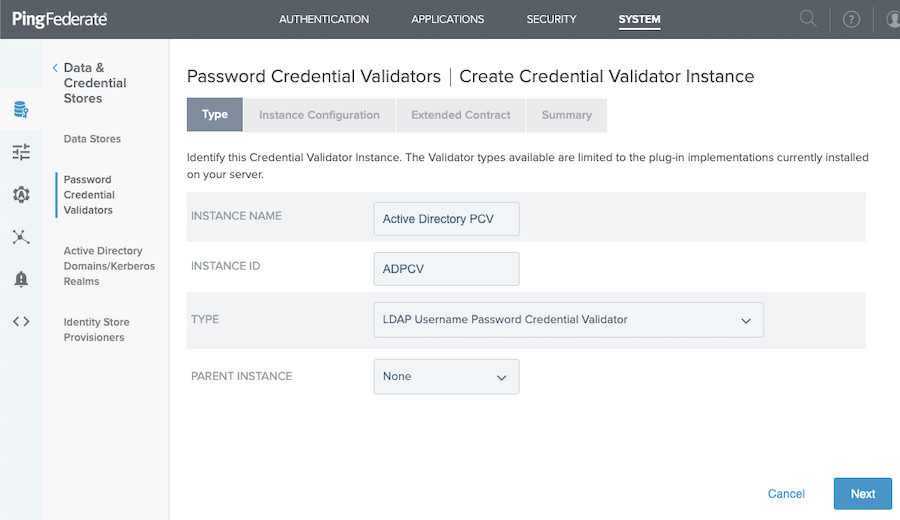
In the PingFederate administrative console, go to System → Data & Credential Stores → Password Credential Validators.
-
Click Create New Instance.
-
On the Type tab, in the Instance Name and Instance ID fields, enter a name and ID.
-
From the Type list, select LDAP Username Password Credential Validator.
-
Click Next.
-
On the Instance Configuration tab, from the LDAP Datastore Field Value list, select Active Directory Data Store.
-
In the Search Base Field Value field, enter the location in the directory from which the LDAP search begins.
-
In the Search Filter Field Value field, enter an LDAP filter.
You can use ${username} as part of the query. For example, for AD, sAMAccountName=${username}.
-
In the Scope of Search section, choose from:
Choose from:
-
One Level
-
Subtree
Choose One Level to search just the base distinguished name (DN), or choose Subtree to search organizational units nested under the base DN.

-
-
Click Next.
-
On the Extended Contract tab, confirm the default values and add additional attributes as needed.
On this tab, you can also extend the attribute contract of the PCV instance.

-
Click Next.
-
On the Summary tab, confirm your entries, and then click Save.
Configuring the IdP adapter
Configure an identity provider (IdP) in PingFederate.
Before you begin
-
Install and run PingFederate.
-
Install Active Directory (AD).
-
Ensure the AD service account has permissions in all domains in that forest to read and access user data in all domains to which the agent connects.
About this task
The following steps are the minimum to set up an HTML adapter to validate against AD.
Steps
-
In the PingFederate administrative console, go to Authentication → Integration → IdP Adapters.
-
Click Create New Instance.
-
On the Type tab, in the Instance Name and Instance ID fields, enter a name and ID.
-
From the Type list, select HTML Form IdP Adapter.

-
Click Next.
-
On the Idp Adapter tab, in the Password Credential Validator Instance section, click Add a new row to 'Credential Validators'.
-
From the Password Credential Validator Instance list, select the appropriate PCV, and then click Update.

-
Review and modify any other fields as needed, and then click Next.
Many fields have default values. Make adjustments as needed.
-
On the Extended Contract tab, confirm the default values and add additional attributes as needed.
-
Click Next.
-
On the Adapter Attributes tab, select the attributes to receive a pseudonym to uniquely identify a user and any attributes that must be masked in the log files.

-
Click Next.
-
On the Adapter Contract Mapping tab, click Configure Adapter Contract.
-
On the Attribute Sources & User Lookup tab, fulfill the adapter contract with the adapter’s default values, or use these values plus additional attributes retrieved from local data stores.
-
Click Next.
-
On the Adapter Contract Fulfillment tab, fulfill your adapter contract with values from the authentication adapter or with dynamic text values.
By default, Adapter is selected from the Source lists.
-
Click Next.
-
On the Issuance Criteria tab, optionally create criteria for PingFederate to evaluate to determine whether users are authorized to access SP resources. Click Next.
-
On the Summary tab, confirm your entries, and then click Done.

-
On the Adapter Contract Mapping tab, click Next.
-
On the Summary tab, review the IdP adapter instance settings, and then click Save.
Result
After completing these steps, the HTML form adapter is ready to use in either an Authentication Policy or an SP connection.
Next steps
Enter AD credentials (username and password) to test the configured adapter.