Setting up PingFederate as a FedHub
Configuring PingFederate as an identity bridge or FedHub (SAML Chaining) allows you to manage external identities and facilitate access to applications across the enterprise community.
Creating a service provider connection
About this task
Create an SP connection in PingFederate using the policy contract created in the previous task.
Steps
-
Go to Applications > Integration > SP Connections and then click Create Connection.
-
On the Connection Template tab, select whether to use a template for this connection, and then click Next.
-
On the Connection Type tab, select the Browser SSO Profiles checkbox, and in the Protocol list, select SAML 2.0. Click Next.
-
On the Connection Options tab, select the option that applies to the connection. Click Next.
-
On the Import Metadata tab, import metadata from a file or URL if desired. Click Next.
-
On the General Info tab, complete the Partner’s Entity ID and Connection Name fields. Click Next.
-
On the Browser SSO tab, click Configure Browser SSO, and then select the applicable SSO profiles. Click Next.
-
On the Assertion Lifetime tab, configure the assertion lifetime. Click Next.
-
On the Assertion Creation tab, click Configure Assertion Creation.
-
On the Identity Mapping tab, select the type of name identifier that you will send to the SP, and then click Next.
-
On the Attribute Contract tab, extend the contract if desired. Click Next.
-
On the Authentication Source Mapping tab, click Map New Authentication Policy.
-
From the Authentication Policy Contract list, select the policy contract you created in step 1. Click Next.
-
On the Mapping Method tab, choose to retrieve additional values from your data stores if desired. Click Next.
-
On the Attribute Contract Fulfillment tab, from the Source list, select Authentication Policy Contract.
-
From the Value list, select a value from the authentication policy contract and then click Next.
-
On the Issuance Criteria tab, configure conditional authorization if desired, and then click Next.
-
On the Summary tab, click Done.
-
Click Next and Done until you reach the Protocol Settings tab. Click Configure Protocol Settings.
-
On the Assertion Consumer Service URL tab, from the Binding list, select a binding, and in the Endpoint URL field, enter the endpoint URL. Click Add and then click Next.
-
Click Next until you reach the Credentials tab, configuring the desired settings.
-
On the Credentials tab, click Configure Credentials.
-
On the Digital Signature Settings tab, from the Signing Certificate list, select a signing certificate. Click Next and Done until you reach the Activation & Summary tab.
-
Click Save.
Creating an identity provider connection
About this task
Create an IdP connection in PingFederate using the policy contract created in step 1.
Learn more in Managing IdP connections (page 678).
|
In this connection, PingFederate will act as the SP, and Company B’s single sign-on (SSO) provider will act as the IdP. You must have the IdP metadata or metadata information from Company B’s SSO administrator. |
Steps
-
Go to Authentication > Integration > IdP Connections and then click Create Connection.
-
On the Connection Type tab, select the Browser SSO Profiles checkbox, and in the Protocol list, select SAML 2.0. Click Next.
-
On the Connection Options tab, select the option that apply to the connection. Click Next.
-
On the Import Metadata tab, import metadata from a file or URL if desired. Click Next.
-
On the General Info tab, complete the Partner’s Entity ID and Connection Name fields. Click Next.
-
On the Browser SSO tab, click Configure Browser SSO, and then select the applicable SSO profiles. Click Next.
-
On the User-Session Creation tab, click Configure User-Session Creation, and then select No Mapping. Click Next.
-
On the Attribute Contract tab, extend the contract if desired. Click Next.
-
On the Target Session Mapping tab, click Map New Authentication Policy, and from the Authentication Policy Contract list, select the policy contract you created in step 1. Click Next.
-
On the Attribute Retrieval tab, select the type of attribute retrieval, and then click Next.
-
On the Contract Fulfillment tab, from the Source list, select a source to fulfill the policy contract, and from the Value list, select a value from the source. Click Next.
-
On the Issuance Criteria tab, you can configure conditional authorization if desired. Click Next, and then on the Summary tab, click Done.
-
Click Next and Done until you reach the Protocol Settings tab. Click Configure Protocol Settings.
-
On the SSO Service URLs tab, from the Binding list, select a binding.
-
In the Endpoint URL field, enter the endpoint URL. Click Add and then click Next.
-
On the Allowable SAML Bindings tab, select which SAML bindings will receive messages from the IdP. Click Next.
-
On the Artifact Resolver Locations tab, in the URL field, enter the remote party URL that you will use to translate the artifact and get the protocol message. Click Add and then Next.
You can add multiple URLs.
-
On the Overrides tab, specify a default target URL and an authentication context if desired. Click Next.
-
On the Encryption Policy tab, specify additional XML encryption for SAML messages if desired. Click Next.
-
On the Signature Policy tab, specify additional signature requirements if desired. Click Next.
-
Click Next and Done until you reach the Credentials tab. Click Configure Credentials.
-
On the Back-Channel Authentication tab, ensure that security settings are properly configured for your selected bindings, and then click Next.
-
On the Signature Verification Settings tab, click Manage Signature Verification Settings and follow the on-screen instructions. When you are returned to this tab, click Next and then Done.
-
Click Next and Done when you reach the Activation & Summary tab.
Creating an authentication policy in PingFederate
Before you begin
Component
-
PingFederate 10.3
Before creating the policy, you must have an Identifier First Adapter instance and an HTML Form Adapter configured. Learn more in Configuring an Identifier First Adapter instance and Configuring an HTML Form Adapter instance.
About this task
Learn more on authentication policies in Defining authentication policies.
Steps
-
Go to Authentication > Policies > Policies, and then click Add Policy.
-
In the Policy list, select IdP Adapters and then select your Identifier First Adapter instance.
-
Click Rules and configure the sign-on flow for users according to the following example.
This determines which IdP the user authenticates against.
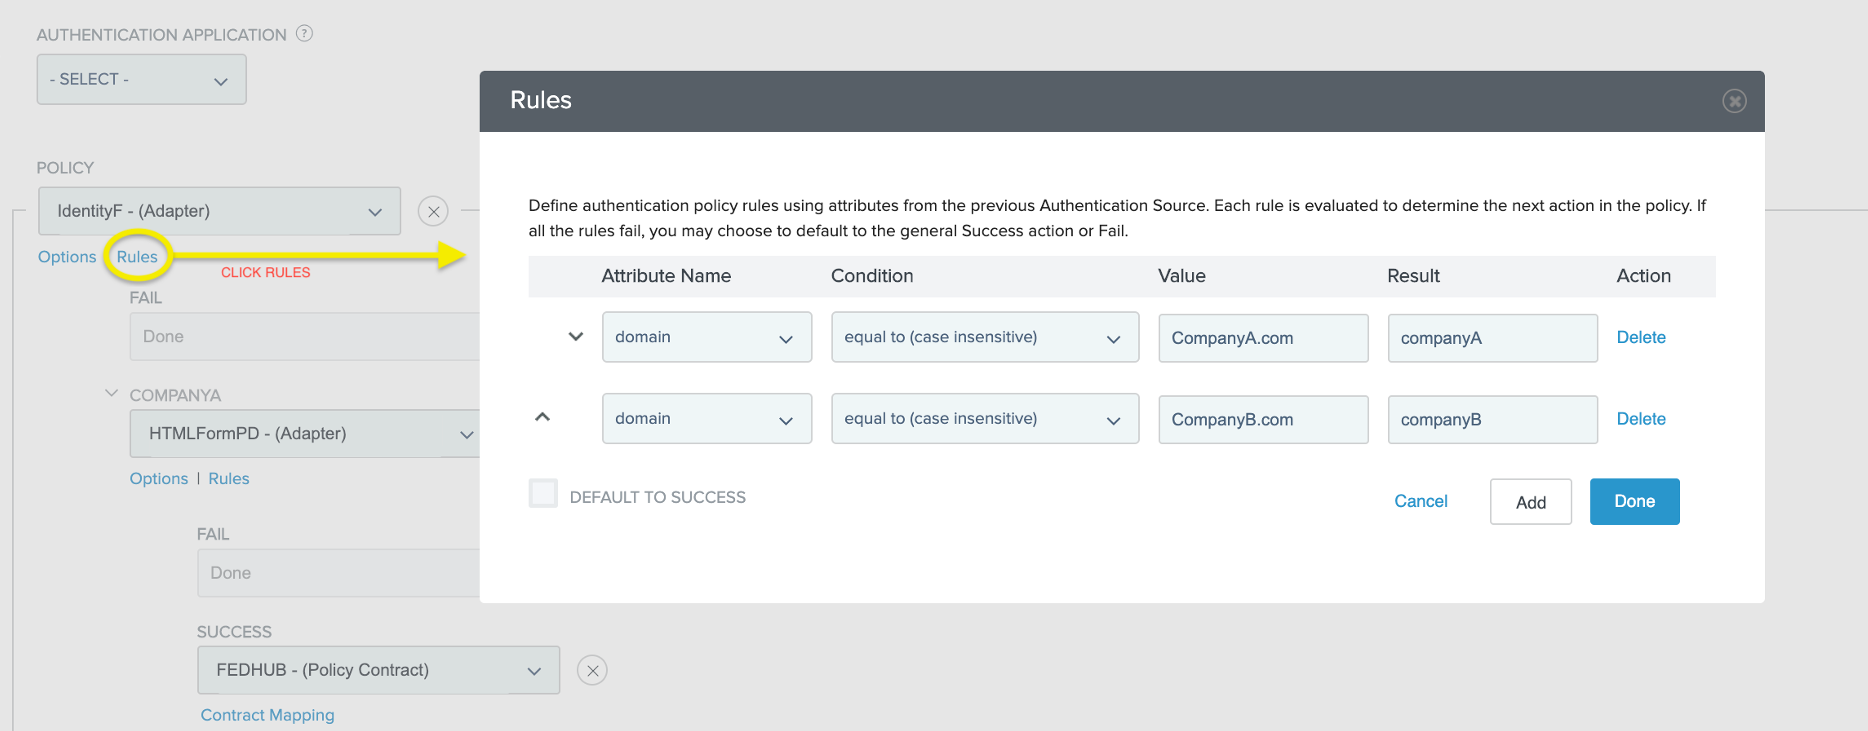
-
Configure the authentication policy according to the following example.
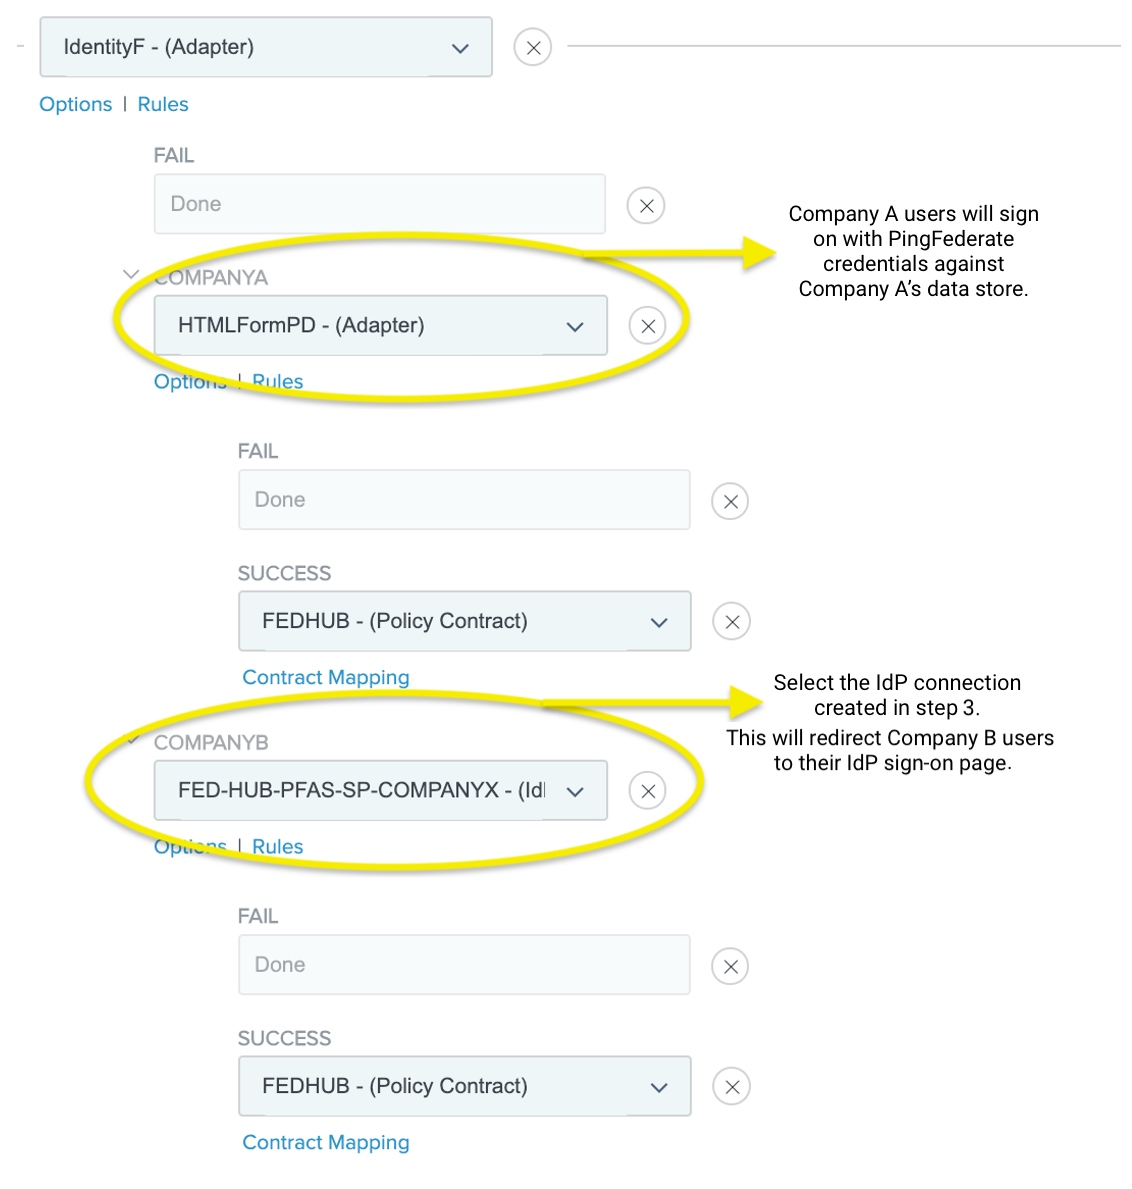
-
Click Done.
Result
When users from Company B sign-on using their IdP, the IdP sends the assertion to the PingFederate SP endpoint. PingFederate provides the necessary attributes to the IdP endpoints, which are then used to generate an authentication response to Company A’s application.