Configuring adaptive authentication in PingFederate
This document explains the conceptual information behind network-based adaptive authentication. It also provides instructions for creating a new selector and configuring an authentication policy to enable adaptive authentication.
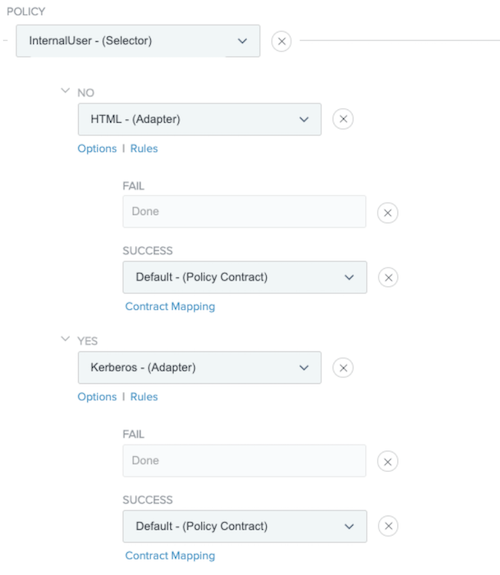
Network-based adaptive authentication is useful when PingFederate must authenticate users differently based on their network location. A typical application of this use case is when users must authenticate differently, depending on whether they are accessing a service from the organization’s internal network or from the internet. For example, an organization might want to use Kerberos to authenticate internal users to provide a seamless single sign-on (SSO) experience while presenting a sign-on page for external users.
Network-based adaptive authentication is achievable on all supported versions of PingFederate. The examples shown make use of PingFederate 10.1. All capabilities are offered out-of-the-box and no additional or custom components are required to implement this solution.
Creating a new selector
Selectors and authentication sources can be conditionally chained together in paths to form policies.
Before you begin
-
PingFederate must determine if a user is inside your internal network. You must know CIDR network ranges that identify your internal network.
-
Upon identifying the network location of your user, you must know how you intend to authenticate your user in each case.
-
Configure authentication adapters, such as the Kerberos adapter and the HTML form adapter, along with their dependencies (Kerberos Realms and password credential validators (PCVs), respectively).
-
-
Define an authentication policy contract to allow the outcome of the authentication process to be mapped into your SAML connections or OAuth environment.
Steps
-
In the PingFederate administrative console, go to Authentication > Policies > Selectors.
-
To create a new selector, click Create New Instance.
-
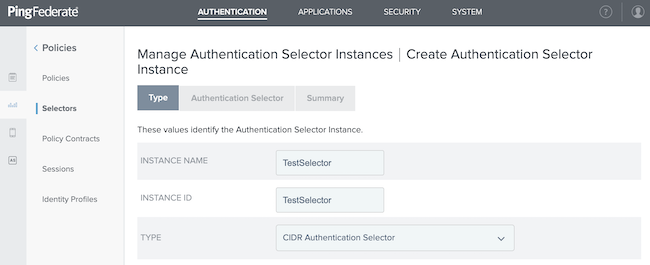
Configure the Type window.
-
In the Instance Name field, enter an instance name.
-
In the Instance ID field, enter the instance ID.
-
In the Type list, select CIDR Authentication Selector.
-
Click Next.

-
-
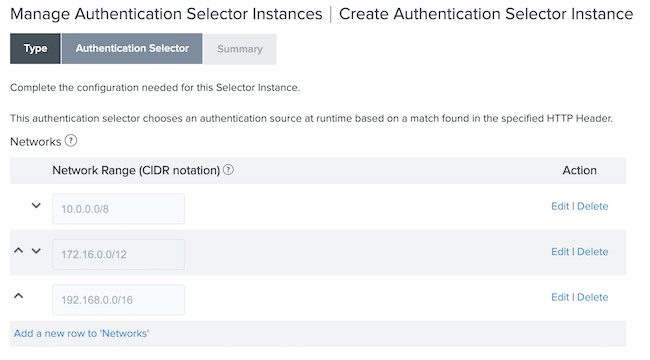
Configure the Authentication Selector window.
-
Click Add a new row to 'Networks'.
-
In the Network Range (CIDR notation) field, enter the CIDR ranges that identify your internal network address ranges.

-
To save your network, click Update.
-
Optional: In the Result Attribute Name field, enter an attribute name.
-
Click Next.
-
-
On the Summary window, click Done.
-
Click Save.
Configuring the authentication policy
Authentication policies define how PingFederate authenticates users.
Steps
-
In the PingFederate administrative console, go to Authentication > Policies > Policies.
-
To create a new policy, click Add Policy.
-
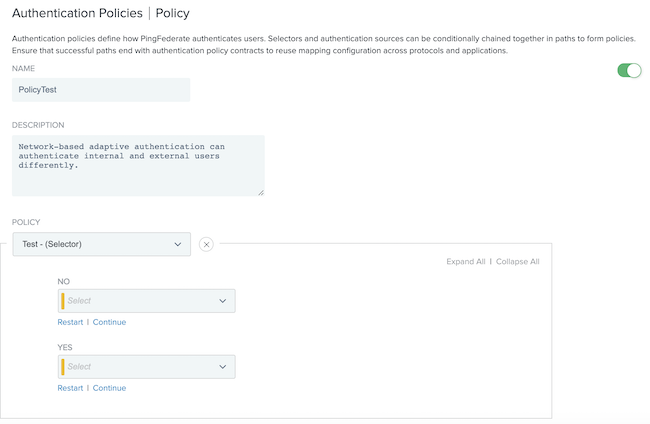
Configure the Policy window.

-
In the Name field, enter a name.
-
In the Description field, enter a description.
-
From the Policy list, go to Selectors and choose your previously created selector.
Result:
After choosing your selector, additional fields display that require you to identify which authentication adapters to use for internal and external users.
-
-
From the additional lists that display, configure the authentication adapters to be used for internal and external users.

-
Click Done.
-
Click Save.
-
To enable the network-based adaptive authentication policy, go to Authentication > Policies > Policies and select the IDP Authentication Policies checkbox.

Next steps
-
Map the policy contract you used after completing the adaptive authentication within your SAML connections, OAuth persistent grants, or both.
-
You can hierarchically organize the policy to appear earlier or later in the Policy list.
To configure PingFederate with multiple authentication policies or specify the order in which they are presented, go to Authentication > Policies > Policies.