Configuring an Active Directory datastore for PingFederate
In PingFederate, establish an Active Directory datastore connection for retrieving user attributes for outbound connections.
Processing steps
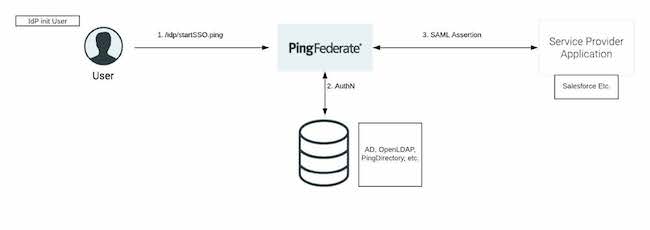
Almost every customer using PingFederate as an identity provider (IdP) has at least one connection to a datastore. A datastore connection allows PingFederate to retrieve user attributes for outbound connections. Active Directory is the most common data source used to connect to PingFederate.
-
The user initiates single sign-on (SSO) and activates PingFederate.
-
The user enters credentials in the htmlForm page. PingFederate query’s the connected datastore for authentication.
-
A SAML assertion is sent to the service provider containing the select attributes for SSO.
Configuring an Active Directory datastore
In PingFederate, configure a datastore connection to allow PingFederate, the identity provider (IdP), to retrieve user attributes for outbound connections.
Before you begin
Your administrator account associated with Active Directory must be configured in the directory and have read permissions to the organizational unit where user attribute searches are done.
About this task
This topic details specific tasks for configuring an Active Directory datastore connection. Learn more in Datastores (page 125) in the PingFederate Server documentation.
Steps
-
From the PingFederate admin console, go to System > Data Stores. Click Add a New Data Store.
Result:
The Data Store window configuration opens.
-
On the Data Store Type tab:
-
In the Name field, enter a name.
-
From the Type list, select Directory (LDAP).
-
Click Next.
-
-
On the LDAP Configuration tab:
-
In the Hostname(s) field, enter the hostname for the configuration. Click Add.
This is the hostname of the domain controller.
The Hostname(s) field entry can rely on network naming to route to the closest domain controller. For example,
pingdemo.comresolves todc1.pingdemo.com.Alternatively, you can define domain controllers explicitly, separated by a space. For example,
dc1.pingdemo.com
dc2.pingdemo.com
. This creates a failover to each domain controller. If it does not find the user in the first directory, it then queries the second and so on. -
In the User DN field, enter the distinguished name (DN).
This is used as the domain name of the service account used to query the directory.
-
In the Password field, enter a password.
This is the password of the service account.
-
Select the Use DNS SRV Record checkbox.
SRV records are not required for this configuration, but you can use them.
-
Choose whether to enable the Use LDAPS checkbox.
-
Select the Use LDAPS checkbox.
The configuration assumes port 636 if the LDAPS option is selected.
-
Clear the Use LDAPS checkbox.
The configuration assumes port 389 if the LDAPS option is cleared.
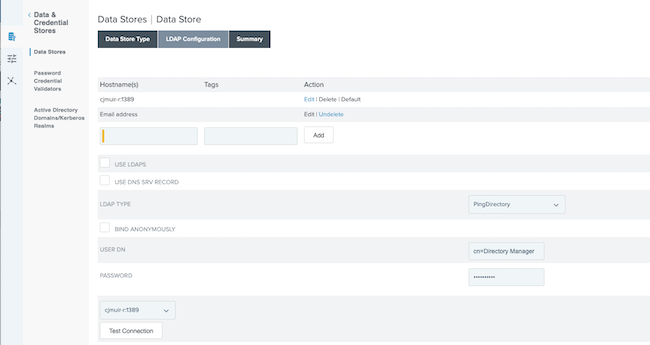
If you are running your directory on another port, you must state this in the Hostname(s) field as shown in the image below, and have the Active Directory public certificate uploaded in your trusted keystore. In following image, notice port 1389 is specified in the Hostname(s) field.
-
-
Click Next.
-
On the Summary tab, click Save.
Result:
The Data Store configuration window closes. You are directed back to the Data Stores window where you can manage all your datastore connections.
-