Setting up password reset in PingOne
Learn how to customize the user’s sign-on experience by enabling self-service management, such as change password and password reset, in the PingFederate administrative console when using the company’s HTML Form sign-on page.
Overview of changing and resetting passwords
The change password capability is helpful when a user knows their password and wants to change it. The password reset capability is helpful when a user forgets their password and wants to use another factor, such as PingDirectory, to authenticate and change their password. This guide covers how to successfully configure password reset and enable change password in the HTML Form Adapter and password credential validator (PCV) framework in PingFederate. PingFederate provides the following password reset methods for self-service password reset:
-
Email one-time link
-
Email one-time passcode
-
Text message
-
PingID
Each method requires additional configuration.
|
Self-service password reset using the authentication policy method in PingFederate isn’t covered in this topic. Learn more about the authentication policy method and configuration steps in Configuring self-service account recovery (page 643) in the PingFederate Server documentation. |
Before you begin
-
Create an LDAP datastore source connection in PingFederate using LDAPS.
-
Create a service provider (SP) connection in PingFederate.
-
Add PingFederate as an identity provider (IdP) to PingOne and configure PingID.
-
Create an HTML Form Adapter and PingID IdP adapter in PingFederate.
-
Create a PCV in PingFederate.
Setting up an LDAPS datastore connection in PingFederate
About this task
The self-service password reset capability relies on the LDAP connection to your directory server and the Username PCV to query the required attributes for the chosen reset method.
PingFederate supports the following datastores:
-
PingDirectory
-
Microsoft Active Directory
-
Oracle Unified Directory
-
Oracle Directory Server out-of-the-box
|
This task covers specific configuration settings for this use case. Learn more in Configuring an LDAP Connection (page 871). |
Steps
-
Go to System > Data & Credential Stores > Data Stores, and click Add New Data Store.
-
On the Data Store Type tab, in the Data Store Name field, enter a name for the datastore.
-
In the Type list, select Directory (LDAP). Click Next.
For an Active Directory (AD) datastore, you must issue a certificate from your internal certificate authority (CA) and import it. Follow these substeps to complete the process:
-
For an AD datastore, go to Security > Trusted CAs, and click Import.
-
On the Import Certificate tab, click Choose File and upload the relevant file. Click Next.
-
On the Summary tab, click Save.
-
-
Go to the LDAP Configuration tab:
-
Select the Use LDAPS checkbox.
PingFederate assumes port 389 when the Use LDAPS checkbox is cleared and assumes port 636 when this checkbox is selected. If you are using the default port of 636, you don’t have to specify it in the Hostname(s) field.
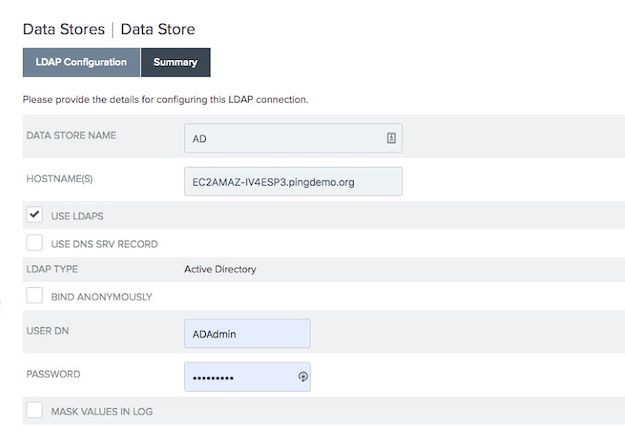
-
Enter the user attributes in the User DN and Password fields.
-
If the Password Reset Type is PingID , the user attribute that passes to PingID/> during password reset must be the attribute that is associated with the PingID/> account in PingOne.
-
For an AD datastore, the default user attribute is
sAMAccountName. This does not have to be the attribute you enter into the username field on the account recovery page.
-
-
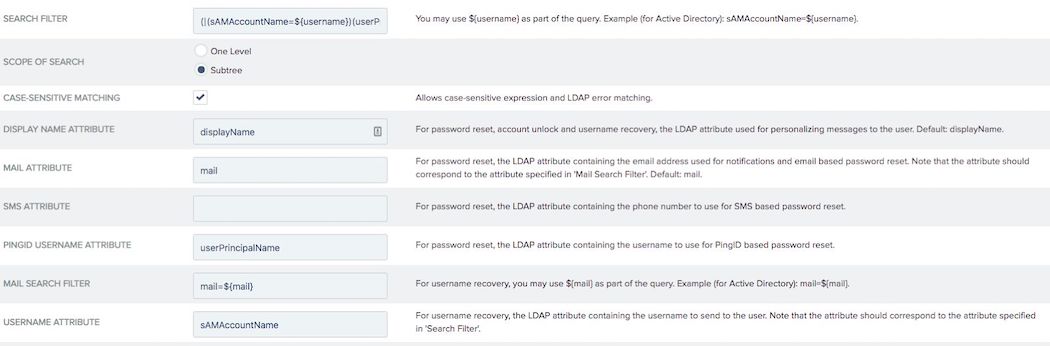
Enter the attributes you want to use to query in the Search Filter field.
The Search Filter field, commonly used for Office 365 connections, allows you to enter
sAMAccountNameoruserPrincipleName.For example,
(|(sAMAccountName=${username})(userPrincipalName=${username})).If the Password Reset Type is PingID, use a search filter that searches with multiple attributes. You can enter either attribute into the fields, and it passes the username attribute you set in your PCV.
To view or modify this user attribute:
-
Go to System > Data & Credential Store > Password Credential Validators > Password Credential Validators, and select the relevant PCV instance.
-
On the Instance Configuration tab, edit the PingID Username Attribute field.
This is the attribute used for a PingID password reset type.
-
-
-
Click Next.
-
Configure the remaining LDAP settings as needed.
Learn more about the settings in Configuring an LDAP connection (page 871) and Setting advanced LDAP options (page 874).
-
On the Summary tab, click Save.
Configuring an HTML Form Adapter instance for password reset
Before you begin
Make sure you have configured an LDAP datastore connection in PingFederate to connect to your application to enable self-service password reset.
This task covers specific configuration steps. You can find comprehensive instructions in Setting up an LDAP connection in PingFederate.
About this task
An HTML Form Adapter instance is used to validate a user authentication session with a PCV and an LDAP datastore connection. This authentication mechanism allows you to customize a user’s sign-on experience, such as:
-
Enabling self-service password reset
-
Account unlock
-
Notifying users with password expiration information
-
Localizable template files
To create or modify an HTML Form Adapter instance with a password credential validator (PCV) and an LDAP datastore connection for self-service password management:
Steps
-
Go to Identity Provider > IdP Adapters and choose an HTML Form Adapter:
Choose from:
-
In the Instance Name list, reuse an existing HTML Form Adapter.
-
Click Create New Instance to create one.
-
-
Go to the IdP Adapter tab:
-
Click Add New Row to 'Credential Validators' and add the PCV that’s linked to your LDAP connection. Click Update.
-
Select the Allow Password Changes checkbox.
You must select the Allow Password Changes checkbox to enable password reset. If you don’t enable this setting, your changes can’t be saved.
-
Optional: To send the user an email when their password is changed, select the Change Password Email Notification checkbox.
-
Optional: To alert the user with an approaching password expiry message at sign on, select the Show Password Expiring Warning checkbox.
-
In the Password Reset Type row, click the password reset method that you want to use.

-
To allow a user with a locked account to unlock the account using the password reset function, select the Account Unlock checkbox.
-
-
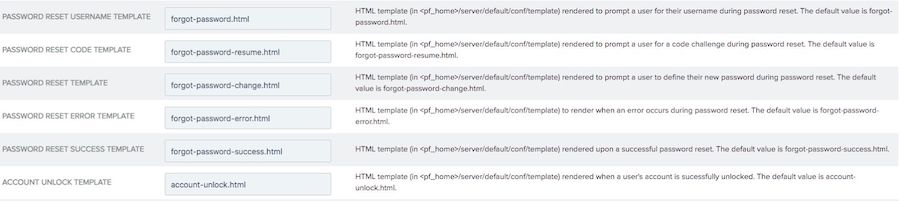
To edit the templates for the HTML pages for password reset:
-
Click Show Advanced Fields.
-
Edit the relevant template fields as needed with the appropriate HTML template.
If you modify and rename a template, make sure to update the template name of that specific template.
-
-
For the PingID password reset type, in the PingID Properties field, import your PingID properties file from PingOne.
This is the same file you used to setup your PingID adapter in PingFederate.
-
Configure the remaining settings as needed. Click Next.
You can find more information about the settings in Configuring an HTML Form Adapter instance (page 288) and HTML Form Adapter advanced fields (page 298).
-
On the Summary tab, click Save.
Result
You have successfully created an instance of the HTML Form Adapter with the self-service password reset capability. When a user signs on through this adapter instance, the sign-on page displays the Change Password? and Trouble Signing On? options.