Federating PingOne and Salesforce
This configuration allows you to sign on to PingOne with a Salesforce account.
Before you begin
-
Configure a domain in Salesforce. When the domain is registered, Salesforce sends you an email.
-
Create at least one user in Salesforce.
Enabling the Salesforce identity provider
Steps
-
Sign on to the Salesforce developer console.
-
Go to Identity → Identity Provider and click Enable Identity Provider.
-
Click Download Certificate.
-
Click Download Metadata.
Creating an identity provider in PingOne
Steps
-
Sign on to the PingOne admin console.
-
Go to Connections → External IDPs and click Add Provider.
-
Click SAML.
-
On the Create IDP Profile tab, in the Name field, enter a name. Click Continue.
-
On the Configure PingOne Connection tab, record the entity ID value from the PingOne (SP) Entity ID field, and then click Continue.
-
On the Configure IDP Connection tab, select the Import Metadata button, and then click Choose.
-
Select the metadata file.
-
In the SSO Binding section, select the HTTP POST button.
-
In the Verification Certificate section, click Choose and import the verification certificate.
-
Click Save and Continue.
-
On the Map Attributes tab, map any additional attributes of your choice. Click Save & Finish.
Consider adding an email address mapping.
-
Return to the Identity Providers list, and click the toggle to enable your IdP.
-
Click the Pencil () icon on your IdP, and then go to the IDP Configuration tab.
-
Record the value of the ACS Endpoint field.
Creating a connected app in Saleforce
Steps
-
In your Salesforce developer console, go to Apps → App Manager and click New Connected App.
-
In the Basic Information section, complete the required fields.
-
In the Web App Settings section, select the Enable SAML checkbox.
-
In the Entity Id field, enter the PingOne entity ID.
-
In the ACS URL field, enter the ACS endpoint.
-
From the IdP Certificate list, select the certificate that is used by your Salesforce IdP.
-
Save the connected app configuration.
Adding the IdP to the PingOne authentication policy
Steps
-
In the PingOne admin console, go to Experiences → Authentication Policies.
-
Click the Pencil () icon to edit a policy or click Add Policy to create a new one.
-
Select the Enable registration checkbox for the Login step.
-
From the Population list, select a population.
-
From the Presented Identity Providers list, select your IdP. Click Save.
You can add your IdP to as many authentication policies as you like.
Creating a permission set in Salesforce
Steps
-
In your Salesforce developer console, go to Users → Permission Sets. Click New.
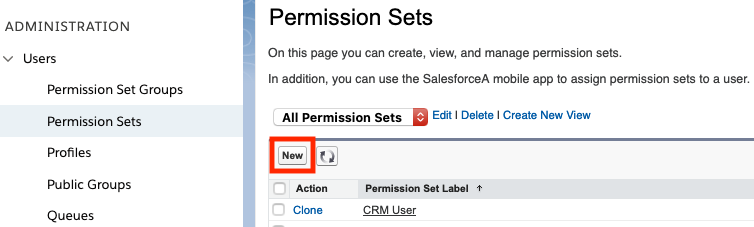
-
Complete the required fields. Click Save.
Selecting --None-- from the license list defaults to the license of the user signing on.
-
From the Permission Sets list, select your new permission set.
-
From the Apps list, select Assigned Connected Apps.
-
Click Edit and select your PingOne app, and click the arrow to move it to the Enabled Connected Apps window. Click Save.
Assigning users to the permission set
Steps
-
From the Permission Sets list, select your new permission set.
-
Click Manage Assignments, and then click Add Assignments.
-
From the All Users list, select the checkboxes of the users you want to assign. Click Assign, and then click Done.
Signing on with your Salesforce IdP
Steps
-
Go to your PingOne self-service URL and click the button to sign on with your Salesforce IdP.
You can find your self-service URL in the Dashboard → Environment Properties tab of PingOne.
For example, https://apps.pingone.com/91d9925b-2220-4933-948e-1a1e450b7af1/myaccount/
Result
PingOne prompts you to create a new user.