Configuring SSO for GlobalProtect VPN with PingOne for Enterprise
Next-Generation Firewall (NGFW) supports the ability to enable Single Sign-On (SSO) through the PingOne for Enterprise admin UI.
Before you begin
-
To ensure the integrity of messages processed in a SAML transaction, use digital certificates to cryptographically sign all messages. For guidelines on certificate usage, see Configure SAML Authentication in the Palo Alto Networks documentation.
-
You have an identity provider (IdP) certificate signed by a certificate authority (CA) and trusted by the NGFW device (recommended).
About this task
You can combine GlobalProtect VPN with PingOne for Enterprise for SSO as shown in the following diagram.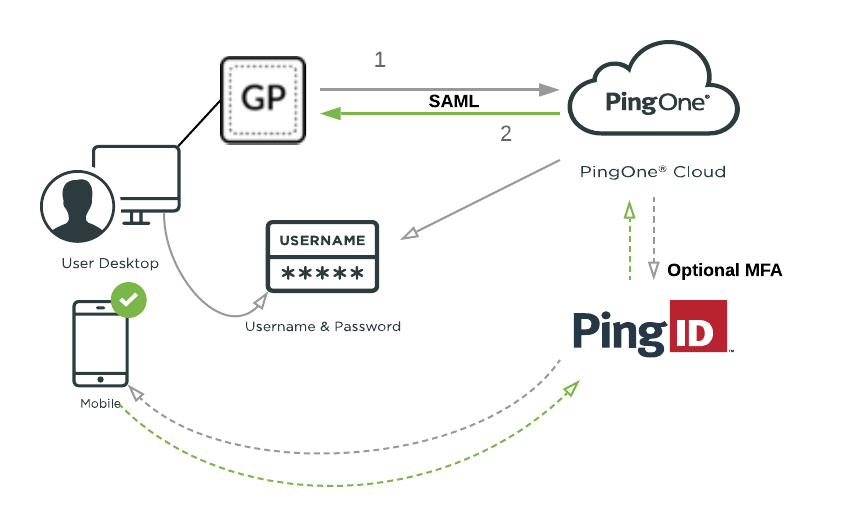
Steps
-
Create a standard security certificate for GlobalProtect to use.
GlobalProtect requires a certificate from a Certificate Authority (CA) and cannot use a self-signed certificate. Ensure that you have a standard certificate.
-
Download the GlobalProtect certificate.
-
Log in to the NGFW admin portal.
-
Go to Device → Certificate Management → Certificates, and select the certificate that you created in step 1.
-
Click Export Certificate. From the File Format list, select
Base64 Encoded Certificate (PEM). -
Clear the Export private key checkbox, and then click OK.
You will use the CN of the certificate for the assertion consumer service (ACS) endpoint and EntityID URL in step 3.
-
-
In PingOne, set up the GlobalProtect application.
-
Log in to PingOne.
-
Go to Applications → Application Catalog, and search for GlobalProtect.
-
Expand the Palo Alto Networks GlobalProtect entry with the black arrow. Click Setup and then click Continue to Next Step.
-
In the ACS URL and Entity ID fields, replace $\{GlobalProtect Portal} with the GlobalProtect FQDN or IP as shown.
Example:
ACS URL:
https://<FQDN or IP>:443/SAML20/SP/ACSEntity ID:
https://<FQDN or IP>:443/SAML20/SP -
Click Browse next to Primary Verification Certificate, and then select the GlobalProtect certificate that you downloaded from NGFW.
Ensure that you:
-
Clear the Encrypt Assertion checkbox, and select the Sign Assertion checkbox.
-
Keep the signing algorithm as
RSA_SHA256.Select Force MFA to use PingID MFA.
-
Click Continue to Next Step.
-
In the Attribute Mapping window, set the value of the
username *application attribute toSAML_SUBJECT, unless a different value is required. Click Continue to Next Step. -
Optional: On the PingOne App Customization page, change the application’s icon, name, description, and category. Click Continue to Next Step.
-
In the Group Access window, add the required user groups for VPN authentication, and then click Continue to Next Step.
Exclude any group that should not have access to VPN.
-
If you choose to verify the user in NGFW under User Identification against your directory, ensure that PingOne for Enterprise is connected to the same directory.
-
Click Download next to SAML Metadata, and then click Finish.
-
-
-
Import the PingOne for Enterprise SAML metadata into GlobalProtect.
-
Log in as administrator to the NGFW admin portal.
-
Go to Device → Server Profile → SAML Identity Provider, and then click Import.
-
In the Profile Name field, enter a name for the profile.
-
In the Identity Provider Metadata field, click Browse and import the metadata file that you downloaded from PingOne.
-
Optional: If you are using a self-signed certificate, clear the Validate Identity Provider Certificate checkbox.
-
Optional: Set the Maximum Clock Skew.
-
Review your configuration and then click OK.
-
-
Create an authentication profile in GlobalProtect.
-
On the Device page, go to Authentication Profile, and click Add.
-
In the Name field, enter a name for the authentication profile.
-
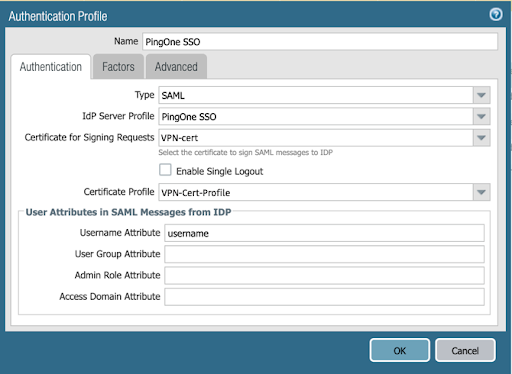
From the Type list, select
SAML. -
In theIDP Server Profile, choose the SAML profile that you created in step 4.
-
In the Certificate for Signing Request field, choose the certificate that you created for GlobalProtect. This is the same certificate that you imported into PingOne for Enterprise.
-
In the Certificate Profile field, choose the certificate profile that you created for GlobalProtect. For more information, see Configure a Certificate Profile in the Palo Alto Networks documentation.
When using a CA-signed certificate in PingOne for Enterprise, import the root CA in Device → Certificates and include it in the certificate profile.
-
Leave the Username Attribute field as
username. -
Leave the Factors tab empty.
If you need to use MFA, you can force PingID MFA from PingFederate.
Your configuration should be similar to the following example.
-
Go to the Advanced tab and choose the group to which this authentication profile applies.
-
Confirm your configuration and then click OK.
-
-
Add the authentication profile to the GlobalProtect portal.
For information on configuring a GP portal, see Set up access to the GlobalProtect Portal in the Palo Alto Networks documentation.
-
Go to Network → GlobalProtect → Portals, and choose the portal that you want to modify.
-
Select Authentication, and choose the SSL service profile.
-
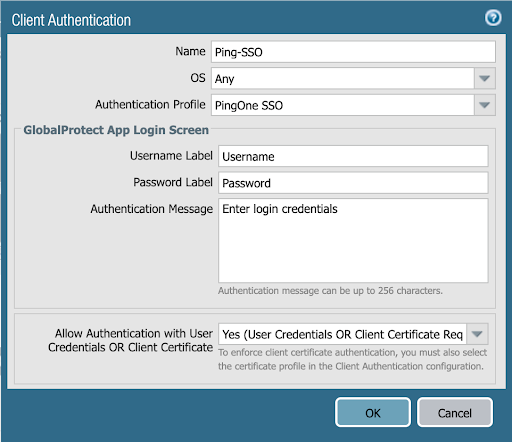
On the Client Authentication tab, click Add.
-
Enter a name for the client authentication profile, and select the authentication profile that you created in step 5.
-
Confirm your configuration and then click OK.
Your configuration should look similar to the following example.
-
-
Go to the Agent tab, and set the trusted root CA.
-
On the Agent tab, click Add.
-
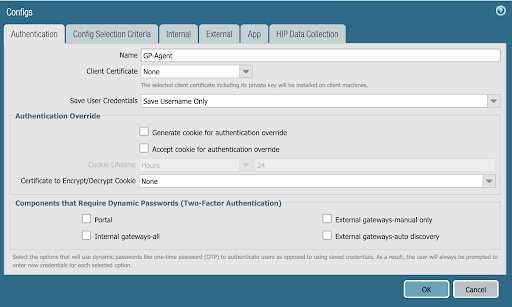
On the Authentication tab, enter a name for the agent in the Name field.
-
From the Save User Credentials menu, select Save username only.
Your configuration should look similar to the following example.
-
-
Add an external gateway to your GlobalProtect configuration.
-
Go to the External tab, and under External Gateways click Add.
-
Give the gateway a name, and set the FQDN or IP for the agent.
Your configuration should look similar to the following example.
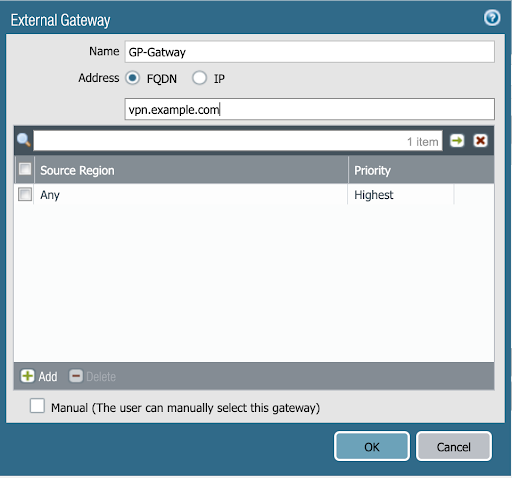
Make sure that the Gateway is configured. For instructions on configuring a gateway, see Configure a GlobalProtect Gateway in the Palo Alto Networks documentation.
-
-
Go to the App tab. Review the configuration and make any required changes, then click OK.
-
Click Commit.