Protecting a web application with PingAccess using PingFederate as the token provider
Configure a proof of concept to protect a web application from unwanted access using PingAccess with PingFederate as the token provider.
There are several ways to set up PingAccess to protect a web application. This use case covers the setup and configuration of PingFederate and PingAccess so PingFederate can act as the token provider. This is intended to be a basic configuration to get PingAccess and PingFederate up and running for a proof of concept. To learn more about other configuration options, see the Protecting a web application with PingAccess.
Setting up PingFederate 10.1
Combine PingFederate 10.1 with PingAccess 6.1 in a basic configuration to perform a proof of concept for protecting web applications. To get started, set up PingFederate.
Before you begin
-
PingFederate system requirements (page 110).
Ensure you have the appropriate version of Java.
-
PingFederate port requirements (page 116).
About this task
To set up PingFederate:
Steps
-
Install PingFederate on your operating system.
Choose from:
-
Installing PingFederate on Windows (page 121).
-
Installing PingFederate on Linux (page 122).
-
-
Start the PingFederate server.
Choose from:
-
Starting and stopping PingFederate on Windows (page 155).
-
Starting and stopping PingFederate on Linux (page 155).
-
-
Open the PingFederate administrative console.
-
Open a browser and enter
https://Your Server Domain:9999/pingfederate/app.Your Server Domain is your fully qualified domain name (FQDN).
If you do not have a DNS set up for an FQDN, you can also use an IP address, but the use of an FQDN long-term is the best practice.
-
To sign on, in the username field, enter
Administrator, and in the password field, enter2Federate. -
To proceed, review the license agreement. Click Accept.
-
-
Click No, Set Up Without PingOne for Enterprise, and then click Next.
-
To import a valid PingFederate license, click Choose File and locate your license file.
Learn more in Reviewing or importing your license (page 157).
-
Click Next.
-
On the Basic Information tab, enter the basic information.
-
In the Base URL field, verify your base URL. Update as needed.
The domain portion of the base URL should match the domain name of your organization because it is part of the address where your applications, users, and partners communicate with your PingFederate environment.
You can add multiple virtual host names at a later time. Learn more in Virtual host names (page 855).
-
In the Entity ID field, enter your Entity ID if prompted. Click Next.
This is the unique identifier of your organization. It is how your partners identify you when communicating with you based on SAML 2.0 specifications.
-
-
On the Connection tab, in the Directory Type list, select your directory type and provide the required information.
Learn more about each field in Connecting to a directory (page 158).
-
Click Next until you reach the Summary tab. Click Done.
If you are connecting to Active Directory (AD), bypass Kerberos authentication at this time.
-
On the Administrator Account tab, create an administrative account.
-
To replace the default value in the Username field, enter a new value.
-
In the Password and Confirm Password fields, enter a password.
-
Click Next.
-
-
On the Confirmation tab, review your configuration.
-
To apply the configuration to PingFederate, click Next, and then click Done.
Setting up PingAccess 6.1
Combine PingFederate 10.1 with PingAccess 6.1 in a basic configuration to perform a proof of concept for protecting web applications. To get started, set up PingAccess.
Before you begin
Review and ensure you meet the PingAccess installation requirements (page 33), including the port requirements and required Java version.
About this task
To set up PingAccess:
Steps
-
Install PingAccess on your operating system.
Choose from:
-
Linux (page 38)
-
Windows using the installer (page 39).
-
Windows from the command line (page 40).
-
-
Start PingAccess (page 41).
You can also run PingAccess as a service (page 44).
-
Go to the administrative console (page 42) and follow the setup wizard.
Result:
The PingAccess administrative console landing page opens.
Preparing PingFederate for PingAccess connectivity
Combine PingFederate 10.1 with PingAccess 6.1 in a basic configuration to perform a proof of concept for protecting web applications. To set up this proof of concept, configure PingFederate for PingAccess connectivity.
About this task
To configure PingFederate for PingAccess connectivity, use the PingFederate console.
Steps
-
To verify PingFederate roles and protocols, go to System → Server → Protocol Settings, and then proceed to Enabling PingFederate roles and protocols.
In PingFederate 10.1.x, all necessary roles and protocols are turned on by default.
-
To verify the password credential validator (PCV) created during the setup process in Setting up PingFederate 10.1, go to System → Data & Credential Stores → Password Credential Validators.
Result:
You see a PCV that corresponds with the directory that you set up.
If there is no PCV displayed, see Creating a password credential validator.
-
To verify the IdP adapter created in the setup process, go to Authentication → Integration → IdP Adapters.
Result:
You see an HTML form adapter associated with the PCV in step 2.
If no IdP adapter is displayed, see Configuring an IdP adapter.
-
To define the default scope, go to System → OAuth Settings → Scope Management. Proceed to Defining the default scope.
-
To create an access token manager, go to Applications → OAuth → Access Token Management.
From Token Management, proceed to Creating an access token manager.
-
Define an authentication policy contract.
-
Go to Authentication → Policies → Policy Contracts.
-
Click Create New Contract.
-
In the Contract Name field, enter a name for your contract.
-
Click Next until you reach the Summary section. Click Save.
Configuring a policy contract instead of configuring an IdP adapter mapping enables more advanced and flexible authentication policies.
-
-
Configure a policy contract grant mapping.
-
Go to Security → Authentication → OAuth → Policy Contract Grant Mapping.
-
From the Policy Contract list, select the policy you just created. Click Add Mapping.
-
Click Next until you reach the Contract Fulfillment section.
-
From the Source list, select Authentication Policy Contract for both User_Key and User_Name contracts.
-
From the Value list, select Subject for both User_Key and User_Name contracts.
-
Click Next until you reach the Summary section. Click Save.
-
-
To configure an access token mapping, go to Applications → OAuth → Access Token Mapping. Proceed to Configuring an access token mapping.
-
To create an OpenID Connect policy, go to Applications → OAuth → OpenID Connect Policy Management. Proceed to Creating an OpenID Connect policy.
-
To create a resource server client, go to Applications → OAuth → Clients. Proceed to Creating a resource server client.
-
To create a web session client, go to Applications → OAuth → Clients. Proceed to Creating a web session client .
-
Create and export a certificate from PingFederate to PingAccess.
-
Go to Security → Certificate & Key Management → SSL Server Certificates.
-
Click Create New.
-
In the Common Name field, enter the PingFederate server address.
This should match the Your Domain Name entry in step 3a in Setting up PingFederate 10.1.
-
In the Organization field, enter your organization’s name.
-
In the Country field, enter the two-letter abbreviation for your country.
-
Complete the remaining fields as required.
-
Click Next.
-
Click Save.
-
In the Action section, click Activate Default for Runtime Server.
-
In the Action section, click Activate Default for Admin Console.
-
In the Action section, click Export.
-
Click Certificate Only. Click Next.
-
Click Export, and then save the exported certificate.
-
Click Done.
To avoid confusion, you can delete the default localhost certificate that appears in the certificate list. In the Action section, select Deactivate, and then click Delete.
-
Result
You are ready to connect PingAccess to PingFederate.
Connecting PingFederate and PingAccess
Combine PingFederate 10.1 with PingAccess 6.1 in a basic configuration to perform a proof of concept for protecting web applications. After PingFederate has been installed and prepared for PingAccess connectivity, connect PingAccess and PingFederate.
About this task
To connect PingFederate to PingAccess, use the PingAccess administrative console.
Steps
-
Importing certificates and creating a trusted certificate group.
-
Configure the token provider.
-
Click Settings, and then go to System → Token Provider → PingFederate → Runtime.
-
In the Issuer field, enter the PingFederate issuer name.
-
From the Trusted Certificate Group list, select the PingFed certificate group.
-
Optional: Click Show Advanced Settings and select the Skip Hostname Verification checkbox.
-
Click Save.
-
Click Settings, and then go to System → Token Provider → PingFederate → Administration.
-
In the Host field, enter the host name or IP address for the PingFederate Runtime.
For example,
mypingfedserver. -
In the Port field, enter the port number for PingFederate Runtime.
For example,
9031. -
In the Admin Username field, enter the username.
This username only requires auditor, read-only, permissions in PingFederate.
-
In the Admin Password field, enter the password.
-
From the Secure list, select Secure.
-
From the Trusted Certificate Group list, select the PingFed certificate group.
-
Click Save.
-
Click Settings, and then go to System → Token Provider → PingFederate → OAuth Resource Server.
-
In the Client ID field, enter the OAuth Client ID you defined when creating the PingAccess OAuth client in PingFederate.
For example,
pa_rs. -
In the Client Credentials Type section, select Secret, then enter the Client Secret assigned when you created the PingAccess OAuth client in PingFederate.
-
In the Subject Attribute Name field, enter the attribute you want to use from the OAuth access token as the subject for auditing purposes.
For example,
username. -
Optional: Select the Send Audience checkbox.
-
Click Save.
-
Result
PingAccess can be configured to protect a web application.
Protecting a web application with PingAccess
Use this use case to combine PingFederate 10.1 with PingAccess 6.1 in a basic configuration to perform a proof of concept for protecting web applications.
About this task
To configure PingAccess to protect a web application for a proof of concept, use the PingAccess administrative console.
Steps
-
To configure PingAccess to listen on port 443, adjust the engine listeners.
-
Go to Settings → Networking → Engine Listeners and click Add Engine Listener.
-
Complete the fields.
-
Click Save.
Port 443 is commonly restricted to root-level access on certain operating systems. Availability to bind to this port might require root access. Consult your system administrator with any questions about port access.
Listening on port 443 is not a requirement for using PingAccess, but rather a recommendation for this specific, proof of concept, use case.
-
-
Configure a virtual host.
-
Click Applications, and then go to Applications → Virtual Hosts.
-
Click Add Virtual Host.
-
In the Host field, enter the name for the virtual host.
This is the host name used by end users to reach the site. For example, myHost.com. You can use a wildcard (
*) for part or all of the host name. For example,*.example.commatches all host names ending in .example.com, and*matches all host names.For this example, add
*:443andlocalhost:443.
-
-
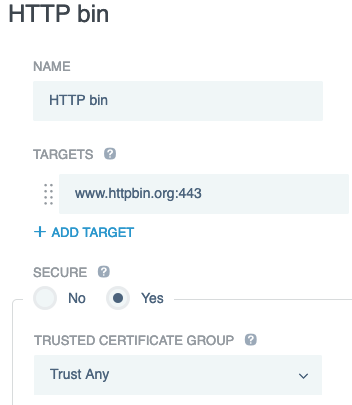
Configure a site.
For this proof of concept we are using https://www.httpbin.org.
The site www.httpbin.org is not affiliated with Ping Identity, but is a good example to use when presenting a proof of concept due to its ability to quickly expose the browser’s communication with the protected site. You can choose to protect a different website, substituting instances of
www.httpbin.orgwith your site.-
Click Applications, and then go to Sites → Sites.
-
Click Add Site.
-
In the Site Name field, enter
HTTP Bin. -
In the Targets field, enter
www.httpbin.org:443. -
Select the Secure checkbox.
-
From the Trusted Certificate Group list, select Trust Any.
-
-
Configure a web session.
-
Click Access, and then go to Web Sessions → Web Sessions.
-
Click Add Web Session.
-
In the Name field, enter
Web Session. -
From the Cookie Type list, select Encrypted JWT.
-
In the Audience field, enter
WebSession. -
From the OpenID Connect Login Type list, select Code.
For maximum security and standards interoperability, use the Code login type. However, other options are available. For information on the available profiles, see Creating web sessions.
-
In the Client ID field, enter
pa_wam. -
From the Client Credentials Type menu, select Secret.
-
Enter the client secret for the OAuth client.
-
In the Idle Timeout field, specify the amount of time, in minutes, that the PingAccess token remains active when no activity is detected by the user.
The default is
60minutes.If there is an existing valid PingFederate session for the user, an idle timeout of the PingAccess session might result in its re-establishment without forcing the user to sign on again.
-
In the Max Timeout field, specify the amount of time, in minutes, that the PingAccess token remains active before expiring.
The default is
240minutes. -
Click Save.
-
-
Configure an identity mapping.
For this proof of concept use case, you do not need to configure rules.
-
Click Access, and then go to Identity Mappings → Identity Mappings.
-
Click Add Identity Mapping.
-
In the Name field, enter
General Identity Mapping. -
From the Type list, select Header Identity Mapping.
-
In the Attribute to Header Mapping section, click Subject.
-
From the Attribute Name list, select sub and in the Header Name field, enter
X-SUB. -
In the Certificate to Header Mapping section, in the Header Name field, enter
X-CERT.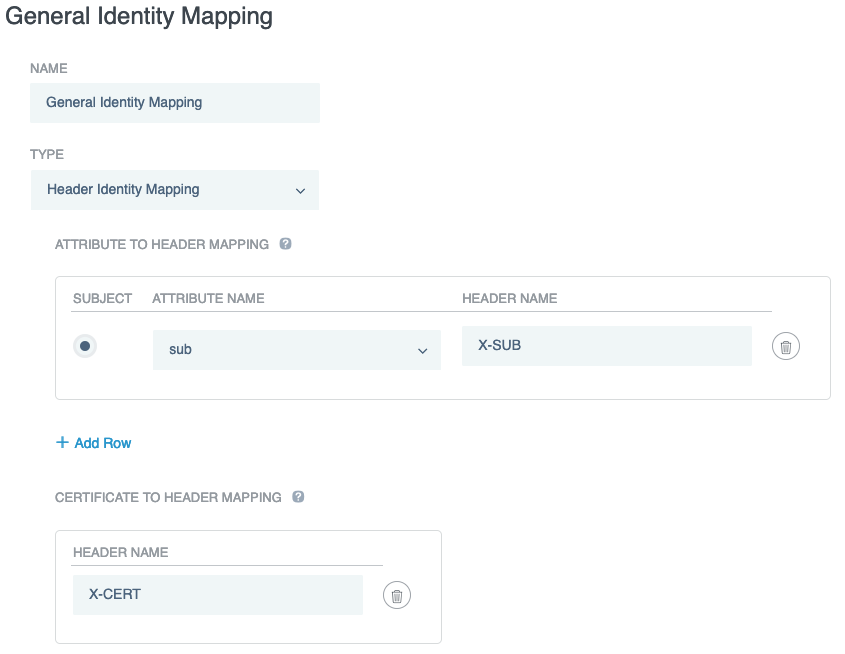
-
-
Add a new redirection URI in PingFederate.
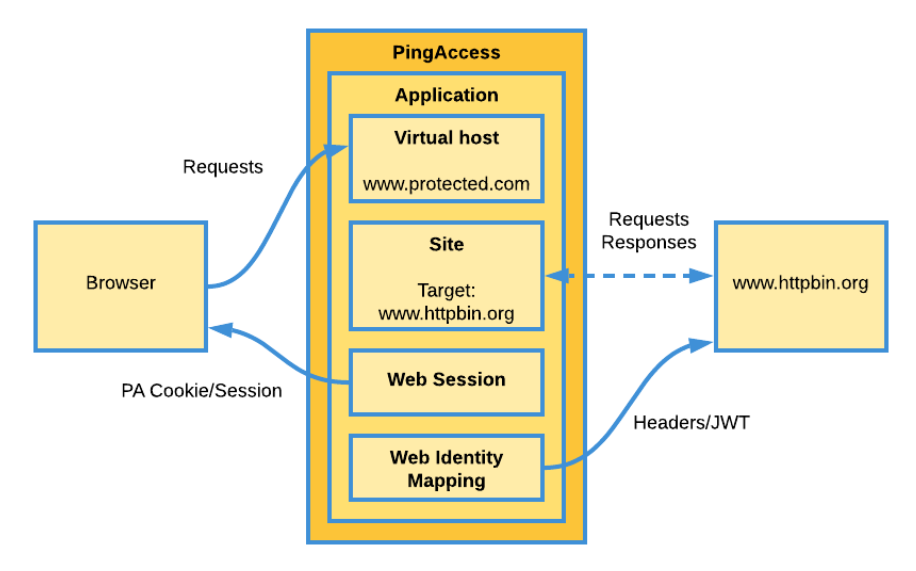
For this proof of concept, we are using
www.protected.com.The redirection URI is what your end users enter when they are accessing the protected site. In this proof of concept, we are entering https://www.protected.com into the browser, but we are accessing https://www.httpbin.org through this configuration with PingAccess. To understand the relationship between the protected site and the redirection URI, see the following diagram.
-
From the PingFederate administrative console, go to Applications → OAuth → Clients → pa_wam.
-
Click Add.
-
In the URI field, enter
https://www.protected.com/pa/oidc/cb.If you choose to use a different URI, format your entry as https://Your Site Address/pa/oidc/cb.
-
-
Configure an application in PingAccess.
-
From the PingAccess administrative console, click Applications and then go to Applications → Applications.
-
Click Add Application.
-
In the Name field, enter
HTTP Bin. -
In the Context Root field, enter
/. -
From the Virtual Host list, select www.protected.com:443.
-
In the Application Type section, select Web.
-
Verify that the SPA Support checkbox is unselected.
-
From the Web Session list, select None.
-
In the Destination section, select Site, then select HTTP Bin.
-
Verify that the Require HTTPS checkbox is selected.
-
Select the Enabled checkbox.
-
Click Save.
-
-
Add a new authentication policy in PingFederate.
-
From the PingFederate administrative console, go to Authentication → Policies.
-
Select the IDP Authentication Policies checkbox.
-
Click Add Policy.
-
In the Name field, enter a name for your policy.
-
From the Policy list, select IdP Adapters and then select HTML Form Adapter.
-
In the Fail section, click Done.
-
In the Success section, from the Success list, select Policy Contracts and then select Default Policy Contract.
-
In the Success section, click Contract Mapping.
-
Click Next until you reach the Contract Fulfillment tab.
-
From the Source list, select Adapter (HTMLFormAdapter).
-
From the Value list, select username.
-
Click Next until you reach the Summary tab. Click Done.
-
Click Done, and then click Save.
Result:
Your policy is saved and enabled.
-
-
Optional: Demonstrate the configuration so far.
-
Open a new browser window in private browsing or incognito mode and enter
https://www.httpbin.org/anything. -
Note the following information:
-
The URL that the browser talks to is listed as https://www.httpbin.org/anything.
-
No cookies, typically found under the
headerssection, are set.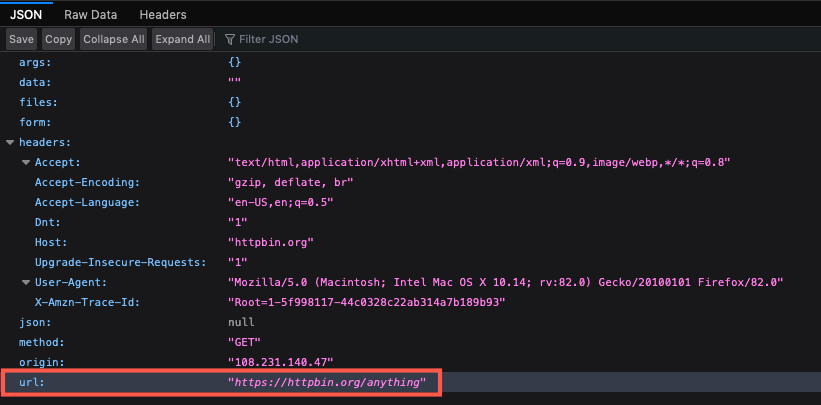
-
-
Open a new browser window in private browsing or incognito mode and enter
https://www.protected.com/anything. -
Note the following information:
-
The site displays the information from https://www.httpbin.org/anything.
-
The URL that the browser talks to is listed as https://www.protected.com/anything.
-
A PingAccess cookie,
PA.WebSession, is set.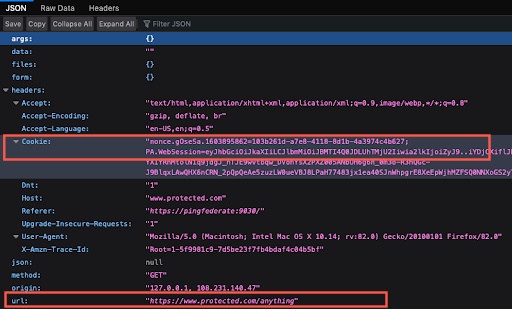
-
-
-
Set authentication requirements for the protected site.
-
In the PingAccess administrative console, go to Applications → HTTP Bin and click the Pencil () icon to edit.
-
From the Web Session list, select Web Session.
-
Click Save.
-
Optional: Refresh the browser window where you are accessing https://www.protected.com/anything.
PingFederate now asks for credentials to access the site.
If you enter valid credentials from your datastore to access the page, the same information from https://www.httpbin.org/anything is displayed through https://www.protected.com/anything.
Result:
PingAccess evaluates the browser’s requests through the authentication requirements you defined.
-
-
Configure PingAccess to pass data to the application.
-
In the PingAccess administrative console, go to Applications → HTTP Bin.
-
From the Web Identity Mapping list, select General Identity Mapping.
-
Click Save.
-
Optional: Refresh the browser window where you are accessing https://www.protected.com/anything.
Result:
There are two new fields following
User-Agent:X-CertandX-Sub.
-