Integrating PingOne with 1Password Business for SSO
To allow your users to access their 1Password business accounts using SSO, integrate PingOne SSO with 1Password so that the two services can communicate with each other.
-
First, add an OIDC web application and configure it so that PingOne SSO can serve as the identity provider for 1Password business accounts.
-
Then, access 1Password and configure both 1Password and PingOne SSO so that the two services can communicate with each other. Test the connection to ensure it works.
-
Finally, specify who will be able to access 1Password using SSO and how many days they have to use SSO to access 1Password before they’ll be locked out of their accounts.
Note that this type of connection does not support automated user provisioning. If this functionality is necessary, use the 1Password Business Provisioning Connector.
Before you begin
Ensure that:
-
You have PingOne SSO and 1Password Business open and available.
-
You have administrator privileges in the PingOne SSO environment.
-
You are in the Administrators or Owners group in your 1Password Business account.
-
If you do not want to turn on SSO for everyone, ensure that the 1Password users who you want to provide SSO access to are members of established 1Password groups.
|
Your 1Password username and email address must match a valid PingOne SSO user in your environment. The connection cannot be made if 1Password cannot verify that the user exists. |
Adding an OIDC web application
About this task
Start by adding an OIDC web application to your PingOne environment.
Steps
-
Go to ConnectionsApplications.
-
Click the icon and create the application profile:
-
In the Application name field, enter a unique identifier for the application.
-
Optional: In the Description field, enter a brief description of the application.
-
Optional: In the Icon field, upload an icon to represent your application.
You can use a file of up to 1MB in JPG, JPEG, GIF, or PNG format.
-
-
In the Application Type field, select OIDC Web App.
-
Click Save.
Result:
The Overview tab of the application that you created displays.
Configuring the new application to serve as an identity provider
About this task
To configure the new application:
Steps
-
On the Configuration tab, click the Pencil () icon to update the configuration.
-
In the Grant Type > PKCE enforcement field, select S256_REQUIRED.
-
In the Token Endpoint Authentication Method field, select None.
-
Click Save.
-
On the Resources tab, click the Pencil () icon to update the scopes allowed.
-
Select the email and profile scopes and click Save.
-
Optional: Apply access policies to the application:
-
On the Policies tab, click the Pencil () icon to update the policies applied. If you have a PingOne DaVinci license, DaVinci policies are available on the DaVinci Policies tab. If you do not, you will only see policies on the PingOne Policies tab.
You can apply DaVinci policies or PingOne policies to the application, but not both.
-
Select the policies that you want to apply and click Save.
-
-
Optional: Provide access to specific user groups:
-
On the Access tab, click the Pencil () icon to update user access.
-
Select the Application Portal Display option if you want the application to be accessible from the application portal.
-
Select theAdmin Only Access option if you only want administrators to be able to access the application. These administrators must have one of these roles:
-
Organization Admin
-
Environment Admin
-
Identity Data Admin
-
Client Application Developer
-
-
If you want to provide access to specific user groups, select the groups from the list.
-
Click Save.
-
-
Enable the application by clicking the slider icon at the top of the page.
Keep the PingOne SSO
browser window open.
Configuring 1Password for SSO
About this task
To configure the services to communicate with each other:
Steps
-
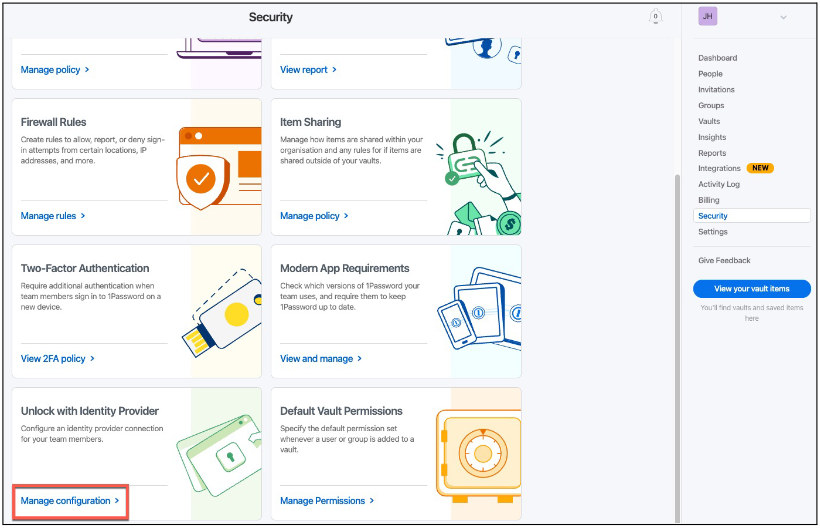
Open 1Password in a new browser window and select Security from the sidebar.
-
On the Unlock with Identity Provider card, click Manage configuration.
Result:
A setup wizard opens.
-
On step 1, you’re prompted to select the name of your identity provider. Select Other and then click Next.
-
On step 2, you’re prompted to provide the name of your identity provider. Select Ping Identity from the list.
-
Go to the PingOne SSO browser tab.
If it’s not already displayed, locate the new OIDC web app that you created inPingOne SSOand click the Configuration tab for the app.
-
Copy the Client ID to your clipboard, return to 1Passwordless, and paste the ID into the Client ID field.
-
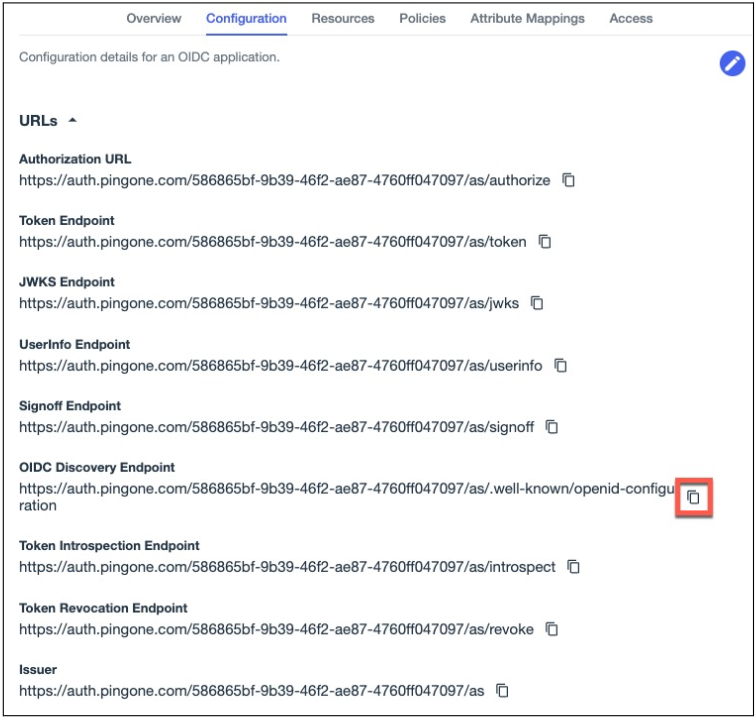
In PingOne, on the Configuration tab, expand the list of URLs and copy the OIDC Discovery Endpoint to your clipboard.
-
In 1Password, paste the OIDC Discovery Endpoint URL into the Well-known URL field. Click Next.
Result:
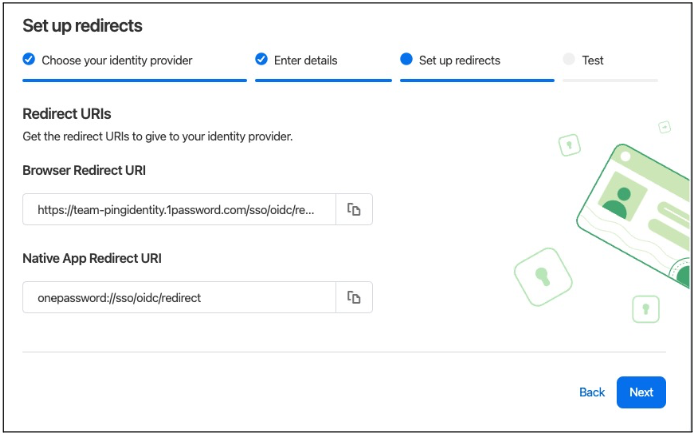
Step 3 of the wizard displays a browser redirect URI and a native app redirect URI.
-
Copy the Browser Redirect URI value.
-
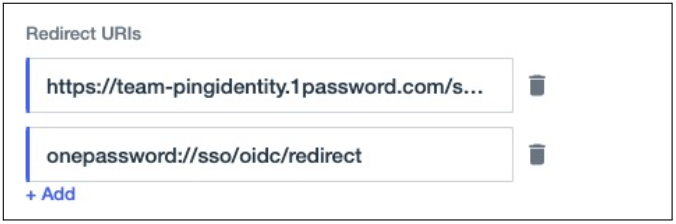
InPingOne SSO, on the Configuration tab, collapse the list of URLs and click the Pencil () icon to update the application with the redirect URIs.
-
Paste the browser redirect URI into the Redirects URIs field.
-
In 1Password, copy the native app redirect URI.
-
InPingOne SSO, click Add under the Redirects URIs field, and paste the native app redirect URI into the next redirect URI field.
-
Click Save.
Testing the connection
About this task
Test the connection to ensure that it works:
Steps
-
In 1Password, click Next, and then click Test Connection.
Result:
You’re redirected toPingOne SSOto sign on.
-
Sign on toPingOne SSOusing the same username that you used to sign on to 1Password.
Result:
You’re redirected back to 1Password. A
Successful Connectionmessage displays, as shown in the following image.
-
Click Save.
Result:
The Settings page opens. No one can use SSO to access 1Password by default.
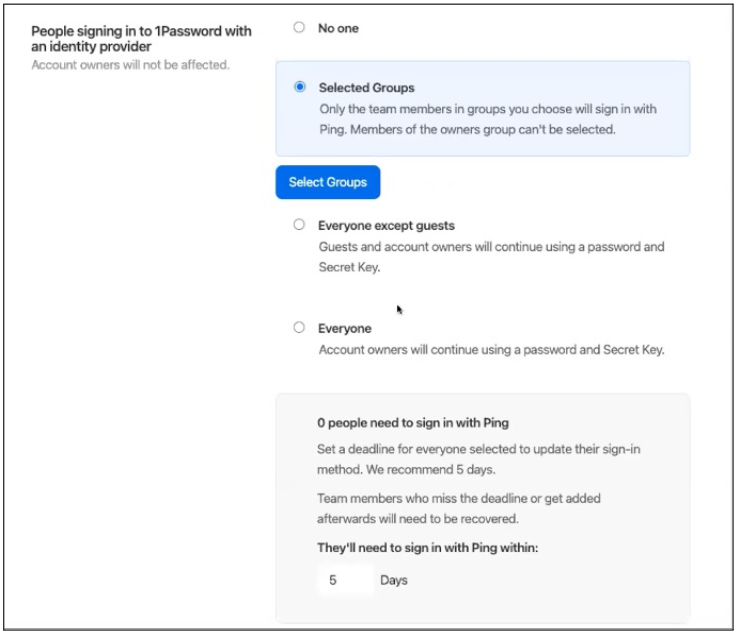
Specifying who can use SSO to access 1Password
About this task
Complete the integration by specifying who can access 1Password using SSO and how many days they have to update their sign-on methods before they’re locked out of their accounts.
Steps
-
Specify who can access 1Password by selecting the appropriate option:
-
Selected groups: Only the users in the groups you specify will be able to sign on using SSO.
-
Everyone except guests: All 1Password users, except guests and account owners, will sign on using SSO.
-
Existing users will be prompted to sign on using SSO.
-
New users will use their PingOne SSO username when initially accessing 1Password.
-
Guests and account owners will sign on using their account password and secret key.
-
-
Everyone: All 1Password users, except those who are account owners, will sign on using SSO.
-
Existing users will be prompted to sign on using SSO.
-
New users will use their PingOne SSO username when initially accessing 1Password.
-
Account owners will sign on using their account password and secret key.
-
-
-
Specify the number of days that users have to update their sign-on methods.
The default is 5 days.
When setting this deadline, consider the following:
-
By default, the deadline is set to 5 days. You can set it to between 1 day and 30 days.
-
The timer starts as soon as the user group is configured to use SSO.
-
If you plan to have additional users use SSO to access 1Password after the initial configuration, you should create a new custom group with its own deadline to ensure that newly-assigned users won’t need to have their accounts recovered.
-
If a user is a member of several groups with different deadlines, the deadline for the first SSO group is used.
-
If you add a user to a group with an expired deadline, you or another administrator will need to recover the account.
-
-
Indicate whether you want users to be able to access 1Password using biometrics. If you do, specify the number of days that users will have to use SSO to access their accounts.

-
When you’re finished, click Review Changes. Click Save.
For more information, see Configure Unlock 1Password with SSO using OpenID Connect.