Securing your VPN with MFA through PingID
To enable PingID for VPN, use PingFederate Bridge and the PingOne for Enterprise admin portal. This secures your VPN with multi-factor authentication (MFA).
Before you begin
You must have:
-
A PingOne for Enterprise admin portal account
You can sign up for a free trial of PingOne for Enterprise.
-
An instance of PingFederate Bridge
Enabling PingID for VPN through the PingOne for Enterprise admin portal
About this task
You can enable PingID for VPN through the PingOne for Enterprise admin portal or PingFederate Bridge. To enable PingID VPN through the PingOne for Enterprise admin portal:
Steps
-
Sign on to the PingOne for Enterprise admin portal.
-
Click Setup.
-
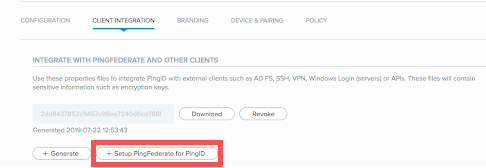
Click PingID → Client Integration.
-
Click Setup PingFederate for PingID.
-
To choose your server platform, follow the on-screen instructions.
-
To download PingFederate Bridge, follow the on-screen instructions.
-
To install and configure PingFederate Bridge, follow the on-screen instructions.
Your Server Domain is your fully qualified domain name (FQDN).
-
In the PingFederate administrative console, review the license agreement. Click Accept.
-
In the PingOne for Enterprise admin portal, in theInstall and Configure PingFederate Bridge section, from the Complete Quick Start section, copy the activation key.

-
In the PingFederate administrative console, click Yes, Connect to PingOne for Enterprise.
-
In the Activation Key field, paste the activation key you copied from the PingOne for Enterprise admin portal. Click Next.
Result:
The PingFederate administrative console displays the Identities section.
-
Proceed to Configuring PingID for VPN with PingFederate Bridge.
Enabling PingID for VPN through PingFederate Bridge
About this task
You can enable PingID for VPN through the PingOne for Enterprise admin portal or PingFederate Bridge.
Steps
-
Install PingFederate from the Ping Identity Downloads Page.
-
Start the PingFederate server by running this script:
<YOUR PINGFEDERATE DIRECTORY>/pingfederate/bin/run.sh. -
Open the PingFederate administrative console.
-
Open a browser and enter
https://Your Server Domain:9999/pingfederate/app.Your Server Domain is your fully qualified domain name (FQDN).
-
To proceed, review the license agreement. Click Accept.
-
-
Click Yes, Connect to PingOne for Enterprise.
-
Click Sign on to PingOne for Enterprise and enter your credentials to sign on.
Result:
The admin portal displays the activation key.
-
Copy the activation key from the PingOne for Enterprise admin portal to your clipboard.
-
In the PingFederate administrative console, in the Activation Key field, paste the key value.
-
Click Next.
Result:
The PingFederate administrative console displays the Identities section.
Configuring PingID for VPN with PingFederate Bridge
Steps
-
From the PingFederate administrative console Identities section, select Yes, Connect a Directory Server.
-
Enter information in the fields that is appropriate for your directory server.
Field Description Directory Type
Select the type of directory server from the list.
Data Store Name
Enter the name of the datastore.
Hostname
Enter the fully qualified domain name (FQDN) for your directory server.
Service Account DN
Enter the distinguished name (DN) of the service account that PingFederate can use to communicate with the directory server.
Password
Enter the password associated with the service account.
Search Base
Enter the DN of the location in the directory where PingFederate begins its datastore queries.
Search Filter
Specify how the username provided by a user at login is mapped to an attribute in your directory.
The default value is either
sAMAccountName=${username}oruid=${username}, depending on the selected directory type.If you require a more advanced search filter, enter the value in the following format:
<Your attribute Name>=${username}. For more information, consult your directory administrators. -
Click Next.
If your directory server is SSL-enabled and presents an untrusted certificate, PingFederate prompts you to upload the server’s certificate. Click Choose Certificate, select the appropriate certificate, and click Next.
-
In the Use Cases section, select the PingID VPN (RADIUS) checkbox. Click Begin.
-
In the Basic Settings section, configure the basic settings:
-
In the Client IP field, enter the IP address of the VPN server.
-
In the Client Shared Secret field, enter the secret shared between the VPN server and PingFederate Bridge.
-
Verify that the Validate with LDAP checkbox is selected.
-
In the PingID Username Attribute field, enter the value you entered in the Search Filter field in step 2.
The integrated RADIUS server listens on port 1812 by default.
-
-
Click Next.
-
In the Provisioning section, the Configure Provisioning checkbox should be unselected. Click Next.
-
In the Summary section, review your configuration. Click Done.
-
Click Next.
-
In the Basic Information section, in the Base URL field, enter
https://Your Server Domain:9031.Your Server Domain is your fully qualified domain name (FQDN).
-
Click Next.
-
To apply the configuration to PingFederate Bridge, click Next.
-
Click Done.
Result
PingID for VPN is enabled in PingFederate Bridge for use.
|
You can find more information on configuring your VPN client/server settings in Integrating PingID with your VPN/Remote access system. |