Create custom authentication nodes to reuse common functionality
Advanced Identity Cloud lets you create your own nodes to reuse common functionality in authentication journeys. Define properties and run custom server-side scripts in these nodes to dynamically set values and decide the outcome of journeys.
To write a script for your custom node, you can use any of the next-generation
script bindings available to the Scripted decision node API,
including httpClient, idRepository, and openidm.
For example, use custom nodes to perform these functions:
-
Update email addresses for users based on their location
-
Add users to a particular group
-
Generate a JWT and store it in shared state
-
Gather user input through callbacks
New custom nodes appear in the node list in the journey editor ready for you to include in your journey. A custom node is realm-agnostic, so you can access it from any realm, not just the realm in which you created it.
You can also share the functionality across tenants by exporting your custom node and importing it into a different environment.
|
You can’t use library scripts with custom nodes. Custom nodes are designed to be self-contained units so that you can import and export them. Import and export functionality isn’t compatible with library scripts. |
Design secure nodes
Before you start creating nodes, read the following points of best practice to make sure your custom nodes are as secure as possible.
- Don’t add sensitive data to shared state
-
Store sensitive information such as passwords in ESVs.
- Sanitize input data
-
Remove sensitive information before using or storing data.
- Don’t log sensitive data
-
Make sure you don’t output sensitive information to logs.
Create a custom node
These steps describe how to create an example custom node called Set Employee Details in the Advanced Identity Cloud admin console.
The node defines two properties, Employee location and Employee group. The node’s script
uses these values to add an email address and set state data.
-
In the Advanced Identity Cloud admin console, in either realm, go to Journeys > Custom Nodes and click New Custom Node.
Custom nodes are global objects and don’t belong to a realm, so even if you create a custom node in the
alpharealm, you can access it from thebetarealm. -
Enter node details so that you can identify the node in the journey editor.
Field Description Name
The node name that’s displayed in the journey editor. For example,
Set Employee Details.Description
(Optional) The description of the node’s purpose that’s displayed in the node properties.
Category
(Optional) Select a category from the list. Your custom node appears under this section in the node list.
Tags
(Optional) Add tags to organize the node. You can use these to search for your node in the node list.
-
Add node properties that you can configure in the journey editor.
Access the properties by their names through the
propertiesbinding in your node script. The values depend on the journey configuration.Field Value Name
The property name to reference from the node script. It must be unique and can only contain alphanumeric and underscore characters. For example,
emp_group.Label
The label appears as the property name in the node properties panel. It must be unique. For example,
Employee group.Description
(Optional) The description appears as the property tooltip.
Type
The input type:
-
String: A single alphanumeric string -
Number: A single numeric string -
Boolean: Lets the user select a checkbox -
Object: Lets the user input a JSON object in a basic script editor
Multi-Valued
Enables multiple separate values for
StringorNumberproperties.Required
Whether it’s mandatory to enter a value for this property.
Enumerated Values
For
Stringinput, define values that display in the UI as a list.The key must only contain upper-case letters, numbers, and underscores. The value can be any valid string.
For example, the
Employee locationproperty has the following enumerated values: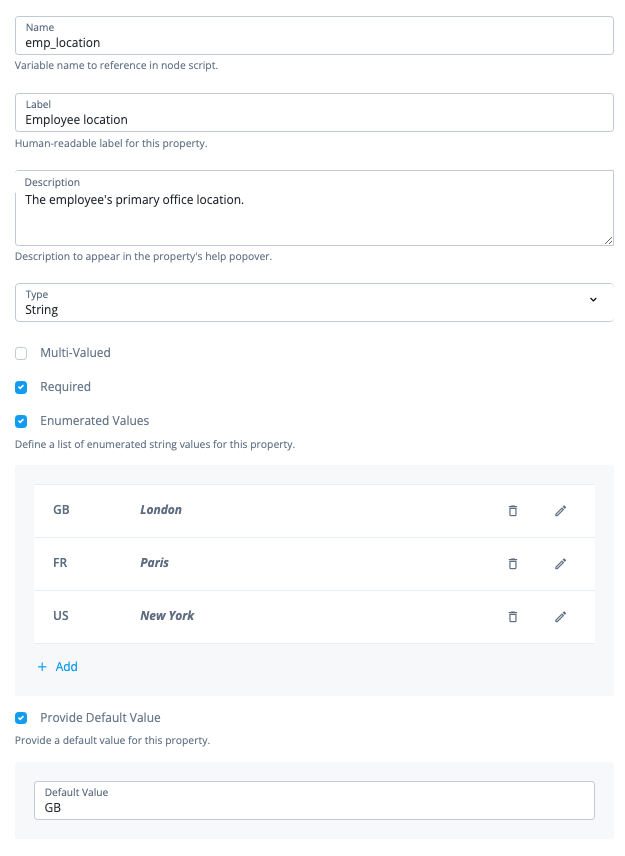
Provide Default Value(s)
The initial property value(s) displayed in the UI.
If you defined
Enumerated Values, the default value must match an enumerated value.If you selected
Multi-Valued, you can specify more than one default value.For example, the
Employee groupproperty has multiple default values: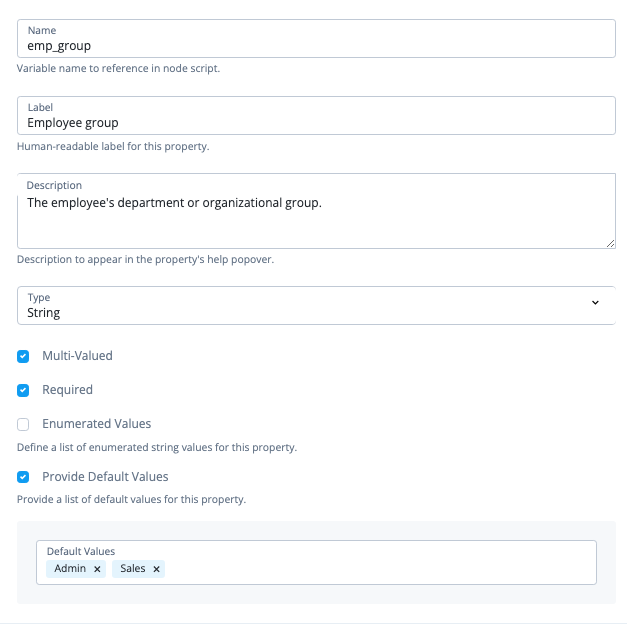
-
-
Configure settings for your node.
Field Value Outcomes
The named outcome paths for the node. You must specify at least one value. For example,
TrueFalse.Require Script Inputs
List the node state data required by the node. For example,
username.If you don’t list anything here, the node can access all shared and transient state data.
Require Script Outputs
List the data the node outputs to shared state.
If you don’t list anything here, the node sets all state data.
Error Outcome
Enable to add an extra path for scripting errors, for example, if the script references an outcome that’s not defined in the Outcomes field.
The outcome appears on the node as Script Error.
-
In the Javascript editor, write or paste a next-generation script to run when a journey processes your custom node.
Use the
propertiescustom node binding to reference the configured values that you’ve defined as properties. In addition toproperties, your script has access to all the Scripted Decision node script bindings.Find examples of scripts and how to use the bindings in Scripted decision node API.
For example, the following script adds an email address to the user profile and stores employee details in node state:
// Get UUID by enabling "Username as Universal Identifier"
// in a preceding Identity Store Decision node
var uuid = nodeState.get("username");
var identity = idRepository.getIdentity(uuid);

var fn = identity.getAttributeValues("givenName")[0];
var sn = identity.getAttributeValues("sn")[0];
var username = fn + "_" + sn;

if (properties.emp_location == "UK") {
    identity.addAttribute("mail", username + "@example.co.uk");
}
else if (properties.emp_location == "FR") {
    identity.addAttribute("mail", username + "@example.fr");
}
else {
    identity.addAttribute("mail", username + "@example.com");
}
identity.store();

nodeState.putShared("location", properties.emp_location);
nodeState.putShared("group", properties.emp_group);

action.goTo("True");
Custom node scripts only appear in the node. You can’t manage these scripts under Scripts > Auth Scripts. -
Save your changes.
Use your custom node
Include your new node in a journey and set values appropriate for the journey.
-
In the Advanced Identity Cloud admin console, create a custom journey.
-
Search for your custom node in the Nodes list using the tags, node name, or by expanding the category of your node.
-
Add the node to your journey and set its properties to values that are appropriate for your authentication journey.
You can view all the journeys that include your custom node in Custom Nodes > Custom node > Overview. -
If you need to make changes to your node, edit its configuration in the custom node editor and return to the journey editor.
You might need to delete the node from your journey and select a new instance to view updates.
This authentication journey uses the example custom node, Set Employee Details, to set user-specific information based on node configuration.
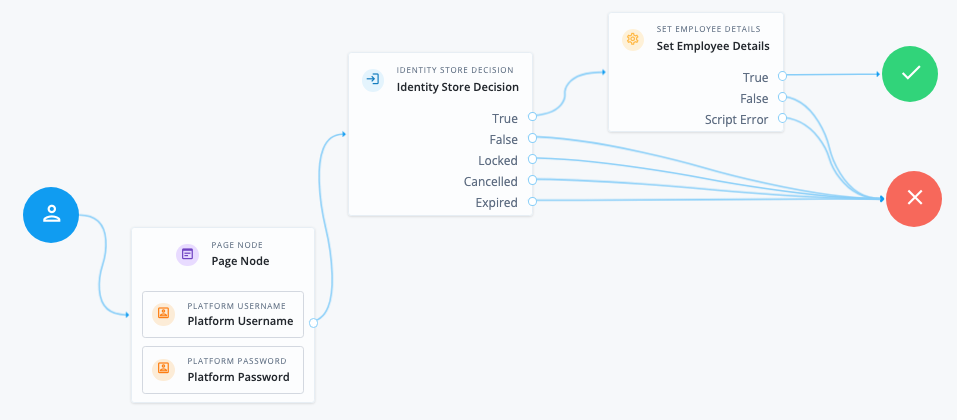
The node is configured with the following values:
- Employee location
-
New York - Employee group
-
AdminSales
For a user, bjensen, the node adds the email address Babs_Jensen@example.com to the
mail identity profile attribute and sets the following data in nodeState:
  ...
  "location": "New York",
  "group": [
      "Admin",
      "Sales"
  ]
  ...
}
Export a custom node
To reuse nodes in other environments, you can export them to a JSON file.
-
In the Advanced Identity Cloud admin console, go to Journeys > Custom Nodes, and click Export.
-
Click Export.
-
The node definitions are downloaded to a JSON file.
|
Exporting custom nodes doesn’t include external dependencies. To make sure exported nodes
work as expected, make a note of any dependencies before you export the node.
Dependencies might include those relied on by bindings that interact with external services
and configuration, for example, You can then use these notes to replicate the dependencies when importing the custom node into a different environment. |
Import a custom node
To reuse custom nodes in other environments, you can import a JSON file containing one or more node definitions.
-
In the Advanced Identity Cloud admin console, go to Journeys > Custom Nodes, and click Import.
-
On the Import Node page, browse to and select a JSON file that contains the node definition to import.
-
Click Import.
Advanced Identity Cloud displays an error if a node of that type already exists or the JSON is invalid.
Delete a custom node
Deleting a custom node is a permanent operation. You can’t retrieve a custom node after it’s deleted.
Delete a custom node in the following ways:
-
In the Advanced Identity Cloud admin console, go to Journeys > Custom Nodes, and click on the node you want to delete. Click More () and choose Delete.
-
In the journey editor, click More () and choose Delete.
| You can’t delete a custom node if it’s used in a journey. |
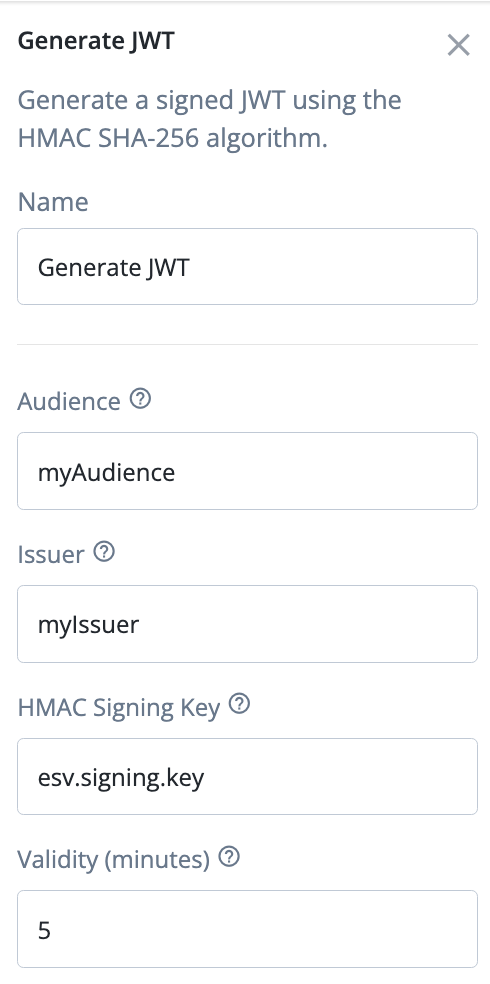
Example: Generate JWT node
This example generates a signed JWT with the HMAC SHA-256 algorithm using the username and journey configuration. It then sets the generated key in shared state.
-
Create a custom node with the following settings:
Name
Generate JWT
Description
Generate a signed JWT using the HMAC SHA-256 algorithm.
Categories
Utilities -
Add properties with the following names and details.
Name
Label
Type
Required
Provide Default Value
audienceAudienceStringEnabled
issuerIssuerStringEnabled
signingkeyHMAC Signing KeyStringEnabled
esv.signing.keyvalidityValidity (minutes)NumberEnabled
5 -
Configure the node settings:
Outcomes
TrueFalseError Outcome
Enabled
-
Paste the following script into the JavaScript editor:
var aud = properties.audience; var iss = properties.issuer; var validity = properties.validity; var esv = properties.signingkey; var signingkey = systemEnv.getProperty(esv); var username = nodeState.get("username"); var data = { jwtType:"SIGNED", jwsAlgorithm: "HS256", issuer: iss, subject: username, audience: aud, type: "JWT", validityMinutes: validity, signingKey: signingkey }; var jwt = jwtAssertion.generateJwt(data); if (jwt !== null && jwt.length > 0) { nodeState.putShared("assertionJwt" , jwt); action.goTo("True"); } else { action.goTo("False"); } -
Create a journey that includes an instance of the new node.
For example:
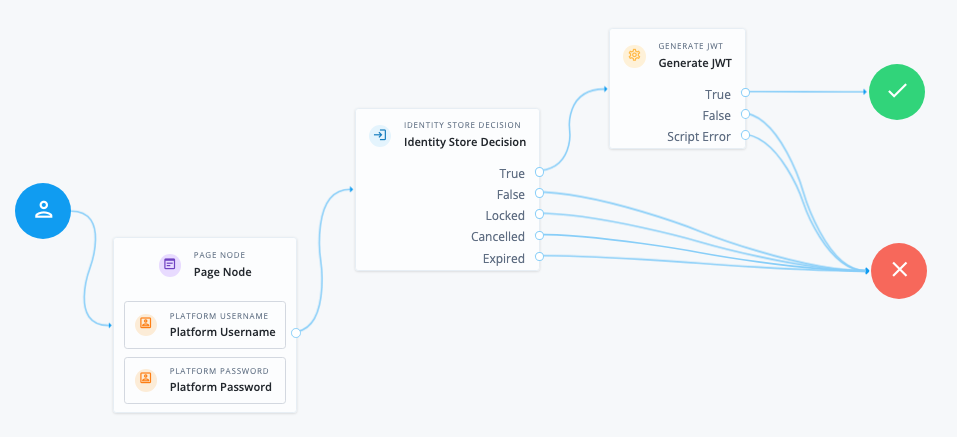
-
Configure the node properties with the following values:
- Audience
-
Enter a valid value for the audience claim.
- Issuer
-
Enter a valid value for the issuer.
- HMAC Signing Key
-
Enter a valid ESV that’s mapped to an HMAC signing secret.
-
Test the journey. Enable debug mode to verify that the JWT is added to shared state:
{
    "realm": "/alpha",
    "assertionJwt": "eyJ0eXAiOiJKV1QiLCJhbGciOiJIUz...rXNQ4QhFeIBC2LiH-Sr72Q4",
    ...
}