Custom attribute for relationships in Advanced Reporting
Advanced Reporting supports custom attributes for relationships in its reports.
When an administrator creates a custom relationship in the native IDM console
for the user identity object, the relationship is available in Advanced Reporting (custom reports) and filters.
A relationship represents a connection between two identity objects, such as users, devices, groups, or roles. Relationships define how these entities interact, enabling hierarchical structures, access controls, and delegation of responsibilities.
|
Advanced Identity Cloud add-on capability
Contact your Ping Identity representative if you want to add Advanced Reporting to your PingOne Advanced Identity Cloud subscription. Learn more in Add-on capabilities. |
Steps
In this example, you have a user who is a developer lead with an Analyst role.
The user supervises other developers in the company.
The tenant administrator creates a relationship,
custom_alpharoles in IDM that represents the connection between two identity objects,
alpha_user and alpha_role.
The general steps are:
Create a custom relationship
-
Sign on to Advanced Identity Cloud admin console as as tenant administrator.
-
Add a custom relationship:
-
Go to Native Consoles > Identity Management.
-
Click Configure > Managed Objects and click Alpha_user.
-
On the Alpha_user page, click Add a property.
-
Scroll down to the bottom of the page and enter the following:
-
For Name, enter
custom_alpharoles.Custom relationships must be prefixed with custom_. Learn more about custom relationships at Create a relationship between two objects. -
For Type, select Relationship.
-
-
Click Next.
-
In the Add Resource modal, select alpha_role for Resource.
-
For Display Properties, select name.
-
-
In the Advanced Identity Cloud admin console, go to Identities > Manage and click Alpha realm - Users.
-
Locate and click your test user to open the Details page.
-
On the Details page, select the Analyst role in the Custom_alpharoles field.
-
Click Save.
-
Create a new report using the custom relationship
-
In the Advanced Identity Cloud admin console, go to Reports.
-
Click New Report.
-
In the New Report modal, enter the following:
-
Name: Enter a descriptive name for the new report.
-
Description (optional): Enter a general description for the report.
-
Who can run: Select Users.
-
-
Click Next.
-
-
Click Data Source.
-
In the Add a Data Source modal, select Users and click Next.
-
On the draft report page, select the properties in the right pane you want to appear in the report. For example:
-
Username
-
First Name
-
Last Name
-
-
-
On the same page in the right pane, scroll down to Related Data Sources.
-
Next to Custom_alpharoles, click and then click Add as Data Source.
-
Scroll down to users/custom_alphaRoles and click Role Name.
You can rearrange the columns by dragging and dropping them in the desired order. -
Click Save.
-
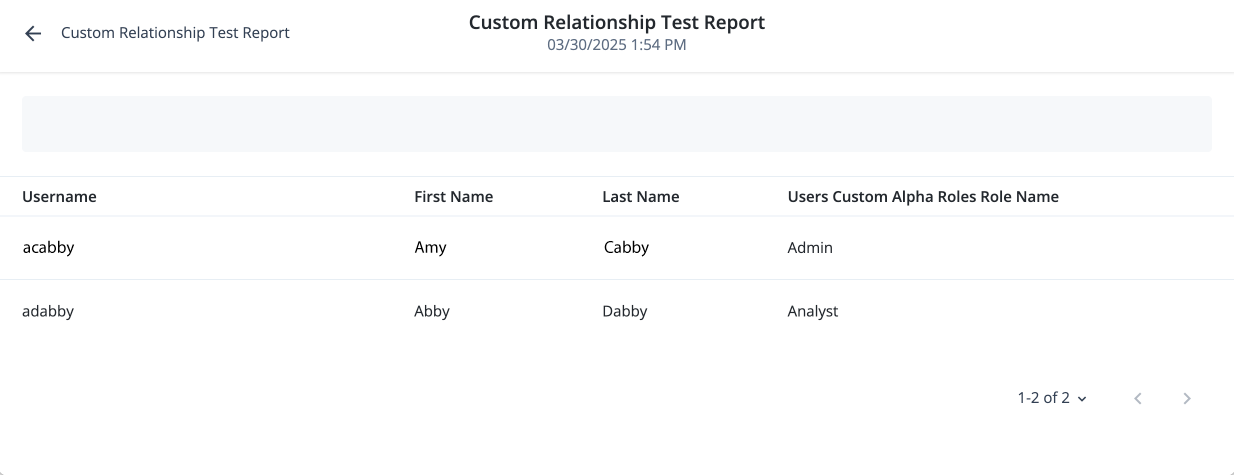
Generate your custom relationship report
-
On the Reports page, locate your custom report and click Run.
-
On your report page, click Run Now.
-
After your report has generated, click View Report.
The report displays all users with a custom relationship.
-
Review your report if you are satisfied with the results, click > Publish to activate it.