Setting up an LDAPS datastore connection in PingFederate
About this task
The self-service password reset capability relies on the LDAP connection to your directory server and the Username PCV to query the required attributes for the chosen reset method.
PingFederate supports the following datastores:
-
PingDirectory
-
Microsoft Active Directory
-
Oracle Unified Directory
-
Oracle Directory Server out-of-the-box
|
This task covers specific configuration settings for this use case. Learn more in Configuring an LDAP Connection (page 871). |
Steps
-
Go to System > Data & Credential Stores > Data Stores, and click Add New Data Store.
-
On the Data Store Type tab, in the Data Store Name field, enter a name for the datastore.
-
In the Type list, select Directory (LDAP). Click Next.
For an Active Directory (AD) datastore, you must issue a certificate from your internal certificate authority (CA) and import it. Follow these substeps to complete the process:
-
For an AD datastore, go to Security > Trusted CAs, and click Import.
-
On the Import Certificate tab, click Choose File and upload the relevant file. Click Next.
-
On the Summary tab, click Save.
-
-
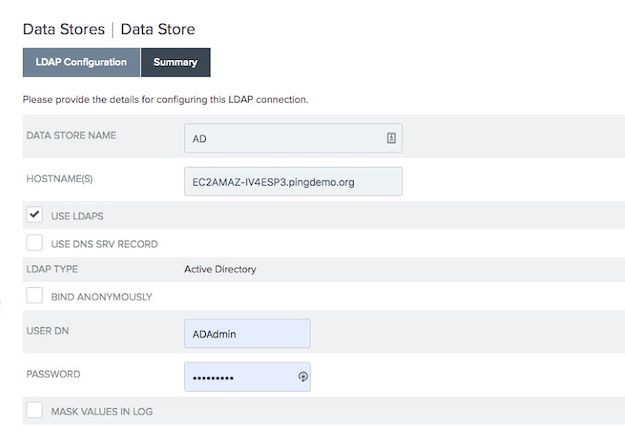
Go to the LDAP Configuration tab:
-
Select the Use LDAPS checkbox.
PingFederate assumes port 389 when the Use LDAPS checkbox is cleared and assumes port 636 when this checkbox is selected. If you are using the default port of 636, you don’t have to specify it in the Hostname(s) field.

-
Enter the user attributes in the User DN and Password fields.
-
If the Password Reset Type is PingID , the user attribute that passes to PingID/> during password reset must be the attribute that is associated with the PingID/> account in PingOne.
-
For an AD datastore, the default user attribute is
sAMAccountName. This does not have to be the attribute you enter into the username field on the account recovery page.
-
-
Enter the attributes you want to use to query in the Search Filter field.
The Search Filter field, commonly used for Office 365 connections, allows you to enter
sAMAccountNameoruserPrincipleName.For example,
(|(sAMAccountName=${username})(userPrincipalName=${username})).If the Password Reset Type is PingID, use a search filter that searches with multiple attributes. You can enter either attribute into the fields, and it passes the username attribute you set in your PCV.
To view or modify this user attribute:
-
Go to System > Data & Credential Store > Password Credential Validators > Password Credential Validators, and select the relevant PCV instance.
-
On the Instance Configuration tab, edit the PingID Username Attribute field.
This is the attribute used for a PingID password reset type.

-
-
-
Click Next.
-
Configure the remaining LDAP settings as needed.
Learn more about the settings in Configuring an LDAP connection (page 871) and Setting advanced LDAP options (page 874).
-
On the Summary tab, click Save.