Configuring a PingFederate SAML connection for CyberArk PVWA
Set up a SAML connection using PingFederate for CyberArk Password Vault Web Access (PVWA).
Steps
-
Go to Applications → Integration → SP Connections, and click Create Connection.
Result:
The SP Connection page opens.
-
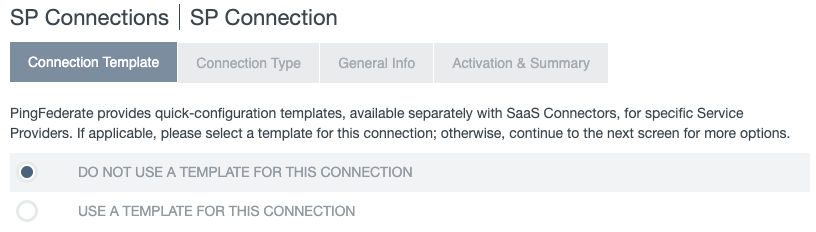
On the Connection Template tab, select Do not use a template for this connection. Click Next.
-
On the Connection Type tab, select the Browser SSO Profiles checkbox. Click Next.
-
On the Connection Options tab, make sure that the Browser SSO checkbox is selected. Click Next.
-
On the Import Metadata tab, select None. Click Next.
-
On the General Info tab:
-
In the Partners Entity ID (Connection ID) field, enter
PasswordVault. -
Enter a Connection Name value.
-
Click Next.
-
-
On the Browser SSO tab, click Configure Browser SSO.
Result:
The Browser SSO page opens.
-
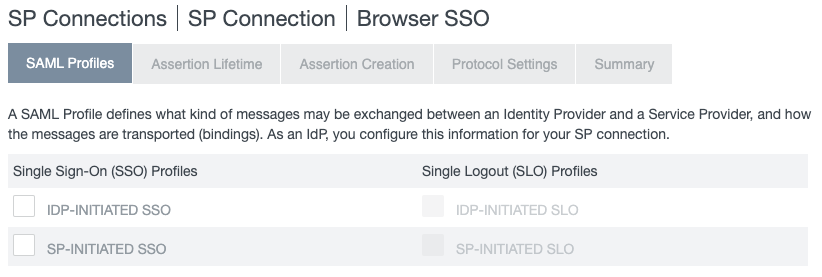
On the SAML Profiles tab, select the IDP-Initiated SSO and SP-Initiated SSO checkboxes. Click Next.
-
On the Assertion Lifetime tab, in the Minutes Before and Minutes After fields, either leave the default setting of
5or enter a different parameter value. Click Next. -
On the Assertion Creation tab, click Configure Assertion Creation.
Result:
A new Assertion Creation page opens.
-
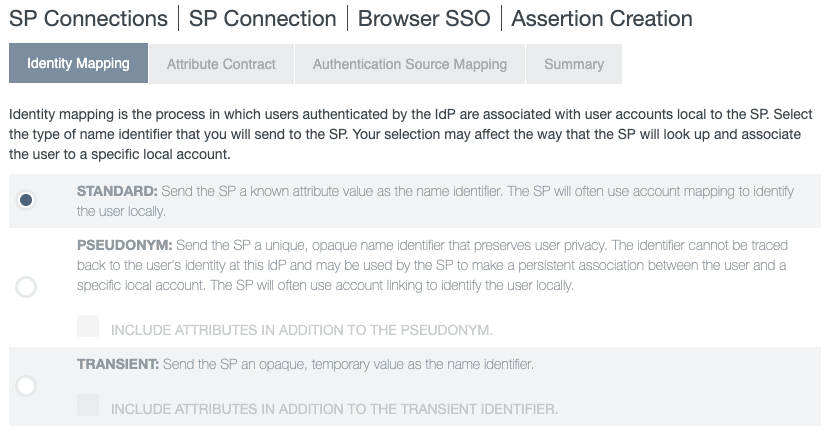
On the Identity Mapping tab, select Standard as the type of name identifier to send to the service provider. Click Next.
-
On the Attribute Contract tab, in the SAML_SUBJECT row, in the Subject Name Format list, select an option. Click Next.
The Extend the Contract field isn’t required.
-
Add a policy contract:
Choose from:
-
Select an existing policy contract by clicking on its name.
-
Create a new policy contract adapter for authentication:
-
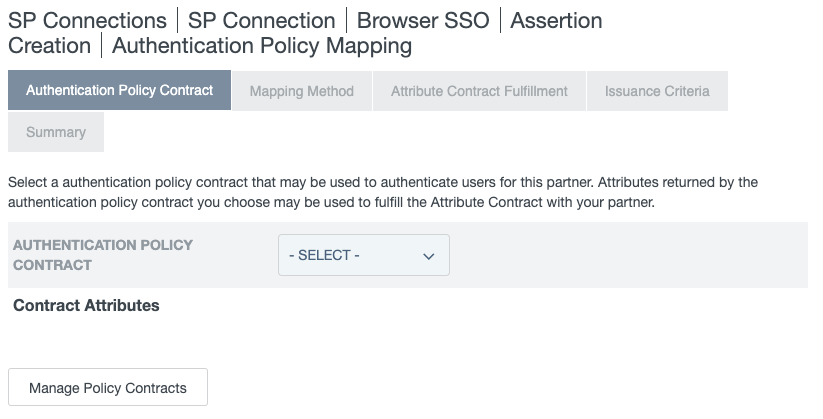
On the Authentication Source Mapping tab, click Map New Authentication Policy.
The Authentication Policy Mapping page opens.
-
On the Authentication Policy Contract tab, click Manage Policy Contracts.
The Policy Contracts page opens.
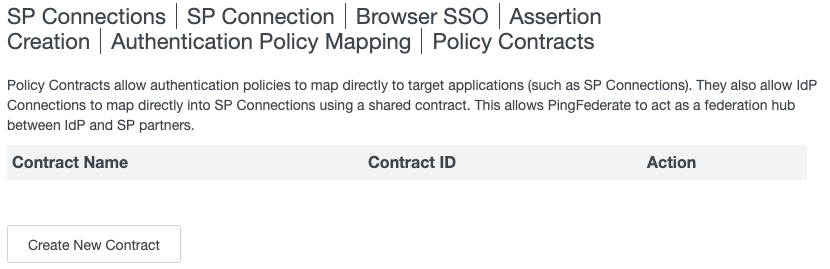
-
Click Create New Contract.
-
The Authentication Policy Contract page opens.
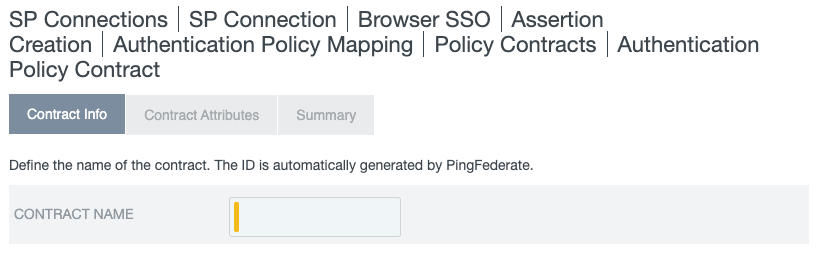
-
On the Contract Info tab, in the Contract Namefield, enter a name. Click Next.
-
On the Contract Attributes tab, click Next.
-
On the Summary tab, click Save.
-
Click Done to return to the Authentication Policy Mapping page.
-
-
Map the authentication policy:
-
On the Authentication Policy Contract tab, in the Authentication Policy Contract list, select the desired policy contract. Click Next.
-
On the Mapping Method tab, click Next.
-
On the Attribute Contract Fulfillment tab, in the Source list, select an option.
-
In the Value field, enter a value.
-
Click Next.
-
On the Issuance Criteria tab, click Next.
-
On the Summary tab, click Done to return to the Assertion Creation page.
-
On the Authentication Source Mapping tab, click Next.
-
On the Summary tab, click Done to return to the Browser SSO page.
-
-
Configure the protocol settings:
-
On the Assertion Creation tab, click Next.
-
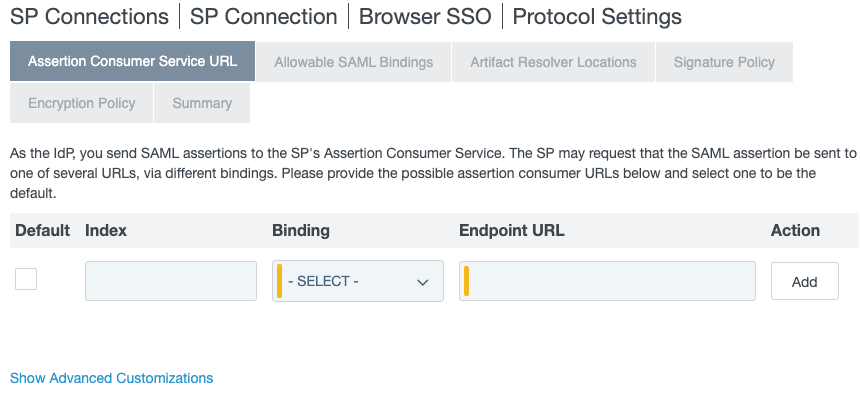
On the Protocol Settings tab, click Configure Protocol Settings.
Result:
A new Protocol Settings page opens.
-
On the Assertion Consumer Service URL tab, enter the values as described in the following table.
Value Entry Index
0Binding
POSTEndpoint URL
-
For PVWA version 9, enter
https://<your PVWA address>/passwordvault/auth/saml/. -
For PVWA version 10, enter
https://<your PVWA address>/passwordvault/api/auth/saml/logon.
-
-
To set a particular assertion consumer URL as the default, select the Default checkbox in the applicable row and click Add. Click Next.
-
On the Allowable SAML Bindings tab, clear the Artifact and SOAP checkboxes. Click Next.
-
On the Signature Policy tab, make sure that all the checkboxes are cleared. Click Next.
By default, no checkboxes are selected.
-
On the Encryption Policy tab,verify the None is selected. Click Next.
-
On the Summary tab, click Done to return to the Browser SSO page.
-
On the Protocol Settings tab, click Next.
-
On the Summary tab, click Done to return to the SP Connection page.
-
-
On the Browser SSO tab, click Next.
-
Complete the credentials configuration:
-
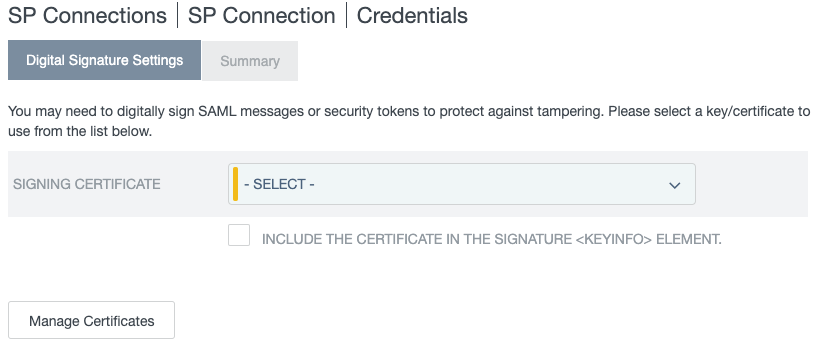
On the Credentials tab, click Configure Credentials.
Result:
The Credentials page opens.
-
In the Signing Certificate list, select the option to use for CyberArk (RSA SAH256).
This certificate is provided to CyberArk in the SAML validation process.
-
Click Next.
-
On the Summary tab, click Done to return to the SP Connection page.
-
On the Credentials tab, click Next.
-
-
On the Activation & Summary tab, from the SSO Application Endpoint field, copy the IdP-initiated URL.
-
Click Save.