Setting up verified trust for help desk account recovery using PingOne
The Verified Trust for Workforce Help Desk Solution provides a robust approach for confirming a user’s identity before performing sensitive account actions, such as password resets. This solution lets authorized help desk agents initiate real-time verification requests using government IDs and liveness-checked selfies. This ensures that agents can perform account recovery services with high confidence that the end user is who they say they are.
To implement this solution in your environment, you’ll take our pre-built PingOne DaVinci flow and configure the PingOne Verify connector with your environment and policy information. You’ll also determine what next steps to take in the account reset journey.
Goals
After completing this use case, you’ll know how to do the following:
-
Execute a guided journey where an agent verifies a workforce employee’s identity in real time to securely authorize account recovery.
-
Configure PingOne Verify to validate government-issued IDs and liveness (selfies) as part of an identity verification policy.
-
Configure the DaVinci orchestration flow to manage the interaction between the help desk agent’s portal and the end user’s verification experience.
What you’ll do
In this use case, you’ll learn how to implement the Verified Trust for Workforce Help Desk Solution by doing the following in DaVinci:
-
Import the pre-built flow.
-
Configure the PingOne Verify connector.
-
Specify a PingOne Verify policy to use.
-
Specify a PingOne group authorized to perform an account reset.
-
Review key optional configurations.
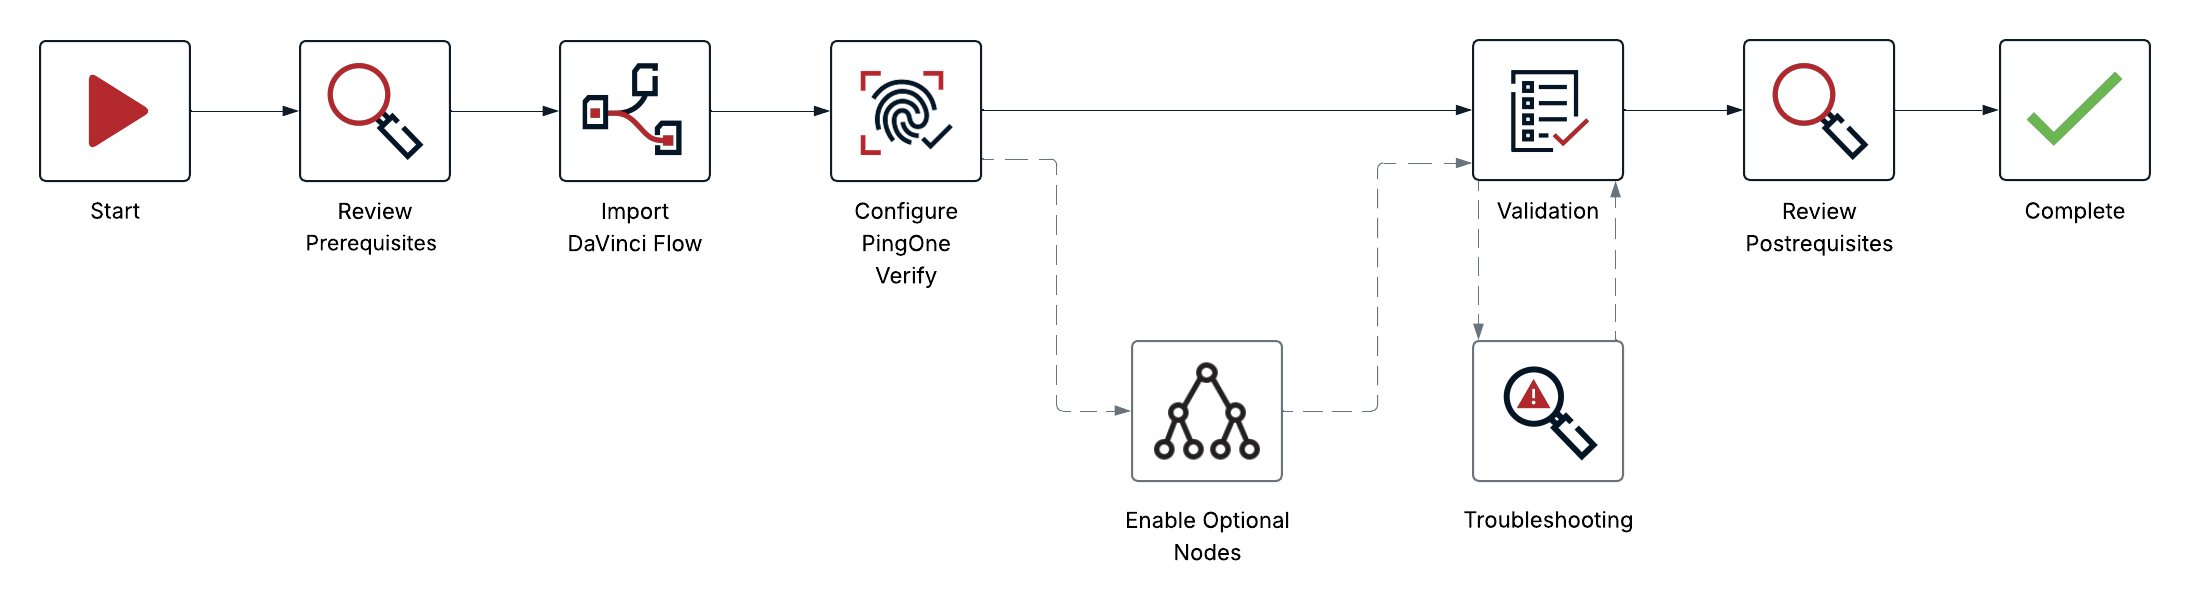
The following diagram provides a high-level overview of the implementation workflow. You can refer back to this map as you work through the steps.
Before you begin
Ensure you have the following:
-
A basic understanding of PingOne Verify
-
Proficiency in:
-
A PingOne test environment with the following services:
-
PingOne SSO
-
Already configured for authentication with DaVinci
-
Populated with test user data
-
-
DaVinci
-
PingOne Verify
-
-
Access to your PingOne test environment with the Environment Admin role assigned
If you want to extend the solution’s functionality for external identity providers (IdPs) and optional services, as described in Task 4, you’ll need the following additional prerequisites:
-
A configured external IdP in PingOne
-
A ServiceNow license and administrator access to your account
-
A Jira license and the ability to generate a bearer authorization token
Learn more about the concepts and components used in this solution in the Concepts section.
Tasks
Task 1: Importing the DaVinci flow
Learn how to import the pre-built DaVinci flow into your test environment.
The DaVinci flow authenticates a help desk agent and confirms their authorization to reset accounts. The agent then specifies an end user and sends them a verification request. The end user verifies their identity and performs a liveness check, which the agent monitors from a real-time dashboard.
Steps
-
Download the Verified Trust for Workforce Help Desk Solution from the Ping Identity Marketplace.
-
In your DaVinci test environment, on the Flows tab, click Add Flow and select Import Flow.
-
Upload the
verified-trust-for-workforce-helpdesk-solution.jsonflow and confirm that the Import Flow modal displays the following:-
In the Main Workflow field:
Help Desk Agent Login and End User Verification -
In the Subflows field:
Help Desk Verify Evaluation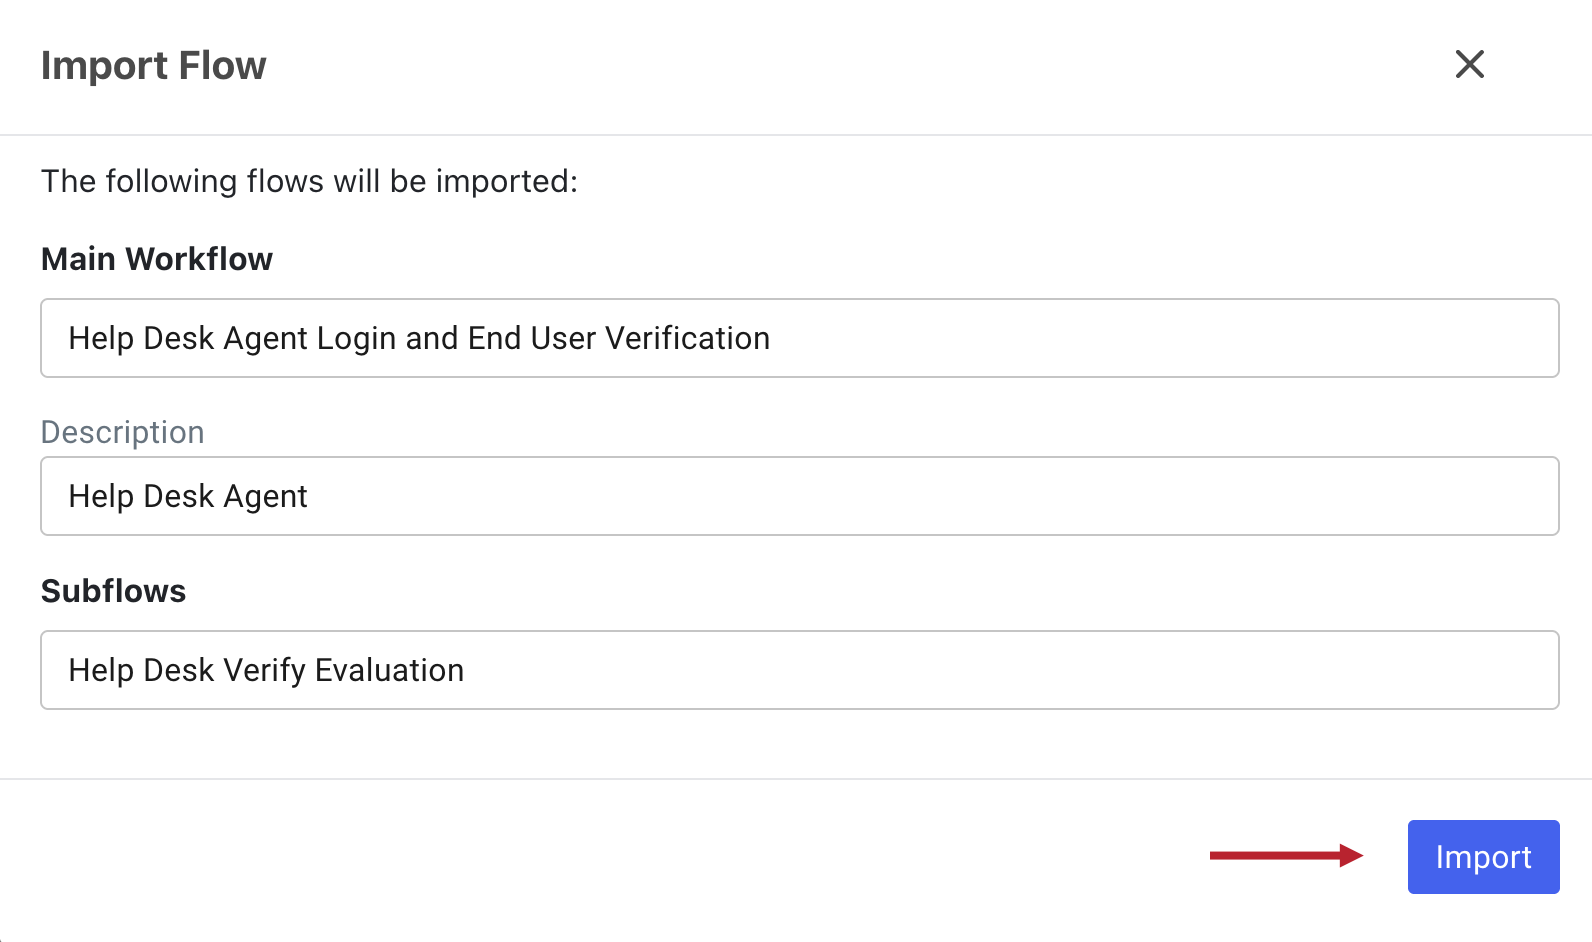
-
-
Click Import.
Task 2: Configuring PingOne Verify components to verify end users
Learn how to specify which PingOne Verify policy to use and how to configure the PingOne Verify connector to communicate with your PingOne test environment.
Steps
-
In the PingOne admin console, go to your test environment, and then go to Applications > Applications.
-
Click the PingOne DaVinci Connection application to open the details panel. The Overview tab contains values for Environment ID, Client ID, and Client Secret.
You’ll use these to configure the PingOne Verify connector, so keep this panel open.
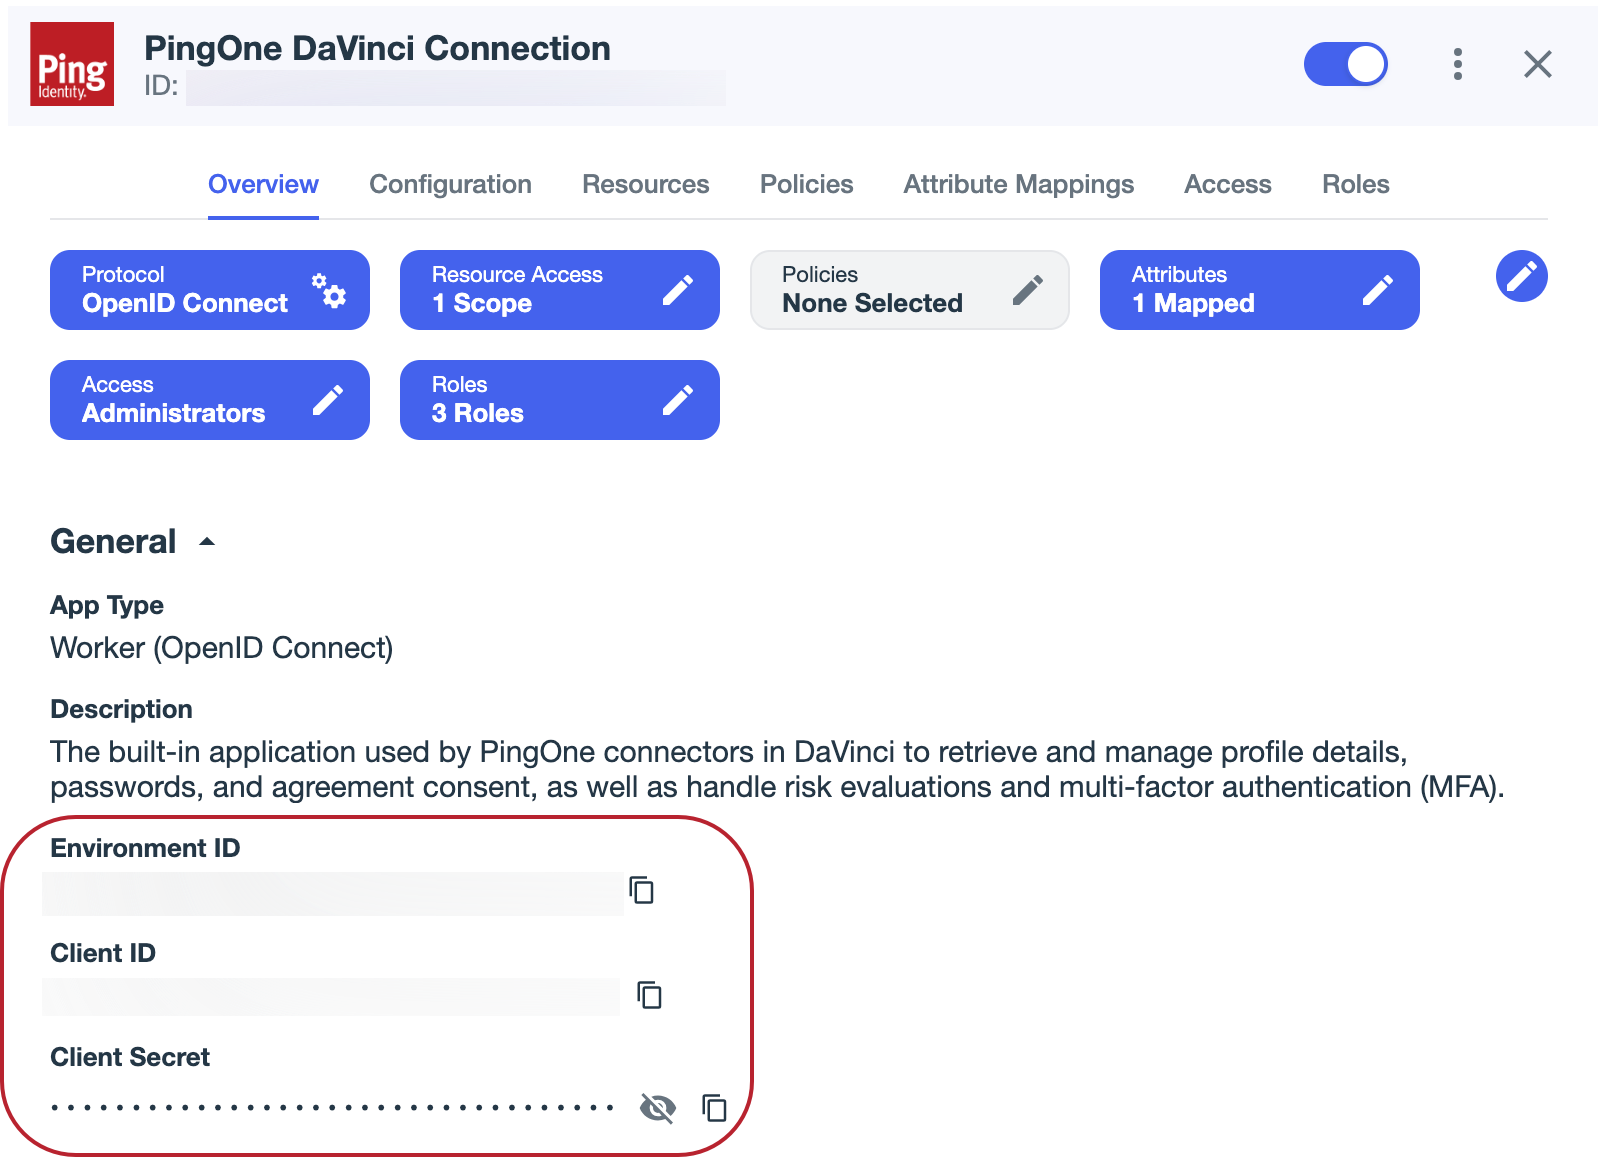
PingOne automatically creates the PingOne DaVinci Connection application when you deploy the DaVinci service. The application enables PingOne and DaVinci to communicate with each other.
-
To open DaVinci, click DaVinci.
-
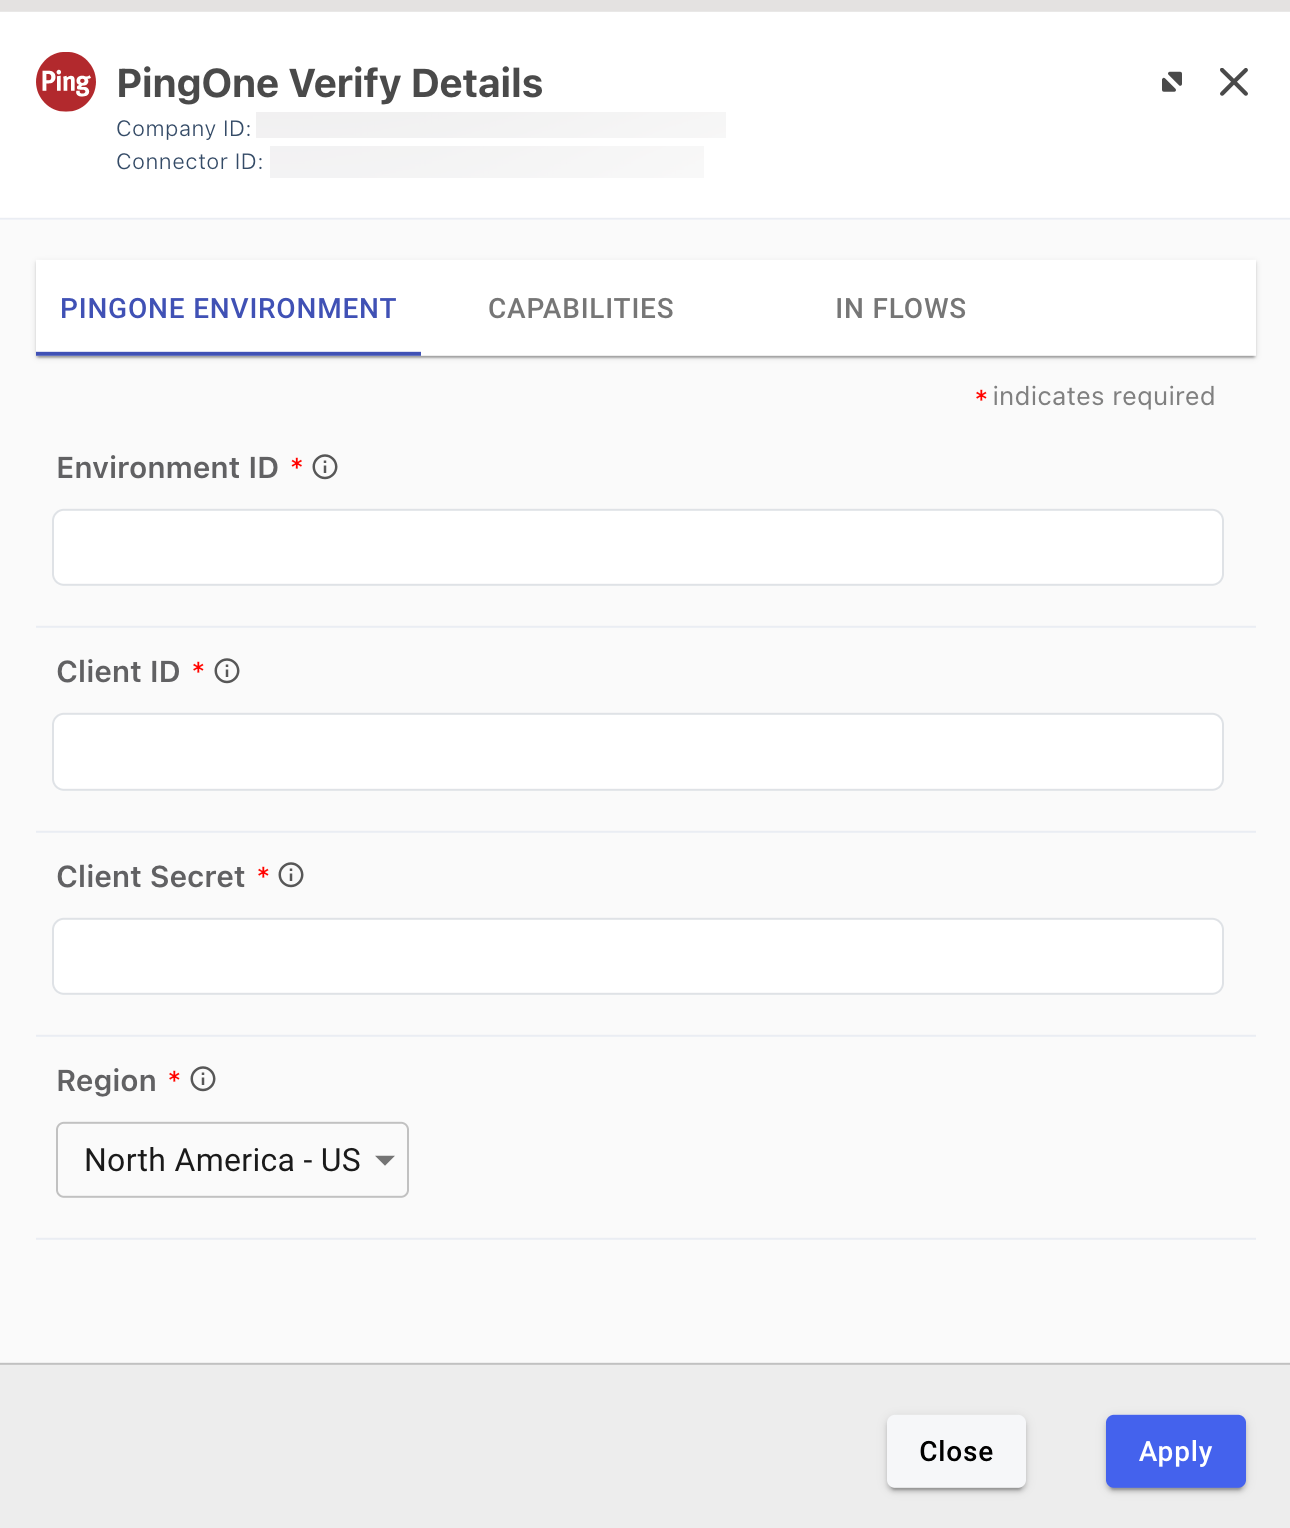
On the Connectors tab, click PingOne Verify in the list of connectors to open the PingOne Verify Details modal.
-
Go back to your PingOne test environment. In the PingOne DaVinci Connection details panel, click the Copy icon to copy the Environment ID value.
-
Paste the value of Environment ID into the Environment ID field of the PingOne Verify Details modal in DaVinci.
-
Repeat the previous two steps for Client ID and Client Secret.
-
In the PingOne Verify Details modal, click Apply.
You’ve now successfully configured the PingOne Verify connector.
-
In the PingOne admin console, go to your test environment, and then go to Identity Verification > Verify Policies.
-
Click Default Verify Policy to open the policy details panel.
-
Copy the ID value at the top of the panel. This is the PingOne Verify policy ID.
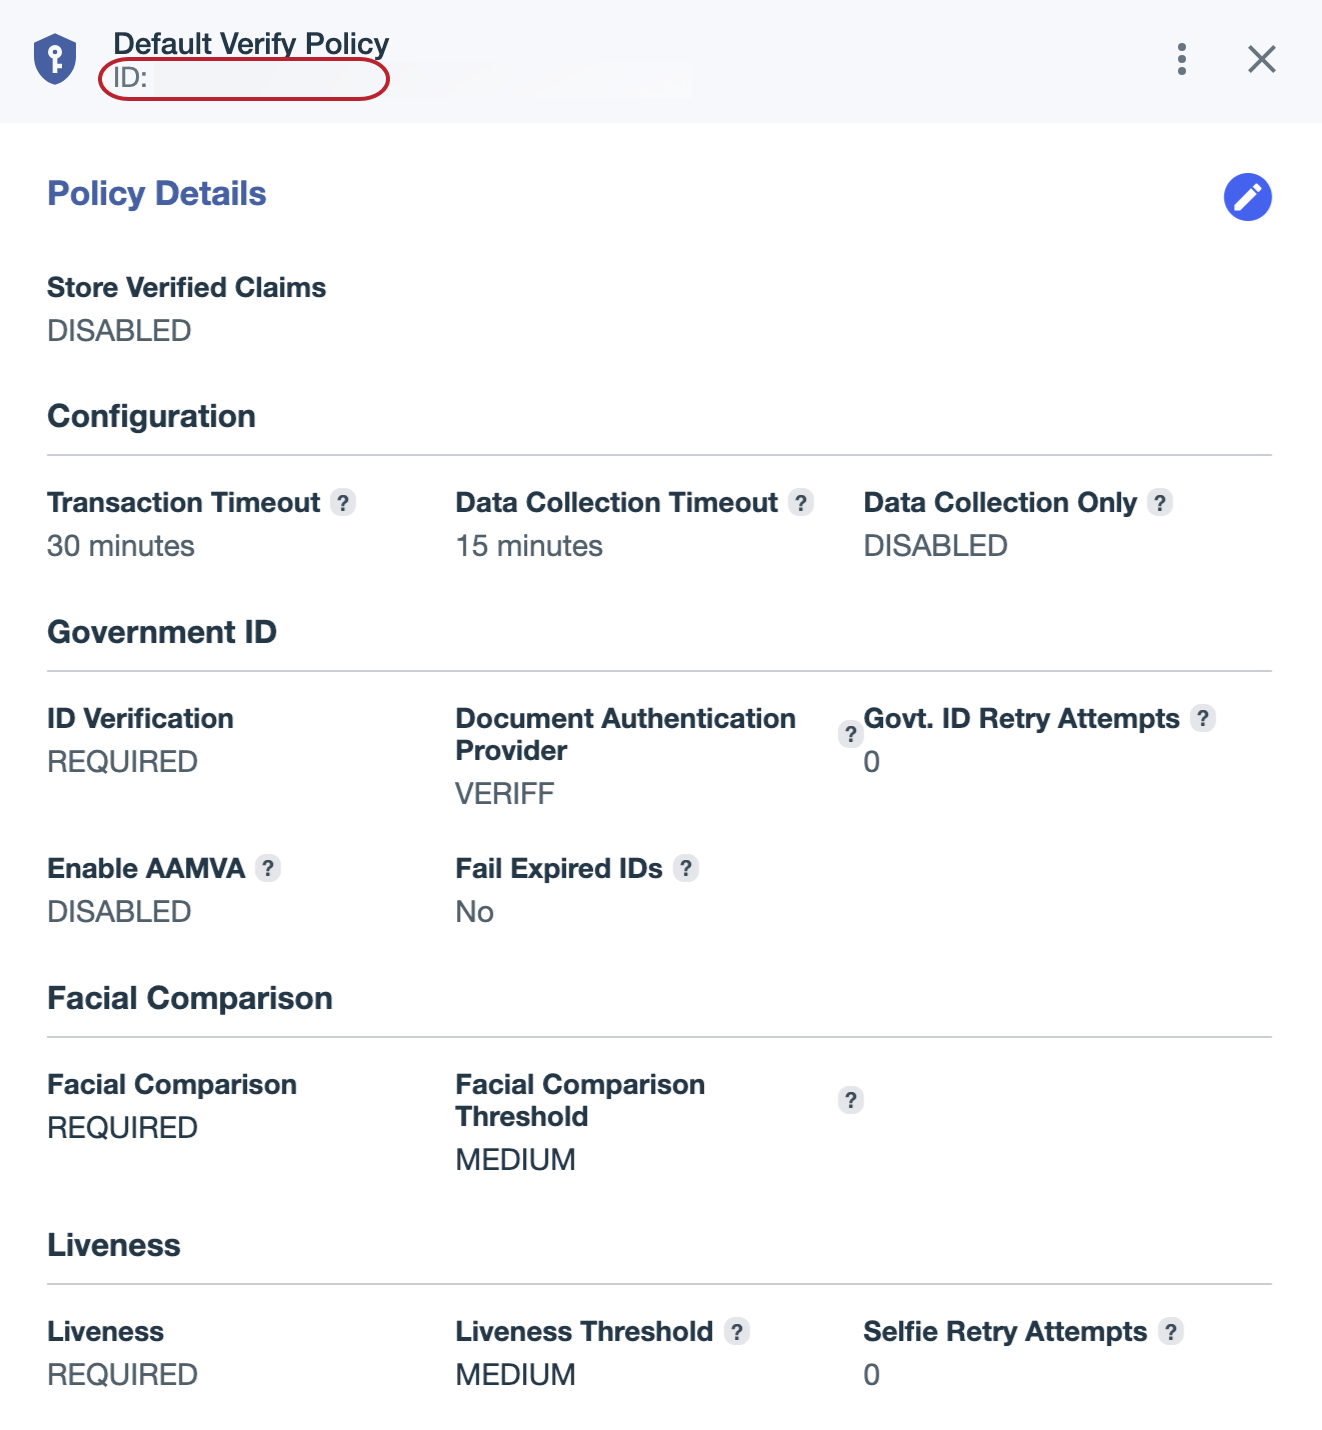
The default policy is sufficient for testing purposes, but might not be appropriate for production environments.
You should configure a custom PingOne Verify policy appropriate for use in your organization’s production environments before deploying this solution outside of a test environment. Learn more in Identity verification using PingOne Verify.
-
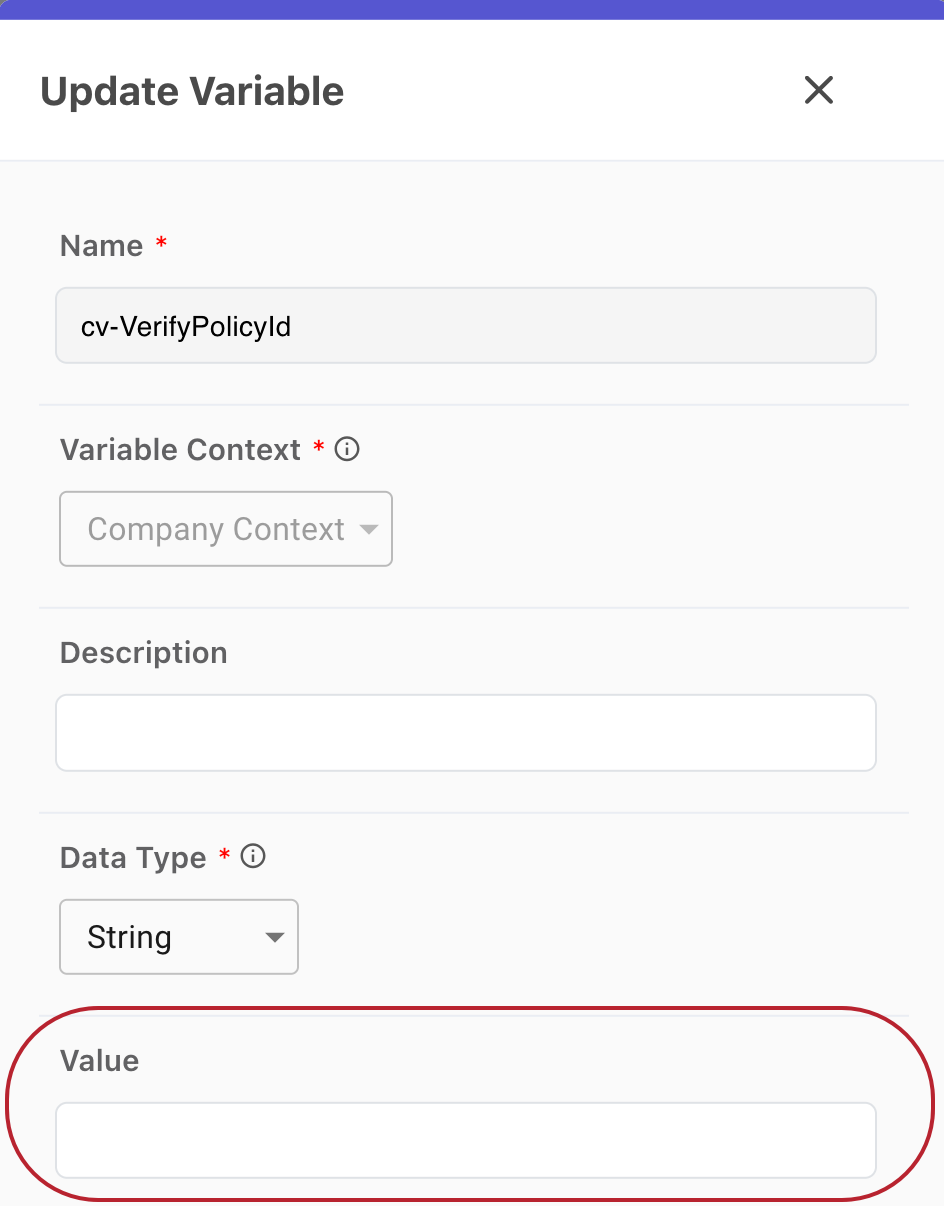
In DaVinci, click the Variables tab.
-
Locate the cv-VerifyPolicyId variable and click Edit to open the Update Variable modal.
-
Paste the value of ID (from the Default Verify Policy) into the Value field and click Update.
You’ve now configured the PingOne Verify policy that the flow will use to verify end users.
Task 3: Configuring the admin group for account recovery
Learn how to authorize help desk agents to perform account resets by specifying an admin group in the Help Desk Agent Login and End User Verification flow.
Steps
-
In the PingOne admin console, create a group in your test environment and add a user that is allowed to perform account resets. Learn more in Create a group.
-
Copy the group name. You’ll use this name to configure a Functions connector named Group Check.
-
To open DaVinci, click DaVinci.
-
On the Flows tab, select Help Desk Agent Login and End User Verification.
-
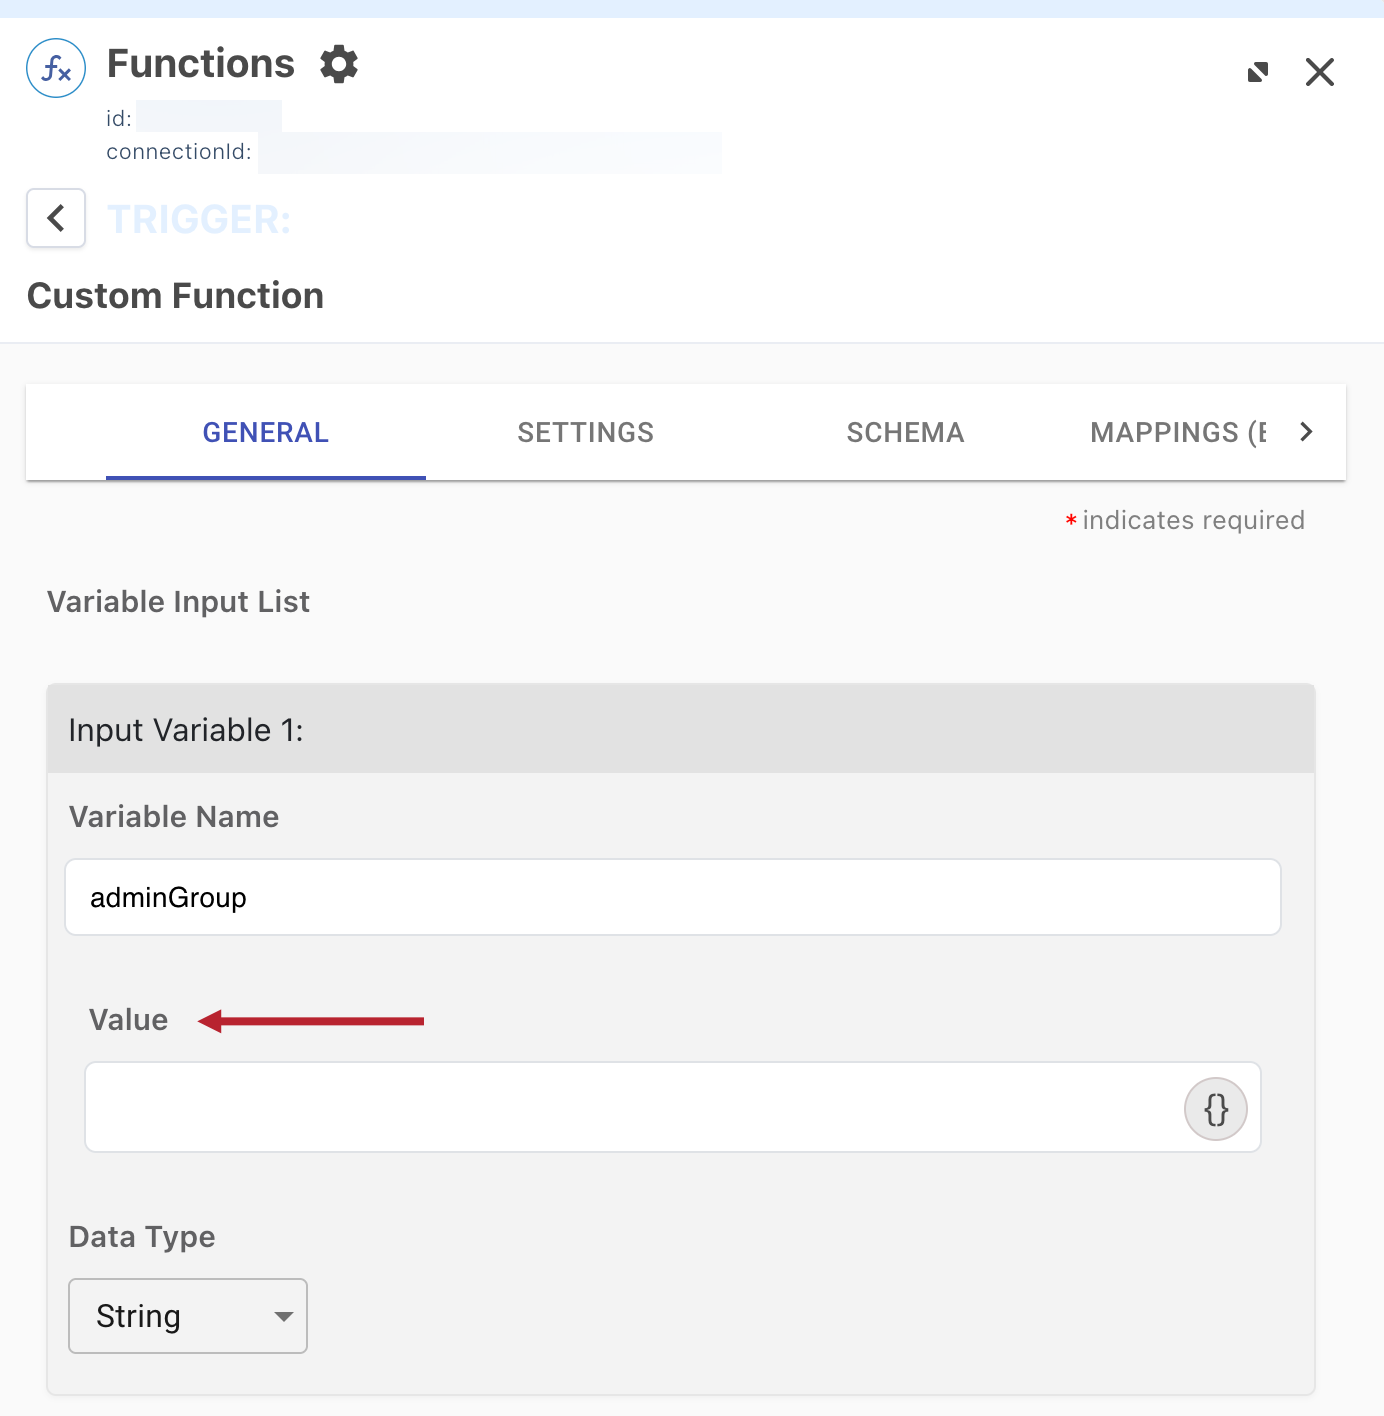
In the DaVinci flow canvas, go to the Verification Experience section and click the Functions connector named Group Check.
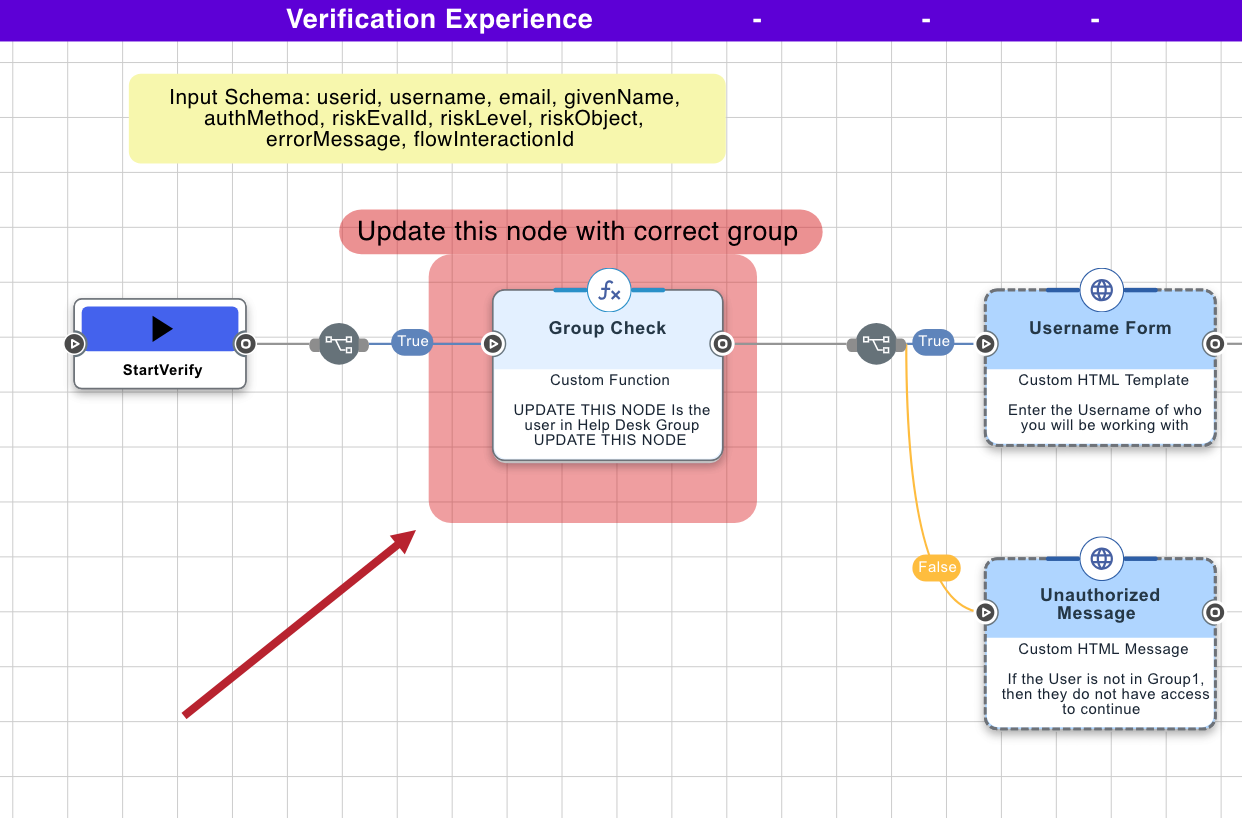
-
On the General tab of the Functions configuration panel, enter the PingOne group name in the Value field for Input Variable 1. Click Apply.
-
At the top of the DaVinci canvas, click Deploy to deploy the configured flow in your test environment.
Result
You’ve now configured the PingOne group authorized to perform account recovery.
|
You’ve now completed the standard configuration for the Verified Trust for Workforce Help Desk Solution. The following task extends the solution’s functionality for external IdPs and additional services. If you’re not extending the solution, skip to the Validation section. |
(Optional) Task 4: Enabling optional nodes for expanded functionality
The provided DaVinci flow and subflow contain optional nodes that you can enable and configure. However, you can still take full advantage of the Verified Trust for Workforce Help Desk Solution without performing these steps.
Adding an external IdP
You can add an external IdP to authenticate the end user whose account is being verified for recovery. The help desk agent will continue to authenticate using PingOne.
Steps
-
In the PingOne admin console, go to your test environment, and then go to Integrations > External IdPs. Copy the ID number listed below the name of your external IdP.
-
In DaVinci, open the Help Desk Agent Login and End User Verification flow and navigate to the Verification Experience section of the canvas.
-
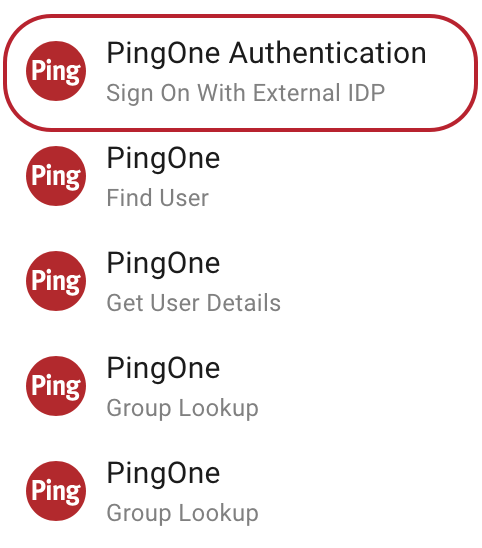
Right-click the PingOne connector named Find User and select Disable. The node should become grayed out.
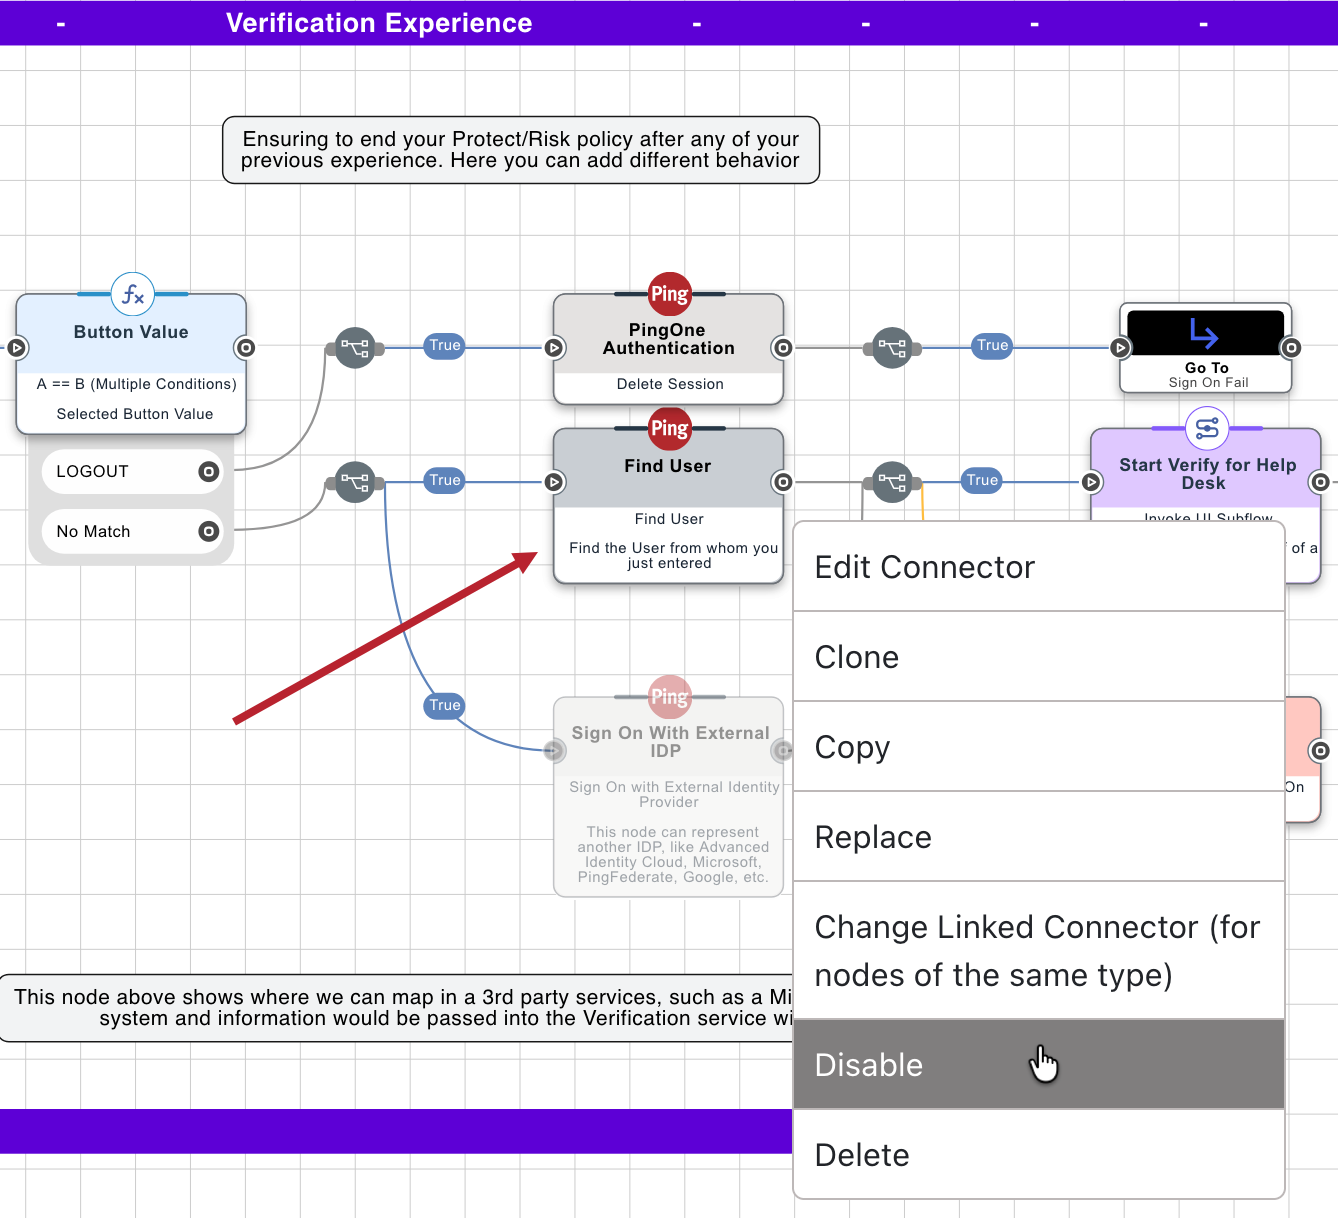
-
Right-click the grayed-out PingOne Authentication connector named Sign On with External Identity Provider and select Enable.
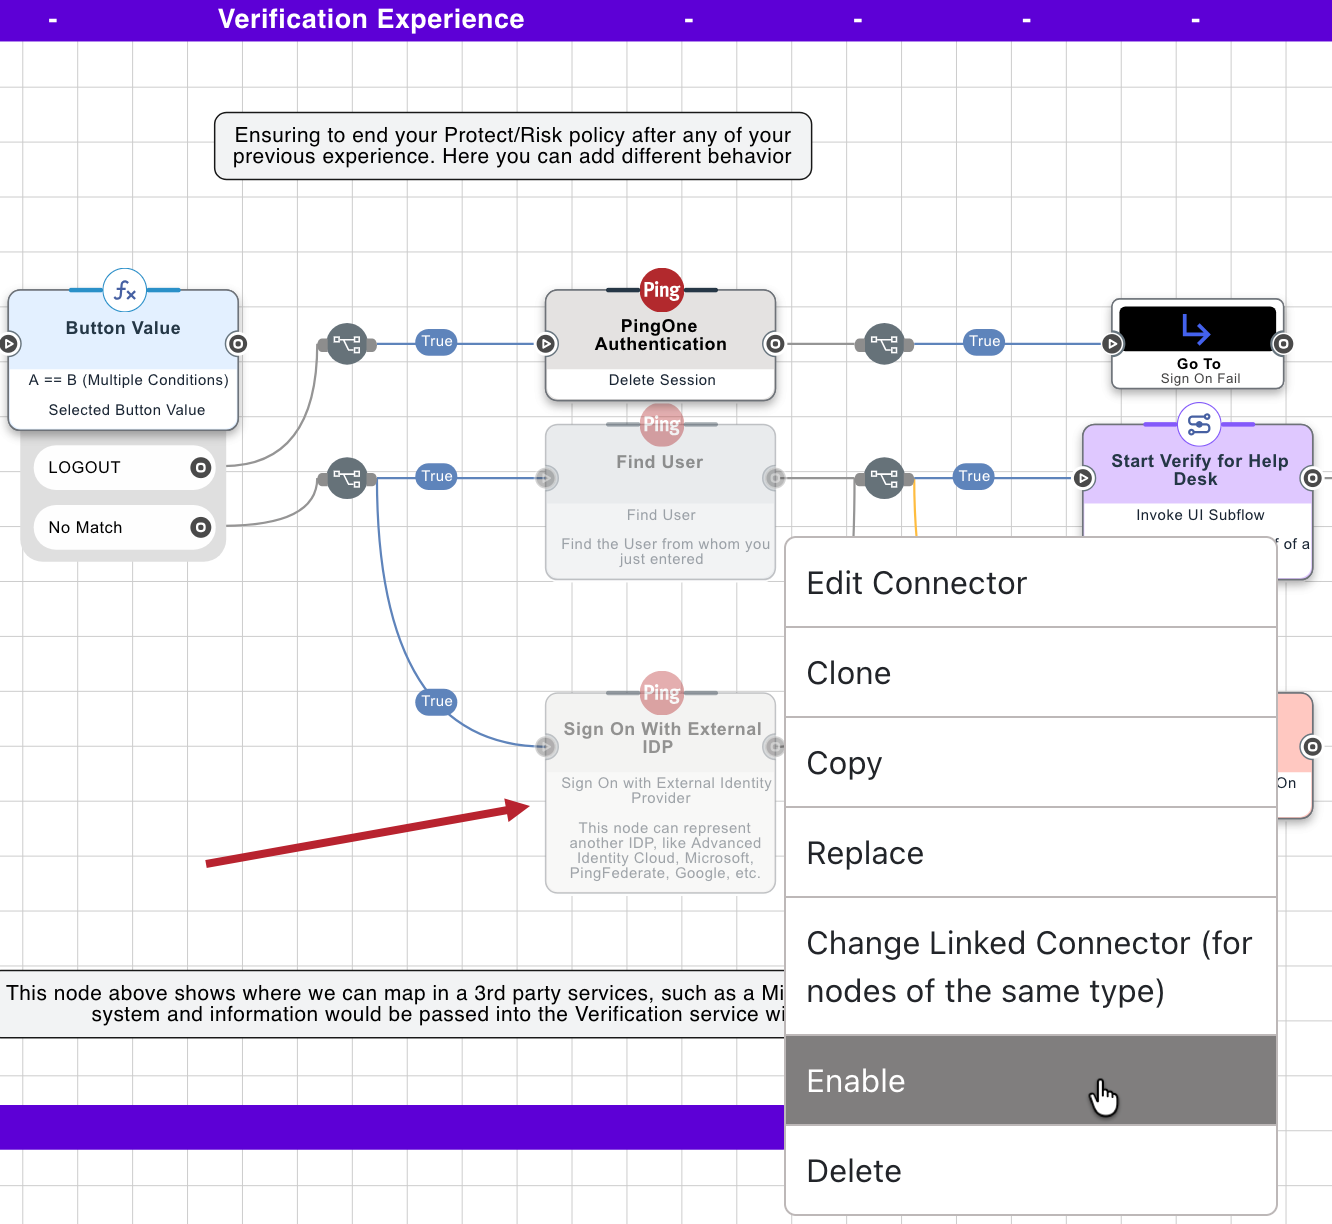
-
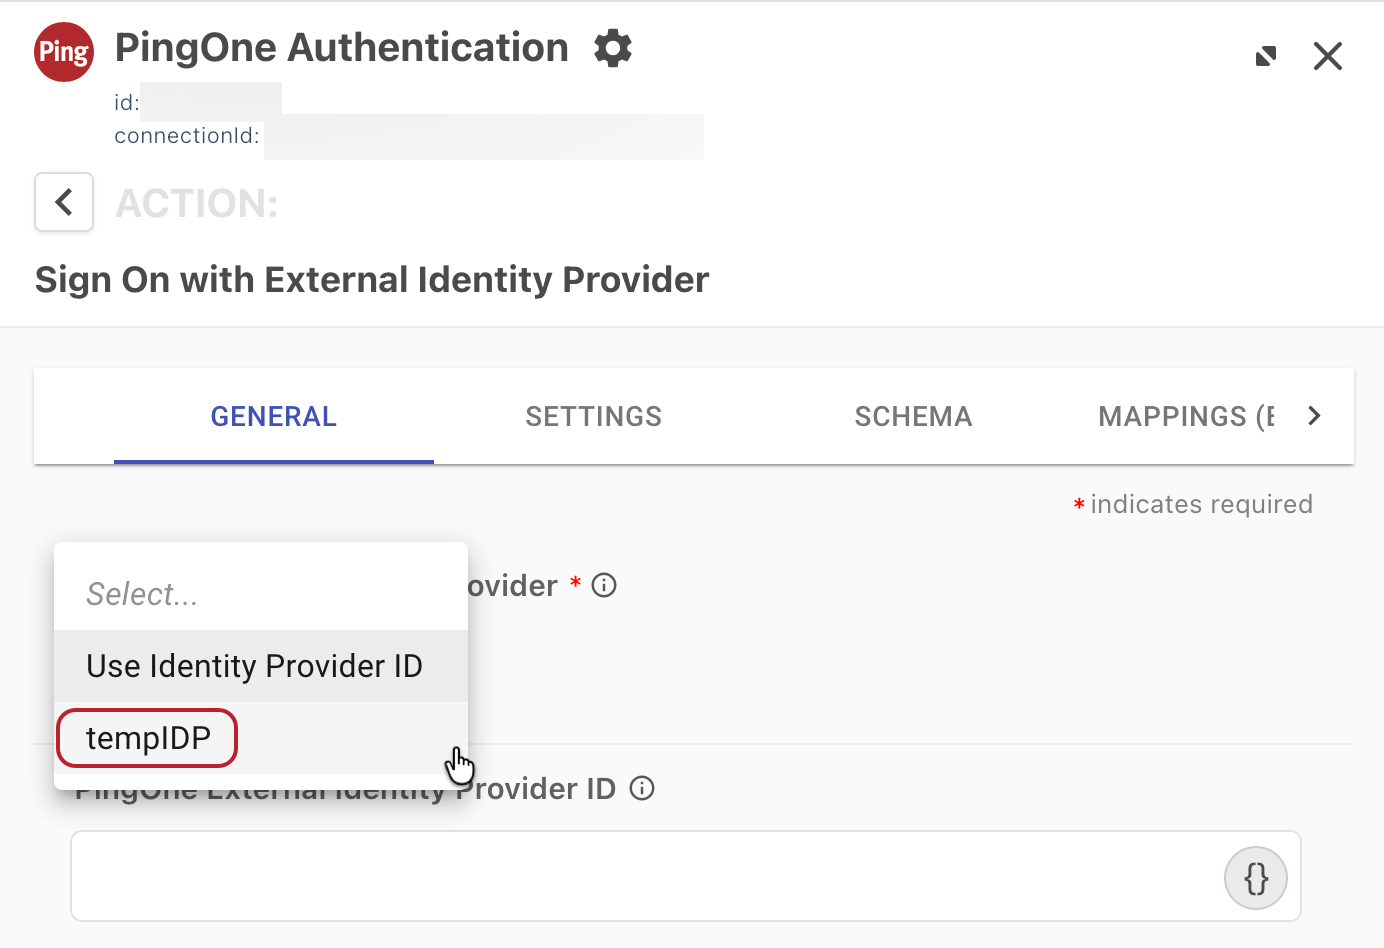
Click the Sign On with External Identity Provider connector.
-
In the PingOne External Identity Provider list, select your external IdP. Alternatively, you can enter the ID number of the external IdP in the PingOne External Identity Provider ID field. Click Apply.
-
Click the Flow connector named Start Verify for Help Desk.
-
On the General tab, do the following:
-
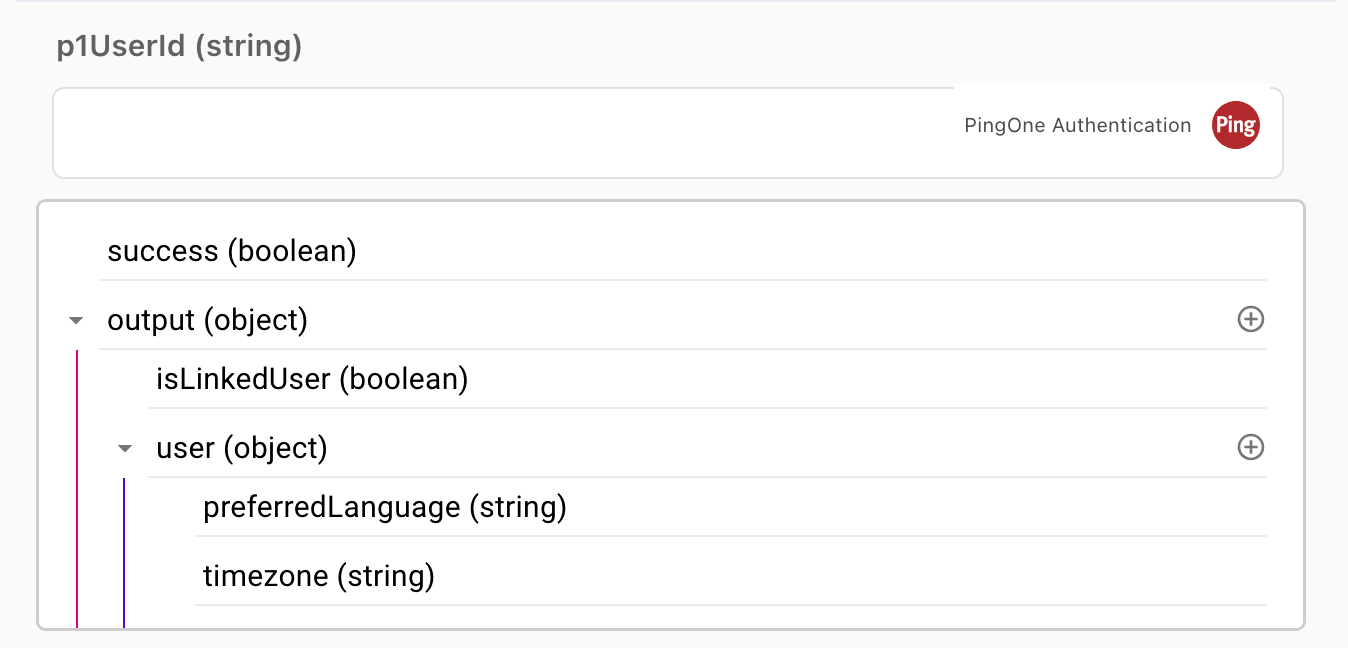
Configure the p1UserId field:
-
Clear the existing value.
-
Click {}, and then click to enable the Show all nodes toggle.
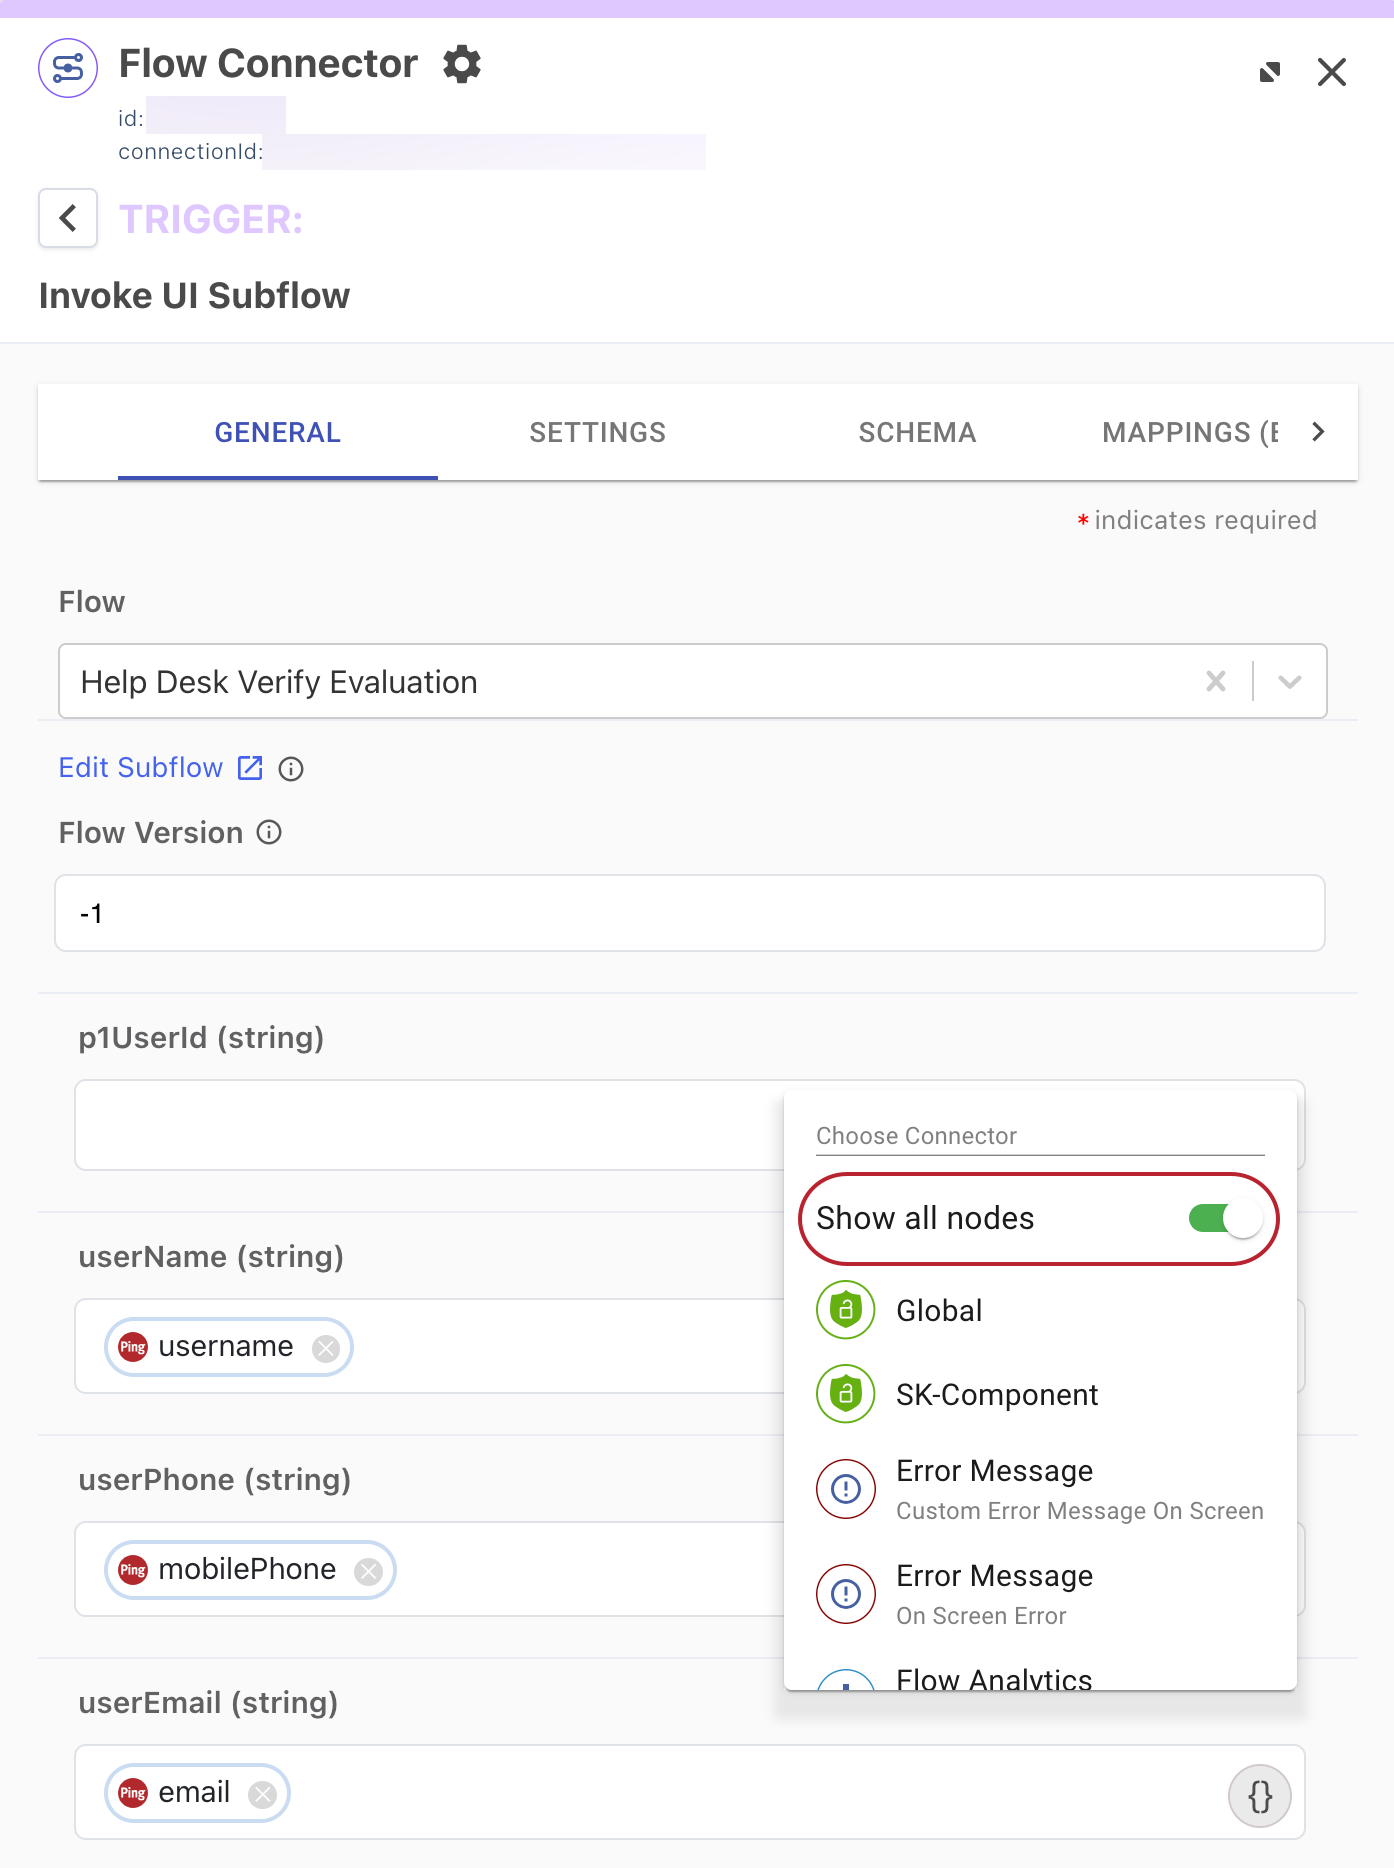
-
In the Choose Connector list, select the PingOne Authentication node named Sign On With External IDP.
A list of available objects and variables displays below the p1UserId field.
-
In the list, go to output > user and select id.
This populates an id attribute in the p1UserId field. Click above the field to close the list.
Verify that you selected the id attribute for user and not for identityProvider.
-
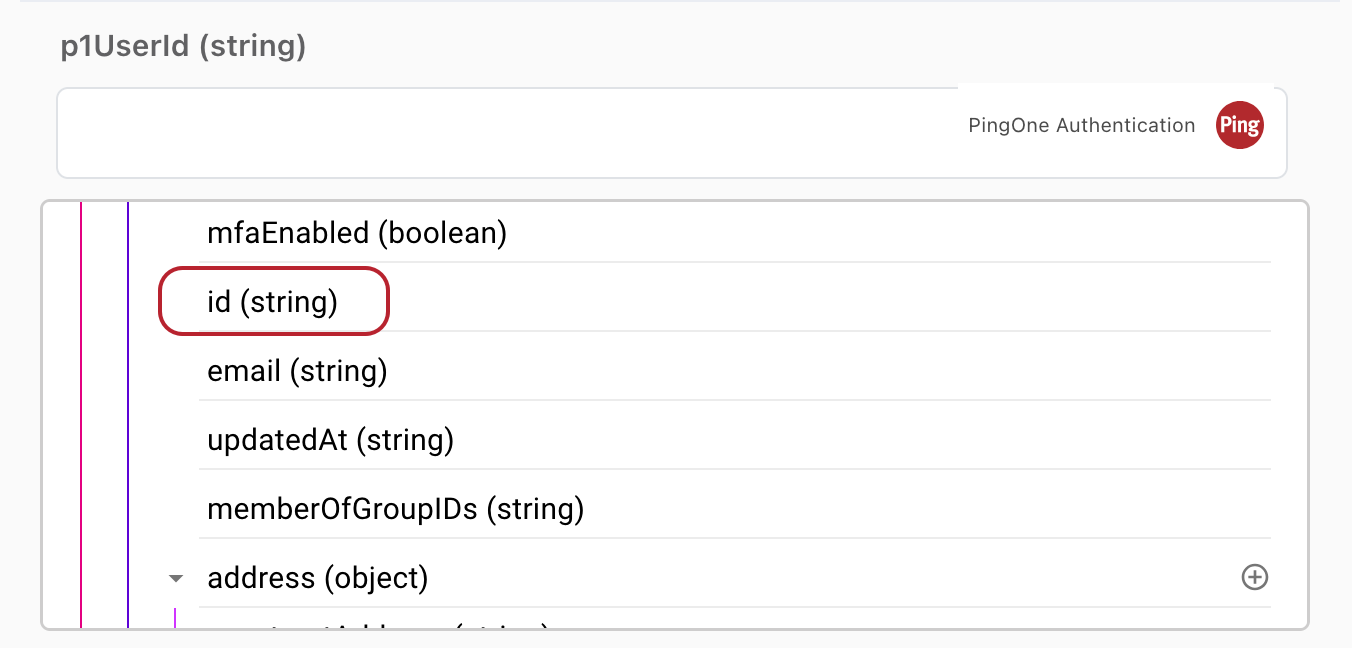
-
Update all of the remaining user fields, from userName to userReferencePhoto, with the corresponding user attribute names from your external IdP. This step maps your user attributes to the PingOne schema, enabling the solution to correctly verify your users.
-
Clear any user fields that don’t apply for your users.
-
Click Apply.
-
-
At the top of the DaVinci canvas, click Deploy to redeploy the updated flow in your test environment.
Recording end-user verification failures
You can create a Jira ticket or a ServiceNow incident to record any end-user verification failures for further action.
|
You can choose to enable and configure one or both of these services. |
Steps to enable Jira
-
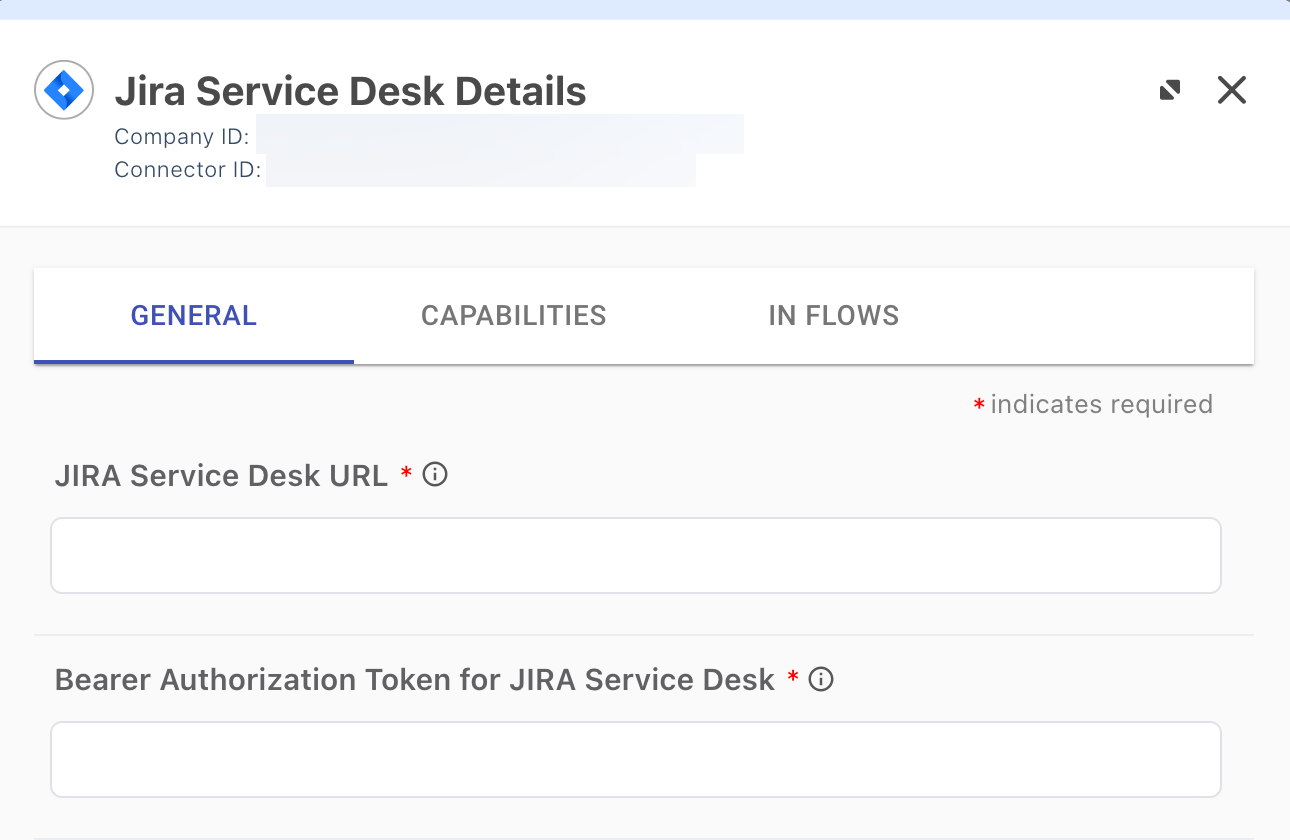
On the DaVinci Connectors tab, from the list of connectors, select Jira Service Desk.
-
In the Jira Service Desk Details modal, configure the required fields according to the Jira connector documentation and click Apply.
-
On the Flows tab, select the Help Desk Verify Evaluation flow and go to the Verification Failure section of the canvas.
-
Right-click the grayed-out Create Jira Ticket connector and select Enable.
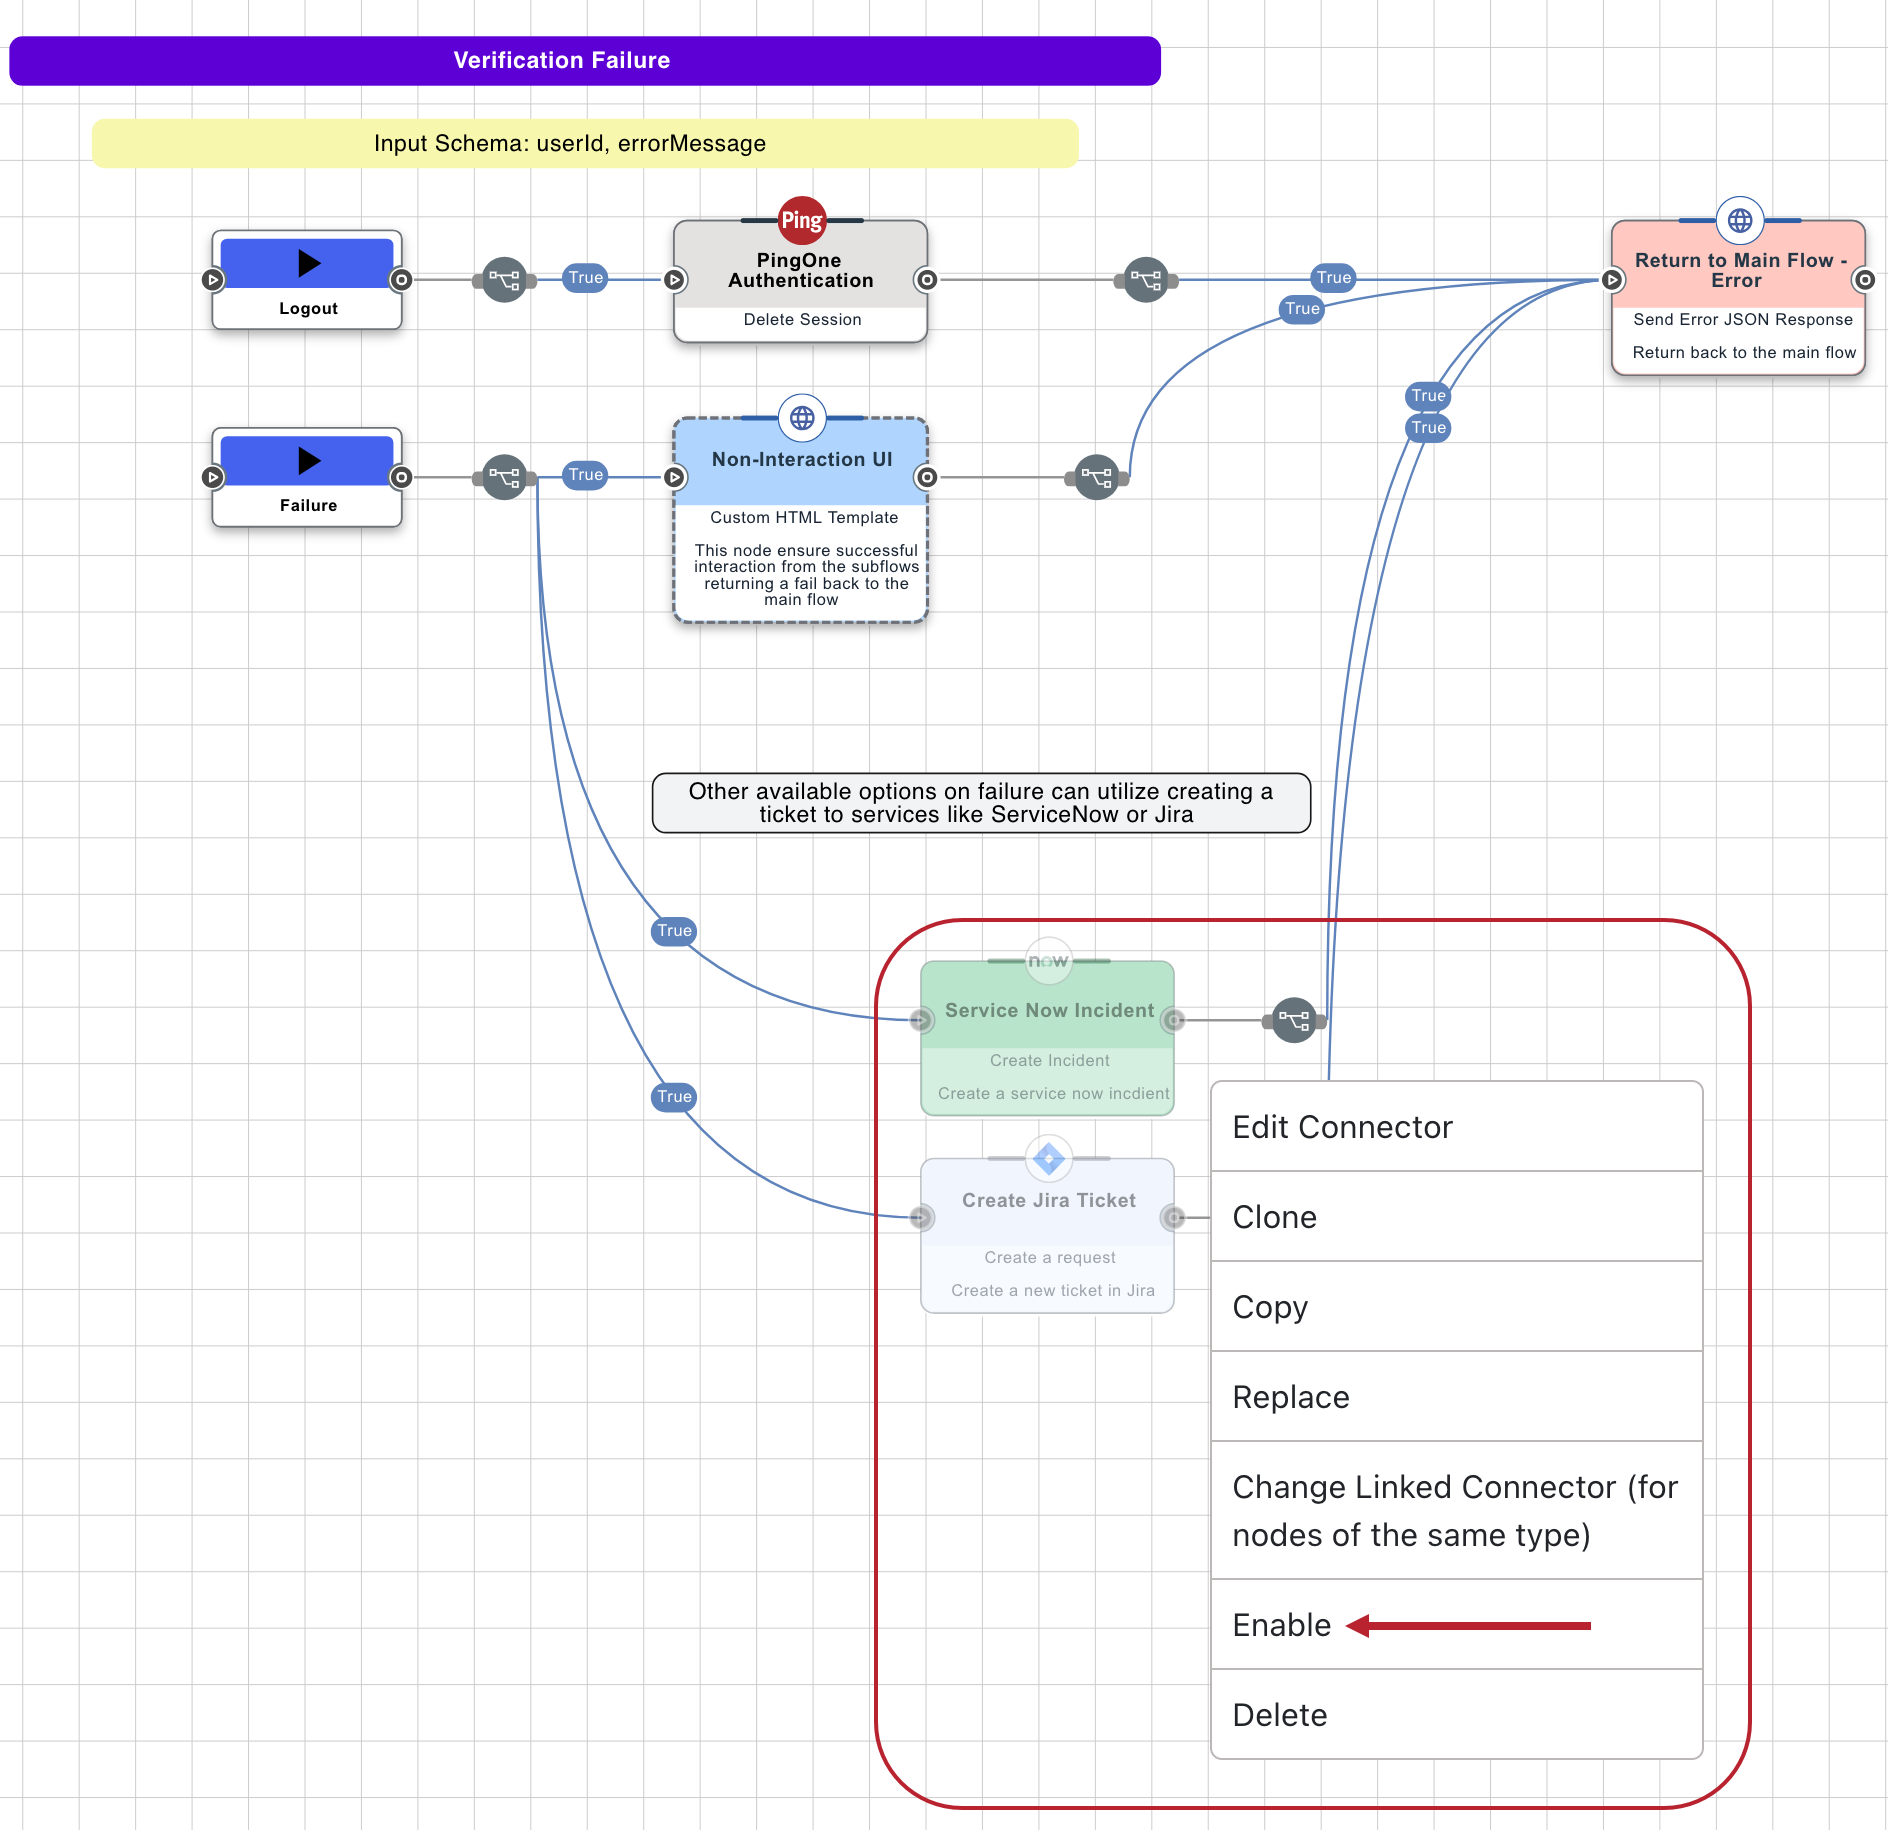
-
To configure the Jira Service Desk connector, click Create Jira Ticket.
-
If you haven’t already done so, in the Jira Service Desk modal, enter the required JSON code in the Raw JSON for creating new JIRA service desk request field.
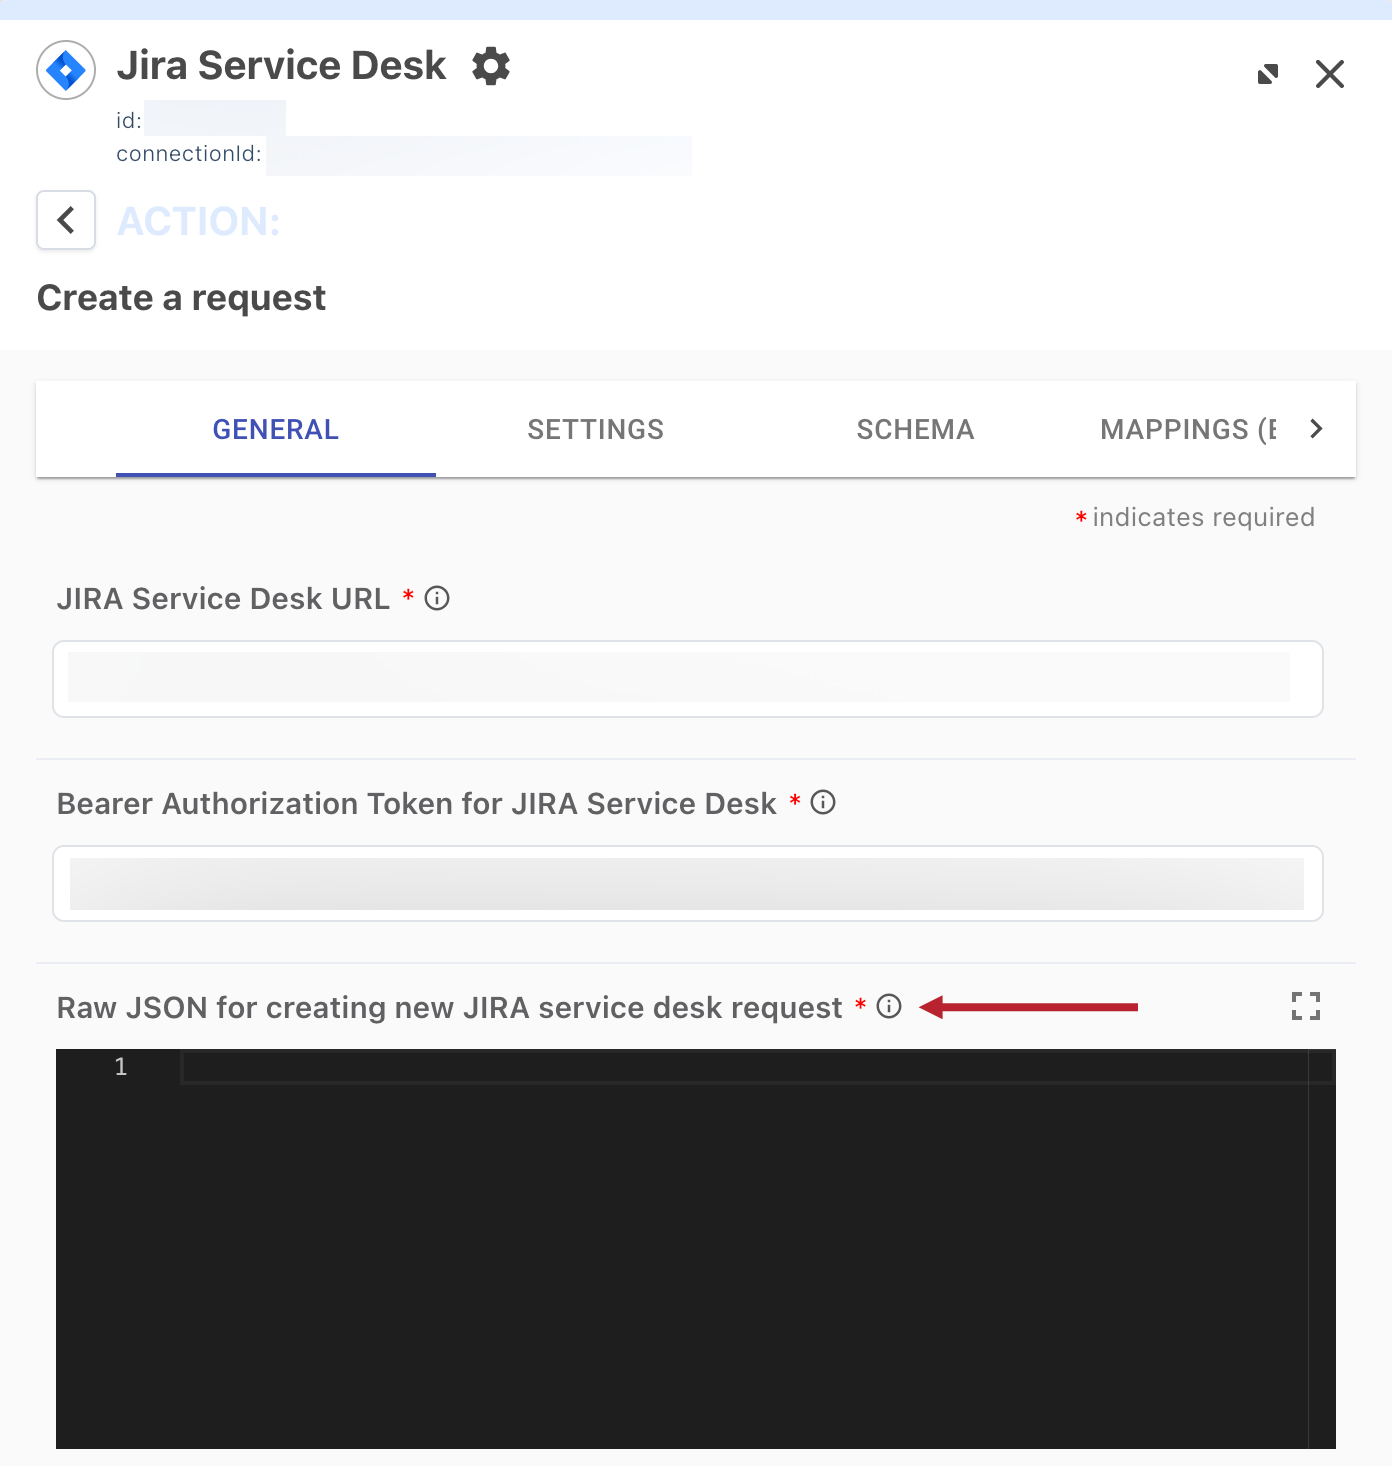
-
Enter any other desired configuration values and click Apply.
-
At the top of the DaVinci canvas, click Deploy to redeploy the updated flow in your test environment.
Result
You’ve now enabled and configured the DaVinci flow to create Jira tickets to record any end-user verification failures.
Steps to enable ServiceNow
-
On the DaVinci Connectors tab, from the list of connectors, select ServiceNow.
-
In the ServiceNow Details modal, configure the required fields according to the ServiceNow Connector documentation and click Apply.
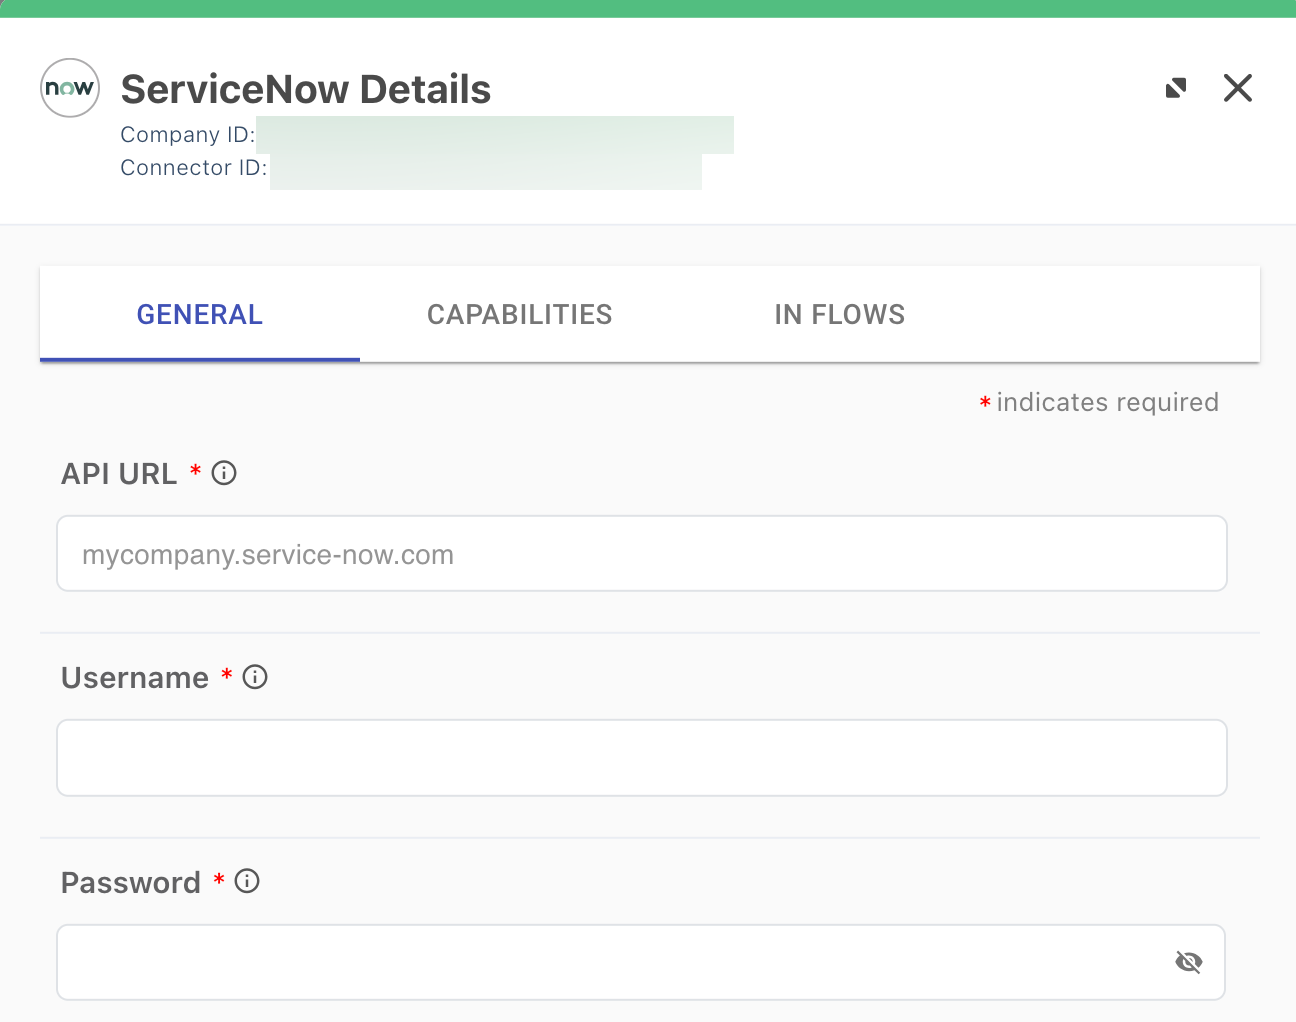
-
On the Flows tab, select the Help Desk Verify Evaluation flow and go to the Verification Failure section of the canvas.
-
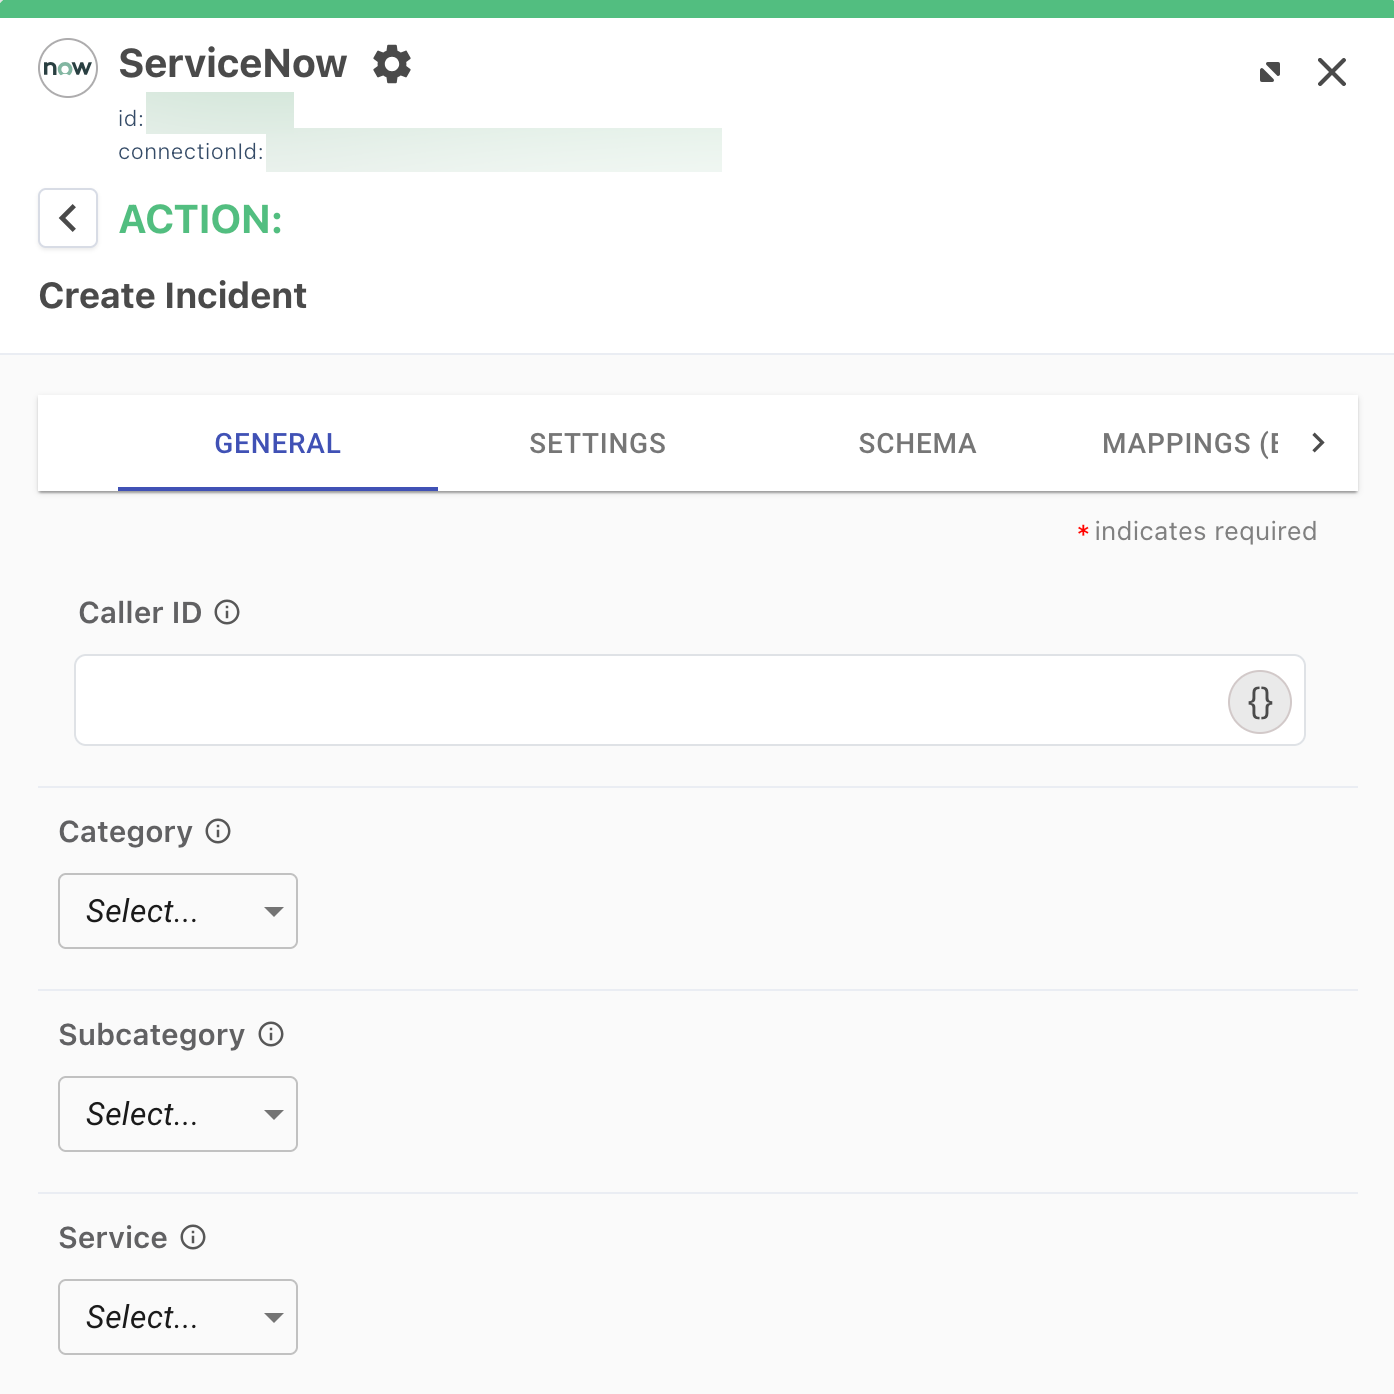
Right-click the grayed-out Service Now Incident connector and select Enable.
-
To configure the ServiceNow connector, click Service Now Incident.
-
In the ServiceNow modal, enter the desired configuration values and click Apply.
-
At the top of the DaVinci canvas, click Deploy to redeploy the updated flow in your test environment.
Validation
Now that you’ve imported the DaVinci flows, configured your PingOne Verify connection, and specified an authorized group for account recovery, you’re ready to test the solution.
Before you begin
Ensure you have the following:
-
Access to the username and password for a help desk agent who’s a member of the PingOne group authorized for account recovery.
-
The email or username of an end user in your PingOne test environment. At minimum, their account should be connected to an email address that you can access to perform verification.
-
A mobile device that can access the test end user’s email and that has a working camera.
-
A valid ID that you can use for testing purposes. Learn more in PingOne Verify types of verification.
Steps
-
Sign on as the help desk agent:
-
In the PingOne admin console, go to your test environment, and then go to Applications > Applications.
-
Click the PingOne DaVinci Connection application to open the details panel.
-
On the Overview tab, click the Copy icon to copy the Signon URL value.
-
Open a web browser and enter the value of Signon URL. The Help Desk Verification page displays.
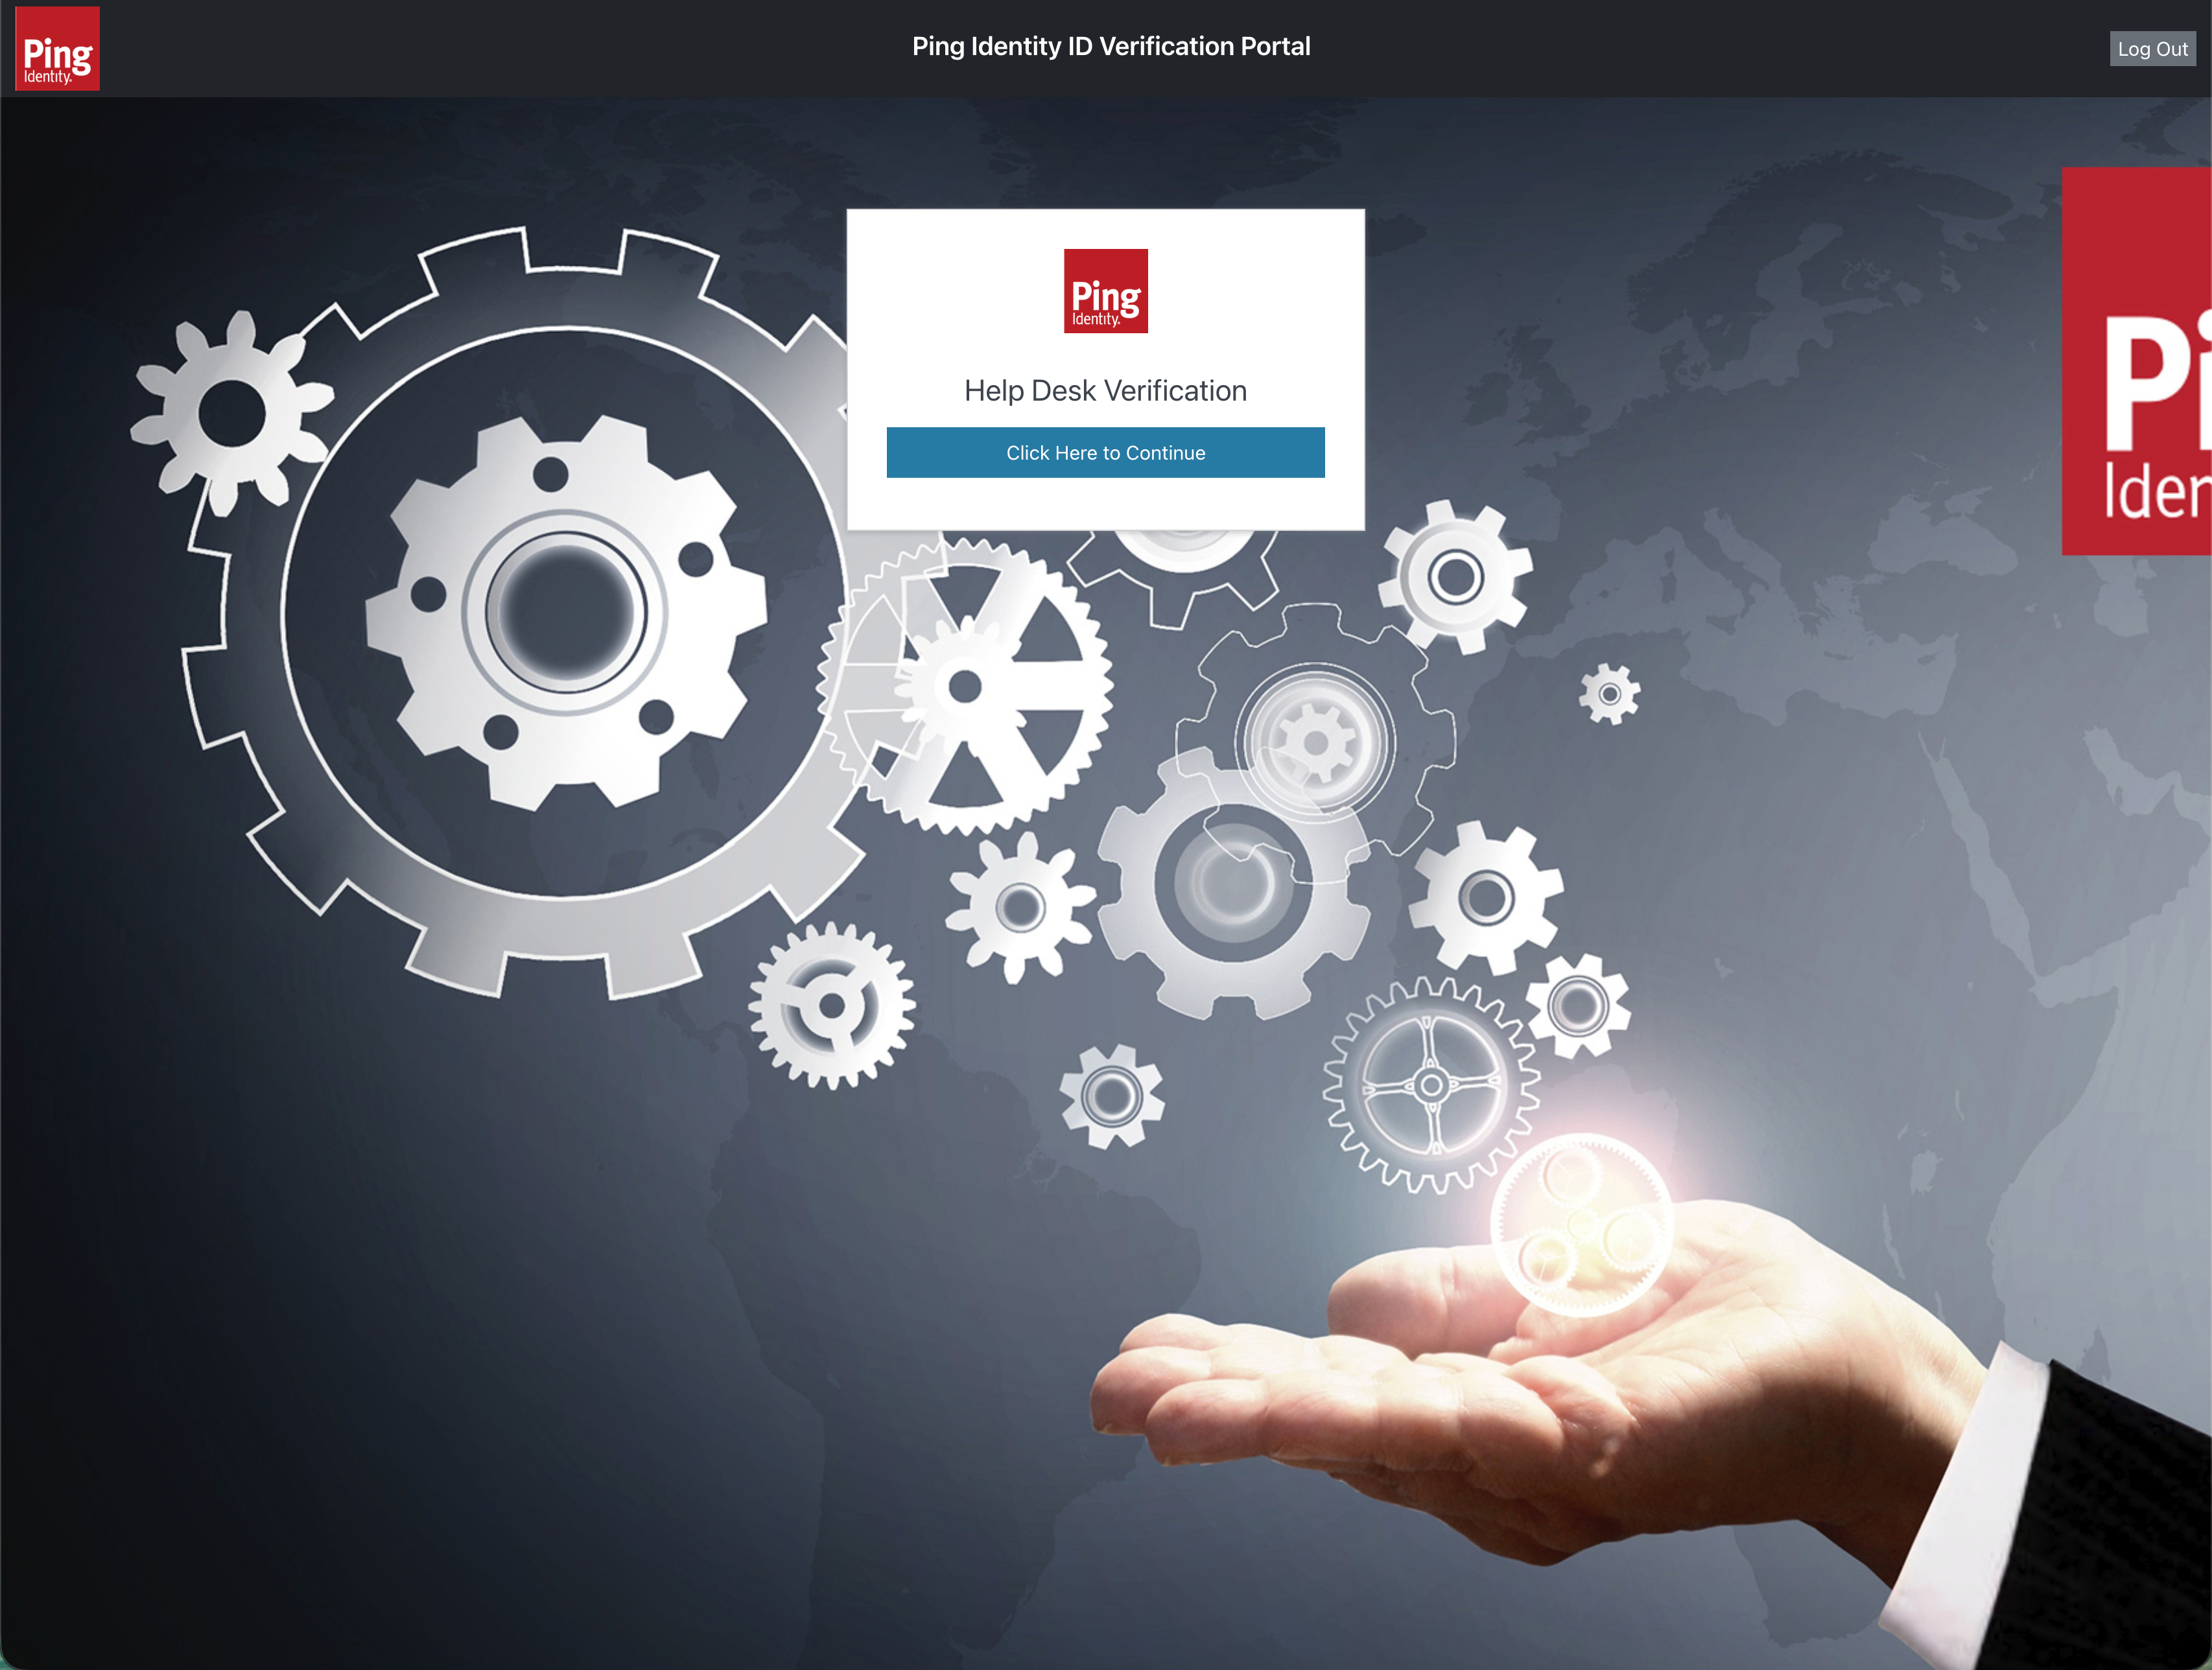
-
Click Click Here to Continue.
-
Enter the username of your help desk agent and click Submit.
-
Enter the help desk agent’s password and click Submit.
-
-
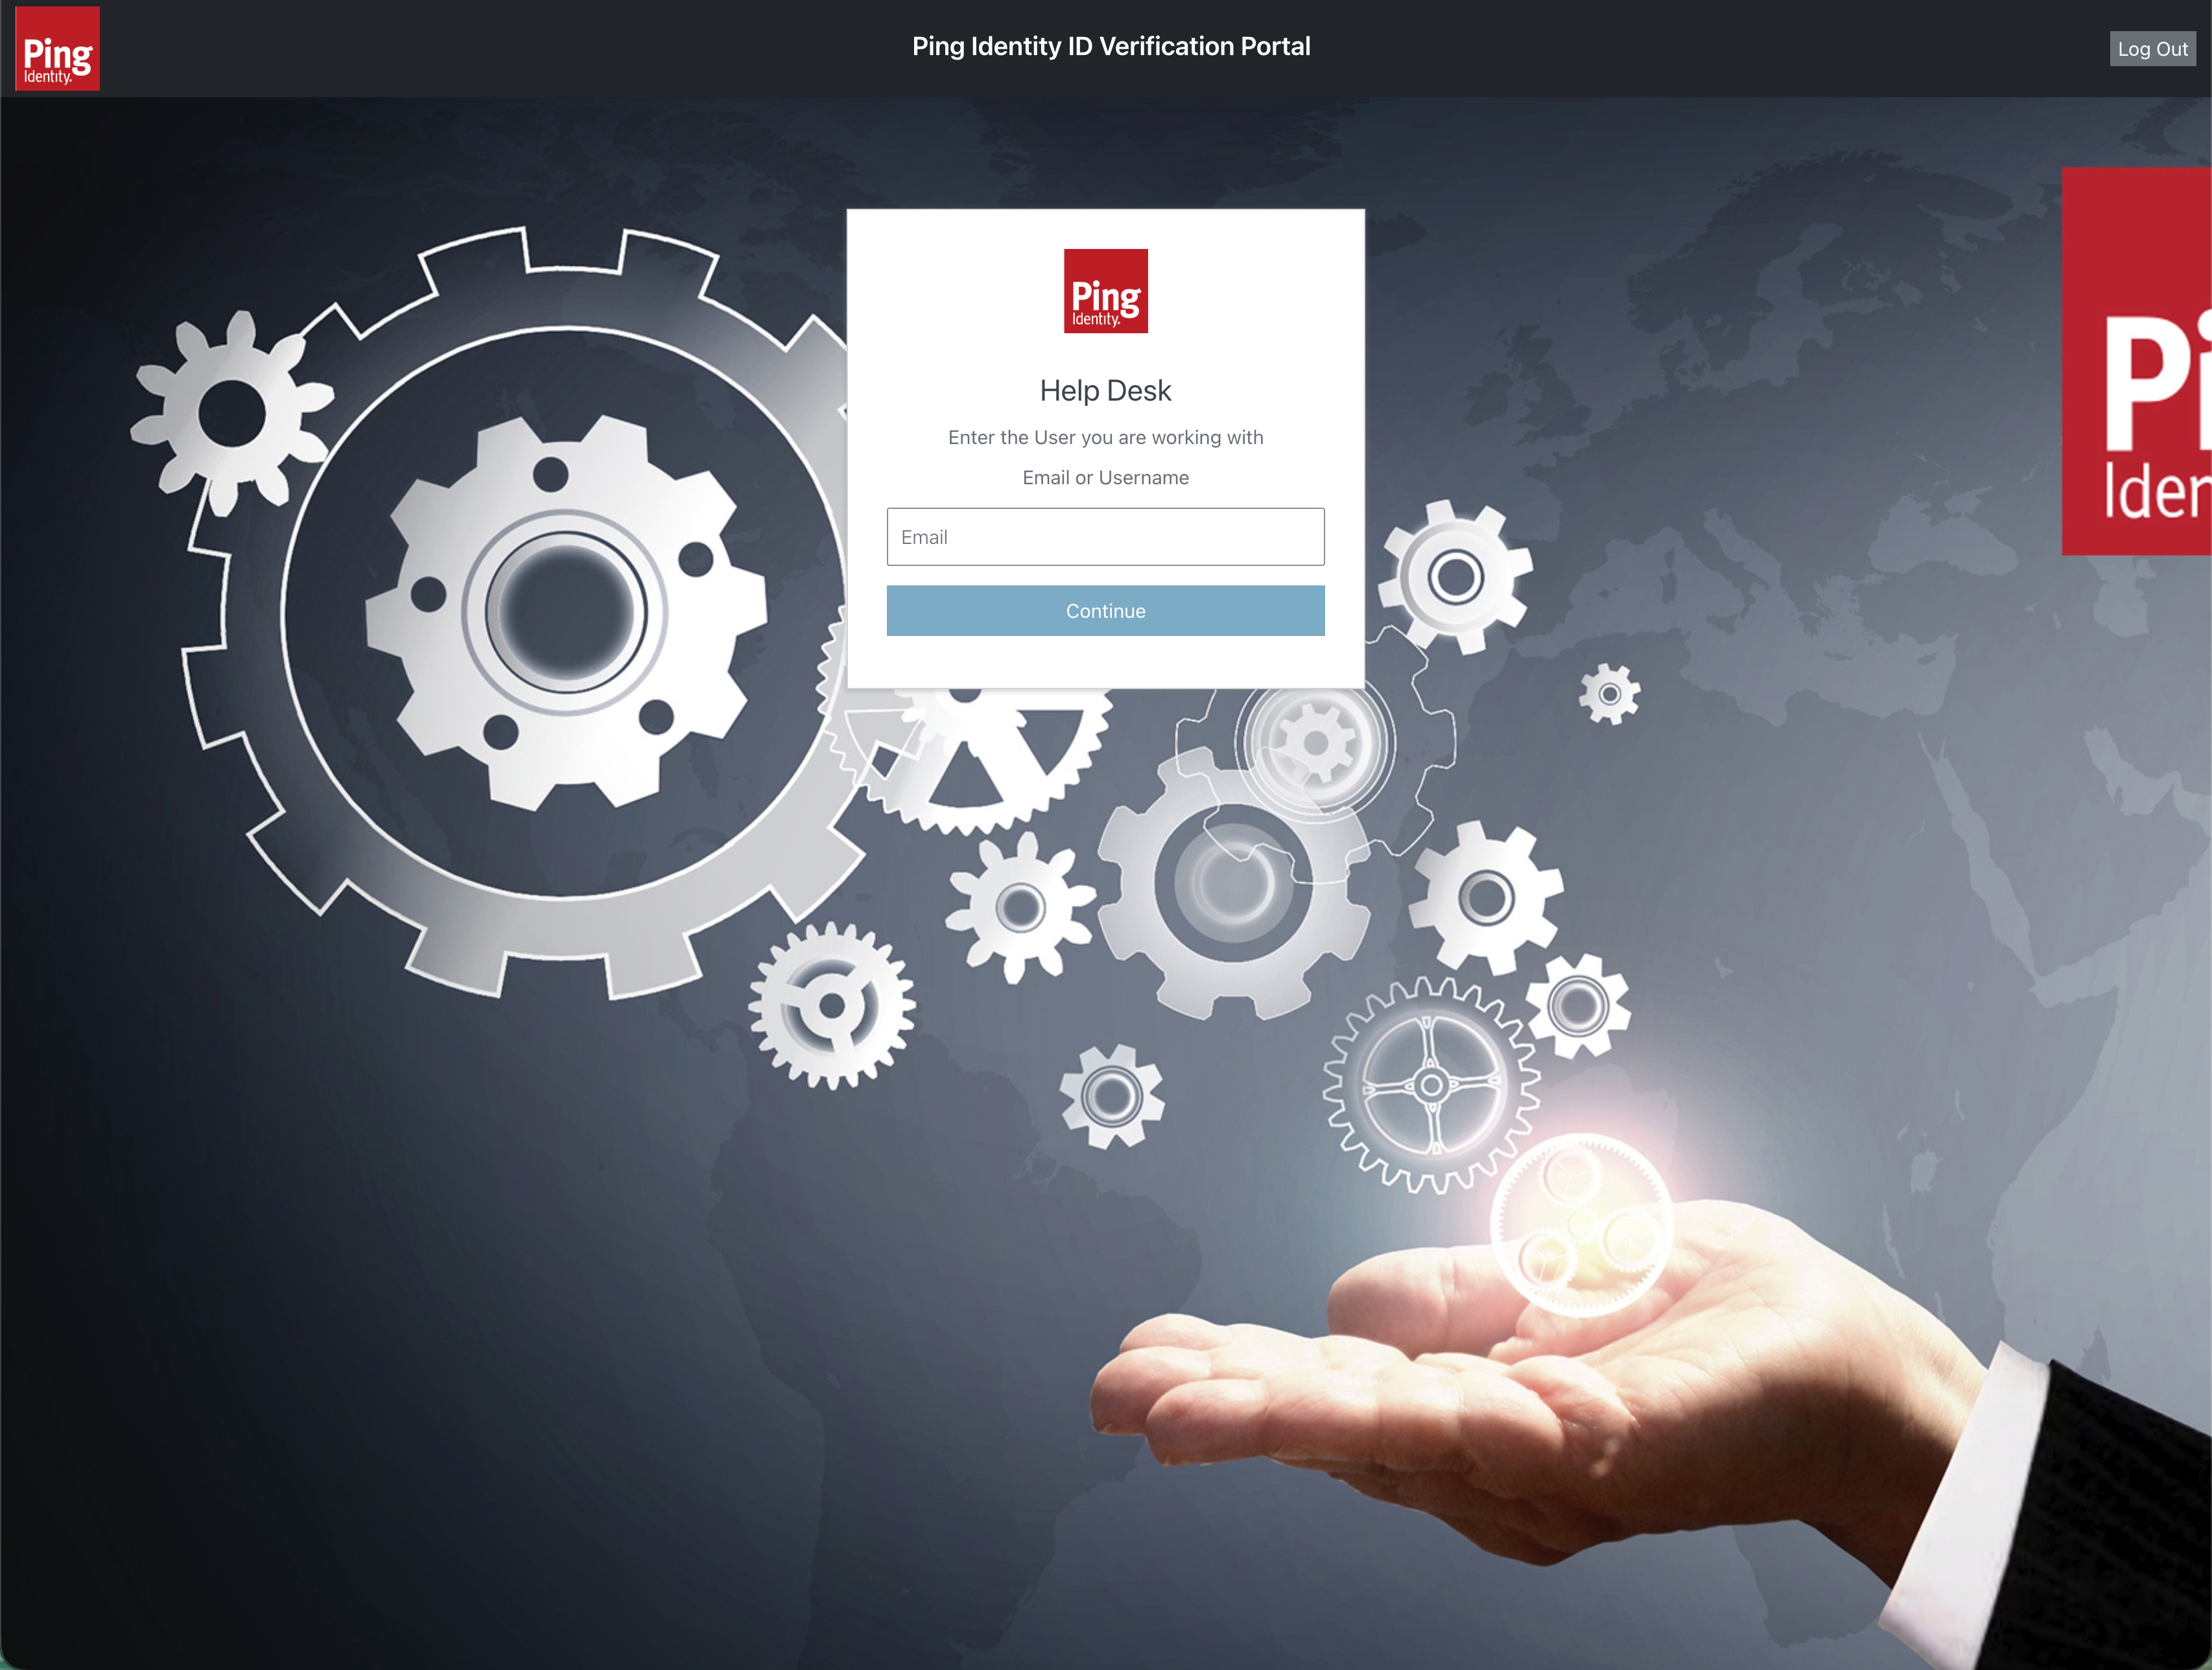
Initiate the end-user verification:
-
On the Help Desk page, enter the end user’s email address or username and click Continue.
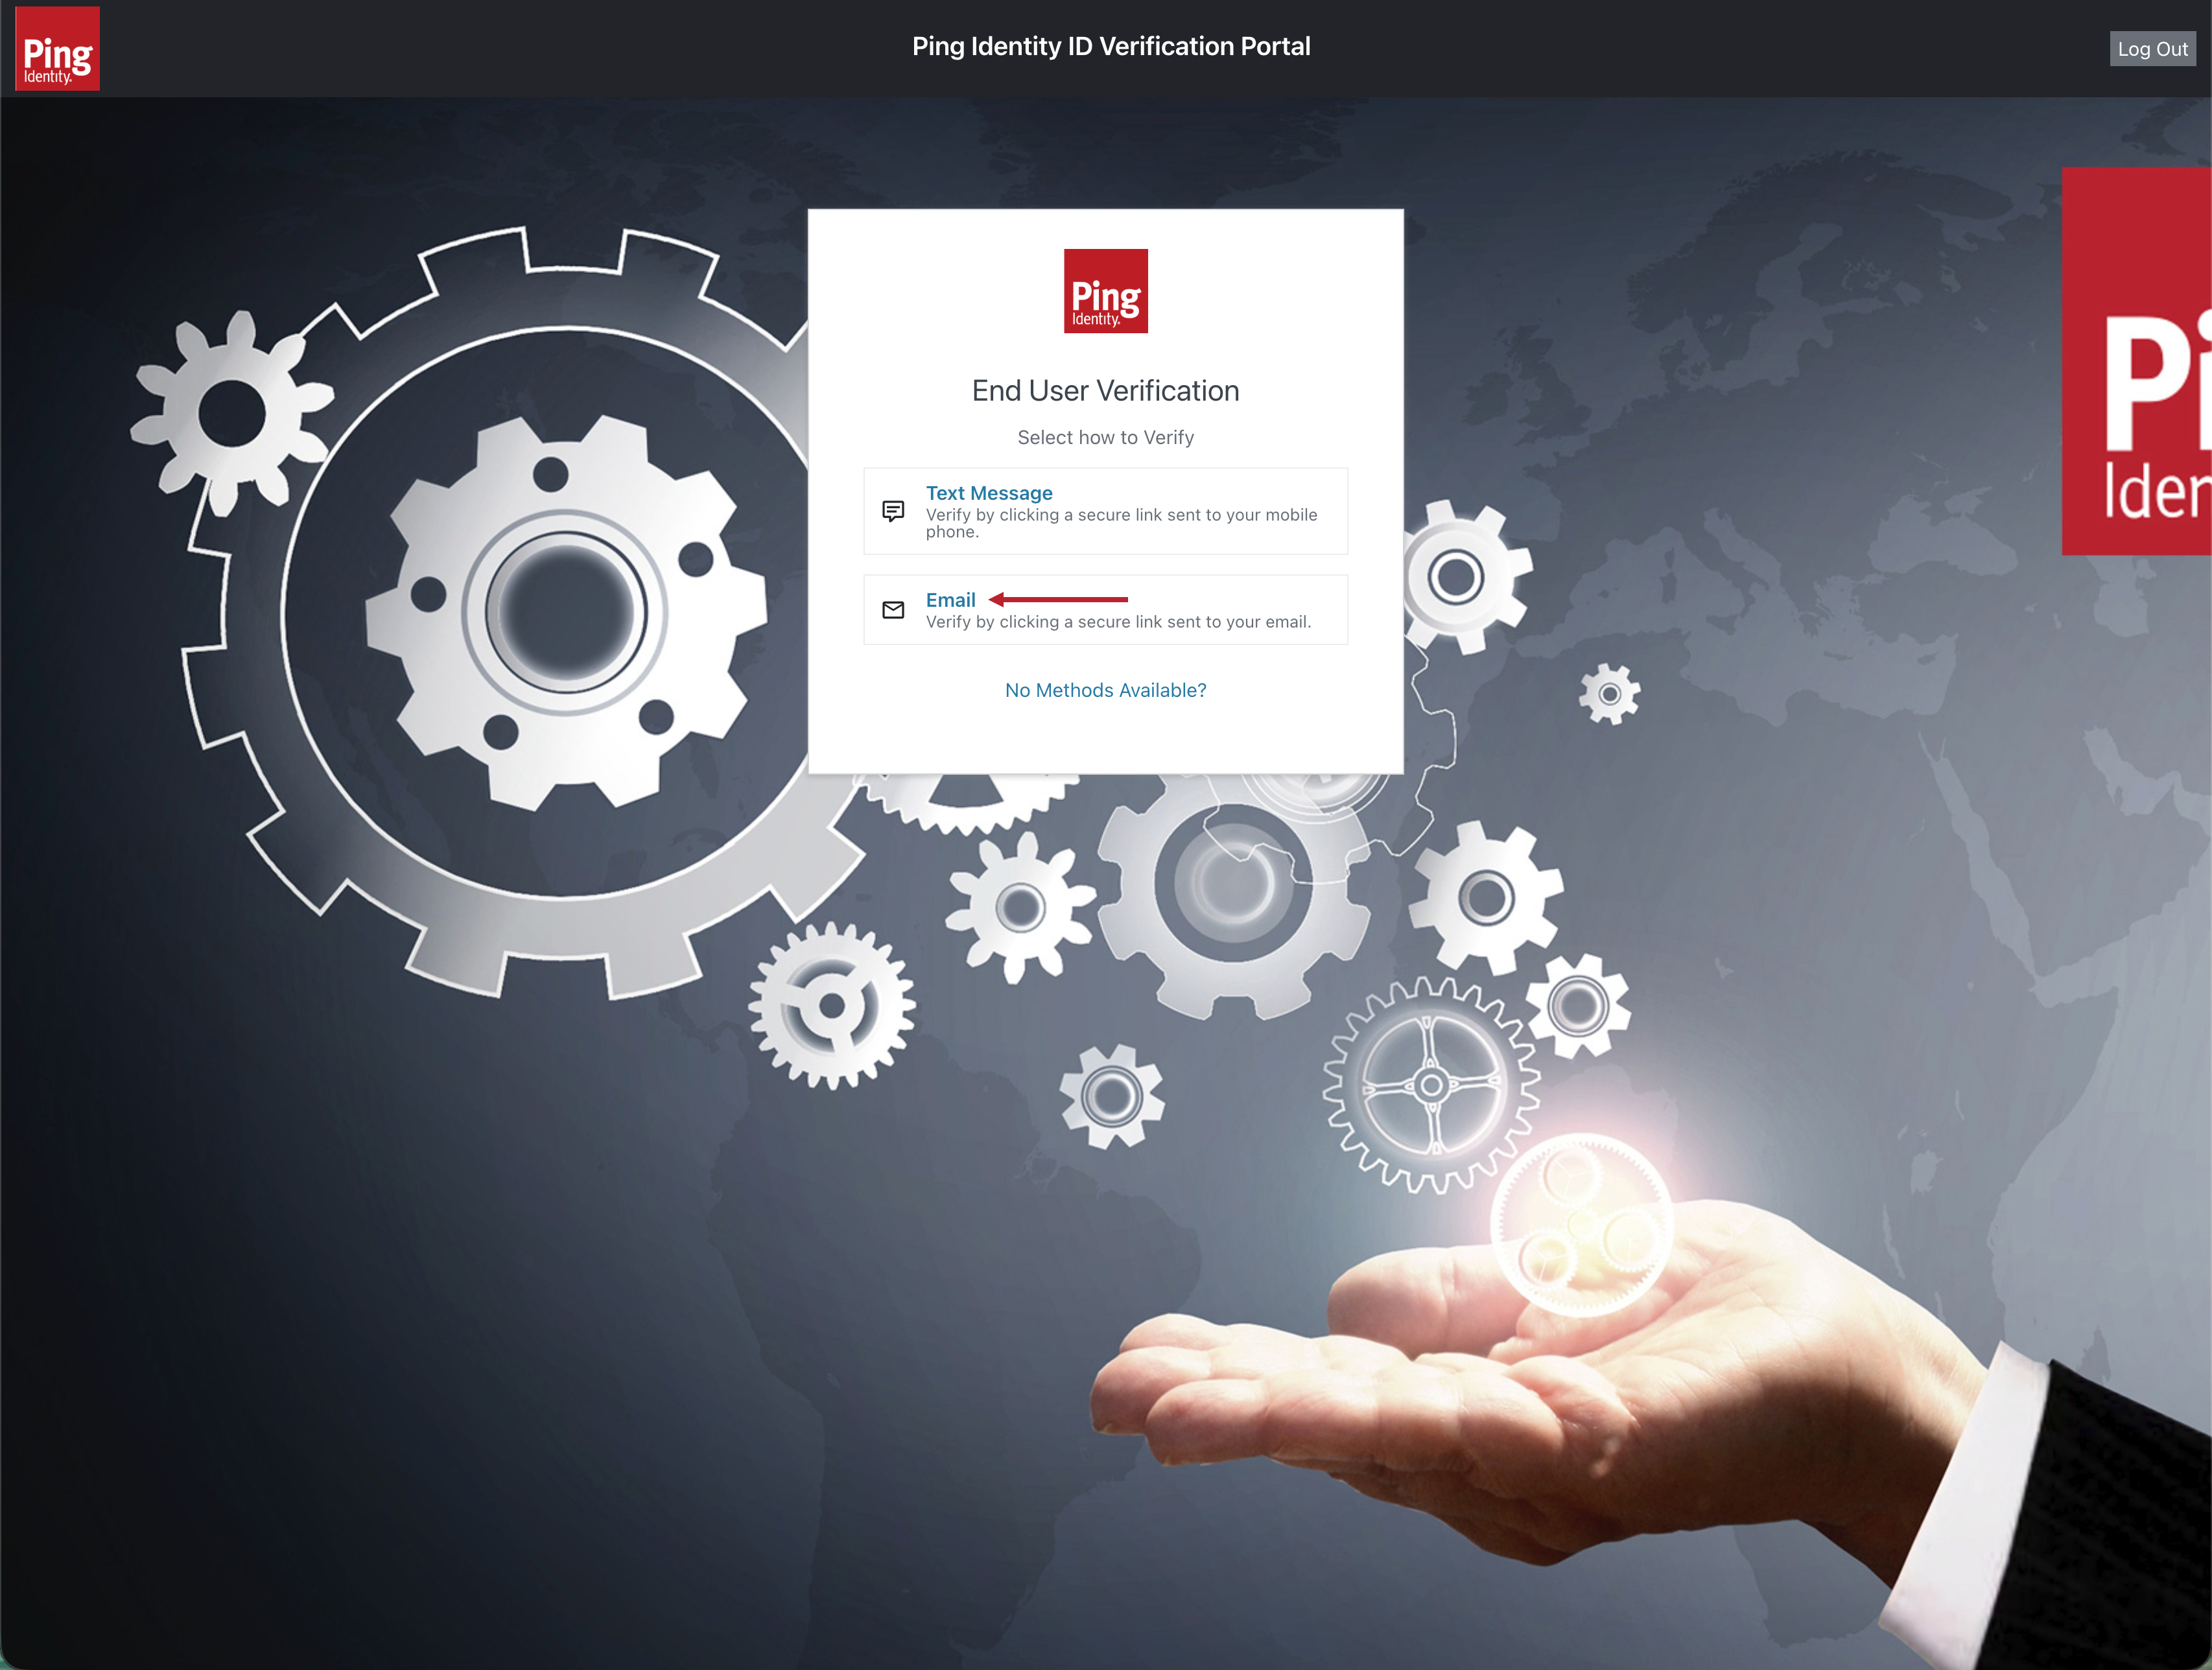
-
Click Email as the verification method. This sends an email to the end user you specified in the previous step.
-
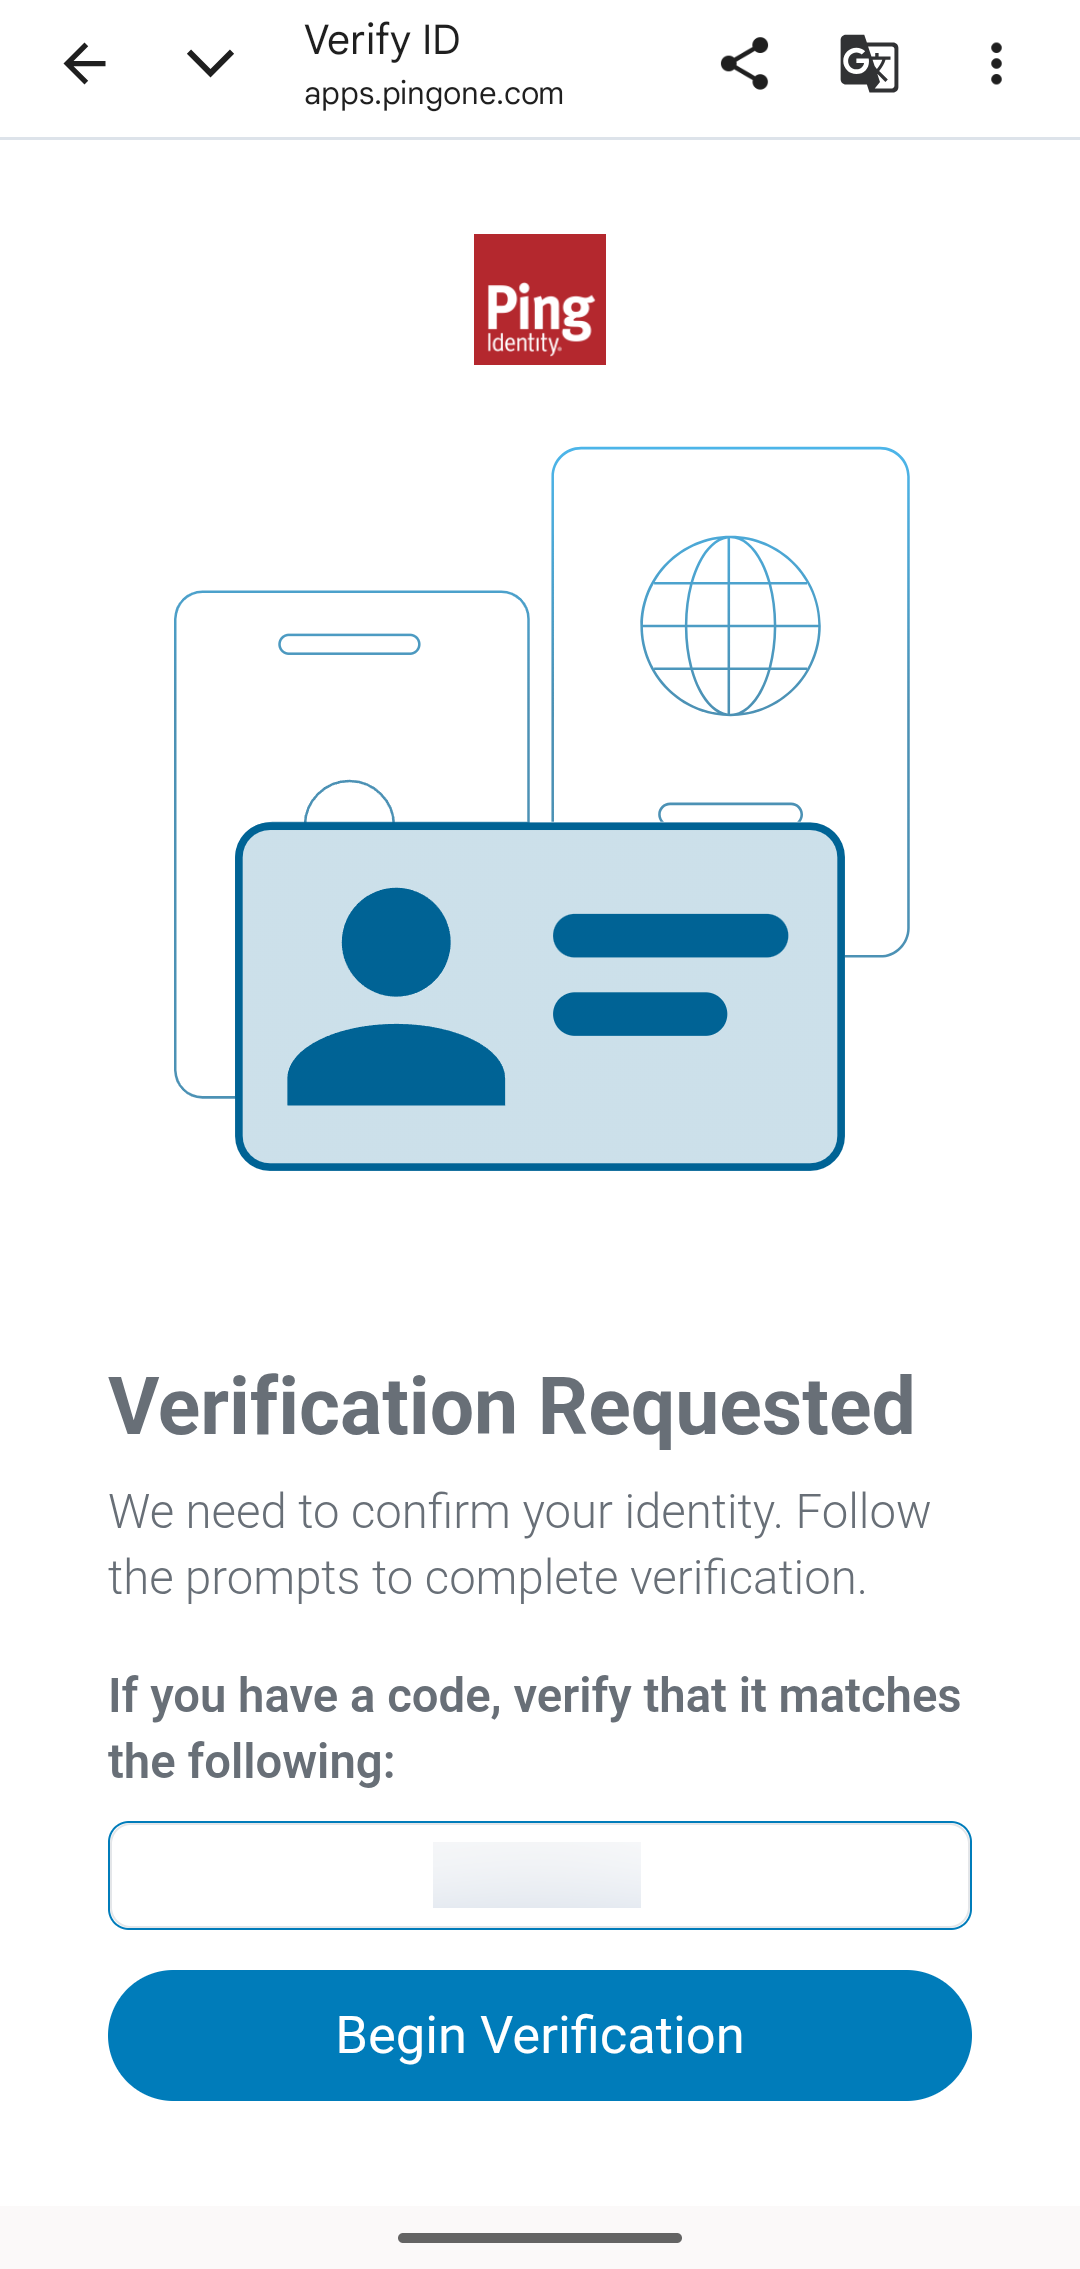
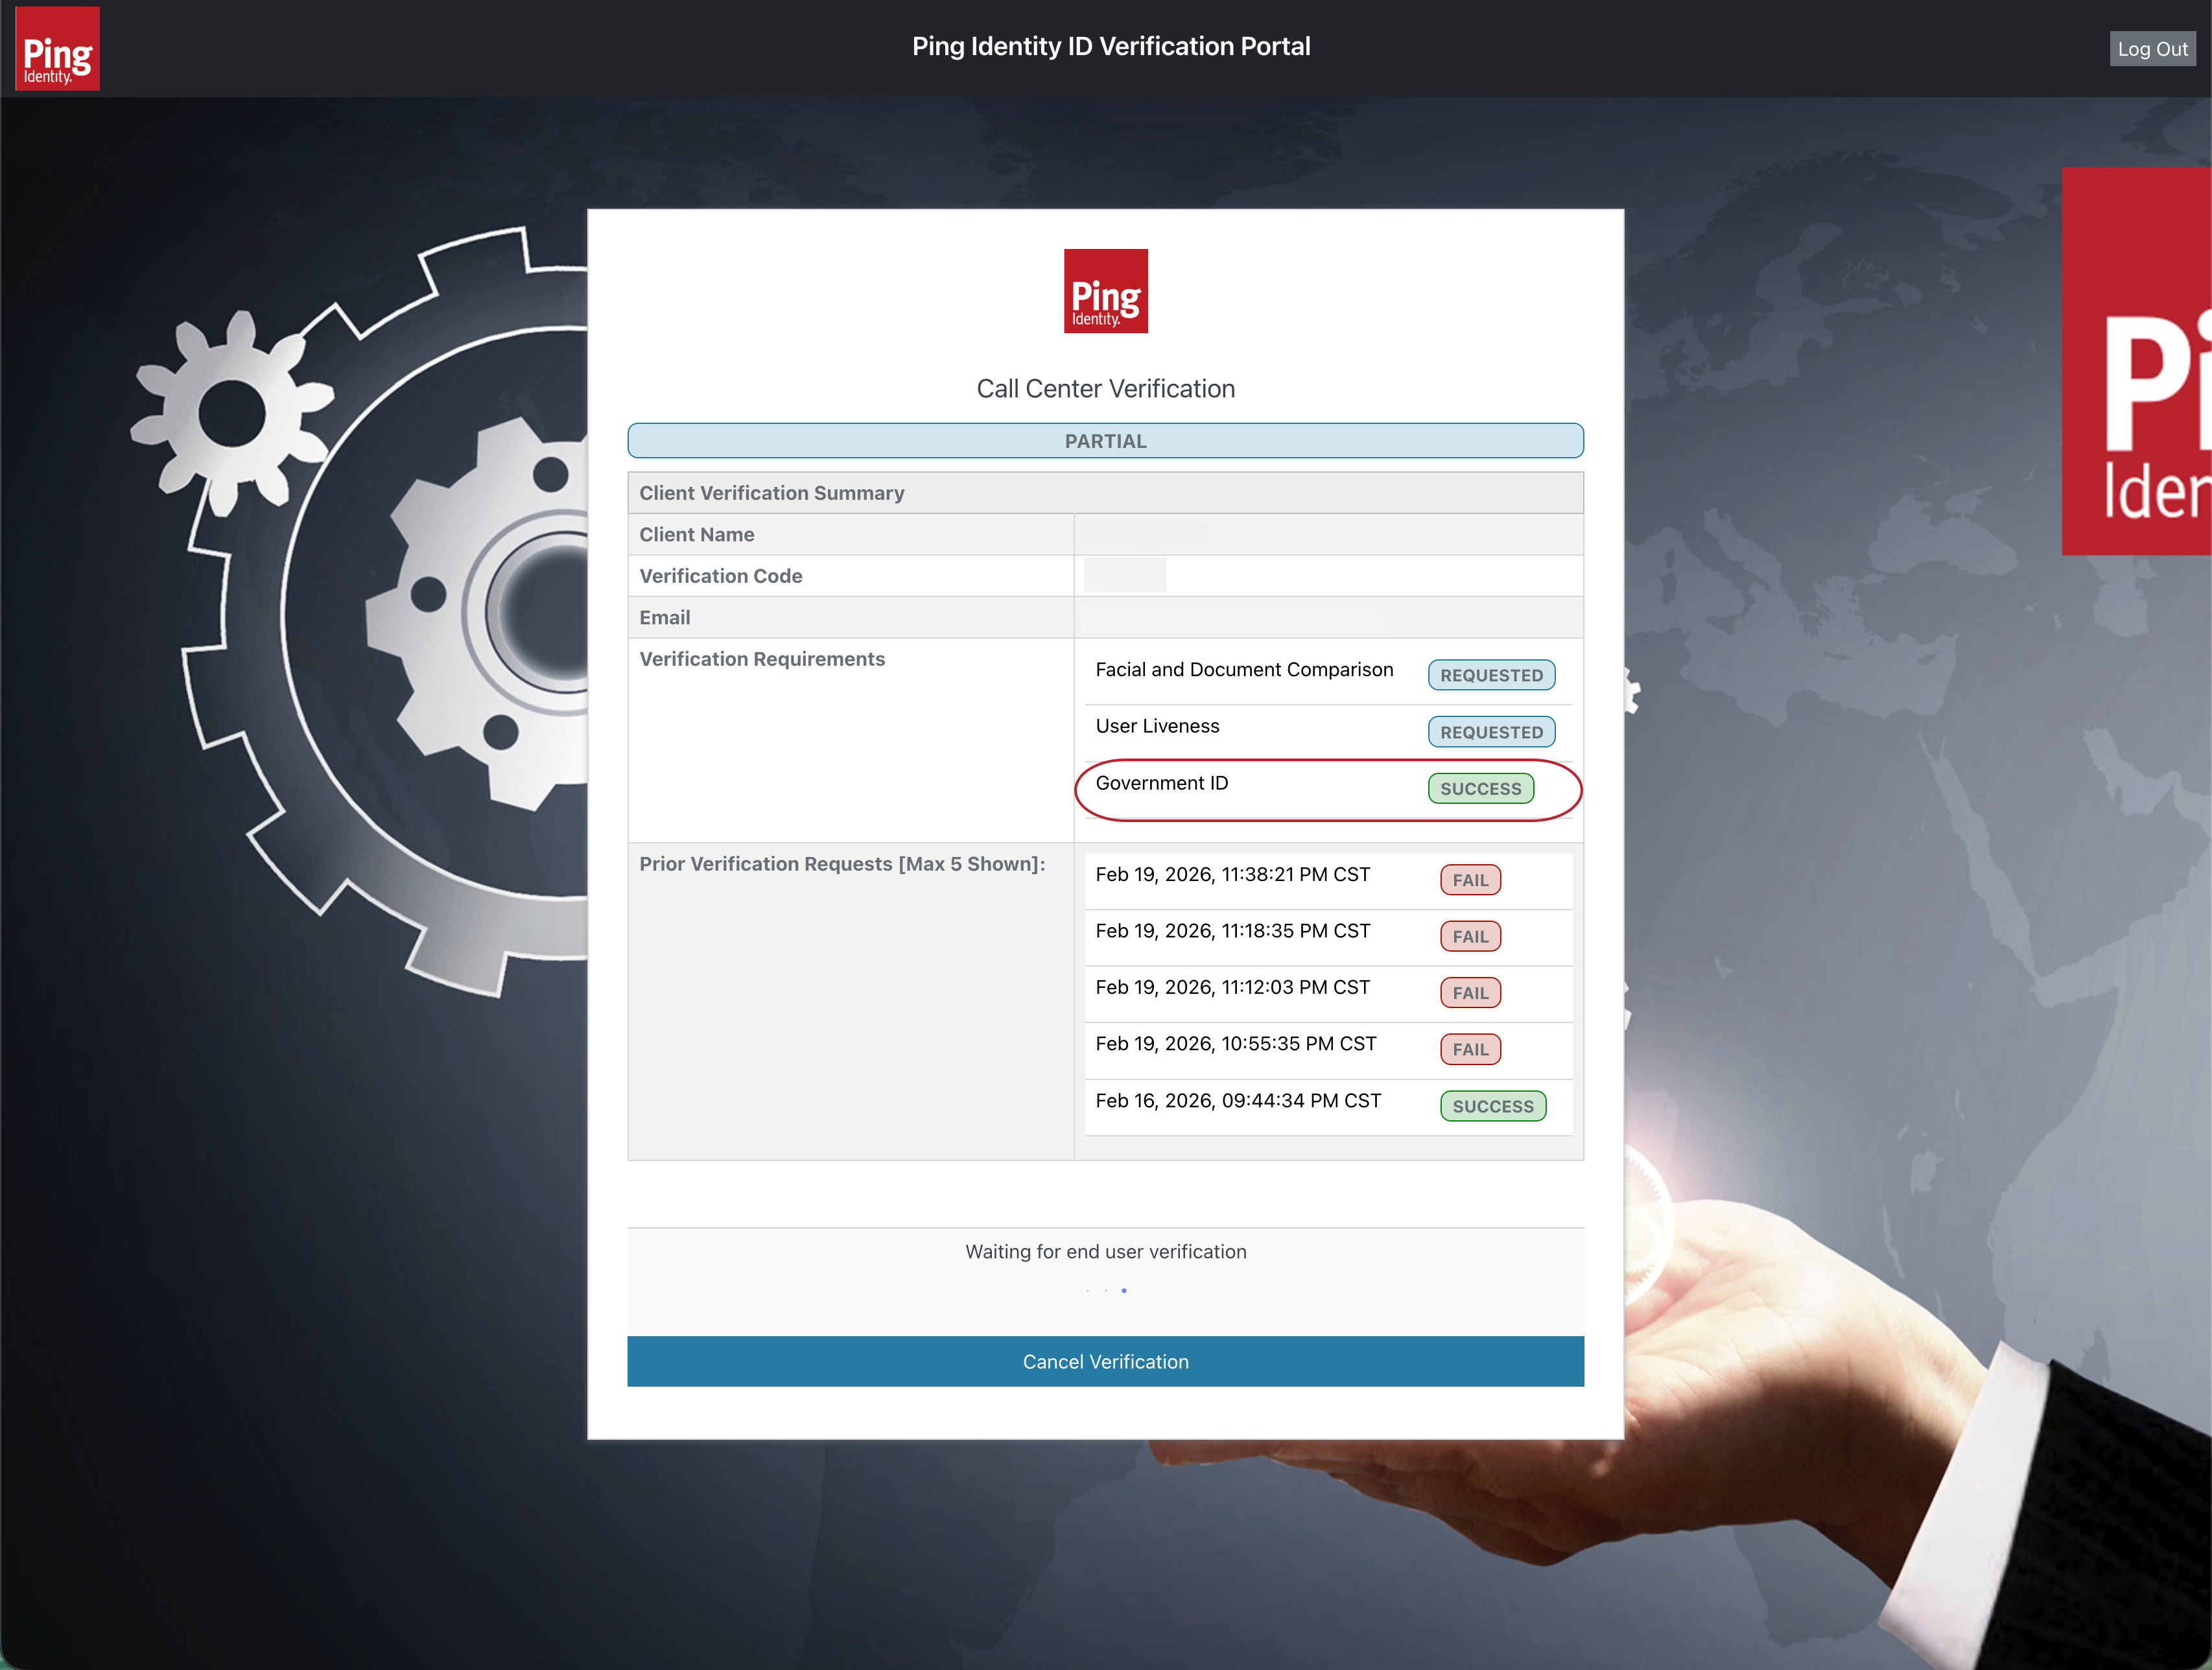
Click Skip on the Confirm Verify Transaction Code page to proceed to the Call Center Verification page, which displays a status chip of Requested. You are now ready to monitor the end-user verification from the help desk agent’s perspective.
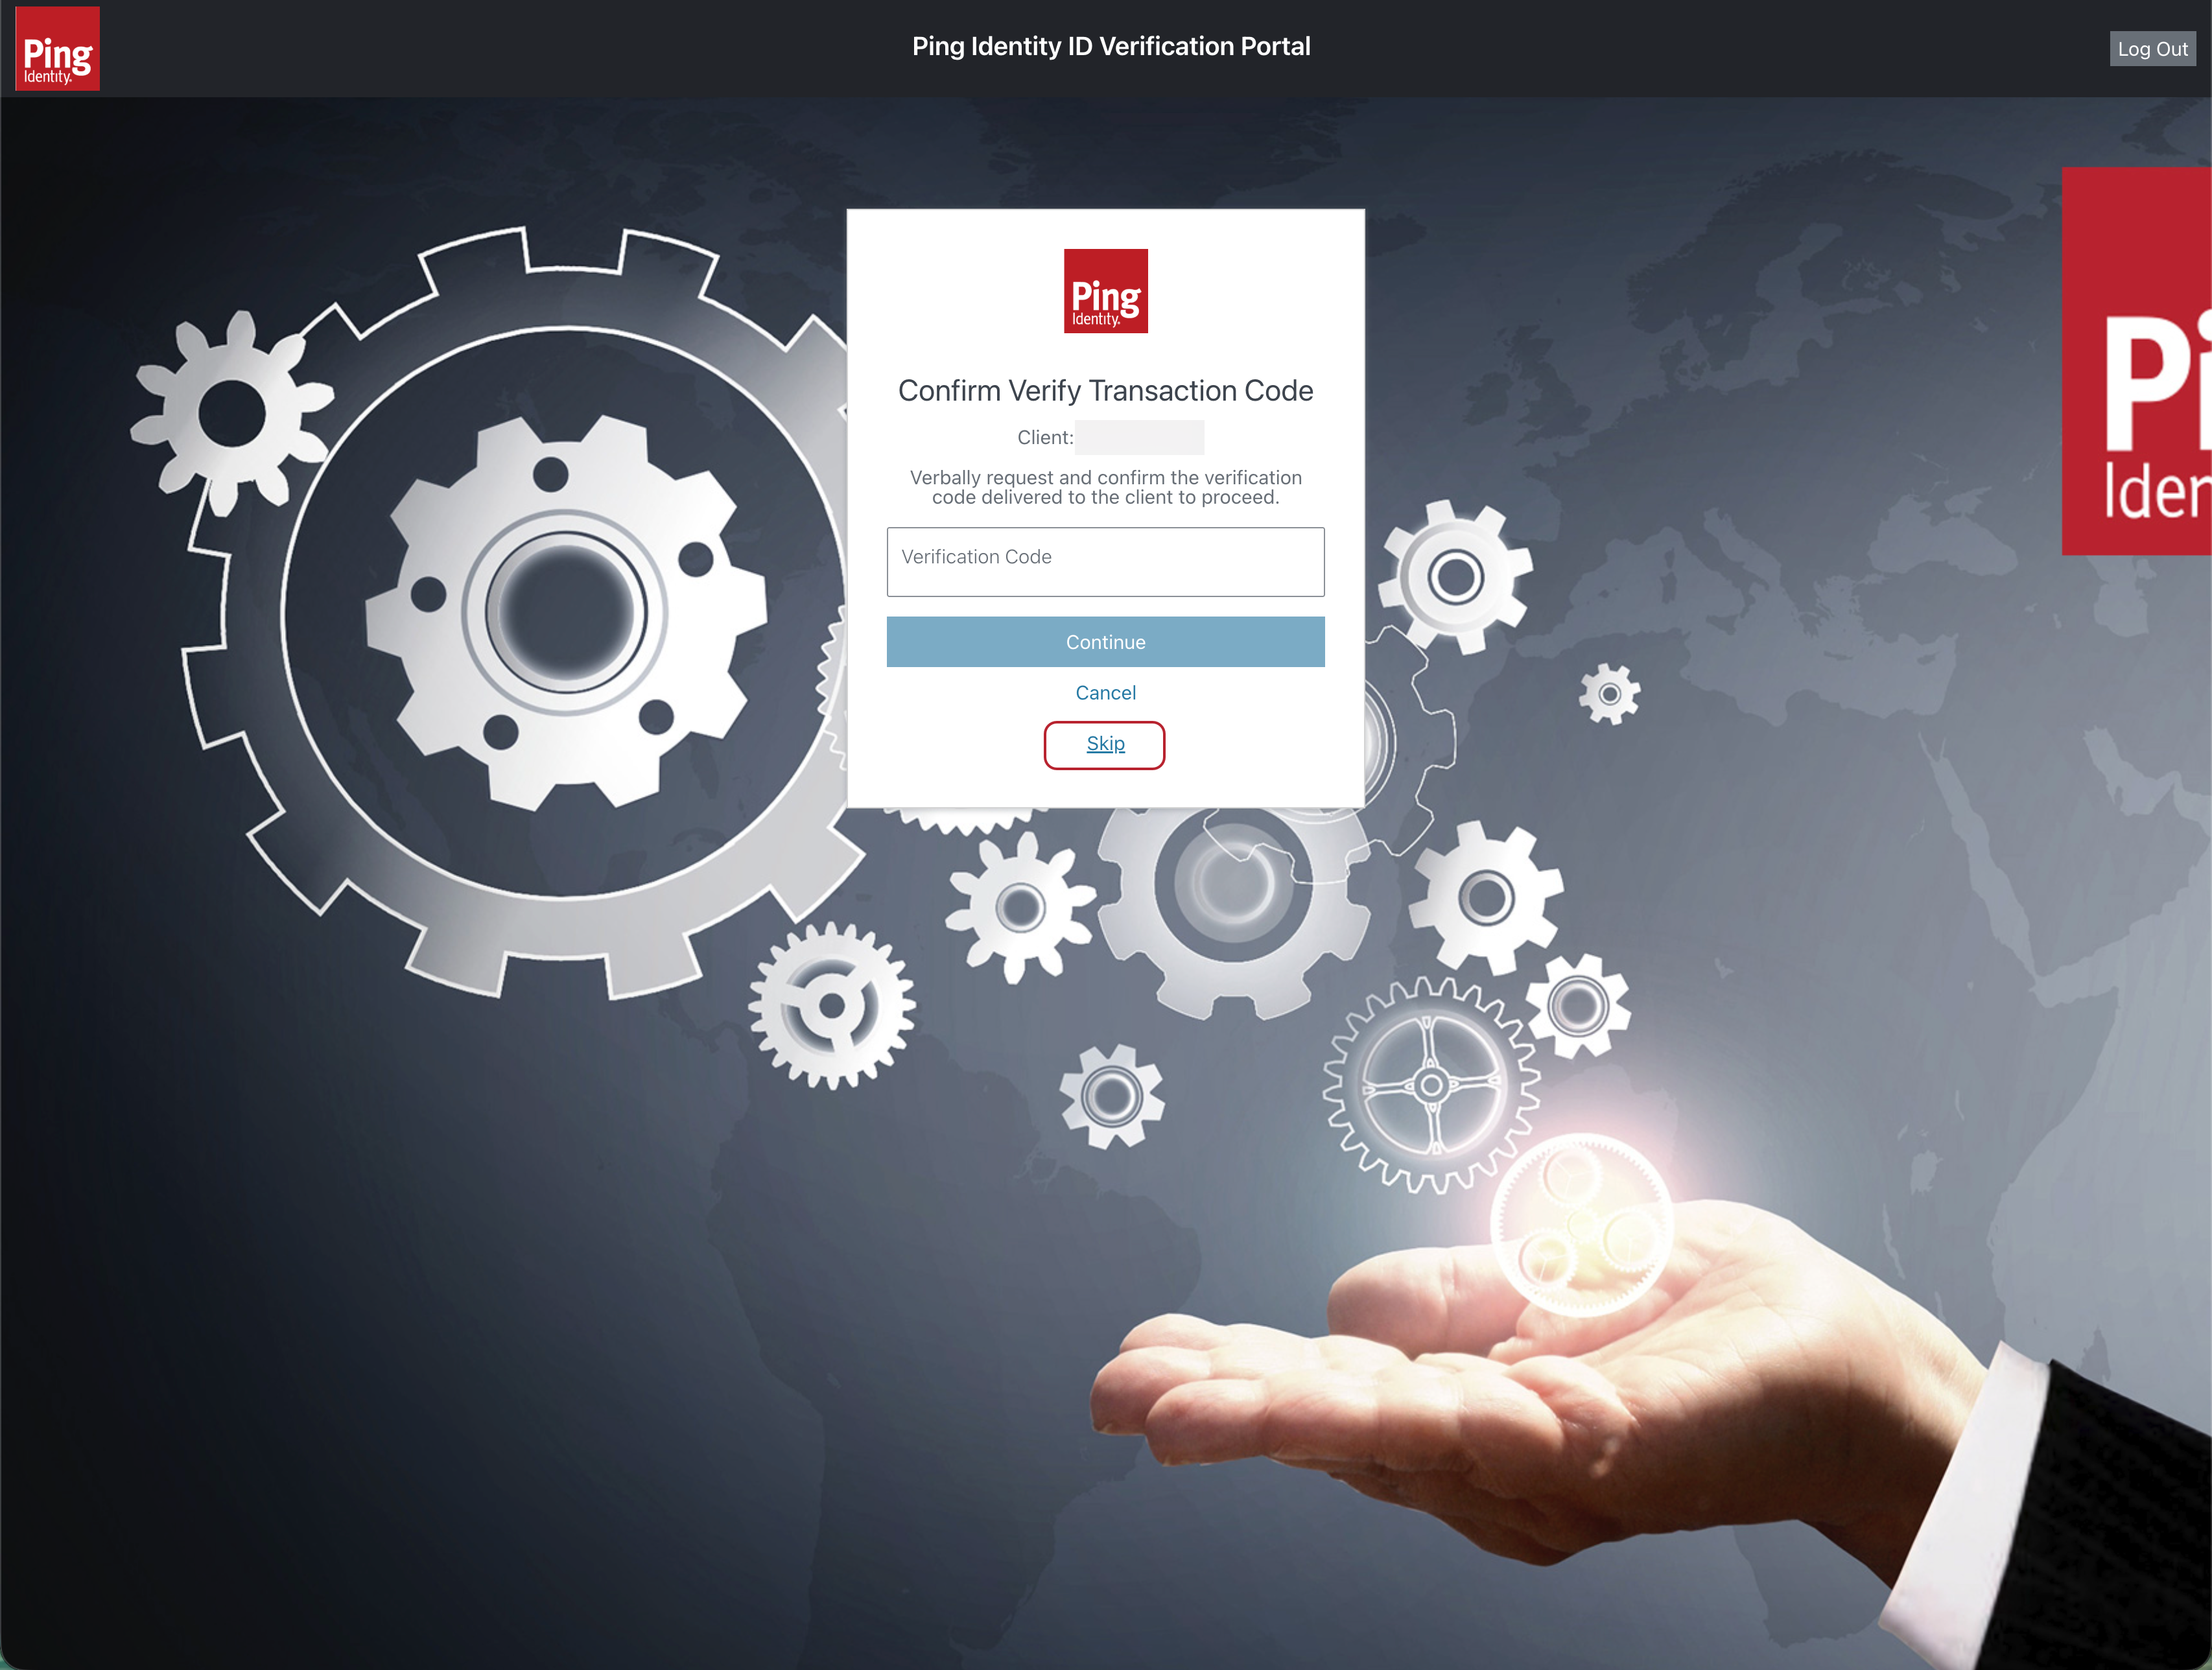

In the end-user experience, on the Verification Requested screen, there is a verification code that the help desk agent can enter to confirm that the agent and end user are participating in the same PingOne Verify transaction. In most cases, it’s unnecessary to use this code, because the agent typically initiates the PingOne Verify transaction and sends it to the end user during a live phone conversation.
-
-
Verify the end-user ID:
-
Access the test end user’s email account from your mobile device. Look for an email from PingOne with the subject line "Finish your ID verification."
-
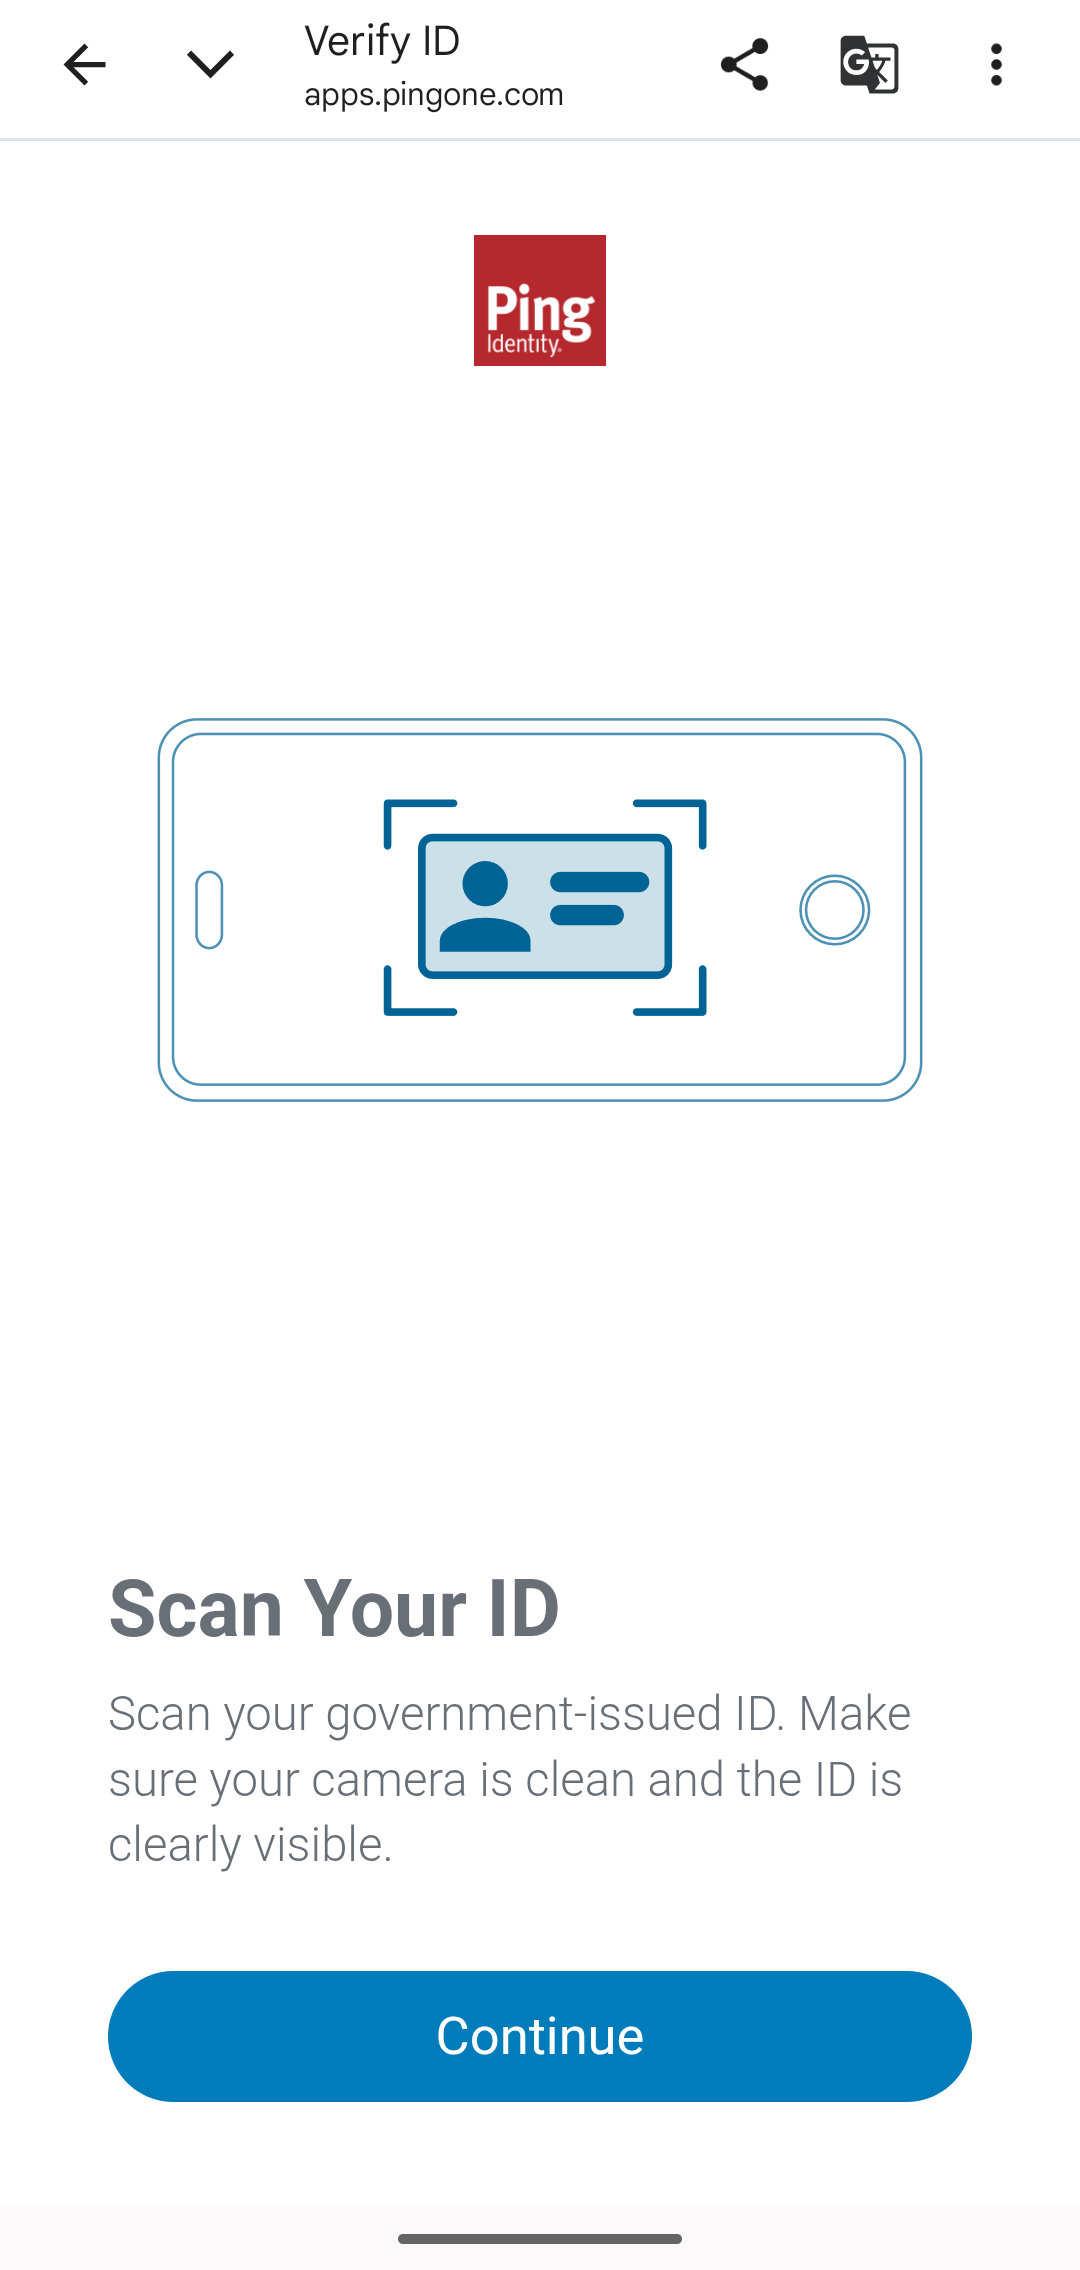
Tap the verification link in the email to load the Verification Requested screen on your mobile device, and then tap Begin Verification.
-
On the Scan Your ID screen, tap Continue.
-
When prompted, allow apps.pingone.com and your mobile browser to use your camera.
-
Scan the front of your ID and follow the on-screen prompts until you see a checkmark.
-
When prompted, flip your ID over and scan the back of it.
-
On the results screen that shows pictures of both sides of your ID, tap Yes, Continue.
The help desk agent’s Call Center Verification page now updates with the status of the ID check. If the verification was successful, you should see a Success status chip next to Government ID in the Verification Requirements section.
-
-
Verify user liveness and compare with the ID:
-
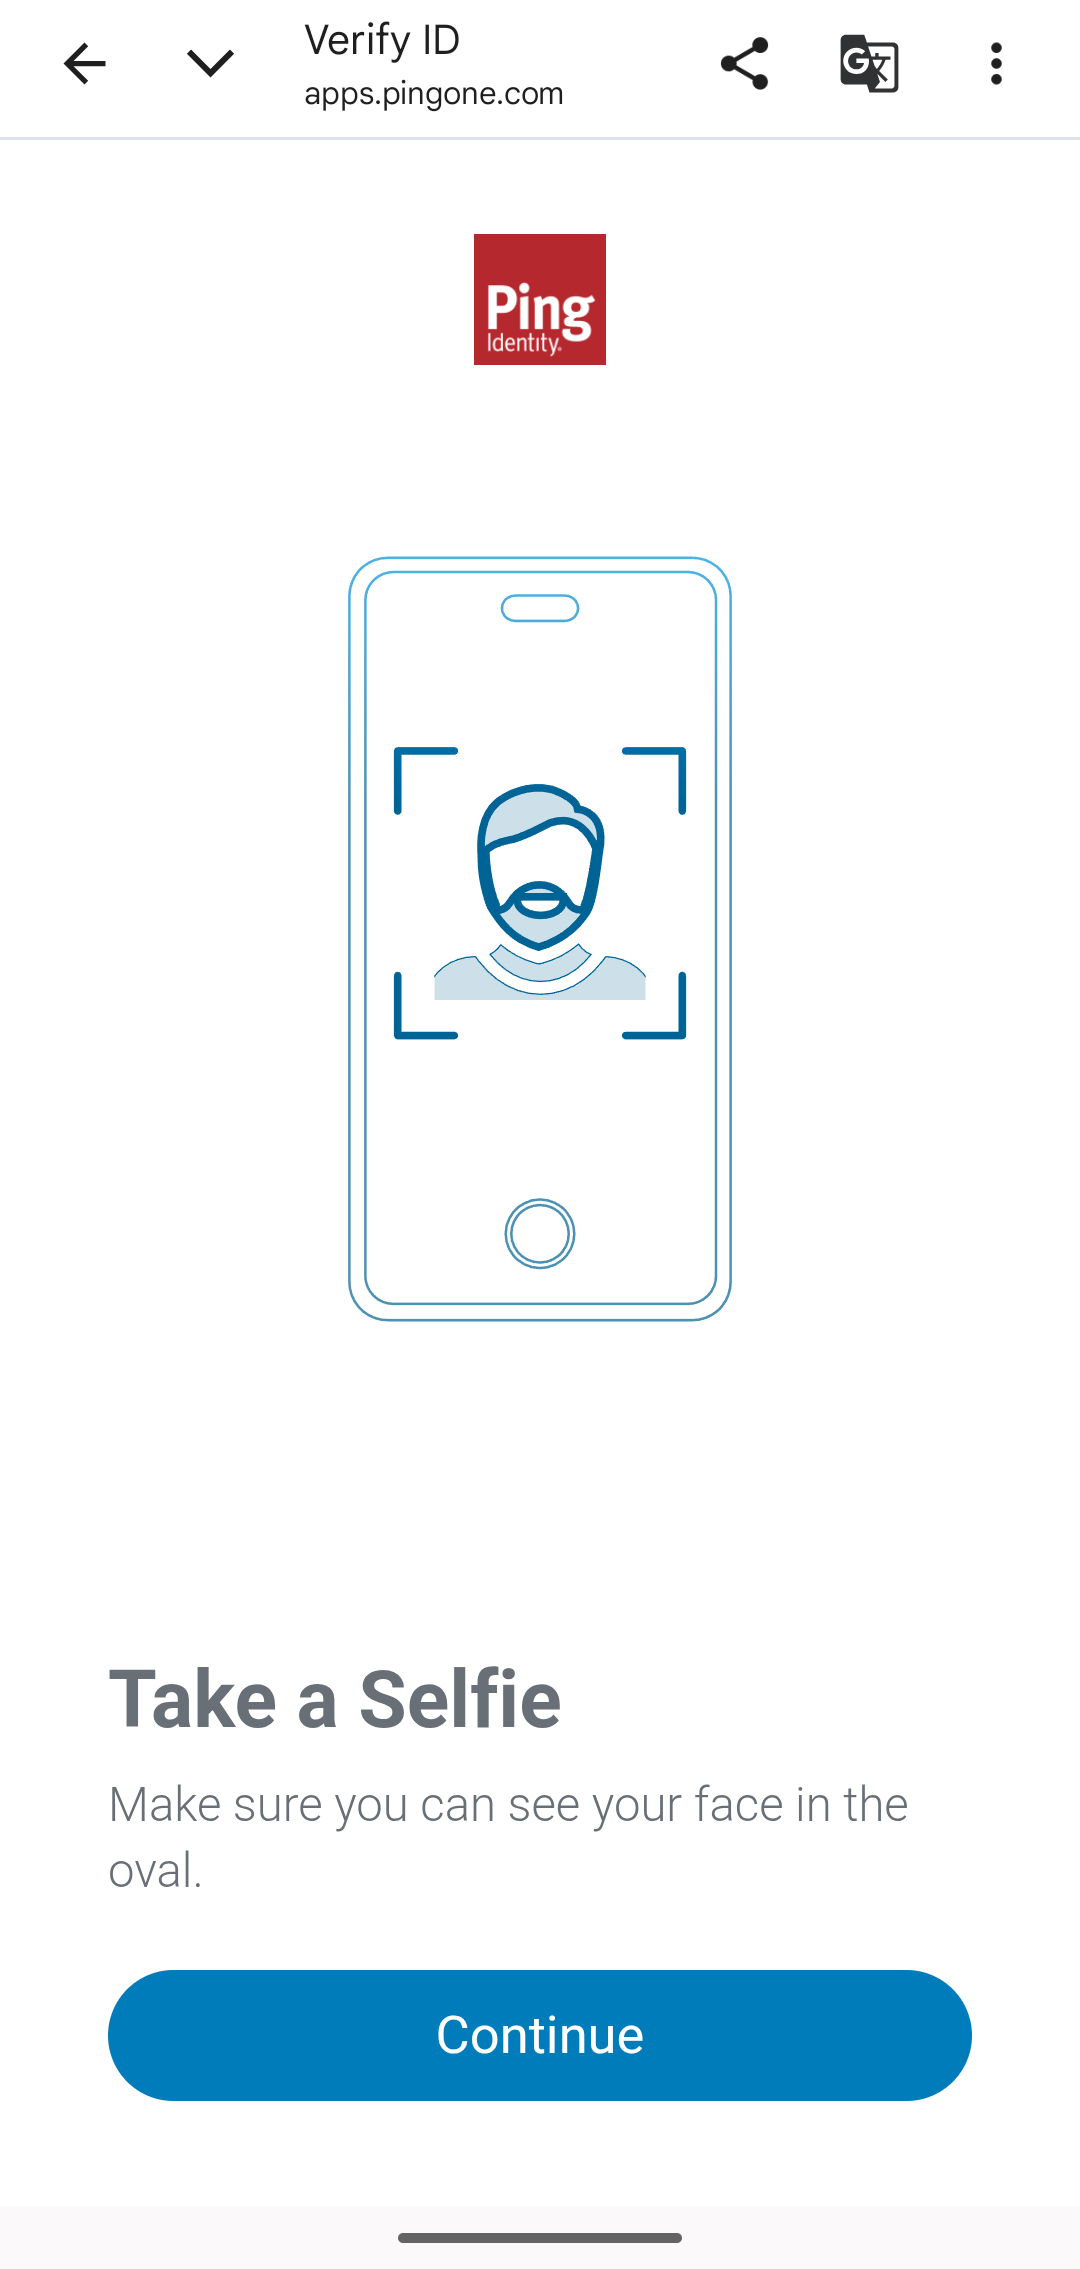
On the mobile device, on the Take a Selfie screen, tap Continue.
-
Follow the prompts on your mobile device. After you take the selfie, tap Continue.
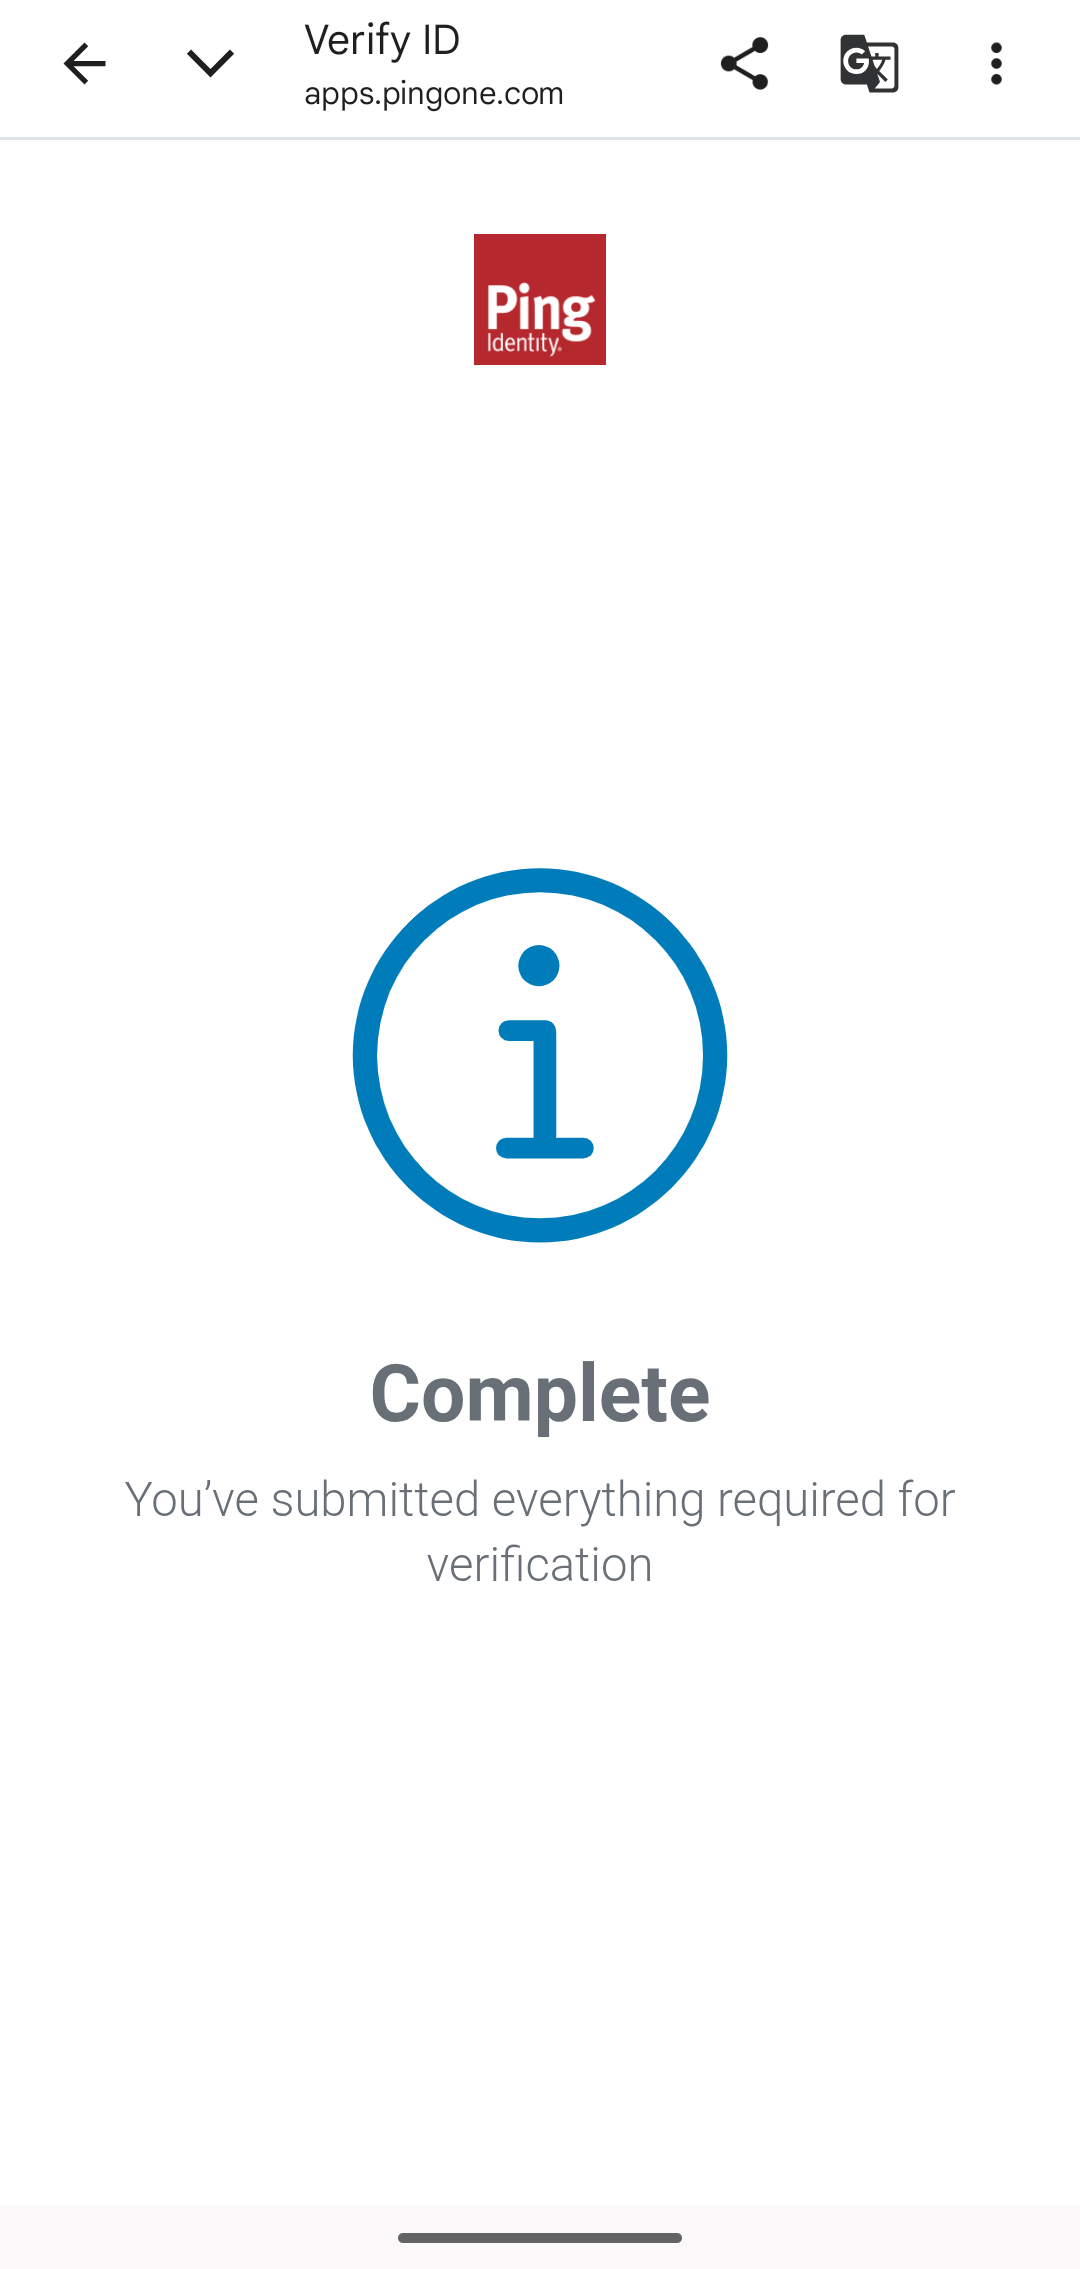
The mobile device now displays a Complete screen. The end user’s portion is completed successfully.
-
-
Complete the verification:
The help desk agent’s Call Center Verification page now displays the status of the verification. If the verification passes, the page displays a Success status chip for the overall status, as well as Success chips for User Liveness and Facial and Document Comparison.
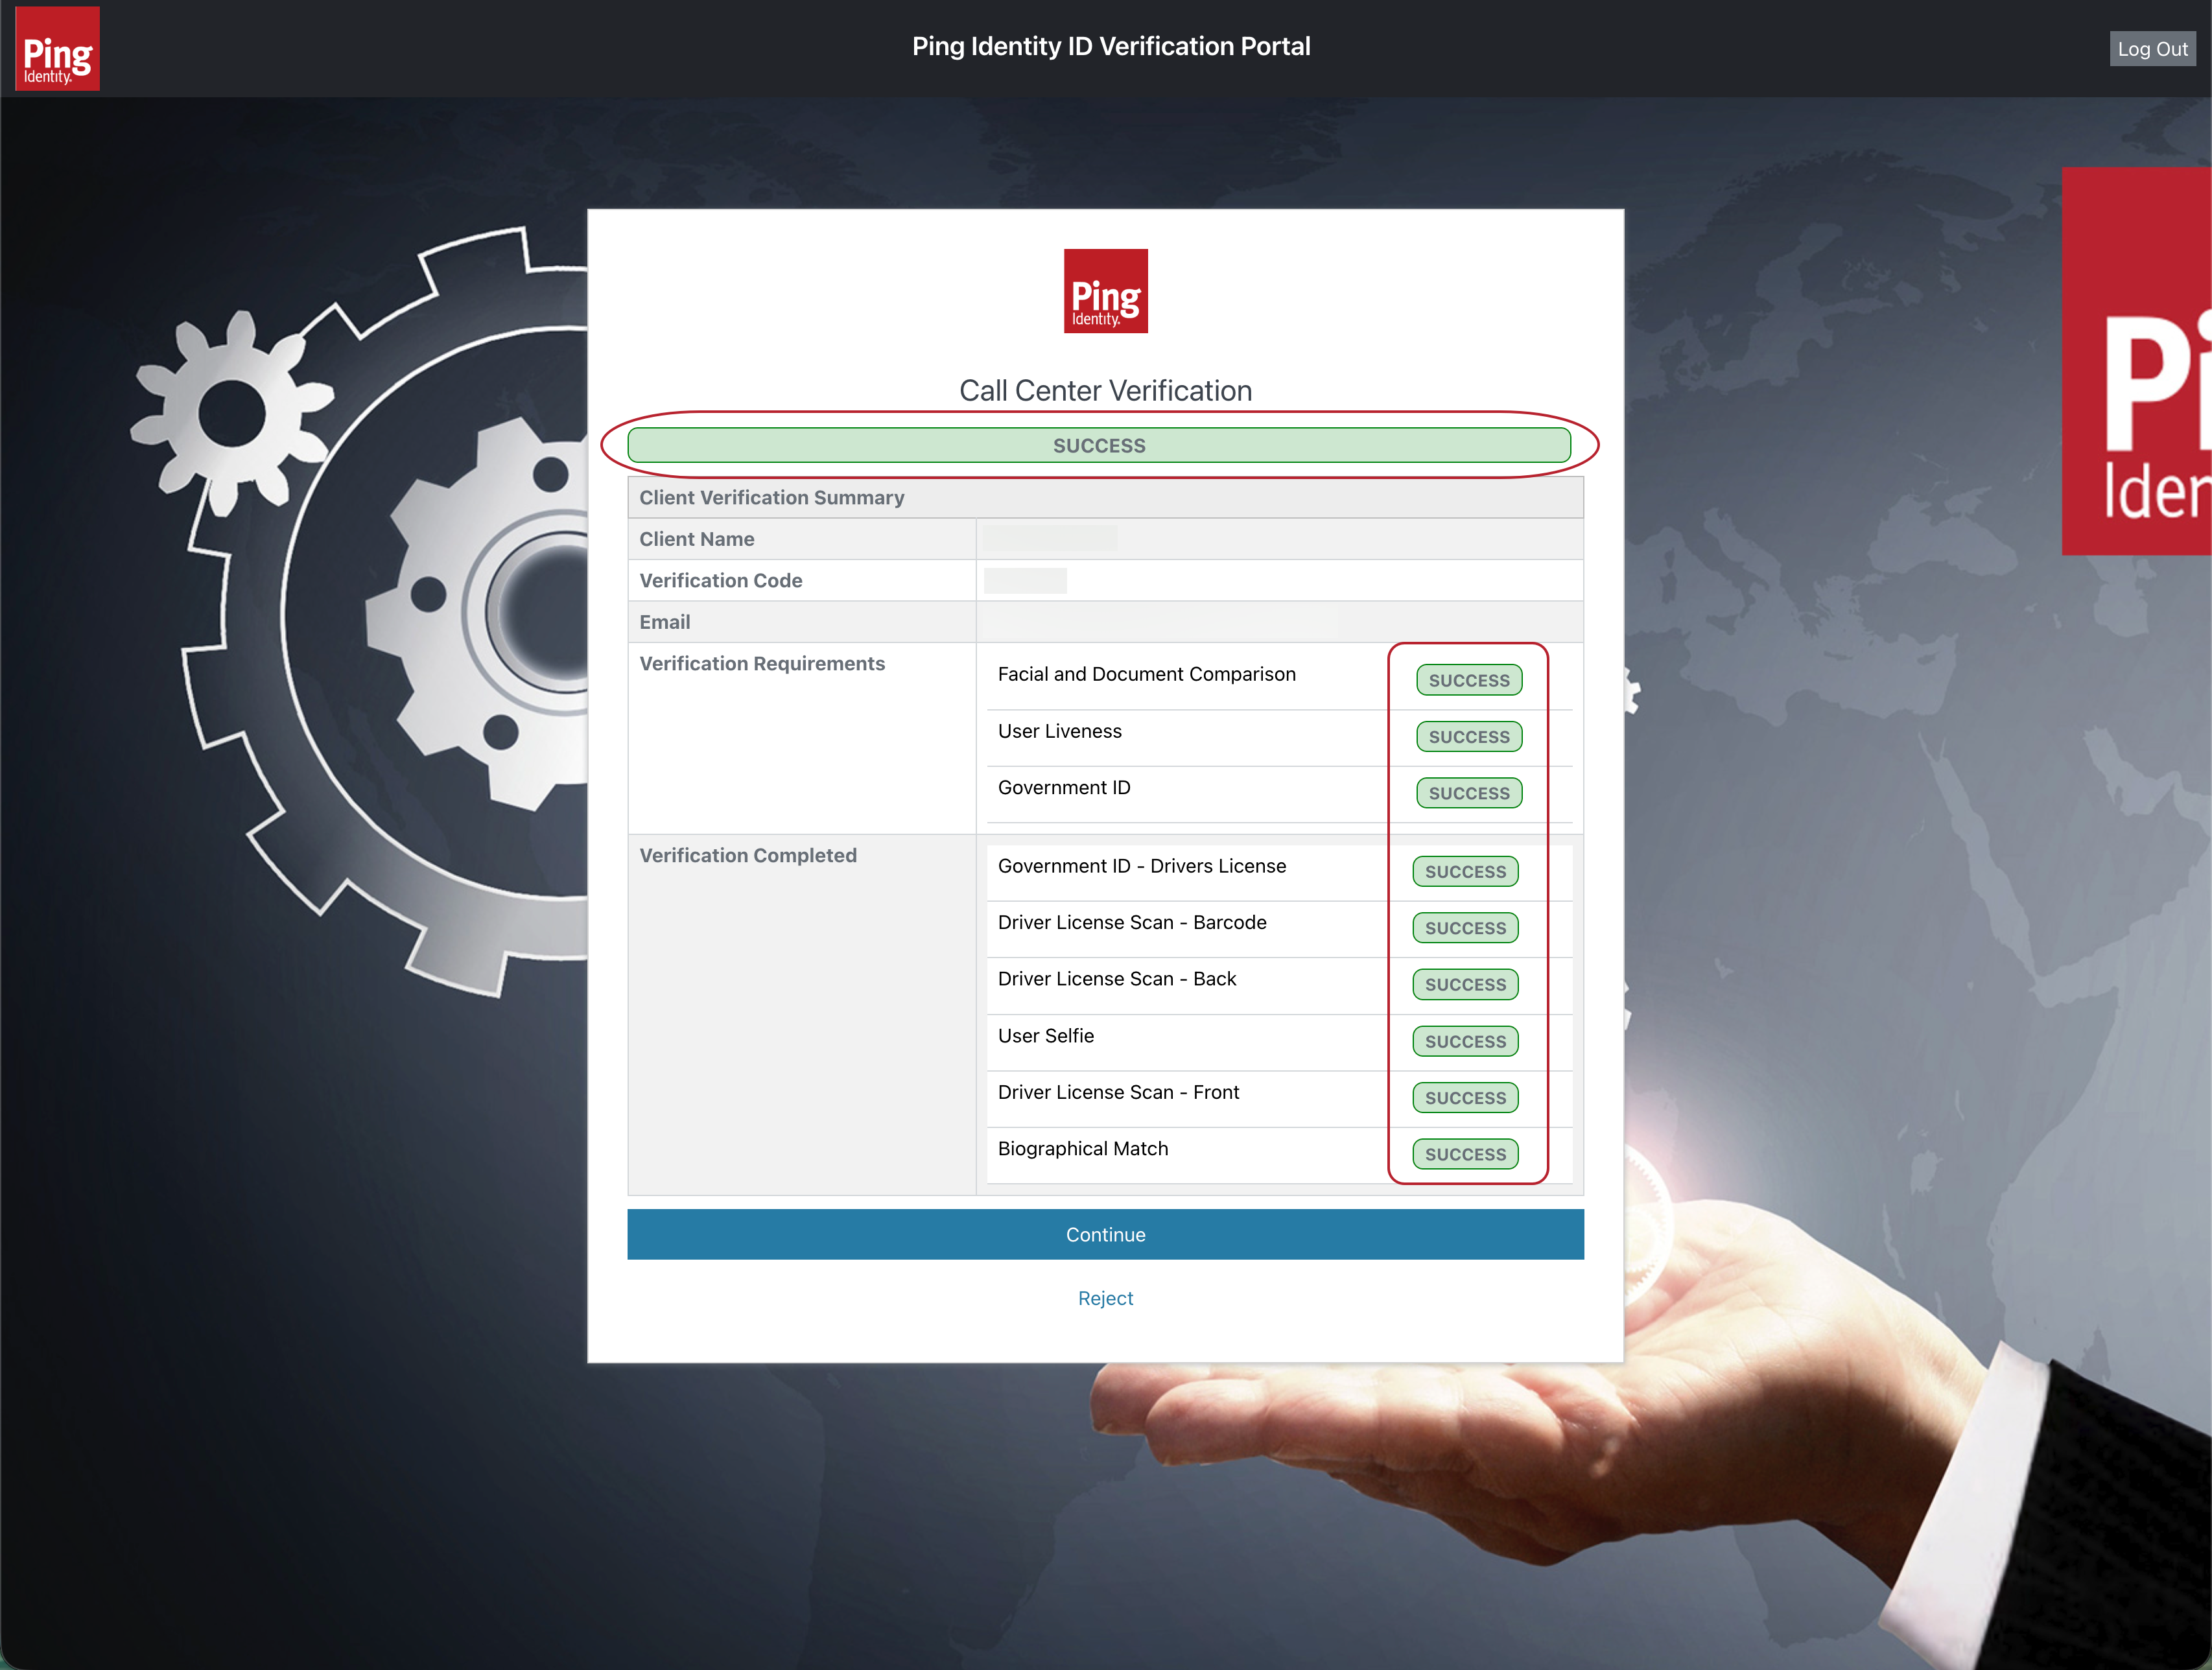
At this point, the help desk agent is ready to reset the end user’s account. If you click Continue to accept the verification, the DaVinci flow proceeds to a success response and displays the SAML Response page.
You need to configure the flow to determine the next logical steps to take, including where to redirect the help desk agent’s browser, depending on the outcome of the end-user verification.
When customizing the solution, you must preserve the required inputs and outputs. Learn more in the Reference section.
Troubleshooting
This section provides troubleshooting tips for common issues related to the Verified Trust for Workforce Help Desk Solution.
- The Try Flow button doesn’t work
-
This solution is built to be launched from PingOne. You’ll need to go to the sign-on URL of the PingOne DaVinci Connection application, as described in the Validation steps.
- The help desk agent can’t sign on
-
When you enter the help desk agent’s credentials on the Help Desk Verification page, you receive an error message. Confirm the following:
-
Your PingOne SSO authentication flow is properly configured, as described in PingOne SSO and Integrating flows into applications.
-
Your PingOne connector is configured with the correct application information. For this solution, we used the PingOne DaVinci Connection application. Learn more in Viewing application details and Editing a connector.
-
Your two solution flows are properly saved and deployed. Learn more in Getting started with DaVinci.
-
- The help desk agent isn’t authorized
-
After you sign on as the help desk agent, the flow displays the Unauthorized page with the message You are not authorized for this action.
This happens because the help desk agent you specified isn’t a member of the appropriate administrator group. You either need to add this agent to the group or specify a different agent who is already a group member. Refer back to the steps in Configuring the admin group for account recovery for more information.
- The end user can’t access the verification link
-
If the end user doesn’t have access to the email addresses or phone numbers configured in their PingOne user account, you can select No Methods Available on the help desk agent’s End User Verification page. The Provide Details page then displays, and you can enter an alternate phone number or email address to send the link to.

- The verification timed out
-
If the help desk agent’s Call Center Verification page displays a message that the verification has timed out, that means the end user didn’t perform the verification steps quickly enough. You can click Retry to start a new verification transaction and send a new link to the end user. Clicking Cancel ends the verification process.
- I want to manually approve a failed verification
-
If the end user verification wasn’t successful, the help desk agent’s Call Center Verification page displays a Fail status chip. To complete the transaction and record the verification as a failure, click Continue with Failed Transaction.
Alternatively, you can proceed as if the verification didn’t fail. To manually approve the verification, click Bypass Failed Transaction, and then click Continue when asked to confirm.
As configured, the solution doesn’t reset end user accounts, whether verifications succeed, fail, or are manually bypassed.
What’s next
In the Help Desk Agent Login and End User Verification flow, locate the Sign On Success and Sign On Fail nodes at the bottom of the canvas. These Teleport connectors lead to the only two outcomes for this solution, returning either a success or error response to the PingOne DaVinci Connection application. As configured, the flow displays these responses on a SAML Response page.
As you integrate and promote this solution into higher environments, you should configure your PingOne application to handle these responses according to your desired workflow.
Explore further
Concepts
Learn more about the concepts used in the Verified Trust for Workforce Help Desk Solution in the following table:
| Concept | Description |
|---|---|
An application acts as a gateway between your site and the flows you’ve created in DaVinci. The application contains settings to determine how external sites can send requests for flows, what flows can be requested, and how users and resources from other sites are managed. External sites can only run flows that are made available through an application. |
|
Connectors form the building blocks for flows. They connect DaVinci with third parties, HTML pages, and other tools. Each connector enables one or more capabilities that you can use as nodes in a flow. When you add a connector, you gain the ability to use its capabilities in your flows. |
|
A flow is a user journey, such as authentication or verification, built from a set of capabilities and logical operators. Every flow consists of one or more nodes joined together by logical operators. Each node performs a specific task, using one of the capabilities of your connectors. After the task is complete, the logical operators determine which task or tasks are performed next. |
|
Integrating a flow into an application lets your users launch the flow from that application. Choose an integration method based on the type of flow and the desired user experience. |
|
Add applications to your PingOne environment to manage access to those applications. PingOne supports multiple application types, including SAML, OpenID Connect (OIDC), native, and single-page applications (SPAs). |
|
In PingOne, tenants are called environments. Environments define separate working domains within an organization and contain assets such as your PingOne services and Ping Identity products, application connections, and user identities. |
|
Using an external IdP allows linked users to authenticate using the credentials provided by the external IdP. |
|
Using groups to organize a collection of user identities makes it easier to manage access to applications. You can create groups within an environment or within a population. |
|
Using PingOne SSO, users can sign on to all their applications and services with a single set of credentials. PingOne SSO uses identity standards like SAML, OAuth, and OIDC, which allow for encrypted tokens to be transmitted securely between the server and the apps. |
|
The PingOne Verify service lets you enable secure user verification based on a government-issued document and live face capture (a selfie). |
Reference material
If you customize the Help Desk Verify Evaluation subflow, you’ll need to make sure to preserve the following flow input and output variables to ensure that the flow operates correctly.
Inputs
| Variable name | Data type | Example value | Description |
|---|---|---|---|
|
String |
|
The PingOne Verify policy ID that specifies your verification requirements. |
|
Array |
|
The delivery methods you allow for sending a verification transaction link to the end user. |
|
Boolean |
|
Set this value to |
|
Boolean |
|
Set this value to |
|
String |
|
The generic user ID from PingOne. |
|
String |
|
The end user’s email (for delivery or matching). |
|
String |
|
The end user’s phone number (for delivery or matching). |
|
String |
|
The end user’s first name. |
|
String |
|
The end user’s last name. |
|
String |
|
The end user’s date of birth. |
|
String |
|
The text to display in the navigation bar of the help desk agent’s UI. |
Outputs
| Variable name | Data type | Description |
|---|---|---|
|
String |
The unique ID of the completed PingOne Verify transaction. |
|
String |
The final status of the verification. |
|
String |
A base64 encoded string of the end user’s selfie with the background replaced. |
|
String |
If the flow fails, this variable contains a description of the error. |
|
String |
The unique identifier for this specific flow execution instance. |