User self-service
These topics show you how to configure, maintain, and troubleshoot the user self-service feature provided by ForgeRock Access Management, which automates account registration and account name retrieval, and forgotten password reset.
User self-service
Enable self-registration, password reset, and username retrieval.
Configure user registration
Register users, or delegate user registration to IDM.
Configure password reset
Allow existing users to reset their password.
Configure username retrieval
Allow existing users to retrieve their username.
ForgeRock® Identity Platform serves as the basis for our simple and comprehensive Identity and Access Management solution. We help our customers deepen their relationships with their customers, and improve the productivity and connectivity of their employees and partners. For more information about ForgeRock and about the platform, see https://www.forgerock.com.
User self-service
AM provides a user self-service feature that lets your customers self-register to your web site, securely reset forgotten passwords, and retrieve their usernames.
AM’s user self-service capabilities greatly reduce help desk costs and offers a rich online experience that strengthens customer loyalty.
- User self-registration
-
Let non-authenticated users register to your site on their own. You can add additional security features like email verification, knowledge-based authentication (KBA) security questions, Google reCAPTCHA, and custom plugins to add to your user self-registration process.
- Knowledge-based authentication security questions
-
Supports the capability to present security questions during the registration process. When enabled, the user is prompted to enter answers to pre-configured or custom security questions. Then, during the forgotten password or forgotten username process, the user is presented with the security questions, and must answer them correctly to continue the process.
- Forgotten password reset
-
Lets registered users already in your system reset their passwords. The default password policy is set in the underlying directory server and requires a minimum password length of eight characters by default. If security questions are enabled, users must also correctly answer their pre-configured security questions before resetting their passwords.
- Forgotten username support
-
Lets users retrieve their forgotten usernames. If security questions are enabled, users must also correctly answer their pre-configured security questions before retrieving their usernames.
- Google reCAPTCHA plugin
-
Supports the ability to add a Google reCAPTCHA plugin to the registration page. This plugin protects against any software bots that may be used against your site.
- Configurable plugins
-
Supports the ability to add plugins to customize the user services process flow. You can develop your custom code and drop the
.jarfile into your container. - Customizable confirmation emails
-
Supports the ability to customize or localize confirmation emails in plain text or HTML.
- Password policy configuration
-
Supports password policy configuration, which is enforced by the underlying DS server and manually aligned with frontend UI templates. The default password policy requires a password with a minimum length of eight characters.
- Self-registration user attribute allowlist
-
Supports attribute allowlisting, which lets you specify which attributes can be set by the user during account creation.
The user self-service feature supports a number of different user flows depending on how you configure your security options. These options include email verification, security questions, Google reCAPTCHA, and any custom plugins that you create.
Forgotten username retrieval and forgotten password reset support various user flows, depending on how you configure your security options. If you enabled security questions and the user entered responses to each question during self-registration, the security questions are presented to the user in random order.
Configure user self-service
You can configure the user self-service features to use email address verification, which sends an email containing a link for user self-registration and forgotten password reset via AM’s email service. You can also send the forgotten username to the user by email if configured.
|
To configure user self-registration and password recovery in the ForgeRock Identity Platform, see the ForgeRock Identity Platform self-service documentation. |
The following table summarizes the high-level tasks required to configure the user self-service features:
| Task | Resources |
|---|---|
Create encryption and signing keys The user self-service features require a key pair for encryption and a signing secret key. Create one of each for each instance of user self-service you plan to configure. |
|
Configure a user self-service instance Each realm requires its own instance. |
|
Configure user self-service security Configure at least one security method for each feature:
|
|
Configure user self-service features Configure the features that your environment requires. |
|
You can also delegate user self-registration to IDM. |
Create a user self-service instance
-
In the AM admin UI, go to Realms > Realm Name > Services and select Add a Service.
-
Select User Self-Service from the list of possible services.
-
Populate the values of the Encryption Key Pair Alias and the Signing Secret Key Alias properties with the names of the key pair aliases in your JCEKS keystore.
Note that the name of the demo keys shows with a gray color; that does not mean the fields are filled in.
For example, if you are using the demo keys in the default
keystore.jceksfile, set the properties as follows:-
Encryption Key Pair Alias to
selfserviceenctest. -
Signing Secret Key Alias to
selfservicesigntest.The demo key aliases are for test or evaluation purposes. Do not use them in production environments. To create new key aliases, see Create self-service key aliases.
-
-
Enable the user self-service features.
-
Select Create.
Configure the email service
The user self-service feature lets you send confirmation emails via AM’s SMTP email service to users who are registering at your site or resetting forgotten passwords. If you choose to send confirmation emails, you can configure the email service by realm or globally.
If the user enters an invalid first or last name, username, or email address
during the username or password reset flows,
AM presents them with a message similar to
An email has been sent to the address you entered. Click the link in that email to proceed,
but does not actually send an email.
If the user enters an existing username while registering,
AM presents them with a message similar to
An email has been sent to the address you entered. Click the link in that email to proceed,
and then sends an email with a registration link to the address that the user entered.
Clicking on the link sends the user to the registration page again,
and AM shows a message similar to One or more user account values are invalid.
This is to protect the service against account enumeration attacks.
|
Each individual user must have a unique email address to use the email features of user self-service. |
Perform the following steps to configure the email service:
-
In the AM admin UI, go to Realms > Realm Name > Services.
-
Select Add a Service and choose Email Service from the list of available services.
-
Configure the email service:
-
In the Mail Server Host Name field, enter the hostname of the mail server. If you are using the Google SMTP server, you must also configure the Google Mail settings to enable access for less secure applications.
-
In the Mail Server Authentication Username field, enter the username to authenticate to the mail server. If you are testing on a Google account, you can enter a known Gmail address.
-
In the Mail Server Authentication Password field, enter the password corresponding to the username used to authenticate to the mail server.
-
In the Email From Address field, enter the email address from which to send the email notifications. For example,
no-reply@example.com. -
Select Create.
-
Configure additional properties in the email service as needed.
For more information about the different configuration properties, see Email service.
-
Configure the Google reCAPTCHA plugin
The user self-service feature supports the Google reCAPTCHA plugin, which can be placed on the Register Your Account, Reset Your Password, and Retrieve Your Username pages. The Google reCAPTCHA plugin protects your user self-service implementation from software bots.
Google reCAPTCHA is the only supported plugin for user self-service. Any other Captcha service will require a custom plugin.
|
To configure JVM properties for proxy support, see Configure AM for outbound communication. |
-
Register your website at a Captcha provider, such as Google reCAPTCHA, to get your site and secret key.
When you register your site for Google reCAPTCHA, you only need to obtain the site and secret key, which you enter in the User Self-Service configuration page in the AM admin UI. You do not have to do anything with client-side integration and server-side integration. The Google reCAPTCHA plugin appears automatically on the Register Your Account, Reset Your Password, and Retrieve Your Username pages after you configure it in the AM admin UI.
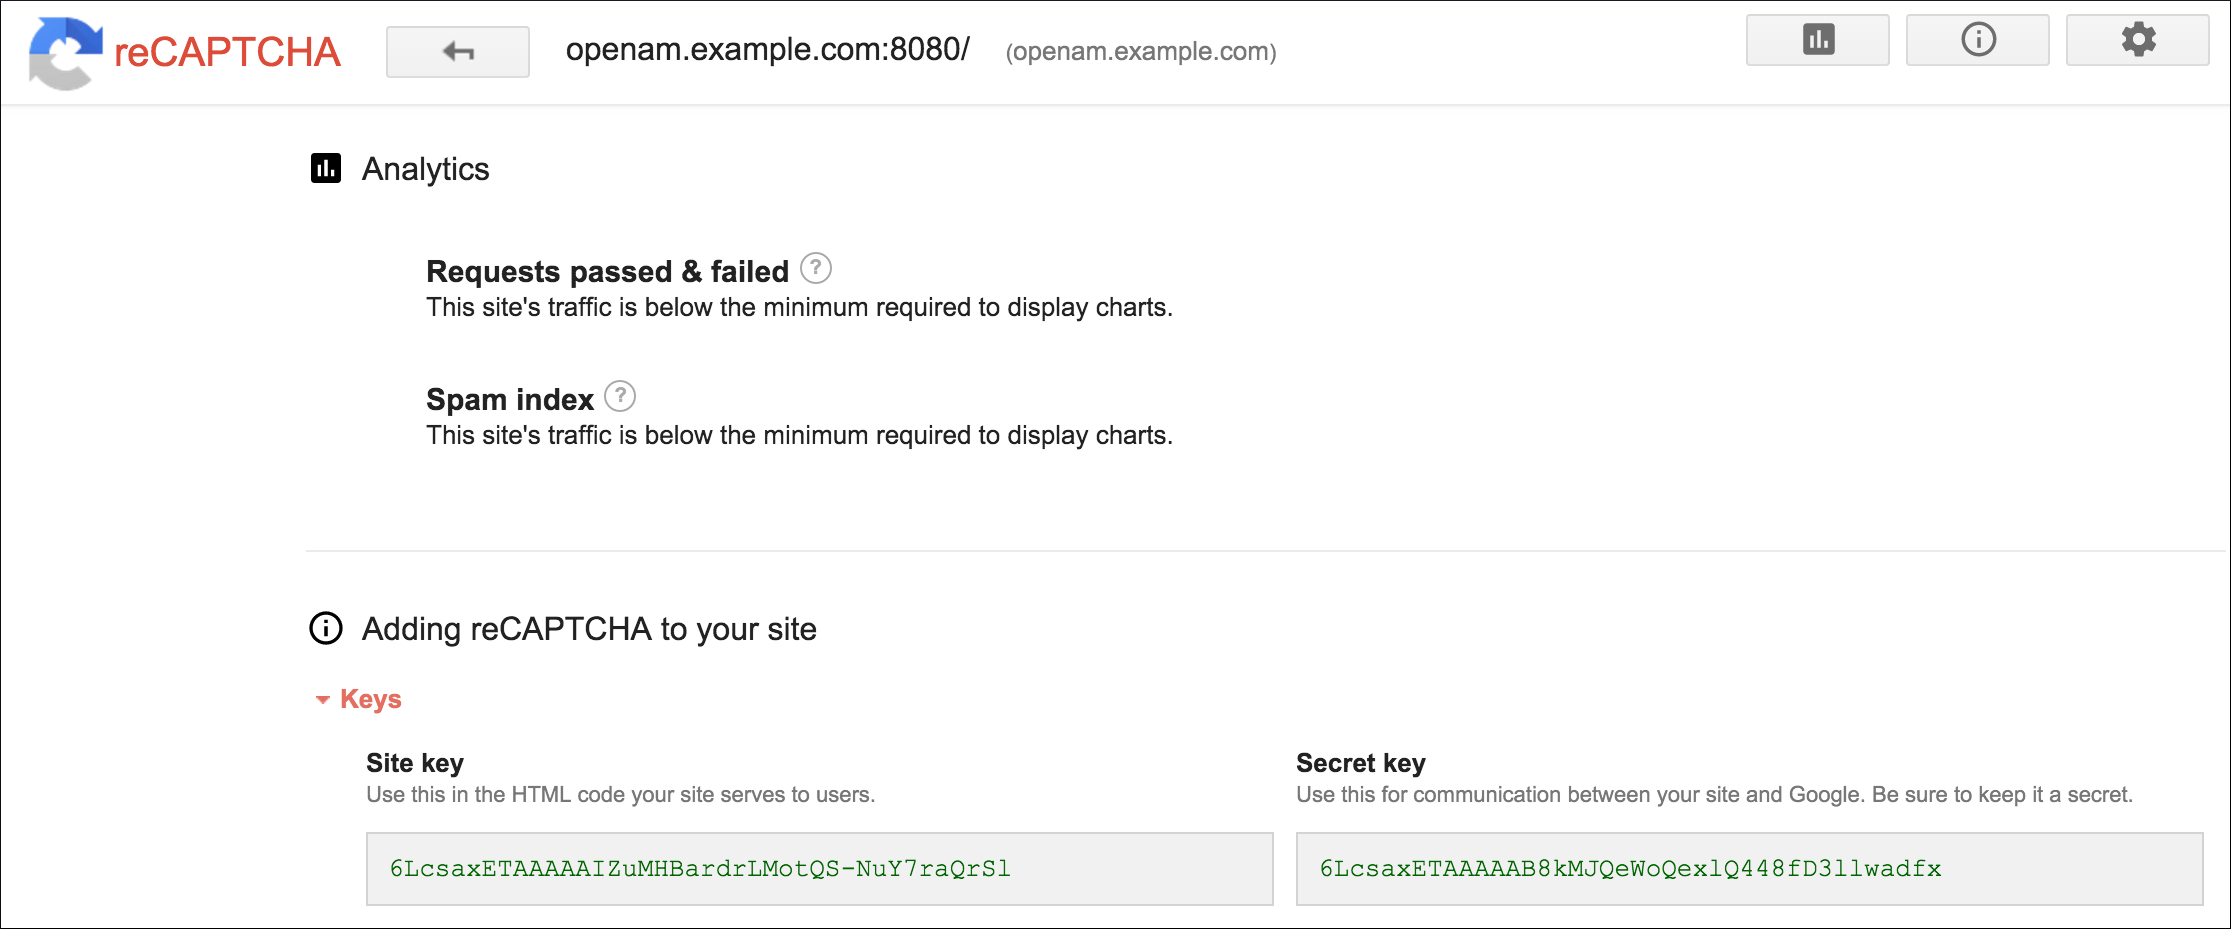 Figure 1. Google reCAPTCHA Page
 -
In the AM admin UI, go to Realms > Realm Name > Services and select the User Self-Service service.
-
Select the General Configuration tab.
-
In the Google reCAPTCHA Site Key field, enter the site key that you obtained from the Google reCAPTCHA site.
-
In the Google reCAPTCHA Secret Key field, enter the secret key that you obtained from the Google reCAPTCHA site.
-
In the Google reCAPTCHA Verification URL field, leave the URL by default.
-
Save your changes.
-
Enable Google reCAPTCHA for the user self-service features.
For more information see:
Configure knowledge-based security questions
Knowledge-based authentication (KBA) is an authentication mechanism in which the user must correctly answer a number of pre-configured security questions that are set during the initial registration setup. If successful, the user is granted the privilege to carry out an action, such as registering an account, resetting a password, or retrieving a username. The security questions are presented in a random order to the user during the User Self-Registration, forgotten password reset, and forgotten username processes.
AM provides a default set of security questions and easily allows AM administrators and users to add their own custom questions.
Security questions must be set in order for users to reset their password.
If the user enters an invalid username, email, or first name/surname pair as part of a recovery flow,
AM presents them with a random KBA question before failing the flow.
This is to protect the service against account enumeration attacks.
If both the security questions and the confirmation emails are enabled for a given flow,
AM presents the user with a message similar to
An email has been sent to the address you entered. Click the link in that email to proceed,
but does not actually send an email.
-
In the AM admin UI, go to Realms > Realm Name > Services and select the User Self-Service service.
-
Select the General Configuration tab.
-
In the Security Questions field, several questions are available by default.
Enter your own questions as required. The syntax is
OrderNum|ISO-3166-2 Country Code|Security Question. For example,5|en|What is your dog’s name?. Make sure that order numbers are unique.You should never remove any security questions as a user may have reference to a given question. -
In the Minimum Answers to Define field, enter the number of security questions that will be presented to the user during the registration process.
-
In the Minimum Answers to Verify field, enter the number of security questions that must be answered during the Forgotten Password and Forgotten Username services.
-
Save your changes.
-
Ensure that the
kbainfoattribute is set in the profile attribute allowlist.
The profile attribute allowlist controls the information returned to non-administrative users when they access json/user
endpoints. For example, the allowlist controls the attributes shown in the user profile page.
Common profile attributes are allowlisted by default. You must add any custom attributes that you want non-administrative users to see.
The allowlist can be set globally, or per realm, in the user self-service service. To modify the list:
-
Globally: Go to Configure > Global Services > User Self-Service > Profile Management, and edit the Self readable attributes field.
-
By realm: Go to Realms > Realm Name > Services > User Self-Service > Profile Management, and edit the Self readable attributes field.
Note that you need to add the user self-service service to the realm if you have not done so already, but you do not need to configure anything other than the allowlist.
Configure user registration
User self-registration lets end users create their own accounts in AM. You can configure AM to perform user registration, or you can delegate user registration to IDM.
Configure AM for user self-registration
Although you can configure user self-registration without any additional security mechanisms, such as email verification or KBA security questions, we recommend configuring the email verification service with user self-registration at a minimum.
-
In the AM admin UI, configure the email service.
-
Go to Realms > Realm Name > Services and select User Self-Service.
-
On the User Registration tab, enable User Registration.
-
Enable Captcha to turn on the Google reCAPTCHA plugin. Make sure you have configured the plugin, as described in Configure the Google reCAPTCHA plugin.
-
Enable Email Verification to turn on the email verification service. We recommend you leave Email Verification enabled, so users who self-register must perform email address verification.
-
Enable Verify Email before User Detail to verify the user’s email address before requesting the user details.
By default, the user self-registration flow validates the email address after the user has provided their details. Enable this setting for backwards-compatibility with self-registration flows configured in OpenAM 13 or 13.5.
-
Enable Security Questions to display security questions during the self-registration process.
If you enable security questions, the user is presented with the configured questions during the forgotten password and forgotten username flows. The user must answer these questions in order to reset their passwords or retrieve their usernames .
-
In the Token LifeTime field, set an appropriate number of seconds for the token lifetime. If the token lifetime expires before the user self-registers, they will need to restart the registration process.
Default:
300seconds. -
To customize the user registration outgoing email, perform the following steps:
-
In the Outgoing Email Subject field, enter the subject line of the email.
The syntax is
lang|subject-text, wherelangis the ISO-639 language code, such asenfor English, orfrfor French. For example, the subject line values could be:en|Registration Emailandfr|E-mail d’inscription. -
In the Outgoing Email Body field, enter the text of the email.
The syntax is
lang|email-text, wherelangis the ISO-639 language code. The email body text must be all on one line, and can contain any HTML tags within the body of the text.For example:
en|Thank you for registering with example.com! Click <a href="%link%">here</a> to register.`
-
-
In the Valid Creation Attributes field, enter the attributes that the user can set during registration.
These attributes are based on the AM identity repository.
-
For Destination After Successful Registration, select one of the following options:
-
auto-login. User is automatically logged in and sent to the appropriate page within the system.
-
default. User is sent to a success page without being logged in. In this case, AM displays a "You have successfully registered" page. The user can then click the Login link to log in to AM. This is the default selection.
-
login. User is sent to the login page to authenticate.
-
-
Save your changes.
-
On the Advanced Configuration tab, configure the User Registration Confirmation Email URL for your deployment. The default is:
https://openam.example.com:8443/openam/XUI/?realm=${realm}#register/. -
Save your changes.
Delegate user self-registration to IDM
Like AM, IDM offers user self-registration functionality. However, IDM provides additional onboarding and provisioning features.
You can delegate user registration to IDM after a user has authenticated to AM, using a social identity authentication module, for example.
For IDM to complete the registration process:
-
AM and IDM must be connected to the same user data store.
For more information, see the shared identity store in the ForgeRock Identity Platform documentation.
-
AM and IDM must share the signing and encryption keys used for self-service.
You can supply your own keys for both servers, or you can use the default IDM keys.
To use the default IDM keys, follow the instructions in Copy key aliases to copy the following key aliases from the IDM keystore to the AM keystore:
-
openidm-selfservice-key—encrypts JWT self-service tokens using HS256 (HMAC with SHA-256) (SecretKeyEntry) -
selfservice—Signs JWT session tokens using RSA (PrivateKeyEntry)
When you have copied the keys, restart AM to apply the changes.
-
Configure AM to let IDM handle registration
-
In the AM admin UI, go to Configure > Global Services > IdmIntegrationService and enable the service.
-
Enter the URL of the IDM instance in the idmDeploymentUrl field, for example
https://idm.example.com. -
Enter the signing and encryption key information:
-
If you used the default IDM keys, enter the following key information:
-
In the provisioningSigningKeyAlias field, enter
selfservice. -
In the provisioningEncryptionKeyAlias field,
openidm-selfservice-key. -
In the provisioningSigningAlgorithm field, enter
HS256. -
In the provisioningEncryptionAlgorithm field, enter
RSAES_PKCS1_V1_5. -
In the provisioningEncryptionMethod field, enter
A128CBC_HS256.
-
-
If you created new signing or encryption keys, enter the details of these keys. The keys must be identical and available in the default keystores of both AM and IDM.
For more information, see Security in the IDM documentation.
-
If you are using IDM 6 or earlier, enable the jwtSigningCompatibilityMode property.
For details of the configuration properties, see IDM provisioning.
-
-
Save your changes.
-
In the AM admin UI, go to Realms > Realm Name > Authentication > Modules, and create or select a social authentication module in which to enable IDM user registration.
-
On the social authentication module page, perform the following actions on the Account Provisioning tab:
-
Select Use IDM as Registration Service.
-
Enable Create account if it does not exist.
-
-
Save your changes.
Successfully authenticating to a social authentication module that has IDM as the registration service redirects the user to IDM to complete the user registration.
For information on integrating AM and IDM, see the Platform Setup Guide.
User management of passwords and security questions
Once the user has self-registered to your system, they can change their password and security questions at any time on the user profile page. The user profile page provides tabs to carry out these functions.
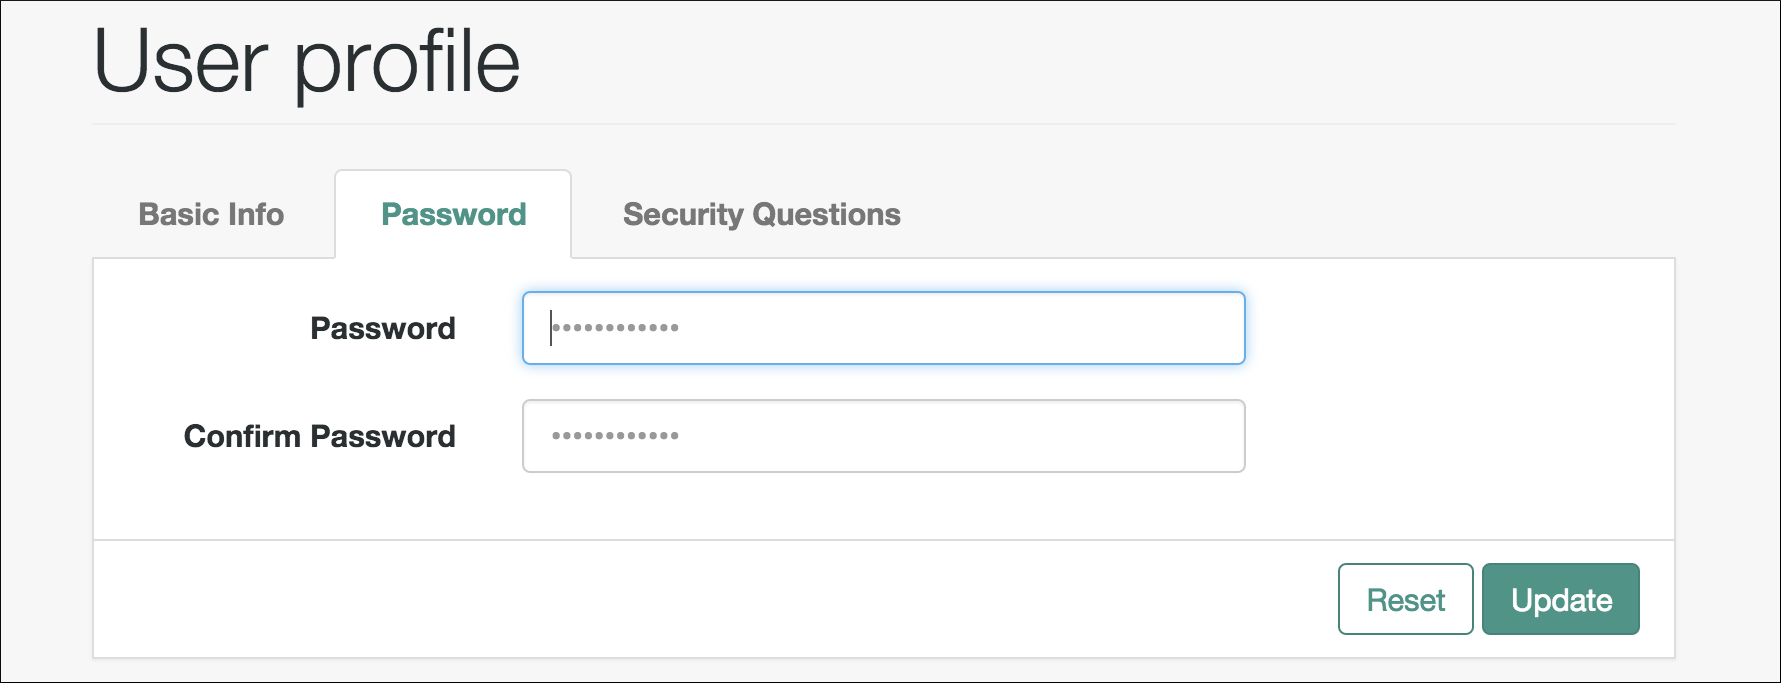
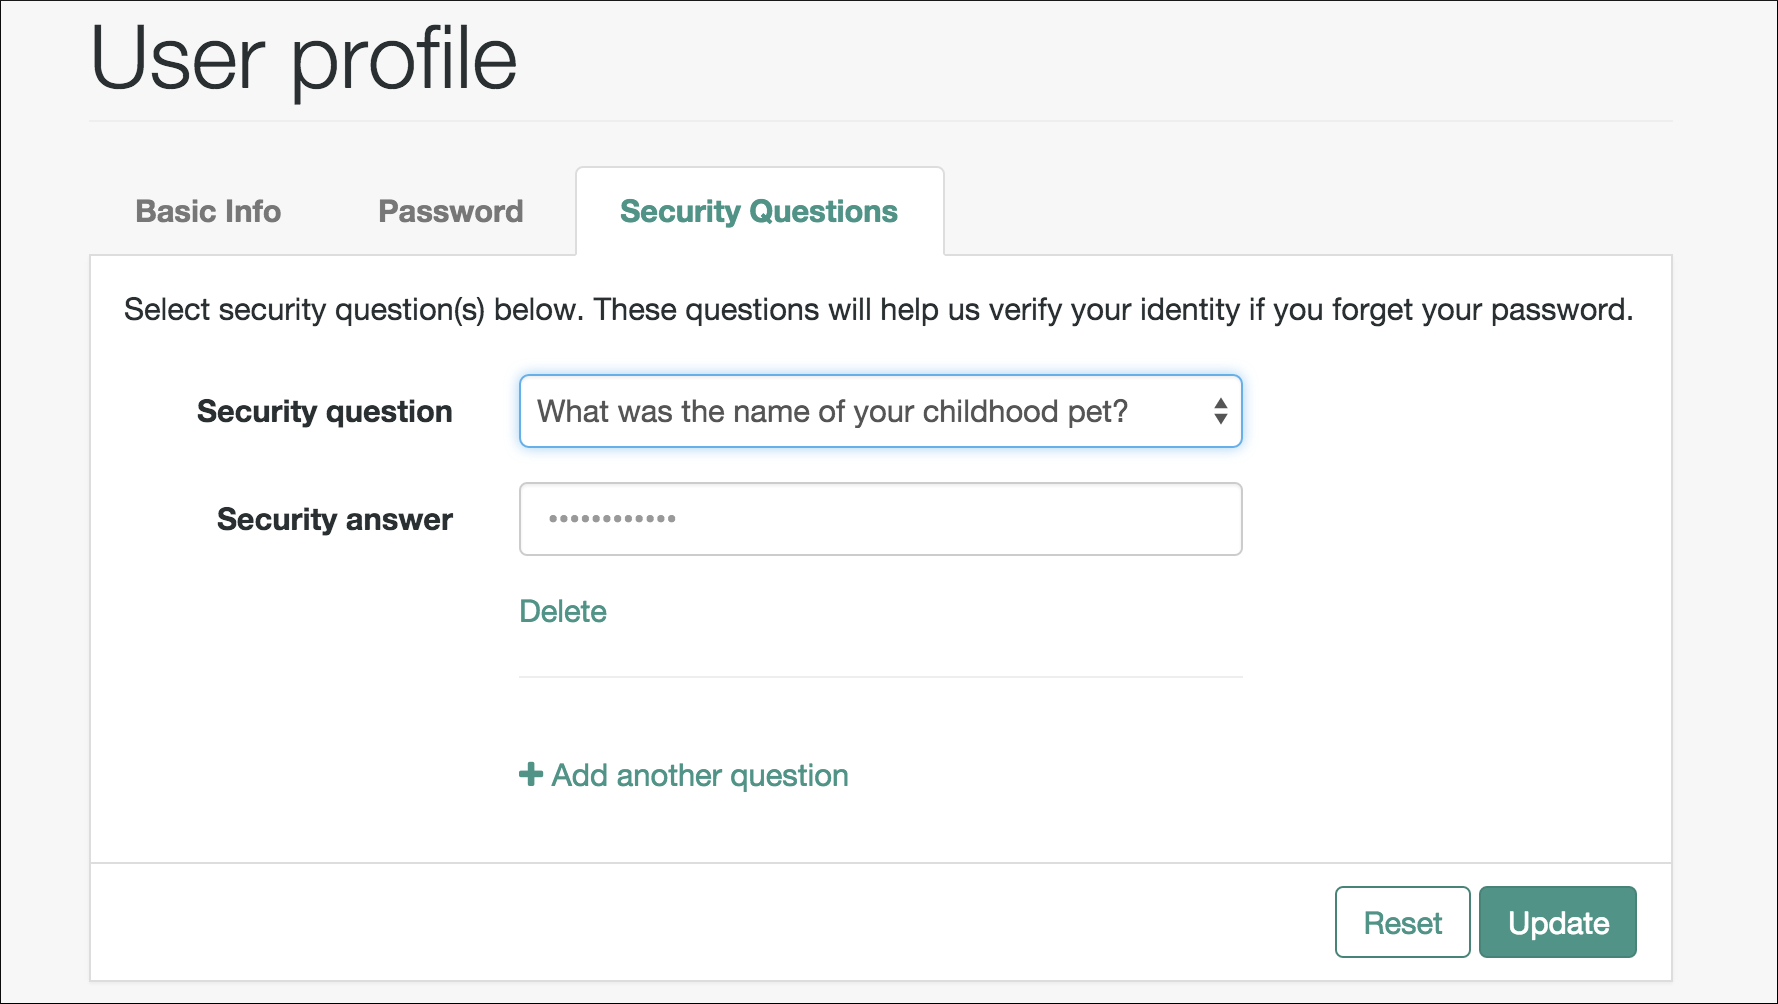
Configure forgotten password reset
The forgotten password feature allows existing users to reset their passwords when they cannot remember them.
-
In the AM admin UI, go to Realms > Realm Name > Services and select the User Self-Service service.
-
Select the Forgotten Password tab.
-
Enable Forgotten Password.
-
Enable Captcha to turn on the Google reCAPTCHA plugin. Make sure you configured the plugin as described in Configure the Google reCAPTCHA plugin.
-
Enable Email Verification to turn on the email verification service. ForgeRock recommends that you keep it enabled.
Note that the recovery link AM emails to the user contains a code that can only be used once.
-
Enable Security Questions to display security questions to the user during the forgotten password reset process. The user must have security questions defined in their profile, and must correctly answer the presented questions to be able to reset passwords.
You can also configure AM to lock an account if the user fails to answer their security questions a number of times. To enable this feature, perform the following steps:
-
Enable Enforce password reset lockout.
-
In the Lock Out After number of attempts field, set the number of questions the user must fail to answer for AM to lock their account.
-
-
In the Token LifeTime (seconds) field, enter an appropriate number of seconds for the token lifetime. If the token lifetime expires before the user resets their password, then the user will need to restart the forgotten password process over again.
Default:
300seconds. -
To customize the forgotten password outgoing email, perform the following steps:
-
In the Outgoing Email Subject field, enter the subject line of the email.
The syntax is
lang|subject-text, wherelangis the ISO-639 language code, such asenfor English,frfor French, and others. For example, the subject line value could be:en|Forgotten Password Email. -
In the Outgoing Email Body field, enter the text of the email.
The syntax is
lang|email-text, wherelangis the ISO-639 language code. Note that email body text must be all on one line and can contain any HTML tags within the body of the text.For example, the email body text could be:
en|Thank you for request! Click <a href="%link%">here<;/a> to reset your password.
-
-
Save your changes.
-
Under the Advanced Configuration tab, change the default Forgotten Password Confirmation Email URL for your deployment. The default is:
https://openam.example.com:8443/openam/XUI/?realm=${realm}#passwordReset/. -
Save your changes.
Configure forgotten username retrieval
The forgotten username feature allows existing users to retrieve their usernames when they cannot remember them.
-
In the AM admin UI, go to Realms > Realm Name > Services and select User Self-Service.
-
Select the Forgotten Username tab.
-
Enable Forgotten Username.
-
Enable Captcha to turn on the Google reCAPTCHA plugin. Make sure you configured the plugin as described in Configure the Google reCAPTCHA plugin.
-
Enable Security Questions to display security questions to the user during the forgotten password reset process. The user must have security questions defined in their profile, and must correctly answer the presented questions to be able to reset passwords.
-
Enable Email Username for the user to receive the retrieved username by email.
-
Enable Show Username for the user to see their retrieved username on the browser.
-
In the Token LifeTime (seconds) field, enter an appropriate number of seconds for the token lifetime. If the token lifetime expires before the user resets their password, then the user will need to restart the forgotten password process over again.
Default:
300seconds. -
To customize the forgotten username outgoing email, perform the following steps:
-
In the Outgoing Email Subject field, enter the subject line of the email.
The syntax is
lang|subject-text, wherelangis the ISO 639 language code, such asenfor English,frfor French, and others. For example, the subject line value could be:en|Forgotten username email. -
In the Outgoing Email Body field, enter the text of the email.
The syntax is
lang|email-text, wherelangis the ISO 639 language code. Note that email body text must be all on one line and can contain any HTML tags within the body of the text.For example, the email body text could be:
en|Thank you for your inquiry! Your username is %username%.
-
-
Save your changes.
Register a user
The AM UI includes pages for users to register to AM. You can, however, create a RESTful application to leverage the user self-service features.
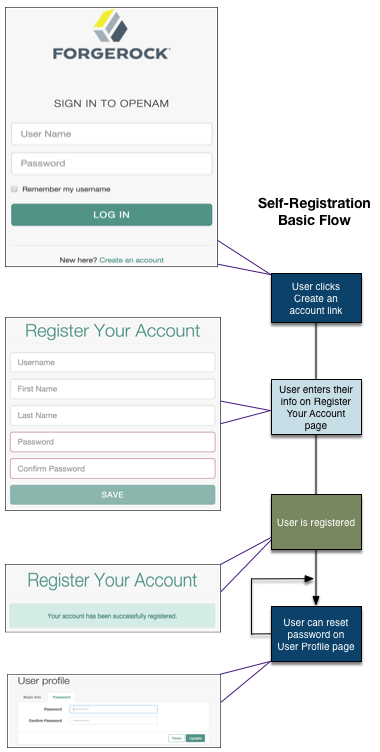
User self-registration flow with options (UI)
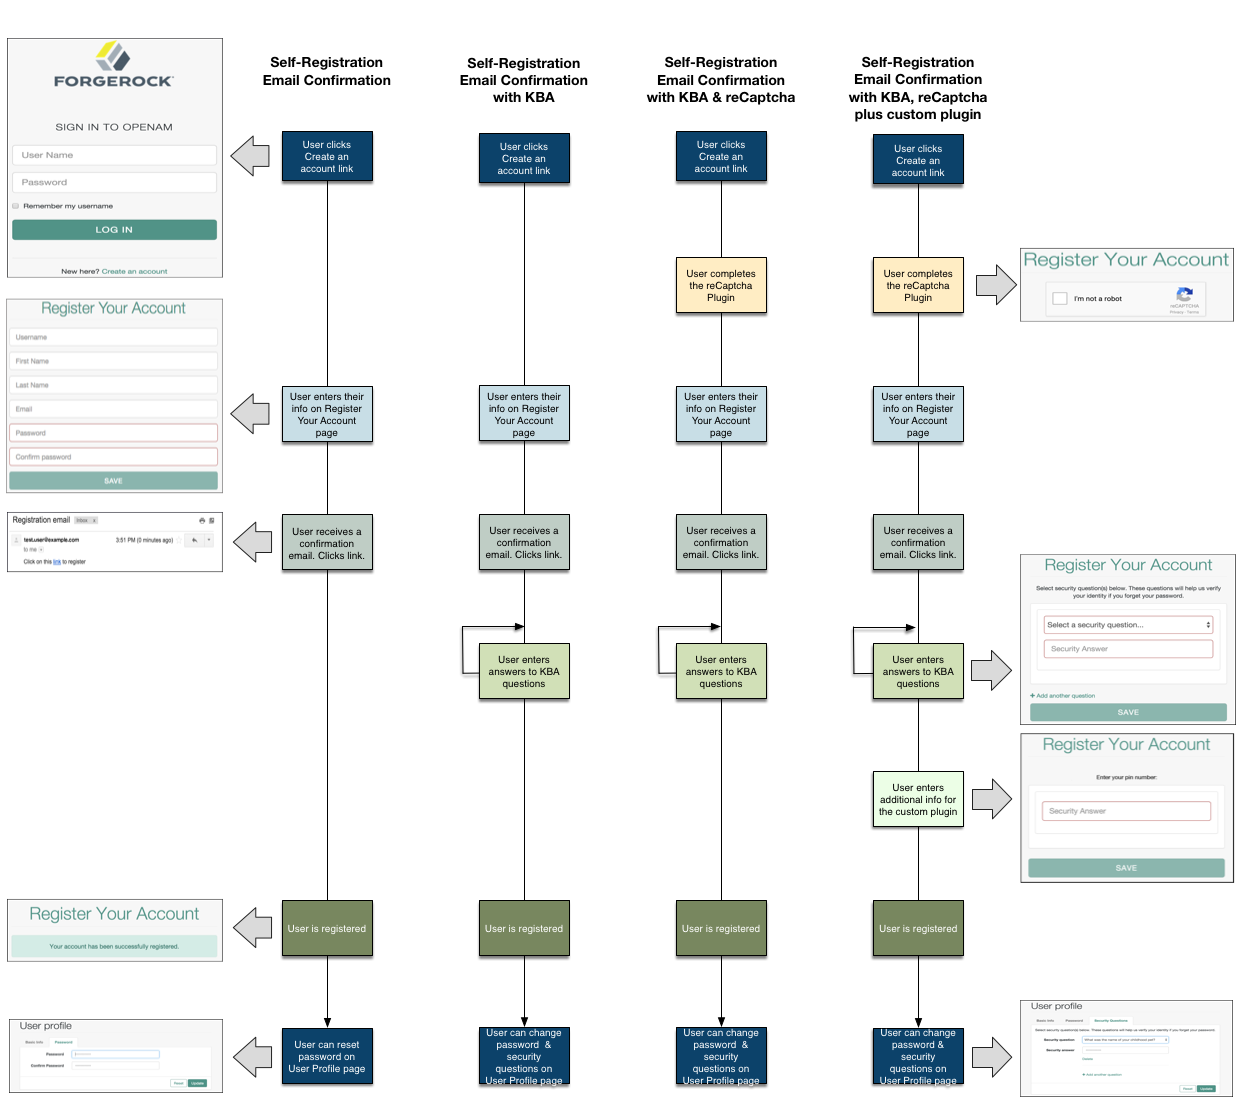
When performing user self-service functions, you can enable one or more security methods, such as email validation, Google reCAPTCHA, knowledge-based authentication, or custom plugins. Each configured security method requires requests to be sent from AM to the client, and completed responses returned to AM to verify.
A unique token is provided in the second request to the client that must be used in any subsequent responses, so that AM can maintain the state of the user self-service process.
By default, the user self-registration flow validates the email address after the user has provided their details. AM also provides a backwards-compatible mode for user self-registration flows configured in OpenAM 13 and 13.5 that lets AM validate the email address before the user has provided their details.
Register a user over REST
Before performing the steps in this procedure, ensure that Verify Email before User Detail (Realms > Realm Name > Services > User Self-Service > User Registration) is disabled.
-
Create a GET request to the
/selfservice/userRegistrationendpoint.Notice that the request does not require any form of authentication:
$ curl \ --header "Accept-API-Version: resource=1.0, protocol=1.0" \ https://openam.example.com:8443/openam/json/realms/root/selfservice/userRegistration { "requirements": { "$schema": "http://json-schema.org/draft-04/schema#", "description": "New user details", "properties": { "user": { "description": "User details", "type": "object" } }, "required": [ "user" ], "type": "object" }, "tag": "initial", "type": "userDetails" }bashAM sends a request to complete the user details. The
requiredarray defines the data that must be returned to AM to progress past this step of the registration. In the example, the required type is auserobject that contains the user details. -
Create a POST response back to the
/selfservice/userRegistrationendpoint with a query string containing_action=submitRequirements. In the POST data, include aninputelement in the JSON structure, which should contain values for each element in therequiredarray of the request.In this example, AM requests an object named
user. Ths object should contain values for theusername,givenName,sn,mail,userPassword, andinetUserStatusproperties:$ curl \ --header "Accept-API-Version: resource=1.0, protocol=1.0" \ --request POST \ --header "Content-Type: application/json" \ --data \ '{ "input": { "user": { "username": "DEMO", "givenName": "Demo User", "sn": "User", "mail":"demo@example.com", "userPassword": "forgerock", "inetUserStatus": "Active" } } }' \ https://openam.example.com:8443/openam/json/realms/root/selfservice/userRegistration?_action=submitRequirements { "requirements": { "$schema": "http://json-schema.org/draft-04/schema#", "description": "Verify emailed code", "properties": { "code": { "description": "Enter code emailed", "type": "string" } }, "required": [ "code" ], "type": "object" }, "tag": "validateCode", "token": "eyJ0eXAiOiJKV.....QiLCJjmqrlqUfQ", "type": "emailValidation" }bashIf the response is accepted, AM continues with the registration process and sends the next request for information.
The value of the
tokenelement should be included in this and any subsequent responses to AM for this registration; AM uses this information to track which stage of the registration process is being completed.Note that the request for information is of the type
emailValidation. Other possible types include:-
captcha, if the Google reCAPTCHA plugin is enabled -
kbaSecurityAnswerDefinitionStage, if knowledge-based security questions are required
For an example of Google reCAPTCHA validation, see Retrieve forgotten usernames.
-
-
Return the information required by the next step of the registration, along with the
tokenelement.In this example, the user information was accepted and a code was emailed to the email address. AM requires this code in the response in an element named
codebefore continuing:$ curl \ --request POST \ --header "Content-Type: application/json" \ --header "Accept-API-Version: resource=1.0, protocol=1.0" \ --data \ '{ "input": { "code": "cf53fcb6-3bf2-44eb-a437-885296899699" }, "token": "eyJ0eXAiOiJKV.....QiLCJjmqrlqUfQ" }' \ https://openam.example.com:8443/openam/json/realms/root/selfservice/userRegistration?_action=submitRequirements { "type": "selfRegistration", "tag": "end", "status": { "success": true }, "additions": {} }bashWhen the process is complete, the response from AM has a
tagproperty with value ofend. If thesuccessproperty in thestatusobject has a value oftrue, then self-registration is complete and the user account was created.In the example, AM only required email verification to register a new user. In flows containing Google reCAPTCHA validation or knowledge-based security questions, you would continue returning POST data to AM containing the requested information until the process is complete.
Register a user over REST (backwards-compatible mode)
Before performing the steps in this procedure, ensure that Verify Email before User Detail (Realms > Realm Name > Services > User Self-Service > User Registration) is enabled.
-
Create a GET request to the
/selfservice/userRegistrationendpoint.Notice that the request does not require any form of authentication:
$ curl \ --header "Accept-API-Version: resource=1.0, protocol=1.0" \ https://openam.example.com:8443/openam/json/realms/root/selfservice/userRegistration { "type":"emailValidation", "tag":"initial", "requirements":{ "$schema":"http://json-schema.org/draft-04/schema#", "description":"Verify your email address", "type":"object", "required":[ "mail" ], "properties":{ "mail":{ "description":"Email address", "type":"string" } } } }bashAM sends the first request for security information. In this example, the first request is of type
emailValidation, but other types includecaptcha, if the Google reCAPTCHA plugin is enabled, andkbaSecurityAnswerDefinitionStage, if knowledge-based authentication is required.The
requiredarray defines the data that must be returned to AM to progress past this step of the registration.The
propertieselement contains additional information about the required response, such as a description of the required field, or the site key required to generate a reCAPTCHA challenge. -
Create a POST response back to the
/selfservice/userRegistrationendpoint with a query string containing_action=submitRequirements. In the POST data, include aninputelement in the JSON structure, which should contain values for each element in therequiredarray of the request.In this example, a
mailvalue was requested:$ curl \ --request POST \ --header "Content-Type: application/json" \ --header "Accept-API-Version: resource=1.0, protocol=1.0" \ --data \ '{ "input": { "mail": "demo.user@example.com" } }' \ https://openam.example.com:8443/openam/json/selfservice/userRegistration\ ?_action=submitRequirements { "type":"emailValidation", "tag":"validateCode", "requirements":{ "$schema":"http://json-schema.org/draft-04/schema#", "description":"Verify emailed code", "type":"object", "required":[ "code" ], "properties":{ "code":{ "description":"Enter code emailed", "type":"string" } } }, "token":"eyAicHis...PIF-lN4s" }bashIf the response was accepted, AM continues with the registration process and sends the next request for information. In this example, the email address was accepted and a code was emailed to the address, which AM requires in the response in an element named
codebefore continuing.The value of the
tokenelement should be included in this and any subsequent responses to AM for this registration. -
Continue returning POST data to AM containing the requested information, in the format specified in the request. Also return the
tokenvalue in the POST data, so that AM can track which stage of the registration process is being completed:$ curl \ --request POST \ --header "Content-Type: application/json" \ --header "Accept-API-Version: resource=1.0, protocol=1.0" \ --data \ '{ "input": { "code": "cf53fcb6-3bf2-44eb-a437-885296899699" }, "token": "eyAicHis...PIF-lN4s" }' \ https://openam.example.com:8443/openam/json/selfservice/userRegistration\ ?_action=submitRequirements { "type":"userDetails", "tag":"initial", "requirements":{ "$schema":"http://json-schema.org/draft-04/schema#", "description":"New user details", "type":"object", "required":[ "user" ], "properties":{ "user":{ "description":"User details", "type":"object" } } }, "token":"eyAicHis...PIF-lN4s" }bash -
When requested—when the
typevalue in the request isuserDetails—supply the details of the new user as an object in the POST data:$ curl \ --request POST \ --header "Content-Type: application/json" \ --header "Accept-API-Version: resource=1.0, protocol=1.0" \ --data \ '{ "input": { "user": { "username": "demo", "givenName": "Demo User", "sn": "User", "userPassword": "d3m0", "inetUserStatus": "Active" } }, "token": "eyAicHis...PIF-lN4s" }' \ https://openam.example.com:8443/openam/json/selfservice/userRegistration\ ?_action=submitRequirements { "type": "selfRegistration", "tag": "end", "status": { "success": true }, "additions": {} }bashWhen the process is complete, the
tagelement has a value ofend. If thesuccesselement in thestatuselement has a value oftrue, then self-registration is complete and the user account was created.
The user self-service feature provides options to set the user’s destination after a successful self-registration.
These options include redirecting the user to a 'successful registration' page, to the login page,
or automaticatically logging the user into the system.
Use the Destination After Successful Self-Registration property to set the option
(on the console: Realm Name > Services > User Self-Service > User Registration).
When you select User sent to 'successful registration' page or User sent to login page,
the JSON response after a successful registration is as follows:
{
   "type": "selfRegistration",
   "tag": "end",
   "status": {
       "success": true
   },
   "additions": {}
}If you select User is automatically logged in, the JSON response is:
{
"type": "autoLoginStage",
"tag": "end",
"status": {
"success": true
},
"additions": {
"tokenId": "AQIC5…MQAA*",
"successUrl": "/openam/console"
}
}Reset forgotten passwords
The AM UI includes pages for users to reset their forgotten passwords. You can, however, create a RESTful application to leverage the user self-service features.
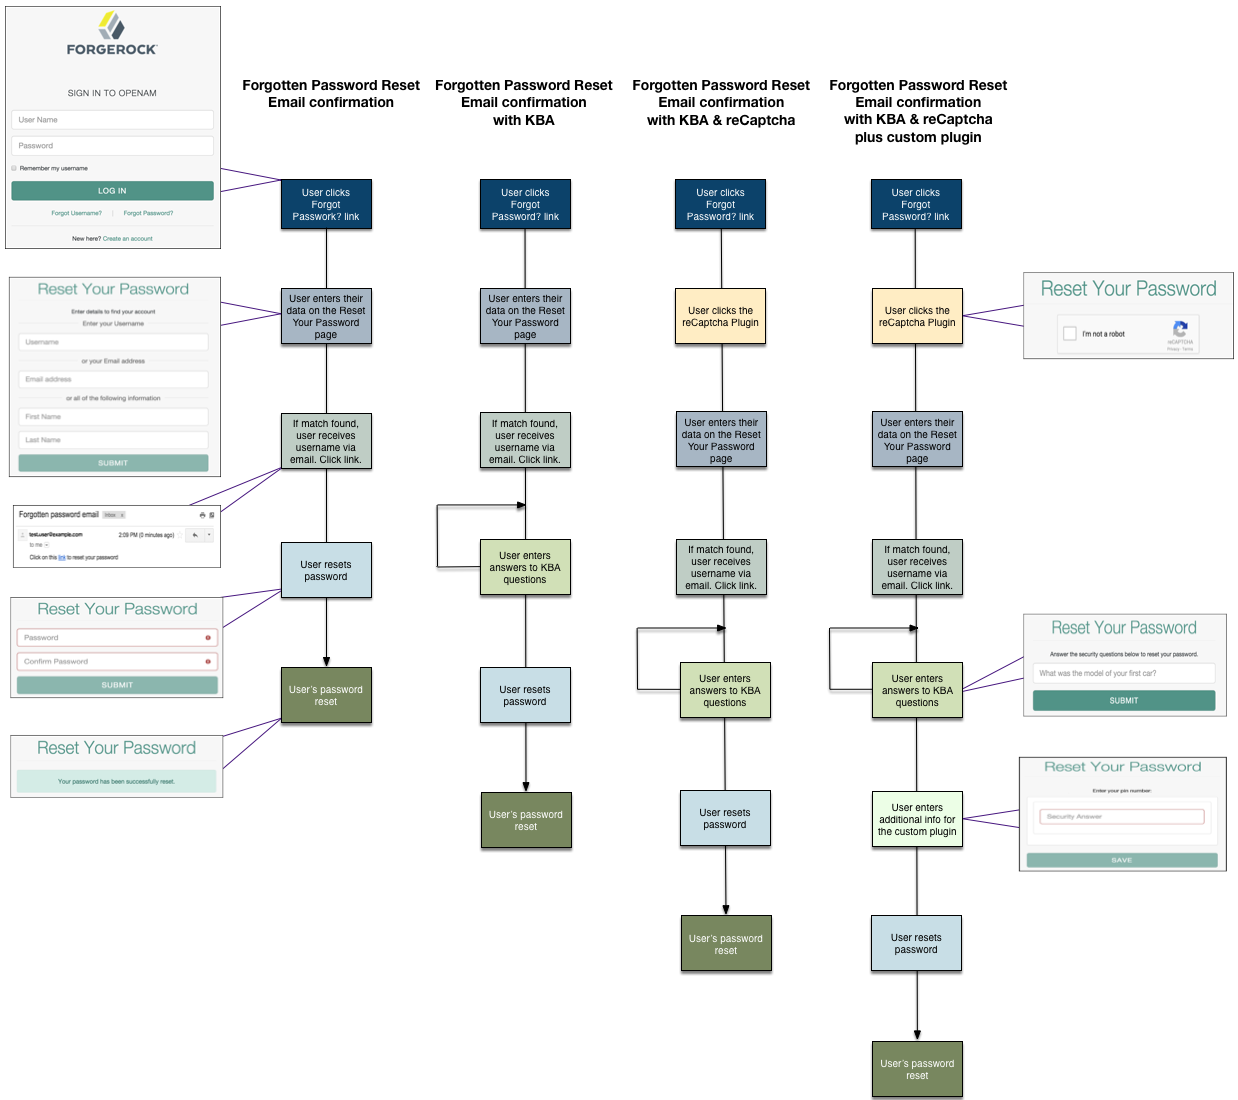
When performing user self-service functions, you can enable one or more security methods such as email validation, Google reCAPTCHA, knowledge-based authentication, or custom plugins.
Each configured security method requires particular security data that AM requests from the client for verification.
A unique token is provided in the second response to the client that must be used in any subsequent requests, so that AM can maintain the state of the user self-service process.
-
Send a GET request to the
/selfservice/forgottenPasswordendpoint.Notice that the request does not require any form of authentication:
$ curl \ --header "Accept-API-Version: resource=1.0" \ "https://openam.example.com:8443/openam/json/realms/root/selfservice/forgottenPassword" { "type": "captcha", "tag": "initial", "requirements": { "$schema": "http://json-schema.org/draft-04/schema#", "description": "Captcha stage", "type": "object", "required": [ "response" ], "properties": { "response": { "recaptchaSiteKey": "6Lfr1…cIqbd", "description": "Captcha response", "type": "string" } } } }bashIn this example, the Google reCAPTCHA plugin is enabled, so the first required item of security data is of the
captchatype. -
Send a POST request to the
/selfservice/forgottenPasswordendpoint with a query string containing_action=submitRequirements. In the POST data, include aninputelement in the JSON structure, which should contain values for each element in therequiredarray of the response.In this example, the
responsevalue required is the user input provided after completing the Google reCAPTCHA challenge:$ curl \ --header "Accept-API-Version: resource=1.0" \ --request POST \ --header "Content-Type: application/json" \ --data \ '{ "input": { "response": "03AHJ…qiE1x4" } }' \ "https://openam.example.com:8443/openam/json/realms/root/selfservice/forgottenPassword?_action=submitRequirements" { "type": "userQuery", "tag": "initial", "requirements": { "$schema": "http://json-schema.org/draft-04/schema#", "description": "Find your account", "type": "object", "required": [ "queryFilter" ], "properties": { "queryFilter": { "description": "filter string to find account", "type": "string" } } }, "token": "eyAicHis…PIF-lN4s" }bashIf the input value was accepted, AM continues with the password reset process and specifies the information required next. In this example, the Google reCAPTCHA was verified and AM is requesting details about the account for the password reset, which must be provided in a
queryFilterelement.The value of the
tokenelement should be included in this and all subsequent requests to AM for this reset process. -
Send a POST request to AM with a
queryFiltervalue in the POST data containing the username of the subject with the password to replace.For more information on query filters, see Query.
$ curl \ --request POST \ --header "Content-Type: application/json" \ --data \ '{ "input": { "queryFilter": "uid eq \"demo\"" }, "token": "eyAicHis…PIF-lN4s" }' \ "https://openam.example.com:8443/openam/json/realms/root/selfservice/forgottenPassword?_action=submitRequirements" { "type": "kbaSecurityAnswerVerificationStage", "tag": "initial", "requirements": { "$schema": "http://json-schema.org/draft-04/schema#", "description": "Answer security questions", "type": "object", "required": [ "answer1" ], "properties": { "answer1": { "systemQuestion": { "en": "What was the model of your first car?" }, "type": "string" } } }, "token": "eyAicHis…PIF-lN4s" }bashIf a single subject is located that matches the provided query filter, the password reset process continues.
If a subject is not found, an HTTP 400 Bad Request status is returned, along with an error message in the JSON data:
{
    "code": 400,
    "reason": "Bad Request",
    "message": "Unable to find account"
}
json -
Continue sending POST data to AM containing the requested information, in the format specified in the response.
Also return the
tokenvalue in the POST data, so that AM can track the stages of the password reset process.$ curl \ --request POST \ --header "Content-Type: application/json" \ --data \ '{ "input": { "answer1": "Mustang" }, "token": "eyAicHis…PIF-lN4s" }' \ "https://openam.example.com:8443/openam/json/realms/root/selfservice/forgottenPassword?_action=submitRequirements" { "type": "resetStage", "tag": "initial", "requirements": { "$schema": "http://json-schema.org/draft-04/schema#", "description": "Reset password", "type": "object", "required": [ "password" ], "properties": { "password": { "description": "Password", "type": "string" } } "code": "cf88bb63-b59c-4792-8fdf-2bcc00b0ab06" }, "token": "eyAicHis…PIF-lN4s" }bash -
When AM has received all the requested information, it sets
typetoresetStageand returns a uniquecodevalue in the response. You can now specify a new password in the POST data, along with both thecodeandtokenvalues:$ curl \ --request POST \ --header "Content-Type: application/json" \ --data \ '{ "input": { "password": "5tr0ng~P4s5worD!" }, "code": "cf88bb63-b59c-4792-8fdf-2bcc00b0ab06", "token": "eyAicHis…PIF-lN4s" }' \ "https://openam.example.com:8443/openam/json/realms/root/selfservice/forgottenPassword?_action=submitRequirements" { "type": "activityAuditStage", "tag": "end", "status": { "success": true }, "additions": {} }bashWhen the process is complete, the
tagelement has a value ofend. If thesuccesselement instatushas a value oftrue, the password reset is complete and the new password is now active.If the password is not accepted, an HTTP 400 Bad Request status is returned along with an error message:
{
    "code": 400,
    "reason": "Bad Request",
    "message": "Minimum password length is 8."
}
json
Retrieve forgotten usernames
The AM UI includes pages for users to recover their forgotten usernames. You can, however, create a RESTful application to leverage the user self-service features.
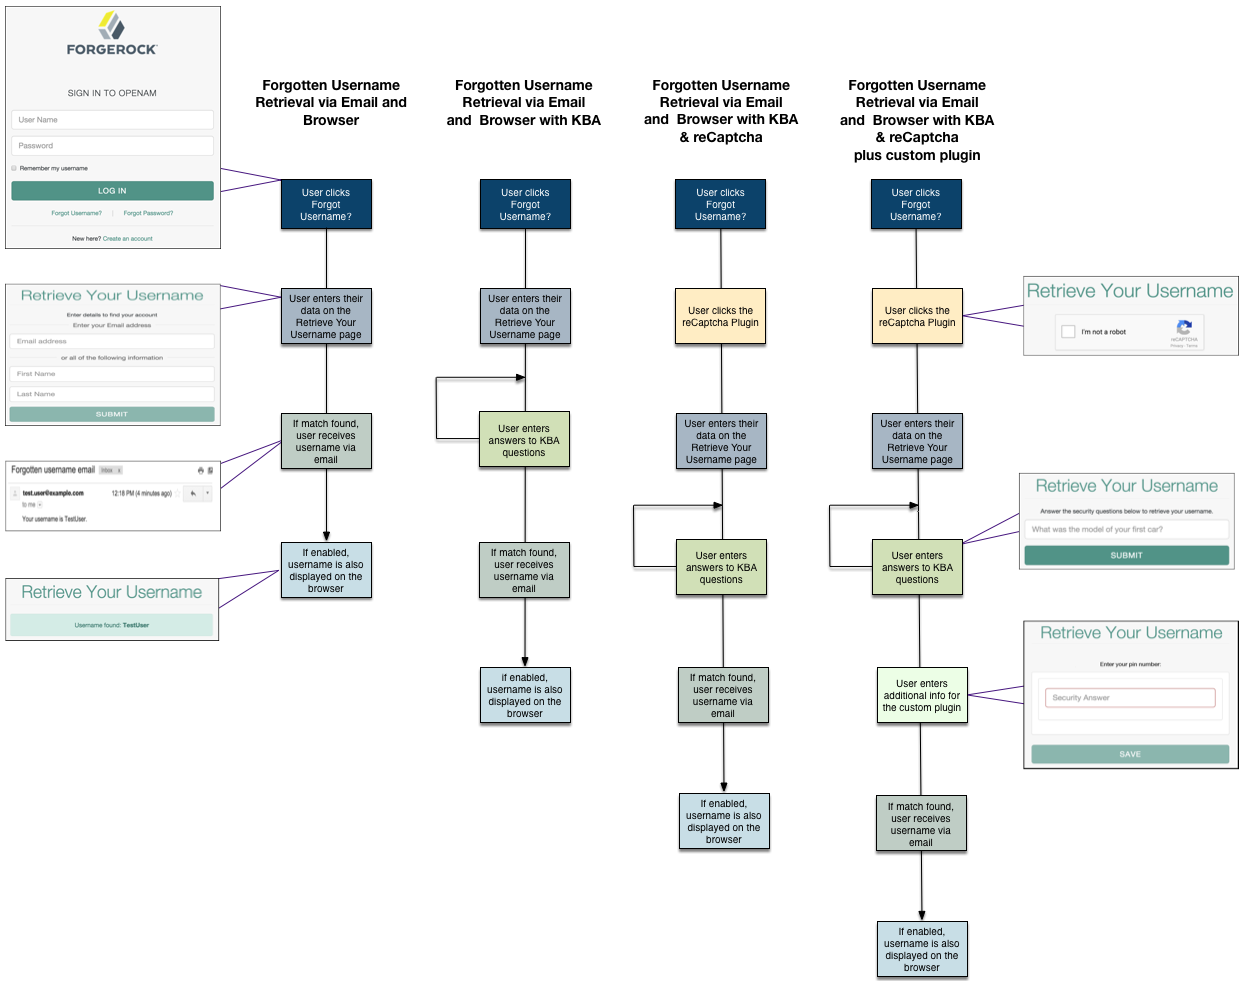
When performing user self-service functions, you can enable one or more security methods, such as email validation, Google reCAPTCHA, knowledge-based authentication, or custom plugins. Each configured security method requires requests to be sent from AM to the client, and completed responses returned to AM to verify.
A unique token is provided in the second request to the client that must be used in any subsequent responses, so that AM can maintain the state of the user self-service process.
-
Create a GET request to the
/selfservice/forgottenUsernameendpoint.Notice that the request does not require any form of authentication.
$ curl \ --header "Accept-API-Version: resource=1.0" \ https://openam.example.com:8443/openam/json/realms/root/selfservice/forgottenUsername { "type": "captcha", "tag": "initial", "requirements": { "$schema": "http://json-schema.org/draft-04/schema#", "description": "Captcha stage", "type": "object", "required": [ "response" ], "properties": { "response": { "recaptchaSiteKey": "6Lfr1…cIqbd", "description": "Captcha response", "type": "string" } } } }bashIn this example, the Google reCAPTCHA plugin is enabled, so the first request is of the
captchatype. -
Create a POST response back to the
/selfservice/forgottenUsernameendpoint with a query string containing_action=submitRequirements. In the POST data, include aninputelement in the JSON structure, which should contain values for each element in therequiredarray of the request.In this example, a
responsevalue was requested, which should be the user input as provided after completing the Google reCAPTCHA challenge.$ curl \ --request POST \ --header "Content-Type: application/json" \ --header "Accept-API-Version: resource=1.0" \ --data \ '{ "input": { "response": "03AHJ…qiE1x4" } }' \ https://openam.example.com:8443/openam/json/realms/root/selfservice/forgottenUsername?_action=submitRequirements { "type": "userQuery", "tag": "initial", "requirements": { "$schema": "http://json-schema.org/draft-04/schema#", "description": "Find your account", "type": "object", "required": [ "queryFilter" ], "properties": { "queryFilter": { "description": "filter string to find account", "type": "string" } } }, "token": "eyAicHis…PIF-lN4s" }bashIf the response was accepted, AM continues with the username retrieval process and sends the next request for information. In this example, the Google reCAPTCHA was verified and AM is requesting details about the account name to retrieve, which must be provided in a
queryFilterelement.The value of the
tokenelement should be included in this and all subsequent responses to AM for this retrieval process. -
Create a POST response to AM with a
queryFiltervalue in the POST data containing the user’s email address associated with their account:$ curl \ --request POST \ --header "Content-Type: application/json" \ --data \ '{ "input": { "queryFilter": "mail eq \"demo.user@example.com\"" }, "token": "eyAicHis…PIF-lN4s" }' \ https://openam.example.com:8443/openam/json/realms/root/selfservice/forgottenUsername?_action=submitRequirements { "type": "kbaSecurityAnswerVerificationStage", "tag": "initial", "requirements": { "$schema": "http://json-schema.org/draft-04/schema#", "description": "Answer security questions", "type": "object", "required": [ "answer1" ], "properties": { "answer1": { "systemQuestion": { "en": "What was the model of your first car?" }, "type": "string" } } }, "token": "eyAicHis…PIF-lN4s" }bashIf a single subject is located that matches the provided query filter, the retrieval process continues.
If KBA is enabled, AM requests answers to the configured number of KBA questions, as in this example.
For more information on query filters, see Query.
If a subject is not found, an HTTP 400 Bad Request status is returned, and an error message in the JSON data:
{ "code": 400, "reason": "Bad Request", "message": "Unable to find account" } -
Return a POST response with the answers as values of the elements specified in the
requiredarray, in this exampleanswer1. Ensure the sametokenvalue is sent with each response.$ curl \ --request POST \ --header "Content-Type: application/json" \ --data \ '{ "input": { "answer1": "Mustang" }, "token": "eyAicHis…PIF-lN4s" }' \ https://openam.example.com:8443/openam/json/realms/root/selfservice/forgottenUsername?_action=submitRequirements { "type": "retrieveUsername", "tag": "end", "status": { "success": true }, "additions": { "userName": "demo" } }bashWhen the process is complete, the
tagelement has a value ofend. If thesuccesselement in thestatuselement has a value oftrue, then username retrieval is complete and the username is emailed to the registered address.If the Show Username option is enabled for username retrieval, the username retrieved is also returned in the JSON response as the value of the
userNameelement, as in the example above.