Configuring SSL for client-side connection or external APIs
ASE supports both TLS 1.2 and SSLv3 for external APIs.
Before you begin
By default, SSLv3 is disabled due to security vulnerabilities. To change the default and enable SSLv3, stop ASE and then change enable_sslv3 to true in ase.conf file. Restart ASE to activate SSLv3 protocol support. SSLv3 is only supported for client to ASE connections, not ASE to backend server connections.
; SSLv3
enable_sslv3=true
About this task
OpenSSL is bundled with ASE. The following are the version details:
-
RHEL: OpenSSL 1.0.2k-fips 26 Jan 2017
-
Ubuntu: OpenSSL 1.0.2g 1 Mar 2016
You can configure SSL in ASE for client-side connection using one of the following methods:
-
Using a CA-signed certificate
-
Using a self-signed certificate
-
Importing an existing certificate
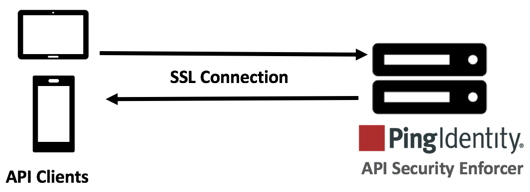
The steps provided in this section are for the certificate and key generated for connections between the client and ASE as depicted in the diagram below:
In a cluster setup:
-
Stop all the ASE cluster nodes
-
Configure the certificate on the management node.
For more information on management node, see API Security Enforcer Admin Guide.
-
Start the cluster nodes one by one for the certificates to synchronize across the nodes
|
You can also configure for Management APIs. For more information on configuring SSL for management APIs, see Configure SSL for Management APIs. |
Using a CA-signed certificate
About this task
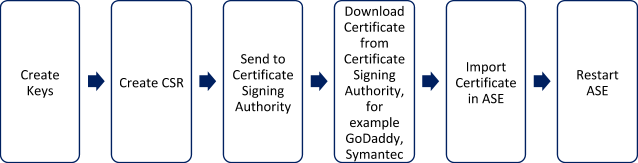
To use a Certificate Authority (CA)-signed SSL certificates, follow the process shown below to create a private key, generate a certificate signing request (CSR), and request a certificate:
|
ASE internally validates the authenticity of the imported certificate. |
Steps
-
Create a private key.
/optCDO:/content/authoring/nrc1651605112856.image/pingidentity/ase/bin/cli.sh create_key_pair -u admin -p
Warning: create_key_pair will delete any existing key_pair, CSR and self-signed certificate
Do you want to proceed [y/n]:y
OK, creating new key pair. Creating DH parameter may take around 20 minutes. Please wait
Key created in keystore
dh param file created at /opt/pingidentity/ase/config/certs/dataplane/dh1024.pem
ASE command-line interface (CLI) is used to create a 2048-bit private key and to store it in the key store.
-
Create a CSR.
/opt/pingidentity/ase/bin/cli.sh create_csr -u admin -p
Warning: create_csr will delete any existing CSR and self-signed certificate
Do you want to proceed [y/n]:y
please provide following info
Country Code >US
State > Colorado
Location >Denver
Organization >Pingidentity
Organization Unit >Pingintelligence
Common Name >ase
Generating CSR. Please wait...
OK, csr created at /opt/pingidentity/ase/config/certs/dataplane/ase.csr
Result:
ASE takes you through a CLI-based interactive session to create a CSR.
-
Upload the CSR created in step 2 to the CA-signing authority’s website to get a CA-signed certificate.
-
Download the CA-signed certificate from the CA-signing authority’s website.
-
Use the CLI to import the signed CA certificate into ASE. The certificate is imported into the key store.
/opt/pingidentity/ase/bin/cli.sh import_cert  <CA signed certificate path>  -u admin -p
Warning: import_cert will overwrite any existing signed certificate
Do you want to proceed [y/n]:y
Exporting certificate to API Security Enforcer...
OK, signed certificate added to keystore
-
Restart ASE by first stopping and then starting ASE.
Using a self-signed certificate
About this task
A self-signed certificate is also supported for customer testing.
Steps
-
Create a private key:
/opt/pingidentity/ase/bin/cli.sh create_key_pair -u admin
					-p
Warning: create_key_pair will delete any existing key_pair, CSR and self-signed certificate Do you want to proceed [y/n]:y OK, creating new key pair. Creating DH parameter may take around 20 minutes. Please wait Key created in keystore dh param file created at /opt/pingidentity/ase/config/certs/dataplane/dh1024.pem
ASE CLI is used to generate a 2048-bit private key, which is in the
/opt/pingidentity/ase/config/certs/dataplane/dh1024.pemdirectory. -
Create a self-signed certificate. Use the CLI to produce a self-signed certificate located in
/pingidentity/ase/config/certs/dataplane/ase.csr./opt/pingidentity/ase/bin/cli.sh create_self_sign_cert -u admin -p Warning: create_self_sign_cert will delete any existing self-signed certificate Do you want to proceed [y/n]:y Creating new self-signed certificate OK, self-sign certificate created in keystore
-
Restart ASE by stopping and starting.
Importing an existing certificate and key pair
About this task
To install an existing certificate, complete the following steps and import the certificate into ASE. If you have intermediate certificate from a CA, then append the content to your server .crt file.
Steps
-
Create the key from the existing
.pemfile:openssl rsa -in private.pem -out private.key
-
Convert the existing
.pemfile to a.crtfile:openssl x509 -in server-cert.pem -out server-cert.crt
-
Import the key pair from step 2:
/opt/pingidentity/ase/bin/cli.sh import_key_pair private.key -u admin -p
Warning: import_key_pair will overwrite any existing certificates
Do you want to proceed [y/n]:y
Exporting key to API Security Enforcer...
OK, key pair added to keystore
-
Import the
.crtfile in ASE using theimport_certCLI command:/opt/pingidentity/ase/bin/cli.sh import_cert server-crt.crt -u admin -p Warning: import_cert will overwrite any existing signed certificate Do you want to proceed [y/n]:y Exporting certificate to API Security Enforcer... OK, signed certificate added to keystore
-
Restart ASE by stopping and starting.