Backchannel Notification node
The Backchannel Notification node adds data to the backchannel transaction from the backchannel journey, which the Backchannel Status node can read. This lets you send real-time status updates to the main journey from the backchannel journey.
Example
The following example shows how the Backchannel Notification node can be used in an out-of-band authentication journey to keep a help desk agent informed of progress while they’re verifying a user’s identity. The help desk agent can see real-time status updates when the user enters their password and when their credentials have been confirmed.
The example shows two journeys:
-
The main journey initializes a backchannel authentication journey and displays status updates to the help desk agent.
-
The backchannel journey is a simple authentication journey that adds status updates to the shared state and uses the Backchannel Notification node to add this data to the backchannel transaction.
Main journey
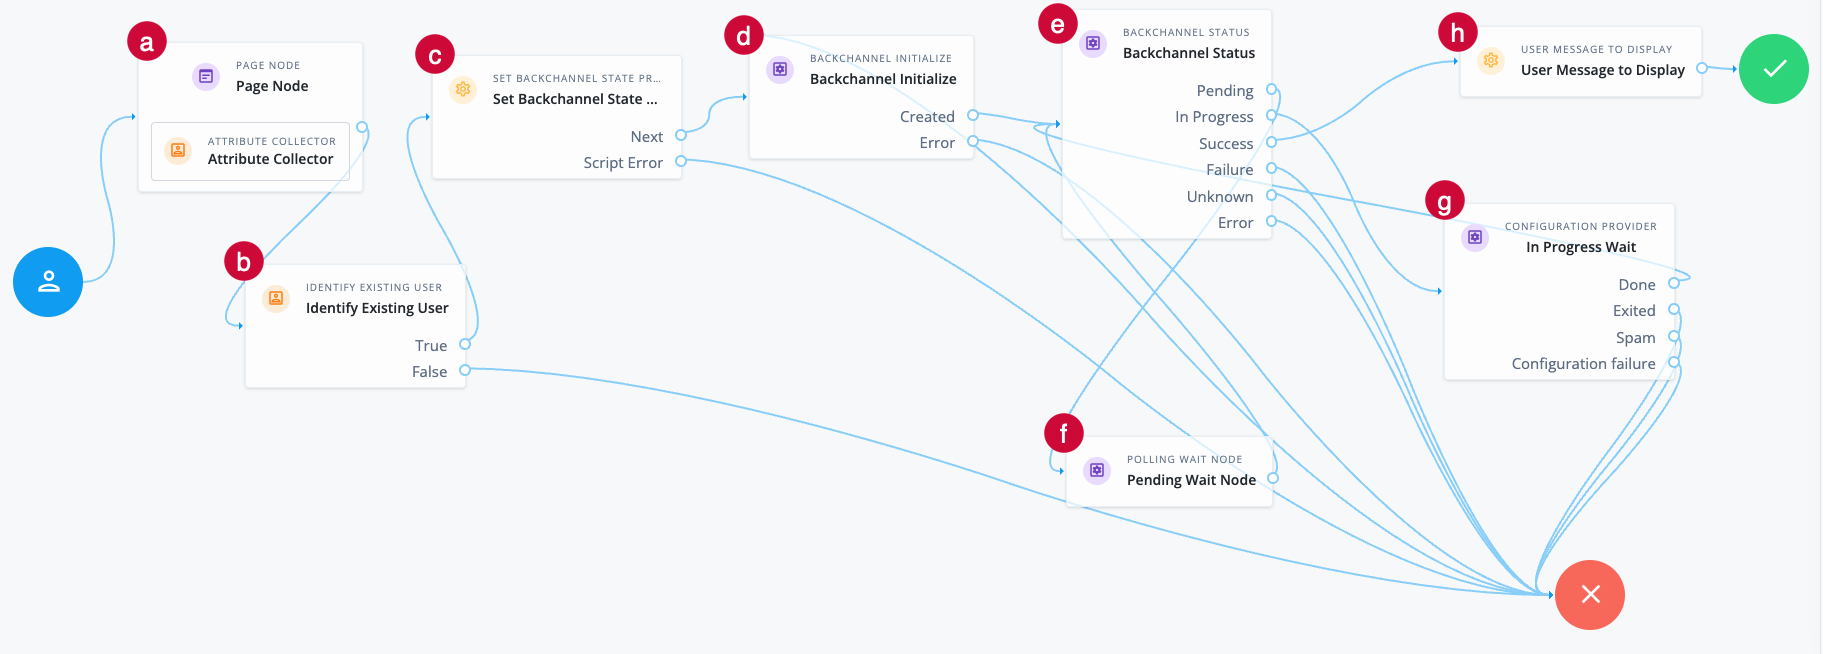
a The Page node with an Attribute Collector node prompts the help desk agent for the end user’s email address.
b The Identify Existing User node attempts to look up the username by matching the email address to the email address in an identity profile.
The lookup fails if no matching email address is found, or if more than one user profile uses the same email address.
c The Set Backchannel State Properties custom node writes the _id, objectAttributes, and username to the shared state.
This example uses the following configuration:
- Attribute list to set
-
_id
objectAttributes
username - Backchannel nodeState property
-
backchannel:data
How do I create this custom node?
The following steps provide the minimum configuration required to create this custom node. Learn more in custom nodes.
-
In the Advanced Identity Cloud admin UI, go to Journeys > Custom Nodes and click New Custom Node.
-
On the
New Custom Nodepage, enterSet Backchannel State Propertiesas the name and click Next. -
Add the following properties to the node and click Next:
- Attribute list to set
-
-
Name:
attributeListProperty -
Label:
Attribute list to set -
Type:
String -
Multi-Valued: Select this option.
-
Required: Select this option.
-
- Backchannel nodeState property
-
-
Name:
backchannelStateProperty -
Label:
Backchannel nodeState property -
Type:
String -
Required: Select this option.
-
Provide Default Value: Select this option.
-
Default Value:
backchannel:data
-
-
Set the following settings and click Next:
- Outcomes
-
Next - Error Outcome
-
Enabled
-
In the script editor, add the following script to define the behavior of the node:
(function () { logger.error(scriptName + "Node execution started"); //Get node properties var nodeStateProperty = properties.backchannelStateProperty; var attributeList = properties.attributeListProperty; //Loop to get and set attributes into the nodeStateProperty nodeState variable var out = {}; for (var i = 0; i < attributeList.length; i++) { var k = attributeList[i]; var v = nodeState.get(k); if (v !== null && v !== undefined) out[k] = v; } nodeState.putShared(nodeStateProperty, out); logger.error(scriptName + "Node execution completed"); action.goTo("Next"); })(); -
Click Save to create the custom node.
d The Backchannel Initialize node reads the username from the shared state.
-
If the
usernameis valid, the node generates a redirect URI to start the backchannel authentication journey. The node writes the redirect URI and the transaction ID of the backchannel transaction to the shared state, and the journey proceeds to the Backchannel Status node. -
If the
usernamecan’t be read, the journey follows the Error outcome and fails.
e The Backchannel Status node reads the transaction ID and provides status on the authentication request.
This example requires the following configuration:
- Record Transaction Data
-
Enabled - Transaction Data Key
-
transaction:data
f The Pending Wait node is a Polling Wait node that pauses this journey when the backchannel authentication request has a status of Pending. After 3 seconds, the journey returns to the Backchannel Status node.
g The In Progress Wait node is a Configuration Provider node. It imitates a Polling Wait node and uses a script to display messages from the backchannel journey to the help desk agent when the backchannel authentication has a status of In progress.
Sample Config Provider node script
var message;
var data = nodeState.get("transaction:data");
//Make sure this property name matches the Transaction Data Key configured in the Backchannel Status node
if (data) {
    message = data["journeyStatus"];
//Make sure this property name matches the Journey status property name configured in the Set Front Channel Status node.
} else {
    message = "Authentication in progress...";
}
config = {
    "secondsToWait": 3,
    "spamDetectionEnabled": false,
    "spamDetectionTolerance": 3,
    "waitingMessage": { "en": message },
    "exitable": false,
    "exitMessage": {}
};
h The User Message To Display custom node displays a message to the help desk agent when the backchannel authentication completes successfully.
This example uses the following configuration:
- Message to display
-
User successfully authenticated
How do I create this custom node?
The following steps provide the minimum configuration required to create this custom node. Learn more in custom nodes.
-
In the Advanced Identity Cloud admin UI, go to Journeys > Custom Nodes and click New Custom Node.
-
On the
New Custom Nodepage, enterUser Message to Displayas the name and click Next. -
Add the following property to the node and click Next:
- Message to display
-
-
Name:
message -
Label:
Message to display -
Type:
String -
Required: Select this option.
-
-
Set the following settings and click Next:
- Outcomes
-
Success
-
In the script editor, add the following script to define the behavior of the node:
(function () { logger.error(scriptName + "Node execution started"); if (callbacks.isEmpty()) { var userMessage = properties.message; callbacksBuilder.textOutputCallback(0, userMessage); } else { logger.error(scriptName + "Node execution completed"); action.goTo("Success"); } })(); -
Click Save to create the custom node.
Backchannel journey
This is a basic authentication journey that takes credentials and authenticates the user based on their existence in the backend identity store.
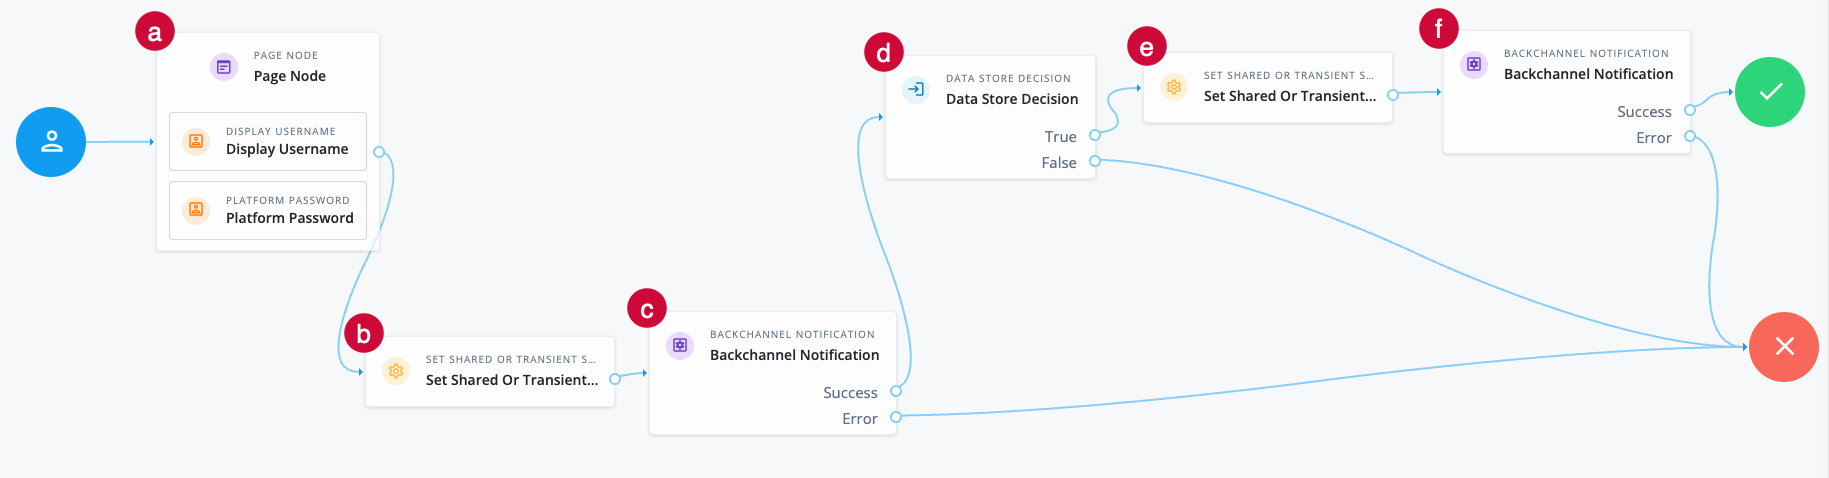
a The Page node includes a Display Username node and a Platform Password node. The username has been supplied in the shared state from the main journey. The user needs to enter their password.
b The Set Front Channel Status custom node adds data to the shared state that the Backchannel Notification node can send to the main journey.
This example uses the following configuration:
- Journey status shared state key
-
transaction:notify - Journey status property name
-
journeyStatus - Journey status message
-
User has entered their credentials
How do I create this custom node?
The following steps provide the minimum configuration required to create this custom node. Learn more in custom nodes.
-
In the Advanced Identity Cloud admin UI, go to Journeys > Custom Nodes and click New Custom Node.
-
On the
New Custom Nodepage, enterSet Front Channel Statusas the name and click Next. -
Add the following properties to the node and click Next:
- Journey status shared state key
-
-
Name:
journeyStatusKey -
Label:
Journey status shared state key -
Description:
The shared state key where the message object will be stored (e.g. transaction:notify). This is the top-level key that will be updated in the journey state. -
Type:
String -
Required: Select this option.
-
Provide Default Value: Select this option.
-
Default Value:
transaction:notify
-
- Journey status property name
-
-
Name:
journeyStatusProperty -
Label:
Journey status property name -
Description:
The name of the property inside the shared state object (e.g. journeyStatus). This defines the field that will hold the message value. -
Type:
String -
Required: Select this option.
-
Provide Default Value: Select this option.
-
Default Value:
journeyStatus
-
- Journey status message
-
-
Name:
journeyStatusValue -
Label:
Journey status message -
Description:
The message to store in shared state. This value will be used by downstream nodes (e.g. Backchannel Notification) to update the front-channel experience. -
Type:
String -
Required: Select this option.
-
Provide Default Value: Select this option.
-
Default Value:
Example Front Channel Message
-
-
Set the following settings and click Next:
- Outcomes
-
Success
Error
-
In the script editor, add the following script to define the behavior of the node:
/** * Script to update sharedState with a key and object value retrieved from properties.value of the custom node * This sharedState key/value is then used by the Backchannel Notification node to update the front channel state * Example property values: * journeyStatusKey = "transaction:notify" * journeyStatusProperty = "journeyStatus" * journeyStatusValue = "Front Channel Message" * * sharedState Result: * ["transaction:notify"] = { journeyStatus: "Front Channel Message" } */ var nodeOutcomes = { SUCCESS: "Success", ERROR: "Error" }; (function () { logger.error(scriptName + ": Node execution started"); try { var stateKey = properties.journeyStatusKey; var propertyName = properties.journeyStatusProperty; var propertyValue = properties.journeyStatusValue; var obj = {}; obj[propertyName] = propertyValue; nodeState.putShared(stateKey, obj); logger.error(scriptName + ": Node execution completed"); action.goTo(nodeOutcomes.SUCCESS); } catch (e) { logger.error(scriptName + ": Failed to update sharedState. Exception: " + e); action.goTo(nodeOutcomes.ERROR); } })(); -
Click Save to create the custom node.
c The Backchannel Notification node reads the shared state and sends a status update to the main journey to inform the help desk agent that the user has entered their credentials.
d The Data Store Decision node validates the username-password credentials.
e The Set Front Channel Status custom node adds data to the shared state that the Backchannel Notification node can send to the main journey. This is the custom node you created earlier in this example.
This instance of the node uses the following configuration:
- Journey status shared state key
-
transaction:notify - Journey status property name
-
journeyStatus - Journey status message
-
User’s credentials are valid
f The Backchannel Notification node reads the shared state and sends a status update to the main journey to inform the help desk agent that the user’s credentials match those stored in the data store.
Availability
| Product | Available? |
|---|---|
PingOne Advanced Identity Cloud |
Yes |
PingAM (self-managed) |
Yes |
Ping Identity Platform (self-managed) |
Yes |
Inputs
This node reads data from the incoming node state using the key specified in the Data Key. The key value must be a JSON object.
Implement a node earlier in the journey to add data to the incoming node state using this key. For example, you could use custom nodes or a Scripted Decision node.
Configuration
| Property | Usage |
|---|---|
Data Key |
The shared state key that contains the data you want to add to the backchannel transaction. For example This key is used to read data from the incoming node state. |
Outcomes
- Success
-
The backchannel notification was successfully sent.
- Error
-
An error occurred when sending the backchannel notification.
Errors
The node can log the following errors:
-
Failed to update backchannel transactionAn error occurred when the node attempted to update the backchannel transaction with the data from the incoming node state.
The node can log the following warnings:
-
Transaction ID not found in contextThe transaction ID is missing from the incoming request context.
-
Data in state at dataKey data key was not found or incorrect type, not updating transaction.The Data Key configured for the node doesn’t exist in the incoming node state, or it exists but contains invalid data.