Configuring SAML SSO with AWS Client VPN and PingOne
Learn to configure SAML single sign-on (SSO) using AWS Client VPN and PingOne.
Before you begin
Make sure you have:
-
An Amazon VPC with an EC2 instance
In the instance Security Group, allow ICMP traffic from the VPC CIDR range. You need this for testing.
-
A private certificate imported into AWS Certificate Manager (ACM)
-
PingOne user and group information
-
A desktop (Windows or macOS) running the latest AWS Client VPN software
You can download the software here.
Create the AWS Client VPN application in PingOne
-
In the PingOne admin portal, go to Connections → Add Application.
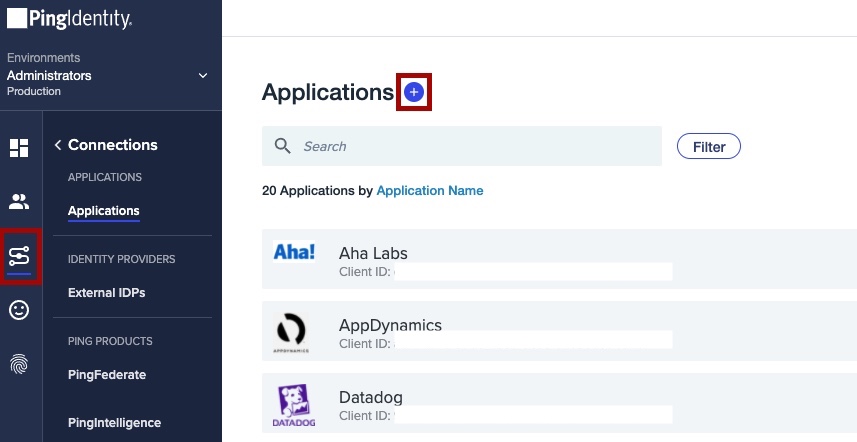
-
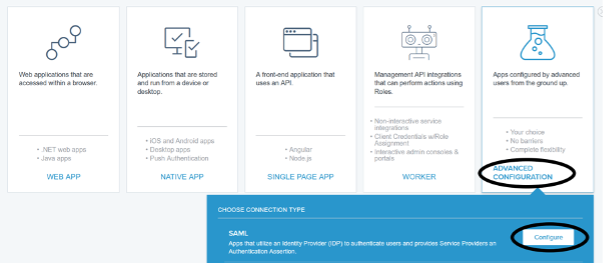
Click Advanced Configuration.
-
In the Choose Connection Type menu, next to SAML, click Configure.
-
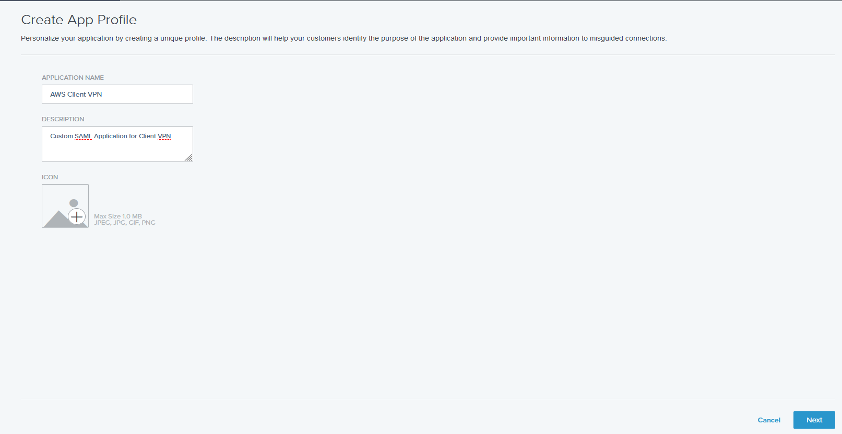
On the Create App Profile page, enter an Application Name, Description, and Icon for your application. Click Next.
-
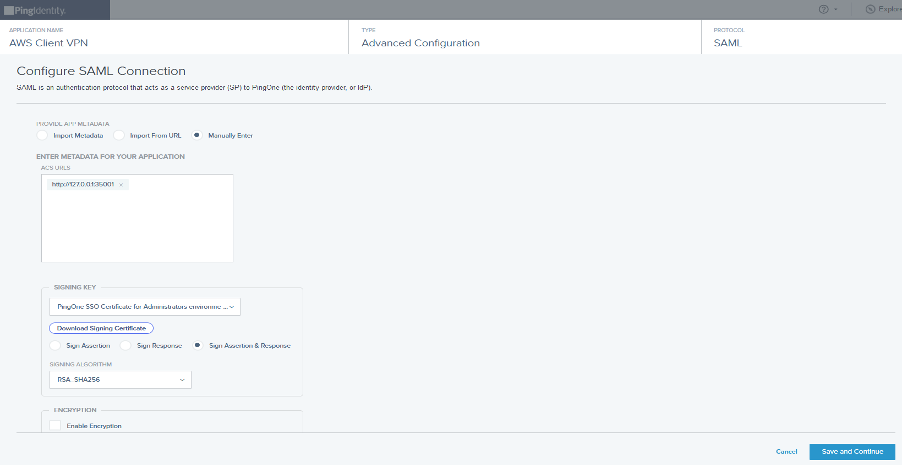
For Configure SAML Connection, select Manually Enter and configure the following:
-
For ACS URLs, enter
http://127.0.0.1:35001. -
Select Sign Assertion & Response.
-
Select RSA_SHA256 as the algorithm for Signing the response.
-
For Entity ID, enter
urn:amazon:webservices:clientvpn. -
For Subject nameID format, enter
urn:oasis:names:tc:SAML:1.1:nameid-format:emailAddress. -
For Assertion Validity Duraction (in seconds), enter
300. -
For SLO options, leave the default settings.
-
-
After configuring the above values, leave the default settings and click Save and Continue.
-
Configure Attribute Mapping by adding the following PingOne Attributes:
PingOne User Attribute Application Attribute Username
saml_subjectGiven Name
FirstNameFamily Name
LastNameGroup Names
memberOfResult:
The new application is shown in the Applications list.
-
Expand the application details and on the Policies tab, click the Pencil icon to edit the Authentication Policy.
-
Expand the application details and on the Configuration tab, download the metadata file.
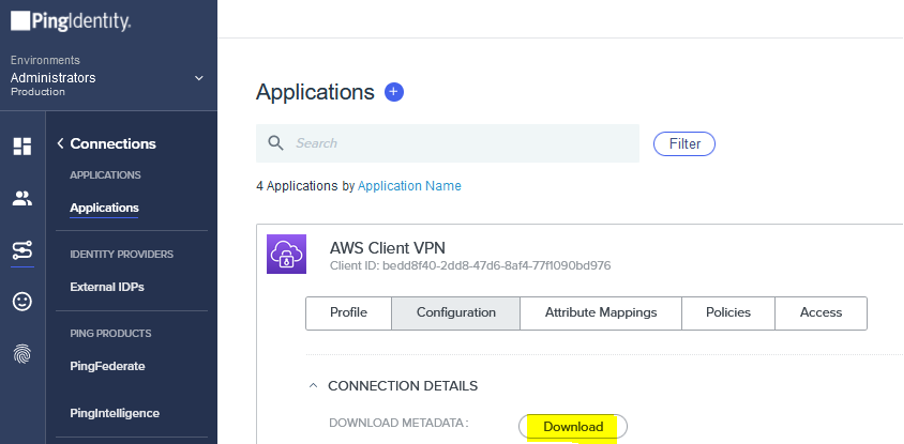
You’ll upload this metadata file in the next step.
Add PingOne as your IdP in the AWS Management Console
|
AWS Client VPN is a separate app and requires a unique IdP definition in AWS. You cannot reuse an IdP already defined for another app, even if it’s from the same vendor. |
-
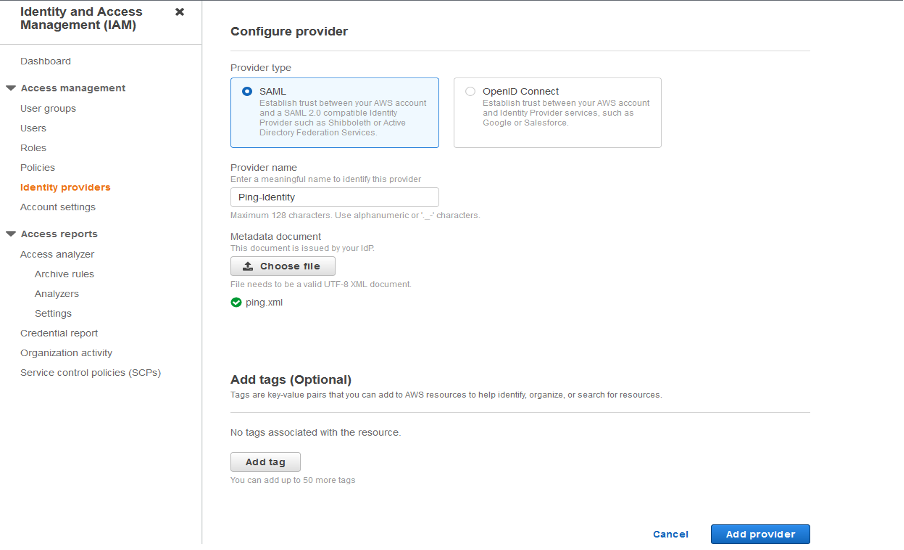
In the AWS Management Console, open the IAM console and in the Access management section, click Identity providers.
-
Click Add Provider.
-
For Provider type, select SAML.
-
For Provider name, enter a unique name.
-
For Metadata document, click Choose file and upload the metadata file that you downloaded from PingOne.
Create an AWS Client VPN endpoint
-
In the Amazon VPC console, in the Virtual Private Network (VPN) section, click Client VPN Endpoints.
-
Click Create Client VPN Endpoint.
-
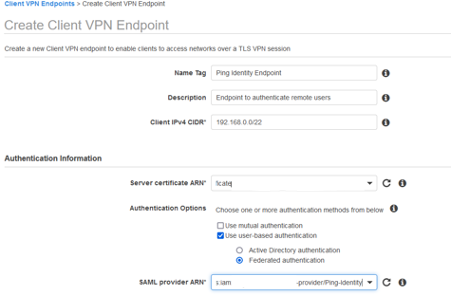
Enter your desired Name Tag and Description.
-
For Client IPv4 CIDR, enter
your-IP-range/22.This is the IP range that will be allocated to your remote users.
-
For Server certificate ARN, select the certificate you created as a prerequisite.
-
For Authentication Options, select Use user-based authentication and Federated authentication.
-
In the SAML provider ARN list, select the PingOne IdP you configured earlier.
-
In the Other optional parameters section, select Enable split-tunnel and leave the rest of the default values.
Enabling split-tunnel makes sure that only traffic to the VPC IP range is forwarded via the VPN.
-
Configure the other options according to your environment requirements.
-
Click Create Client VPN Endpoint to complete the setup.
Configure the AWS Client VPN Endpoint association
-
In the Amazon VPC console, in the Virtual Private Network (VPN) section, click Client VPN Endpoints.
-
Select the VPN you created in the last step.
It should be in the Pending state.
-
Go to Options → Associations and click Associate.
-
In the Associations list, select the target VPC and subnet with which you want to associate your endpoint.
-
Optional: Repeat the previous steps to associate your Client VPN endpoint to another subnet for high availability.
Set up SAML group-specific authorization
-
In the Amazon VPC console, in the Virtual Private Network (VPN) section, click Authorization.
-
Click Authorize Ingress.
-
For Destination network to enable, specify the IP address of your EC2 instance that you created as a prerequisite.
-
In the Grant access to section, select Allow access to users in a specific access group.
-
In the Access group ID field, enter the name of the group that you want to allow access to the EC2 instance.
-
Provide an optional description and click Add authorization rule.
Connect to the Client VPN
-
In the Amazon VPC console, in the Virtual Private Network (VPN) section, click Client VPN Endpoints.
-
Select the VPN that you created.
It should be in the Available state.
-
To download the configuration profile to your desktop, click Download Client Configuration.
-
Open the AWS Client VPN desktop application.
-
Go to File → Manage Profiles.
-
Click Add Profile, choose the configuration profile that you downloaded, and give it a Display Name of your choice.
Your profile appears in the AWS Client VPN profile list.
-
Select your profile and click Connect.
You’re redirected to PingOne for authentication.
-
Sign on to PingOne as a user with access to your EC2 instance.
After successful authentication, you should be able to reach the EC2 instance in the target VPC.