Configuring SAML SSO with HubSpot and PingFederate
Learn how to enable HubSpot sign-on from a PingFederate URL (IdP-initiated sign-on) and direct HubSpot sign-on using PingFederate (SP-initiated sign-on).
Before you begin
-
Configure PingFederate to authenticate against an IdP or datastore containing the users requiring application access.
-
Populate HubSpot with at least one user to test access.
-
You must have administrative access to PingFederate and HubSpot.
Create a PingFederate SP connection for HubSpot
-
Obtain the HubSpot SSO details.
-
Sign on to HubSpot, click the Gear icon (), and select Account Details from the Settings menu.
-
In the Single Sign-on section, click Set up.

-
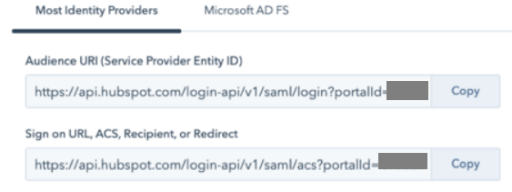
Copy the Audience URI and Sign on URL, ACS, Recipient, or Redirect values.

-
-
Sign on to the PingFederate administrative console.
-
Create an SP connection for HubSpot in PingFederate.
-
Configure using Browser SSO profile SAML 2.0.
-
Set Partner’s Entity ID to the HubSpot Audience URI value.
-
Enable IdP-Initiated SSO and SP Initiated SSO.
-
In Assertion Creation: Authentication Source Mapping: Attribute Contract Fulfillment, map the SAML_SUBJECT to the email attribute.
-
In Protocol Settings: Assertion Consumer Service URL, set Binding to POST and set Endpoint URL to the HubSpot Sign on URL, ACS, Recipient, or Redirect value.
-
In Protocol Settings: Allowable SAML Bindings, enable POST.
-
In Credentials: Digital Signature Settings, select the PingFederate signing certificate.
-
-
Export the metadata for the newly-created HubSpot SP connection.
-
Export the signing certificate.
-
Open the metadata file and copy the values of the entityID and the Location entry (
https://your-value/idp/SSO.saml2).
Add the PingFederate connection to HubSpot
-
Sign on to HubSpot, click the Gear icon (), select Account Details, and access the Single Sign-on settings.
-
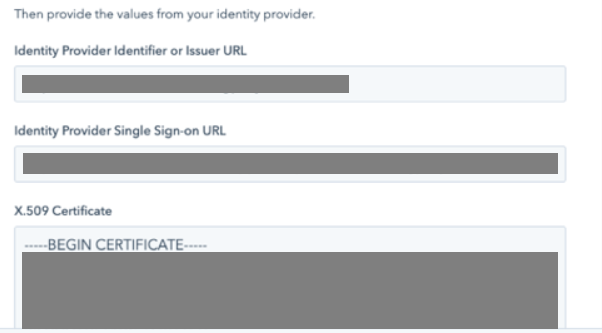
Paste the entityID value that you copied previously to the Identity Provider Identifier or Issuer URL field.
-
Paste the Location value you copied previously to the Identity Provider Single Sign-on URL field.
-
Paste the PingFederate certificate into the X.509 Certificate field.

-
Click Verify.
-
In the left sidebar menu, click Account Defaults.
-
In the Single Sign-on (SSO) section, select the Require Single Sign-on to log in check box.

The user setting this up is automatically excluded to ensure their access is not lost in case of setup issues.
Test the PingFederate IdP-initiated SSO integration
-
Go to the PingFederate SSO Application Endpoint for the HubSpot SP connection.
-
Complete PingFederate authentication.
You’re redirected to your HubSpot domain.

