Setting up Verified Trust for help desk account recovery using PingOne Advanced Identity Cloud
The Verified Trust for Workforce Help Desk Solution provides a way to confirm a user’s identity before performing sensitive account actions, such as password resets and multi-factor authentication (MFA) device resets. This solution lets authorized help desk agents look up a workforce employee, send them a verification link, and monitor the verification status in real time. After the employee verifies their identity using a government-issued ID and a liveness selfie, the agent can securely reset their password or MFA device.
This implementation uses a set of pre-built PingOne Advanced Identity Cloud journeys that work together through PingOne Advanced Identity Cloud’s backchannel authentication mechanism. The main agent-facing journey coordinates identity verification and account recovery through a set of inner and backchannel journeys. To implement this solution in your environment, you’ll import these journeys and configure them with your PingOne Worker Service and PingOne Verify policy.
Goals
After completing this use case, you’ll know how to:
-
Execute a guided journey where a help desk agent verifies a workforce employee’s identity in real time to securely authorize account recovery
-
Configure PingOne Verify to validate government-issued IDs and liveness (selfies) as part of an identity verification policy.
-
Configure the PingOne Advanced Identity Cloud journey nodes to communicate with PingOne using the PingOne Worker Service.
What you’ll do
In this use case, you’ll learn how to implement the Verified Trust for Workforce Help Desk Solution by doing the following in PingOne Advanced Identity Cloud:
-
Set up prerequisites: email templates, custom nodes, and custom user attributes.
-
Import the pre-built journeys in two phases.
-
Configure post-import journey settings and node connections.
-
Configure help desk agent access using a HelpDesk group.
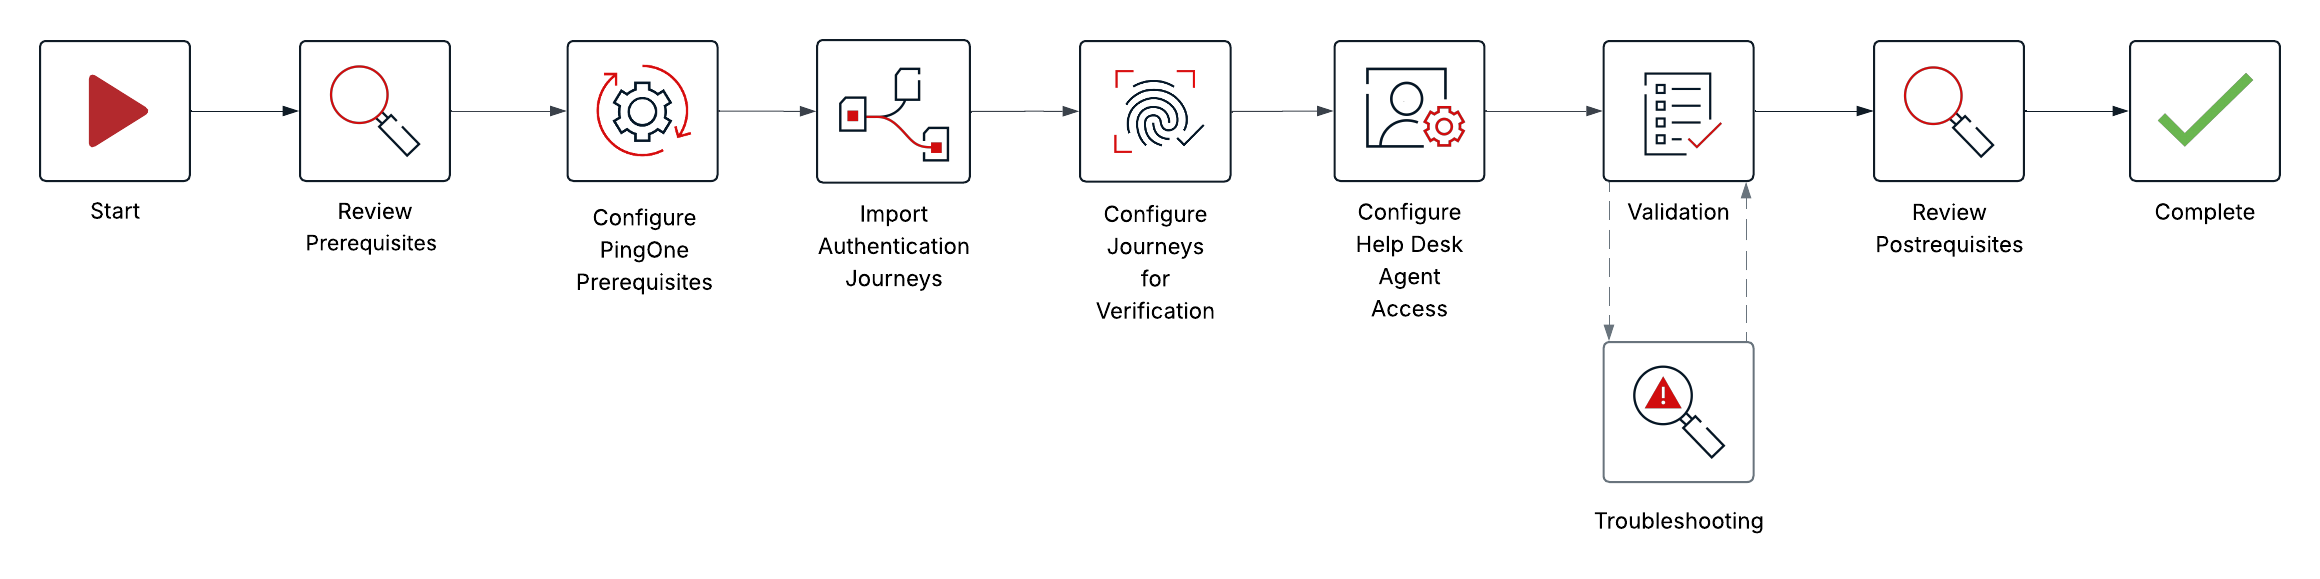
The following map provides a high-level overview of the implementation workflow. You can refer back to this map as you work through the steps.
Before you begin
Ensure you have:
-
A basic understanding of key PingOne Advanced Identity Cloud concepts including tenants and realms.
-
A basic understanding of PingOne Verify in PingOne Advanced Identity Cloud.
-
Familiarity with:
-
A PingOne Advanced Identity Cloud development tenant with the following configured:
-
A PingOne environment mapped to the tenant, with the PingOne Verify service configured
-
A PingOne Worker App configured in PingOne
-
The PingOne Worker App client ID, client secret, and environment ID
-
-
A configured PingOne Verify policy in your mapped PingOne environment.
-
The PingOne Verify policy ID to use when configuring scripts in PingOne Advanced Identity Cloud.
-
Access to the PingOne Advanced Identity Cloud admin console with administrator permissions.
-
Access to the PingOne admin console with the Environment Admin role assigned.
-
Your mobile device and government-issued identity document to validate the solution.
Learn more about the concepts and components used in this solution in the Concepts section.
Tasks
Task 1: Setting up prerequisites
Learn how to set up the email templates, custom nodes, and custom user attributes required before importing the journeys.
Step 1a: Configuring ESVs for the PingOne Worker Service
The journeys use a PingOne Worker Service to communicate with PingOne. You must create ESVs in your PingOne Advanced Identity Cloud tenant to hold the credentials for the worker application.
Steps
-
In the PingOne Advanced Identity Cloud admin console, go to Tenant Settings > Environment Secrets & Variables.
-
Create the following ESV secret:
Name Description esv-hd-pingone-worker-client-secretThe client secret of your PingOne Worker App
-
Create the following ESV variables:
Name Description esv-hd-pingone-environment-idThe environment ID of your mapped PingOne environment
esv-hd-pingone-worker-client-idThe client ID of your PingOne Worker App
-
Apply the ESV updates.
Step 1b: Configuring the PingOne Worker Service
The journeys reference a PingOne Worker Service named HelpDesk PingOne Worker. You must create this service before importing the journeys.
Steps
-
In the PingOne Advanced Identity Cloud admin console, go to Native Consoles > Access Management.
-
In the AM admin UI, go to Services > PingOne Worker Service.
-
Create a new PingOne Worker Service secondary configuration using the following hints, replacing the URL values with those for your PingOne region:
Field Value Name
HelpDesk PingOne WorkerEnvironment ID
esv-hd-pingone-environment-id(the ESV you created)Client ID
esv-hd-pingone-worker-client-id(the ESV you created)Client Secret Label Identifier
pingoneworkhelpdeskPingOne API Server
For example,
https://api.pingone.eu/v1(use the URL for your region)PingOne Auth Server
For example,
https://auth.pingone.eu(use the URL for your region) -
In the AM admin UI, go to Secret Stores > ESV > Mappings and map
am.services.pingone.worker.pingoneworkhelpdesk.clientsecrettoesv-hd-pingone-worker-client-secret(the ESV you created). -
Go back to the PingOne Worker Service configuration and use Save and Test Connection to verify the connection to PingOne.
Step 1c: Importing email templates
The journeys send backchannel links to end users by email. Three email templates are required.
Steps
-
Download the Verified Trust for Workforce — Helpdesk Solution package from the Ping Identity Marketplace. The package includes a
Prerequisitesfolder with the email templates and custom nodes. -
In the PingOne Advanced Identity Cloud admin console, go to Email Templates.
-
Import or create each of the following templates using the HTML files in the
Prerequisites/Email Templatesfolder:Template name File Help Desk BackChannel Verification LinkHelp Desk BackChannel Verification Link Template.htmlHelp Desk BackChannel Password Reset LinkHelp Desk BackChannel Password Reset Link Template.htmlHelp Desk BackChannel MFA Reset LinkHelp Desk BackChannel MFA Reset Link Template.htmlThe template names must match exactly as shown. The journeys reference these templates by name.
Step 1d: Importing custom nodes
The journeys use custom nodes that must be imported before the journeys themselves.
Steps
-
In the PingOne Advanced Identity Cloud admin console, go to Journeys > Custom Nodes.
-
Click Import and upload the
Prerequisites/Custom Nodes/Custom Nodes.jsonfile from the downloaded package.
-
Confirm that the following custom nodes are listed after import:
-
User Message to Display
-
Select MFA Method
-
Remove MFA Device
-
Get IDM User Attributes
-
Display Node State Variables
-
Step 1e: Creating custom user attributes
The journeys use custom attributes on user profiles to track verification state. You must create these attributes before importing the journeys.
Steps
-
In the PingOne Advanced Identity Cloud admin console, go to Identities > Configure > Alpha realm - user > Properties.
-
Create the following custom attributes:
Name Type Purpose custom_backChannelVerifyLinkExpiredString
Tracks whether the backchannel verification link has already been used or has expired.
custom_lastVerifyTransactionIDString
Stores the last PingOne Verify transaction ID to detect whether a new transaction has started.
custom_backChannelTransactionIdString
Stores the current backchannel transaction ID.
custom_DOBString
Stores the user’s date of birth. Set the readable title to
DOB (YYYY-MM-DD)to specify the required format.If it’s required for advanced data matching by the PingOne Verify policy, set the field to the end-user date-of-birth. PingOne Advanced Identity Cloud provides the value to PingOne Verify for comparison with the date-of-birth on the end-user identification document.
Task 2: Importing the journeys
Learn how to import the pre-built PingOne Advanced Identity Cloud journeys into your development environment. The journeys are split across two import files that must be imported in order.
Phase 1: Importing backchannel and inner journeys
The first import file contains the supporting backchannel and MFA registration journeys that the main journey depends on.
Steps
-
In the PingOne Advanced Identity Cloud admin console, select your development environment and the alpha realm.
-
In the sidebar click Journeys.
-
Click Import, and then select Import journeys from file.
-
Upload the
Help_Desk_Import_Phase_1_Dependencies.jsonfile from the downloaded package.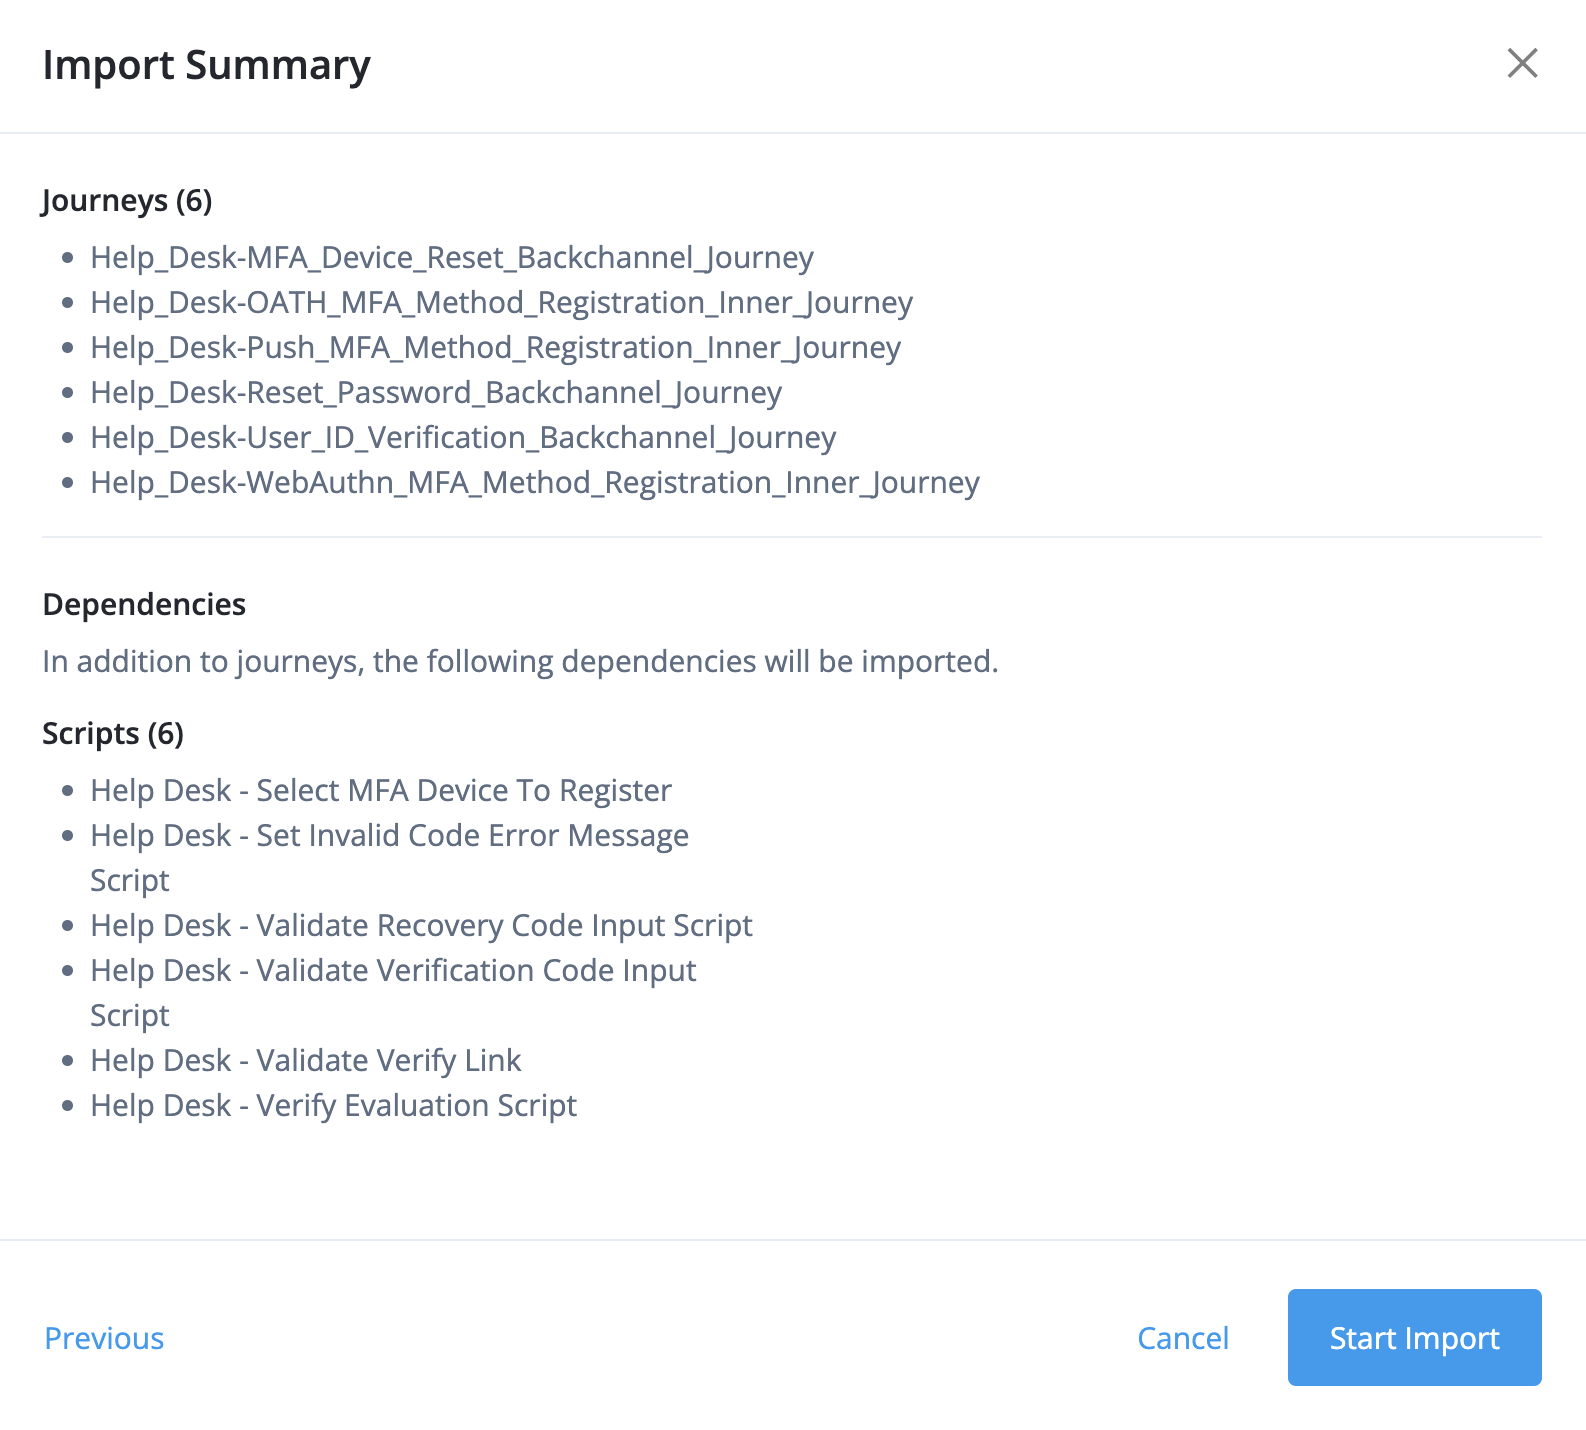
-
Confirm that the import dialog lists the following journeys:
-
Help_Desk-OATH_MFA_Method_Registration_Inner_Journey -
Help_Desk-Push_MFA_Method_Registration_Inner_Journey -
Help_Desk-WebAuthn_MFA_Method_Registration_Inner_Journey -
Help_Desk-Reset_Password_Backchannel_Journey -
Help_Desk-MFA_Device_Reset_Backchannel_Journey -
Help_Desk-User_ID_Verification_Backchannel_Journey
-
-
Click Start Import.
Phase 2: Importing the main and profile management journeys
The second import file contains the main agent-facing journey, the user profile management journey, and the ID verification link journey.
| Wait a few minutes before importing the second journeys file in PingOne Advanced Identity Cloud to make sure phase 1 fully completed. |
Steps
-
Click Import, and then select Import journeys from file.
-
Upload the
Help_Desk_Import_Phase_2_Profile_Send_Main.jsonfile from the downloaded package.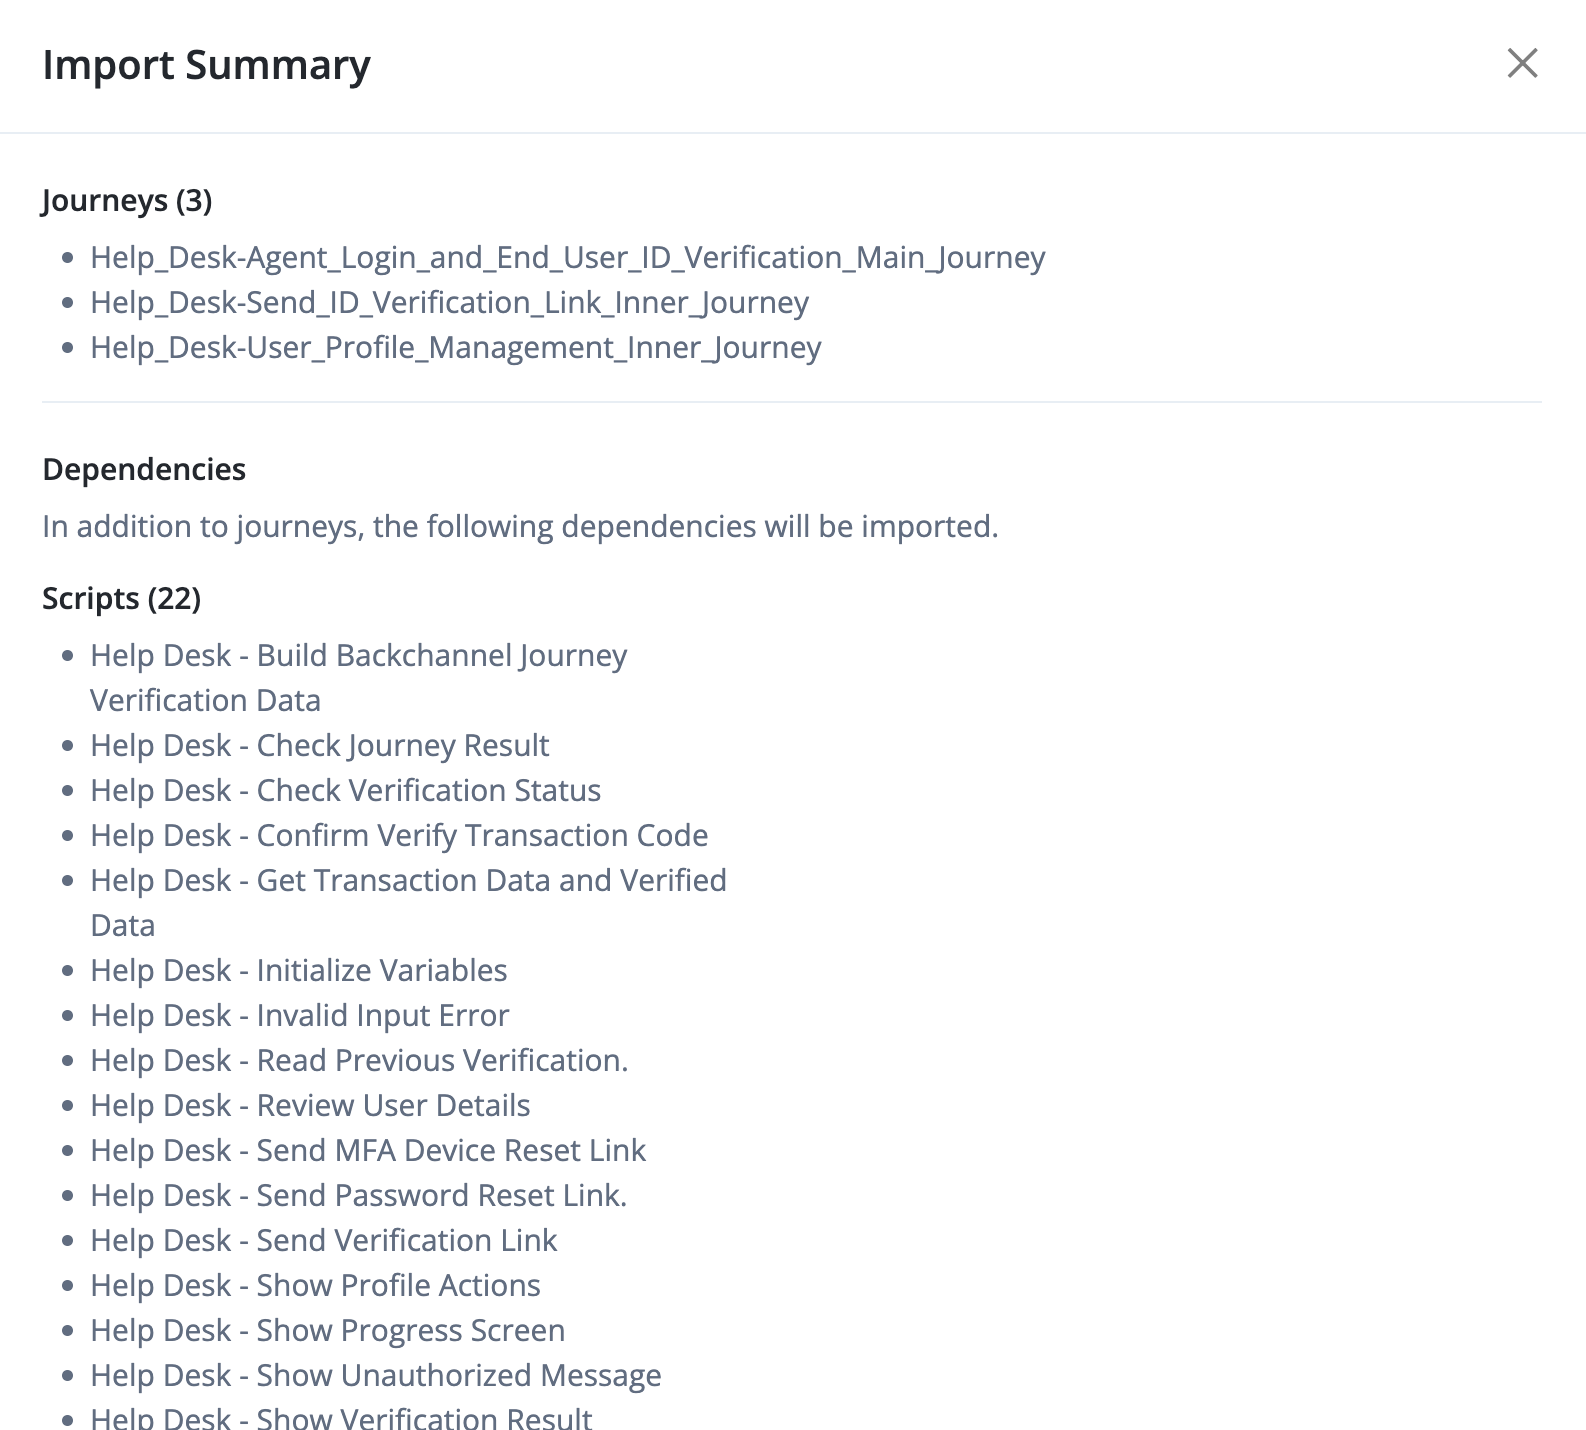
-
Confirm that the import dialog lists the following journeys:
-
Help_Desk-Send_ID_Verification_Link_Inner_Journey -
Help_Desk-User_Profile_Management_Inner_Journey -
Help_Desk-Agent_Login_and_End_User_ID_Verification_Main_Journey
-
-
Click Start Import.
Task 3: Configuring post-import journey settings
After importing both phases, you must update the journey settings and configure several nodes that require manual setup.
Step 3a: Updating journey settings
Some journeys require specific runtime settings to operate correctly.
Steps
-
In the PingOne Advanced Identity Cloud admin console, select your development environment and the alpha realm, then go to Journeys.
-
Edit the following journeys to use Run journey for all users regardless of current session and No Session:
-
Help_Desk-Agent_Login_and_End_User_ID_Verification_Main_Journey -
Help_Desk-User_ID_Verification_Backchannel_Journey
-
-
Edit the following journeys to Run journey for all users regardless of current session only:
-
Help_Desk-MFA_Device_Reset_Backchannel_Journey -
Help_Desk-Reset_Password_Backchannel_Journey
-
Step 3b: Configuring the Send ID Verification Link journey
The Help_Desk-Send_ID_Verification_Link_Inner_Journey requires you to configure the backchannel node, select scripts for two Verify nodes, and assign the PingOne Worker Service.
Steps
-
Open the
Help_Desk-Send_ID_Verification_Link_Inner_Journeyjourney. -
Click the Backchannel Initialize node and set the following:
Field Value Journey
Help_Desk-User_ID_Verification_Backchannel_JourneySubject Name Key
backchannelUserData Object Key
backchannelDataMax Time (Seconds)
600(or longer if needed to allow time for verification)Allow Retry
Not enabled
-
Click the Read Previous Verification Transaction node, enable Use a script to process Verify transactions, and select the script
Help Desk - Read Previous Verification. -
Click the Get Transaction Data and Verified Data node, enable Use a script to process Verify transactions, and select the script
Help Desk - Get Transaction Data and Verified Data. -
On the following nodes, set the PingOne Worker Service to
HelpDesk PingOne Worker:-
PingOne Verify Completion Decision
-
PingOne Create User
-
PingOne Identity Match
-
-
Click Save on the journey.
Step 3c: Configuring the User Profile Management journey
The Help_Desk-User_Profile_Management_Inner_Journey contains two Backchannel Initialize nodes that connect to the password reset and MFA reset backchannel journeys.
Steps
-
Open the
Help_Desk-User_Profile_Management_Inner_Journeyjourney. -
Click the Backchannel Initialize node connected to the Reset Password path and set the following:
Field Value Journey
Help_Desk-Reset_Password_Backchannel_JourneySubject Name Key
backchannelUserData Object Key
backchannelDataMax Time (Seconds)
600(or as required for your users) -
Click the Backchannel Initialize node connected to the Reset MFA Device path and set the following:
Field Value Journey
Help_Desk-MFA_Device_Reset_Backchannel_JourneySubject Name Key
backchannelUserData Object Key
backchannelDataMax Time (Seconds)
600(or as required for your users) -
Click Save on the journey.
Step 3d: Configuring the User ID Verification Backchannel journey
The Help_Desk-User_ID_Verification_Backchannel_Journey contains the PingOne Verify evaluation configuration and requires you to specify the Verify Policy ID and PingOne Worker Service.
Steps
-
In the PingOne admin console, open the PingOne Verify policy for editing and copy the policy ID at the top of the configuration panel.
-
In the PingOne Advanced Identity Cloud admin console, open the
Help_Desk-User_ID_Verification_Backchannel_Journeyjourney. -
Click the Verify Evaluation node.
-
In the node’s configuration script (the Provider node script), set the following values:
Field Value pingOneWorkerHelpDesk PingOne Worker(the name of the PingOne Worker Service)verifyPolicyIdThe ID of your PingOne Verify policy from your PingOne environment
-
On the following nodes, set the PingOne Worker Service to
HelpDesk PingOne Worker:-
PingOne Create User
-
PingOne Identity Match
-
-
Click Save on the journey.
Task 4: Extending the journey timeout (optional)
By default, PingOne Advanced Identity Cloud journeys time out after 5 minutes. For end users who need more time to complete identity verification, you can extend this timeout.
Task 5: Configuring help desk agent access
Learn how to authorize help desk agents to perform account resets.
The Help_Desk-Agent_Login_and_End_User_ID_Verification_Main_Journey uses a Set Admin Group node to check that the authenticated agent belongs to the HelpDesk group (specifically, that adminGroup: HelpDesk is present in the node state). You must create this group and add your help desk agents to it.
Steps
-
In the PingOne Advanced Identity Cloud admin console, select your development environment and the alpha realm.
-
In the sidebar, go to Identities > Groups, then create a new group named
HelpDesk. -
In the sidebar, go to Identities > Manage, then select Alpha realm - Users.
-
Click a help desk agent’s user account to open their profile, then add them to the
HelpDeskgroup. -
Repeat for each help desk agent who should be authorized to perform account resets.
Task 6: Create an end-user account
Prepare an end-user account to validate your work.
Steps
-
In the PingOne Advanced Identity Cloud admin console, select your development environment and the alpha realm.
-
In the sidebar, go to Identities > Manage, then select Alpha realm - Users.
-
Create an end user account based on these hints:
Field Value First NameThe given and middle names on your identification document
Last NameThe surname on your identification document
Email AddressA valid email address where PingOne Advanced Identity Cloud can send you messages with links for the validation process
Address(Optional) If required for advanced data matching in the PingOne Verify policy, include the address on your identification document
DOB(Optional) If required for advanced data matching in the PingOne Verify policy, include the birthdate on your identification document
Result
The end-user account is ready for the verification steps.
|
You’ve now completed the configuration for the Verified Trust for Workforce Help Desk Solution on PingOne Advanced Identity Cloud. Learn how to test the solution in the Validation section. |
Validation
Now that you’ve imported the journeys, configured the PingOne Worker Service, specified a PingOne Verify policy, and prepared a help desk agent and end-user account, you’re ready to test the solution.
Before you begin
Ensure you have the following:
-
The username and password of a help desk agent whose account belongs to the
HelpDeskgroup. -
The username of an end user in the alpha realm whose account has a valid email address you can access.
-
A mobile device that can access the test end user’s email and has a working camera.
-
A valid government-issued ID that you can use for testing purposes. Learn more in PingOne Verify types of verification.
Steps
-
Open the agent journey in an incognito browser window by navigating to the following URL, replacing
<tenant-fqdn>with your PingOne Advanced Identity Cloud tenant domain:https://<tenant-fqdn>/am/XUI/?realm=alpha&authIndexType=service&authIndexValue=Help_Desk-Agent_Login_and_End_User_ID_Verification_Main_Journey -
Sign on as the help desk agent:
-
Enter the help desk agent’s username and click Next.
-
Enter the help desk agent’s password and click Sign On.
-
-
Look up the end user:
-
When prompted, search for the end user by username or email address, then select the user’s account.
The journey verifies that the agent belongs to the
HelpDeskgroup and retrieves the end user’s profile.
-
-
Send the verification request:
The journey sends a verification link to the end user’s email address and displays a status-monitoring screen while waiting for the end user to respond.
-
Verify the end user’s identity:
-
As the end user, open a separate incognito browser window and access the verification link from the email.
-
As the help desk agent, get the code shown on the end-user mobile device and enter it in your browser to get updates about the end user’s progress.
-
As the end user, click Begin Verification and follow the on-screen prompts to scan your government-issued ID and take a selfie.
After completing verification, the screen confirms that identity verification was successful.

-
-
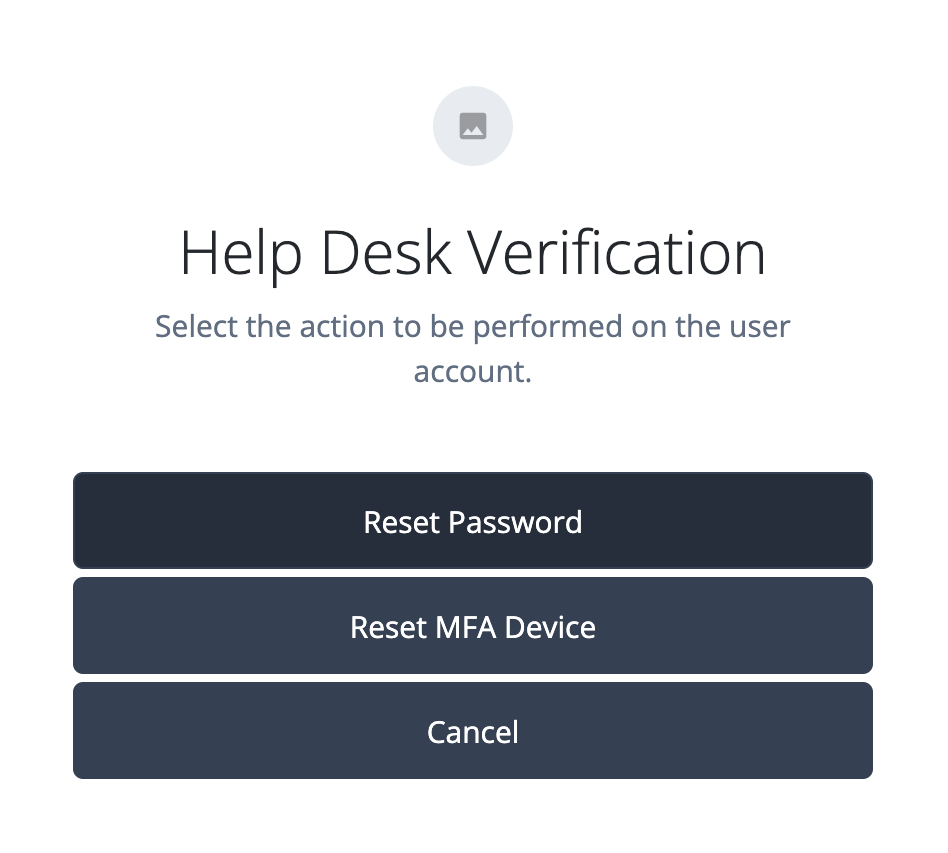
As the help desk agent, update the status in the agent window. When verification succeeds, choose to either reset the end user’s password or reset their MFA devices:
-
Complete the account recovery:
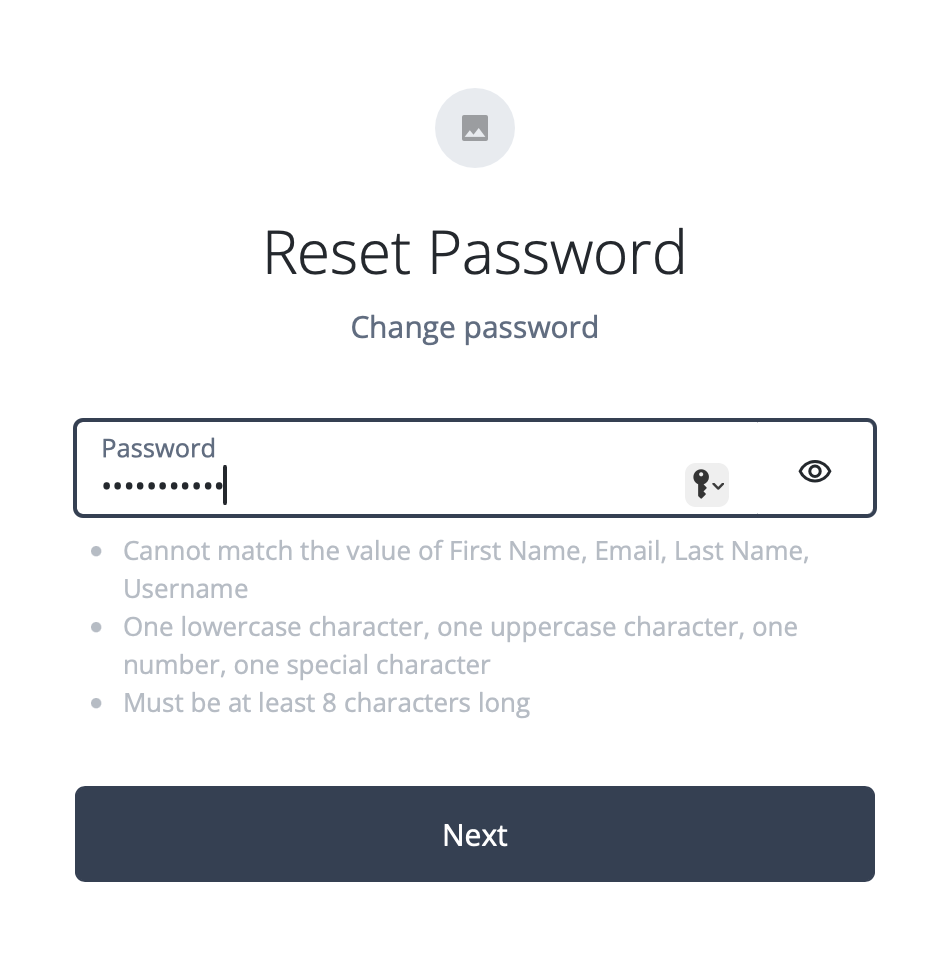
PingOne Advanced Identity Cloud sends the end user another email with a link to complete the reset. As the end user, open the link and follow the prompts. For a password reset, enter and confirm a new password:
On success, the end user is signed on and the end-user profile page is displayed, confirming that account access has been restored.
Troubleshooting
This section provides troubleshooting tips for common issues with the Verified Trust for Workforce Help Desk Solution on PingOne Advanced Identity Cloud.
- The help desk agent can’t sign on
-
When you enter the help desk agent’s credentials, the journey returns an error or failure page. Confirm the following:
-
The agent’s user account exists in the alpha realm of your PingOne Advanced Identity Cloud development environment.
-
The journey is enabled. In the PingOne Advanced Identity Cloud admin console, go to Journeys and confirm that Help_Desk-Agent_Login_and_End_User_ID_Verification_Main_Journey is toggled on.
-
- The help desk agent is not authorized
-
After signing on, the journey exits with a failure rather than proceeding to the end-user lookup step. Confirm that the agent’s user account belongs to the
HelpDeskgroup as described in Task 5. - The end user lookup fails
-
The journey exits with a failure after you search for the end user. Confirm that:
-
The end user account exists in the alpha realm.
-
The end user account has a valid email address (required for backchannel link delivery).
-
- The PingOne Worker Service connection fails
-
A node in the verification or backchannel journeys fails with a connection or authentication error. Confirm the following:
-
The
HelpDesk PingOne Workerservice in your PingOne Advanced Identity Cloud development environment is correctly configured with valid ESV values for the client ID, client secret, and environment ID from your mapped PingOne environment. Learn more in Set up PingOne workers and configure them as PingOne Advanced Identity Cloud services. -
All nodes that reference
HelpDesk PingOne Workerin theHelp_Desk-Send_ID_Verification_Link_Inner_JourneyandHelp_Desk-User_ID_Verification_Backchannel_Journeyare configured with the correct service name.
-
- The verification link has expired or the backchannel timed out
-
The backchannel journey’s Max Time (Seconds) has elapsed before the end user completed verification. The agent’s status screen reflects the failure. The agent can restart the main journey to send a new verification request. Consider increasing the Max Time value in the Backchannel Initialize node and extending the journey timeout as described in Task 4.
- The PingOne Verify evaluation timed out
-
The end user didn’t complete the ID and liveness steps within the PingOne Verify evaluation window. The agent can restart the main journey to initiate a new verification session.
What’s next
As you integrate and promote this solution to higher environments, consider the following:
-
Customizing the
HelpDeskgroup name and the Set Admin Group node’s group check to align with your organization’s group naming conventions. -
Adding extension points to the journey to integrate with external ticketing systems. For example, creating a Jira ticket or ServiceNow incident when an end user fails identity verification.
-
Configuring a custom PingOne Verify policy appropriate for your organization before deploying to production. The default policy is sufficient for testing but might not meet your production requirements.
Explore further
Concepts
Learn more about the concepts used in the Verified Trust for Workforce Help Desk Solution in the following table:
| Concept | Description |
|---|---|
A journey is a visual, node-based workflow that defines how users or agents authenticate, verify their identity, or perform account management tasks. In this solution, a main agent-facing journey coordinates identity verification and account recovery through a set of inner and backchannel journeys. |
|
Backchannel authentication lets a journey start a separate, asynchronous journey for a different subject — in this case, the end user — while the originating journey monitors the outcome. The main journey uses Backchannel Initialize nodes to trigger user-facing journeys and polls for their results using Backchannel Status nodes. |
|
The PingOne Worker Service is a service configuration in PingOne Advanced Identity Cloud that gives journey nodes the credentials they need to call PingOne APIs. It acts as the bridge between PingOne Advanced Identity Cloud journey nodes (such as PingOne Verify Evaluation) and your connected PingOne environment. Each node that communicates with PingOne must reference a configured worker service instance. |
|
ESVs let you store sensitive configuration values, such as API credentials, outside of journey configuration. This solution uses ESVs to store the PingOne Worker App’s client ID, client secret, and environment ID, which the PingOne Worker Service reads at runtime. |
|
The Backchannel Initialize node starts an asynchronous journey for a different subject. It takes the end user’s ID from shared state, generates a magic link URL to the target journey, and writes the backchannel transaction ID to shared state so the Backchannel Status node can track the outcome. |
|
The Backchannel Status node checks the current status of an active backchannel transaction. Together with the Polling Wait node, it repeatedly polls the transaction until the end user completes (or fails) the target journey. |
|
The PingOne Verify Evaluation node starts or resumes a PingOne Verify evaluation transaction. In this solution, it is configured with a policy ID that defines the verification requirements (government ID, liveness detection, and facial comparison). On success, the journey proceeds to the account recovery step. |
|
The PingOne Identity Match node checks whether the PingOne Advanced Identity Cloud user has a corresponding user account in PingOne. If no match is found, the journey creates one using the PingOne Create User node. This step is required before PingOne Verify can target the correct user for a verification transaction. |
|
The PingOne Verify service lets you enable secure user verification based on a government-issued document and a live face capture (a selfie). In this solution, PingOne Verify is triggered within the ID verification backchannel journey after the help desk agent initiates the request. |