Managing administrator roles
You can assign built-in or custom administrator roles to individual users or to groups.
|
Learn more about built-in roles and creating and managing custom roles in Administrator Roles and Custom role scenarios before you start assigning roles to administrators. |
Managing roles individually
Use the Users page to add roles to a user.
Steps
-
In the PingOne admin console, go to the Administrators environment.
Older organizations might not have an Administrators environment by default. To improve security posture, separate administrators from end users and manage all administrators in their own environment.
-
Go to Directory > Users.
-
Browse or search for an existing user or create a new one.
Learn more in Adding a user in PingOne.
-
Click the user entry to open the user details panel.
-
Click the Roles > Administrator Roles tab.
If there aren’t any application roles available in the environment, the settings are on the Roles tab.
If roles are assigned to the user, they’re listed here with information about where those roles apply. For example, in the following image, BX User is assigned the following administrator roles:
-
Advanced Help Desk Admin: They have this role over one group in one environment.
-
Application Owner: They have this role at the environment level in two environments. Because the role is assigned at the environment level, they have the role over all of the applications in both of those environments. In a third environment, they have the role over only one application. That is the only application they can manage in that environment.
-
Environment Admin: They have this role for one environment.
-
Identity Data Admin: They have this role over one population in one environment.
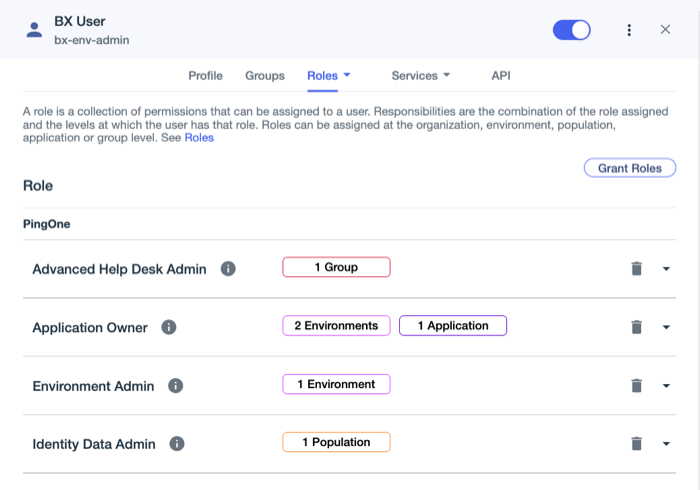
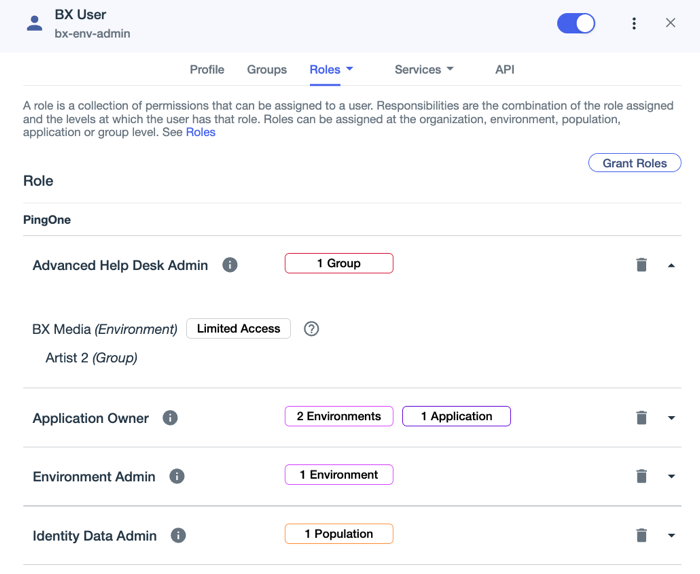
Click the Info icon to view the permissions associated with the role. Click the down arrow on the right to view the list of environments, populations, applications, or groups for which the role is assigned. The levels at which a role can be assigned depends on the role. For example, only certain roles can be assigned at the group or application levels.
-
-
Click Grant Roles.
The Available Responsibilities tab lists the roles that you’re allowed to assign and the environments for which you’re allowed to assign them. A responsibility is the combination of the role assignment and the level, or scope, at which the role is applied. Depending on the role, it could be assigned at the organization, environment, population, group, or application level.
The Granted Responsibilities tab lists any roles that are currently assigned.
-
On the Available Responsibilities tab, click the role that you want to assign or change and perform any combination of the following:
-
To assign the role, select the checkboxes next to the applicable environments for which you want the user to have the role.
Click Select All or Remove All to select or clear all available responsibilities.
-
To remove a role assignment, clear the checkboxes next to the applicable environments.
-
To grant this access for only a portion of the environment, click the Reduce Access icon (
 ), select a subset of the available applications, populations, or groups on the Limit Access page, and click Confirm.
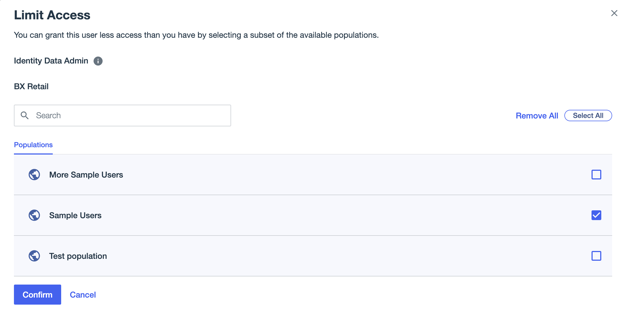
You can grant only roles that are assigned to you or that grant the permissions needed to assign that role to others. For example, if you don’t have the Environment Admin role, you can’t assign the Environment Admin role to others (and that role won’t be listed under Available Responsibilities). However, even if you have only the Identity Data Admin role, you can assign either the Identity Data Admin role or the Identity Data Read Only role to others. The permissions for the Identity Data Admin role allow the bearer to assign both of these roles to others.
Learn more about the permissions associated with each role in Roles in the PingOne API documentation.
-
-
Click Save.
Result
The role assignments that you selected are listed on the Granted Responsibilities tab.
Managing roles using groups
Use the Groups page to add roles to a group.
Assigning roles to groups allows you to:
-
Manage roles for multiple users at once.
-
Apply role changes in bulk.
-
See users that have a certain role by viewing group members.
For security reasons, only static groups can have roles assigned to them. You can’t assign roles to dynamic groups, which have members included based on a filter or rule. With a dynamic group, you might inadvertently add users to the group that would inherit role assignments. Learn more in Static and dynamic groups.
When adding users to groups that have roles assigned, be careful not to inadvertently assign a role to a user by adding them to a group. If a user has a role inadvertently assigned to them because they’re added to a group, remove the user from the group to remove the role. If a user has a role assigned to them individually, you can remove the role from the user.
|
Managing group roles
Assign roles to groups of administrators using the Groups page.
Steps
-
In the PingOne admin console, go to the Administrators environment.
Older organizations might not have an Administrators environment by default. To improve security posture, separate administrators from end users and manage all administrators in their own environment.
-
Go to Directory > Groups.
-
Browse for an existing group or create a new one.
Learn more in Creating a group.
-
Click the group entry to open the details panel.
-
Click the Roles > Administrator Roles tab.
If there aren’t any application roles available in the environment, the settings are on the Roles tab.
If roles are assigned to the user, they’re listed here with information about where those roles apply. For example, in the following image, BX User is assigned the following administrator roles:
-
Advanced Help Desk Admin: They have this role over one group in one environment.
-
Application Owner: They have this role at the environment level in two environments. Because the role is assigned at the environment level, they have the role over all of the applications in both of those environments. In a third environment, they have the role over only one application. That is the only application they can manage in that environment.
-
Environment Admin: They have this role for one environment.
-
Identity Data Admin: They have this role over one population in one environment.
Click the Info icon to view the permissions associated with the role. Click the down arrow on the right to view the list of environments, populations, applications, or groups for which the role is assigned. The levels at which a role can be assigned depends on the role. For example, only certain roles can be assigned at the group or application levels.
-
-
Click Grant Roles.
The Available Responsibilities tab lists the roles that you’re allowed to assign and the environments for which you’re allowed to assign them. A responsibility is the combination of the role assignment and the level, or scope, at which the role is applied. Depending on the role, it could be assigned at the organization, environment, population, group, or application level.
The Granted Responsibilities tab lists any roles that are currently assigned.
-
On the Available Responsibilities tab, click the role that you want to assign or change and perform any combination of the following:
-
To assign the role, select the checkboxes next to the applicable environments for which you want the user to have the role.
Click Select All or Remove All to select or clear all available responsibilities.
-
To remove a role assignment, clear the checkboxes next to the applicable environments.
-
To grant this access for only a portion of the environment, click the Reduce Access icon (
), select a subset of the available applications, populations, or groups on the Limit Access page, and click Confirm.
You can grant only roles that are assigned to you or that grant the permissions needed to assign that role to others. For example, if you don’t have the Environment Admin role, you can’t assign the Environment Admin role to others (and that role won’t be listed under Available Responsibilities). However, even if you have only the Identity Data Admin role, you can assign either the Identity Data Admin role or the Identity Data Read Only role to others. The permissions for the Identity Data Admin role allow the bearer to assign both of these roles to others.
Learn more about the permissions associated with each role in Roles in the PingOne API documentation.
-
-
Click Save.
Result
The role assignments that you selected are listed on the Granted Responsibilities tab.
Managing administrator roles using external groups
Before you begin
Ensure that you have one administrator user with direct sign-on access to PingOne. Add this user to the Administrators environment to keep them separate from your end users.
|
This task uses PingOne Admin User to refer to this user. |
About this task
You can leverage just-in-time provisioning and use external groups, such as those in an identity store accessed through an external identity provider (IdP), to manage administrator role assignment in PingOne.
For example, you configure PingOne to use an external IdP with Active Directory (AD) as the identity store. You then create a group in the Active Directory identity store. You add users to this group and provision it to PingOne to ensure that these users have access to PingOne with the appropriate roles.
To use an external group to manage administrator roles in PingOne:
Steps
-
Add a custom OIDC or SAML external IdP in PingOne.
Managing roles using external groups is currently supported only for custom OIDC or SAML external IdPs.
When you get to the step for mapping attributes, you must map at least the following PingOne user attributes to the corresponding attributes for the identity provider:
-
Username
-
Email Address
-
External Group Names
Example:
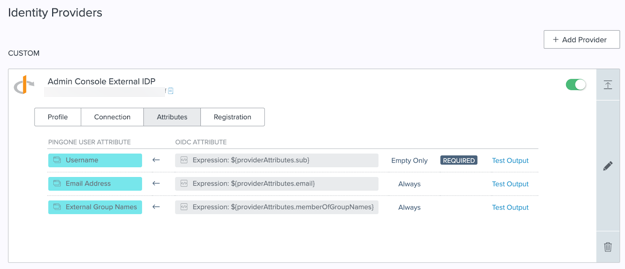
The values in the previous image are for example purposes only. The external attribute names will vary depending on the provider.
Set Update Condition for the Email Address and External Group Names attributes to Always. This ensures that these attributes are updated in PingOne whenever they are updated in the external IdP and that their access and permissions are always in sync.
Map additional attributes as needed.
When authenticating into PingOne from an external IdP, ensure that you enable MFA as part of your authentication policy.
-
-
Create the applicable groups in your external identity store.
-
During the initial group set up, add the PingOne Admin User to each external group that you want to provision to PingOne.
You can add more users, but at a minimum each group must contain one user with direct access to PingOne before you continue. The process for adding users to groups depends on the external identity store that you are using. Follow the steps in the documentation for your identity store.
-
Sign on to PingOne as the PingOne Admin User.
Result:
The external groups are provisioned to PingOne using just-in-time provisioning.
Learn more in Just-in-time provisioning of external groups.
-
Assign the appropriate admin roles to the groups in PingOne.
Learn more on the Using groups tab in Managing roles using groups.
You must assign at least one role to each group, or the users will be unable to sign on to PingOne.
These roles are assigned to all users currently in the group and to any users added to the group in the future.
-
Add users to the external group in the external identity store as needed to ensure that they can access PingOne with the appropriate role assignments.
Similarly, remove users from the external group to remove their access to PingOne or to move them to a group with different role assignments.
Next steps
You should audit the users in your external directory regularly to ensure that their group membership and level of access is correct.