MCP security gateway
Model Context Protocol (MCP) offers an open standard to connect artificial intelligence (AI) agents with AI servers. By exposing services over MCP, you make them usable by AI agents.
The challenge, however, consists in implementing an appropriate, consistent, documented, and adaptable security model across the service assets you expose over MCP. PingGateway helps you meet this challenge as an MCP gateway, protecting MCP servers to:
-
Allow only valid MCP requests.
-
Audit MCP requests and actors.
-
Throttle request rates.
-
Enforce coarse-grained OAuth 2.0 security controls.
-
Enforce fine-grained access control policies with PingOne Authorize, PingOne Protect, and Advanced Identity Cloud.
-
Perform token transformation mapped to your security models.
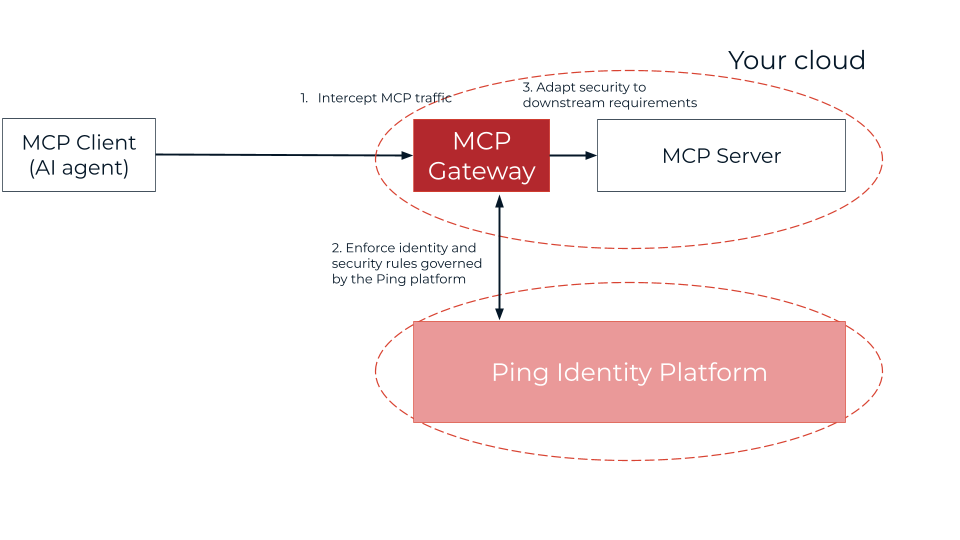
Business teams can focus on accelerating AI adoption in the business while identity and access management and security teams address security.
| This feature has Evolving interface stability. It’s subject to change without notice, even in a minor or maintenance release. |
This page shows how to protect a sample MCP server using Advanced Identity Cloud as the OAuth 2.0 authorization server (AS). Follow similar steps when using PingOne or PingAM as the AS and to protect your own MCP servers.
Goals
When you complete this tutorial, you will know:
-
How to use PingGateway to protect an MCP server.
-
How to create a route to audit, protect, and validate MCP requests.
-
How PingGateway acts as an MCP gateway and resource server in an MCP security architecture.
What you’ll do
In this tutorial, you will start by preparing the sample MCP software with the server to protect. Once the MCP software works on your computer, you will use PingGateway to protect the MCP server.
The tutorial assumes you already have PingGateway and the AS set up, and only need to configure them for MCP.
The full example has two parts with multiple tasks each:
-
Prepare the sample MCP software:
By completing these tasks, you show the sample MCP software works on your computer without PingGateway or Advanced Identity Cloud.
-
Protect the sample MCP server with PingGateway:
By completing these tasks, you show how to use PingGateway in an MCP security architecture.
Preparation
Before trying the tutorial, prepare the sample MCP software to make sure it works on your computer.
Preparation task 1: Install software for this tutorial
-
Install the prerequisite software on your computer:
-
Download the sample MCP agent and server software from Ping Identity Download Center and unpack it on your computer.
Preparation task 2: Run the sample MCP server
The sample MCP server runs as a Python script.
-
In the directory where you unpacked the sample MCP server, add the Python requirements.
Install the requirements based on the
requirements-lock.txtfile provided with the sample MCP server:$ pip install -r requirements-lock.txt -
In the directory where you unpacked the sample MCP server, run the sample MCP server script:
$ uvicorn sample-mcp-server:app --host 0.0.0.0 --port 8000 --log-level infoIf necessary, learn about additional options in the
README.mdfile.
You have successfully started the sample MCP server.
Preparation task 3: Run the MCP agent
The sample MCP agent uses Meta’s Llama 3.2 model. Run it in a different terminal window from the sample MCP server.
-
Download, install, and run Ollama if you haven’t already done so.
-
Install the Ollama model for the sample MCP server locally:
$ ollama pull llama3.2:1b -
Run Ollama.
-
In the directory where you unpacked the sample MCP agent, add the Python requirements.
Install the requirements based on the
requirements-lock.txtfile provided with the sample MCP agent:$ pip install -r requirements-lock.txt -
In the directory where you unpacked the sample MCP agent, run the sample MCP agent script:
$ python3 sample-mcp-agent.py --mcp-server-url http://localhost:8000If necessary, learn about additional options in the script help:
python3 sample-mcp-agent.py --help -
In the console where the sample MCP agent runs, notice the available commands:
[INFO] Discovered tools [http://localhost:8000]:
[INFO] - geocode: Returns a list of objects containing city name, latitude, longitude, country, admin1 (region), and timezone for each matching city
[INFO] - forecast_daily: Returns a multi-day weather forecast for a given location
[INFO] - forecast_periods: Returns weather forecasts for each representative period of the current day
[INFO] - forecast_hourly: Returns an hourly weather forecast for the current day
[INFO] - weather_at_time: Returns the forecasted weather for a specific time at a given location

Enter your message (or 'exit|quit|q'):
This shows the sample MCP agent can connect to the sample MCP server.
-
Enter a prompt and get a response from the MCP server, then exit the agent.
The following example uses the
forecast_dailytool to get the daily forecast for Tokyo:Enter your message (or 'exit|quit|q'): What is the daily forecast for Tokyo? Agent: The daily forecast for Tokyo is: <MCP server response with forecast details> Enter your message (or 'exit|quit|q'): exit User requested exit. Goodbye!
You have successfully run the sample MCP agent with the sample MCP server.
Tutorial
Now you know the sample MCP software works on your computer. Show you can protect the sample MCP server with PingGateway using Advanced Identity Cloud as the AS.
Tutorial task 1: Before you begin
-
Prepare the sample MCP software as described in Preparation.
-
Make sure you can access the PingOne Advanced Identity Cloud tenant as an administrator.
-
Choose the realm to use in the PingOne Advanced Identity Cloud tenant.
The following tasks use the
alpharealm. -
Prepare PingGateway as described in PingGateway and PingOne Advanced Identity Cloud.
After you follow the instructions to register the PingGateway agent in Advanced Identity Cloud, the PingGateway profile is registered with Advanced Identity Cloud as
ig_agent. -
Update the agent profile to set the token introspection scope:
-
Open the AM admin UI at Native Consoles > Access Management.
-
In the AM admin UI, go to Applications > Agents > Identity Gateway > ig_agent.
-
Set Token Introspection to
Realm Only. -
Click Save Changes.
-
Tutorial task 2: Prepare Advanced Identity Cloud as the AS
-
Sign on to the Advanced Identity Cloud admin UI as an administrator.
-
Make sure you have an OAuth2 Access Token Modification script to support RFC 8707, Resource Indicators for OAuth 2.0 as required by MCP.
If the OAuth2 Provider for your realm already uses an OAuth2 Access Token Modification script, add code to set the audience claim in the access token as shown for the following script.
To add a new script, go to Scripts > Auth Scripts > New Script > OAuth2 / OIDC > OAuth2 Access Token Modification, click Next, add the following script, and click Save and Close:
-
Name:
MCP aud script -
JavaScript:
// Make sure the `audience` claim matches the resource identifier
(function () {
	  accessToken.setField("audience", requestProperties.get("requestParams").get("resource").get(0));
	  // No return value is expected. Leave it undefined.
	  }());
The PingGateway McpProtectionFilter will consume the claim specified in its
"resourceIdPointer"setting.
-
-
Using the AM admin UI, update the
OAuth2 Providerservice settings for the realm.In the AM admin UI at Native Consoles > Access Management, go to Services and change the following settings for the
OAuth2 Providerservice:-
Advanced tab > Client Registration Scope Allowlist: Add
test. -
Client Dynamic Registration tab > Allow Open Dynamic Client Registration: Enable and click Save Changes.
-
Plugins tab > Access Token Modification Script: Set to
MCP aud scriptif you added it as a new script and click Save Changes.
-
You have successfully prepared Advanced Identity Cloud to act as the AS.
Tutorial task 3: Configure PingGateway
Previously, you prepared PingGateway for HTTPS as described in Tutorial task 1: Before you begin. Now, configure PingGateway to protect the sample MCP server:
-
In the
admin.jsonfile for PingGateway, enable streaming:"streamingEnabled": truePingGateway requires this setting for server-side events (SSE), part of MCP.
-
Restart PingGateway to apply the change.
-
Add the following route to PingGateway updating
"properties"as needed for your deployment:- Linux
-
$HOME/.openig/config/routes/mcp.json - Windows
-
%appdata%\OpenIG\config\routes\mcp.json
{
  "name": "mcp",
  "condition": "${find(request.uri.path, '^/mcp')}",
  "properties": {
    "amUrl": "https://myTenant.forgeblocks.com/am/",
    "amRealm": "/alpha",
    "gatewayUrl": "https://ig.example.com:8443",
    "mcpServerUrl": "http://localhost:8000"
  },
  "baseURI": "&{mcpServerUrl}",
  "heap": [
    {
      "name": "AuditService",
      "type": "AuditService",
      "config": {
        "eventHandlers": [
          {
            "class": "org.forgerock.audit.handlers.json.JsonAuditEventHandler",
            "config": {
              "name": "json",
              "logDirectory": "&{ig.instance.dir}/audit",
              "topics": [
                "access",
                "mcp"
              ]
            }
          }
        ]
      }
    },
    {
      "name": "SecretsPasswords",
      "type": "Base64EncodedSecretStore",
      "config": {
        "secrets": {
          "agent.secret.id": "cGFzc3dvcmQ="
        }
      }
    },
    {
      "name": "AmService",
      "type": "AmService",
      "config": {
        "url": "&{amUrl}",
        "realm": "&{amRealm}",
        "agent": {
          "username": "ig_agent",
          "passwordSecretId": "agent.secret.id"
        },
        "secretsProvider": "SecretsPasswords",
        "sessionCache": {
          "enabled": true
        }
      }
    },
    {
      "name": "rsFilter",
      "type": "OAuth2ResourceServerFilter",
      "config": {
        "scopes": [
          "test"
        ],
        "accessTokenResolver": {
          "type": "TokenIntrospectionAccessTokenResolver",
          "config": {
            "amService": "AmService",
            "providerHandler": {
              "type": "Chain",
              "config": {
                "filters": [
                  {
                    "type": "HttpBasicAuthenticationClientFilter",
                    "config": {
                      "username": "ig_agent",
                      "passwordSecretId": "agent.secret.id",
                      "secretsProvider": "SecretsPasswords"
                    }
                  }
                ],
                "handler": "ClientHandler"
              }
            }
          }
        }
      }
    }
  ],
  "handler": {
    "type": "Chain",
    "capture": "all",
    "config": {
      "filters": [
        {
          "type": "McpAuditFilter",
          "config": {
            "auditService": "AuditService"
          }
        },
        {
          "type": "UriPathRewriteFilter",
          "config": {
            "mappings": {
              "/mcp": "/"
            }
          }
        },
        {
          "type": "McpProtectionFilter",
          "config": {
            "resourceId": "&{gatewayUrl}/mcp",
            "authorizationServerUri": "&{amUrl}oauth2/realms/root/realms&{amRealm}",
            "resourceServerFilter": "rsFilter",
            "supportedScopes": [
              "test"
            ],
            "resourceIdPointer": "/audience"
          }
        },
        {
          "type": "McpValidationFilter",
          "config": {
            "acceptedOrigins": ".*"
          }
        }
      ],
      "handler": {
        "type": "ReverseProxyHandler",
        "config": {
          "soTimeout": "20 seconds"
        }
      }
    }
  }
}
Source: mcp.json
Notice the following features of the route:
-
The sample route uses a base-64 encoded secret to connect to the AS. In production, don’t include secrets in route files.
-
PingGateway acts as an OAuth 2.0 resource server (RS) when protecting the sample MCP server.
-
The McpAuditFilter audits MCP requests. PingGateway records MCP audit events in an
audit/mcp.audit.jsonfile. -
The UriPathRewriteFilter sends the request to the root resource of the MCP server. The MCP server expects requests at
/. -
The McpProtectionFilter uses the RS configuration, extending it for MCP.
-
PingGateway validates MCP requests with an McpValidationFilter.
-
The ReverseProxyHandler uses a long
"soTimeout"setting to accommodate an MCP agent receiving few or infrequent SSE updates.
This simple route doesn’t show throttling or fine-grained access control. Add those features as needed to meet your security requirements.
-
Check the PingGateway log to verify the route loads successfully.
You have successfully configured PingGateway to protect the sample MCP server.
Tutorial task 4: Start the MCP agent
In the directory where you unpacked the sample MCP agent, start the sample MCP agent again. This time, point it to the PingGateway route for MCP requests:
$ python3 sample-mcp-agent.py --mcp-server-url https://ig.example.com:8443/mcpYou have successfully started the sample MCP agent.
Validation
With PingGateway protecting the MCP server, the sample MCP agent directs you to the AS to sign on as an end user and authorize access to make MCP requests.
-
Copy the authorization URL the sample MCP agent now displays in your terminal window.
The URL looks similar to
https://myTenant.forgeblocks.com/am/oauth2/realms/root/realms/alpha/authorize?response_type=code&client_id=… -
In your browser’s privacy or incognito mode, go to the authorization URL you copied.
-
Sign on with the end-user credentials (username:
demopassword:Ch4ng3!t) and consent to the requestedtestscope before closing the browser tab as prompted.You set these credentials when you set up a demo user in PingOne Advanced Identity Cloud.
-
In the terminal where the sample MCP agent runs, notice the available commands:
[INFO] Discovered tools [https://ig.example.com:8443/mcp]: [INFO] - geocode: Returns a list of objects containing city name, latitude, longitude, country, admin1 (region), and timezone for each matching city [INFO] - forecast_daily: Returns a multi-day weather forecast for a given location [INFO] - forecast_periods: Returns weather forecasts for each representative period of the current day [INFO] - forecast_hourly: Returns an hourly weather forecast for the current day [INFO] - weather_at_time: Returns the forecasted weather for a specific time at a given location Enter your message (or 'exit|quit|q'): -
Enter a prompt and get a response from the MCP server through PingGateway, then exit the agent:
The following example uses the
forecast_dailytool to get the daily forecast for Tokyo:Enter your message (or 'exit|quit|q'): What is the daily forecast for Tokyo? Agent: The daily forecast for Tokyo is: <MCP server response with forecast details> Enter your message (or 'exit|quit|q'): exit User requested exit. Goodbye!Find additional details about the MCP request in the PingGateway log.
You have successfully validated PingGateway can protect the MCP server.