Install
This guide describes how to install and remove PingGateway software. For information about how to install PingGateway for evaluation, refer to the Quick install.
Read the Release notes before you install.
Product names changed when ForgeRock became part of Ping Identity. PingGateway was formerly known as ForgeRock Identity Gateway, for example. Learn more about the name changes from New names for ForgeRock products.
Prepare to install
Before you install, make sure your installation meets the requirements in the release notes.
Create a PingGateway service account
To limit the impact of a security breach, install and run PingGateway from a dedicated service account. This is optional when evaluating PingGateway, but essential in production installations.
A hacker is constrained by the rights granted to the user account where PingGateway runs; therefore, never run PingGateway as root user.
-
In a terminal window, use a command similar to the following to create a service account:
-
Linux
-
Windows
$ sudo /usr/sbin/useradd \ --create-home \ --comment "Account for running PingGateway" \ --shell /bin/bash PingGatewaynet user username password /add /comment:"Account for running PingGateway" -
-
Apply the principle of least privilege to the account, for example:
-
Read/write permissions on the installation directory,
/path/to/identity-gateway-2025.3.0. -
Execute permissions on the scripts in the installation
bindirectory,/path/to/identity-gateway-2025.3.0/bin.
-
Prepare the network
Configure the network to include hosts for PingGateway, AM, and the sample application. Learn more about host files from the Wikipedia entry, Hosts (file).
-
Add the following entry to your host file:
-
Linux
-
Windows
/etc/hosts%SystemRoot%\system32\drivers\etc\hosts127.0.0.1 localhost ig.example.com app.example.com am.example.com -
Set up PingOne Advanced Identity Cloud
This documentation contains procedures for setting up items in PingOne Advanced Identity Cloud that you can use with PingGateway. For more information about setting up PingOne Advanced Identity Cloud, refer to the PingOne Advanced Identity Cloud documentation.
About authentication to PingOne Advanced Identity Cloud
PingOne Advanced Identity Cloud provides an authentication journey to validate the agent credentials with an Agent Data Store Decision node.
When you register PingGateway with PingOne Advanced Identity Cloud, PingOne Advanced Identity Cloud uses the journey to authenticate PingGateway.
Register a PingGateway agent in PingOne Advanced Identity Cloud
This procedure registers an agent profile for PingGateway.
-
Log in to the Advanced Identity Cloud admin UI as an administrator.
-
Click Gateways & Agents > New Gateway/Agent > Identity Gateway > Next and use the hints in the following table to create the agent profile:
Field Description Example ID
Set the unique agent profile name PingGateway uses to connect.
ig_agentPassword
Store the password PingGateway uses to connect in the agent profile.
Record the password to use when configuring PingGateway.
A strong password.
The examples in the documentation use
passwordand its base64-encodingcGFzc3dvcmQ=.Use Secret Store for password
Store the password in a secret and reference the secret by its label.
Follow the steps in Use the secret store for the password after you create the agent profile.
Click to enable
Secret Label Identifier
This field appears when you select Use Secret Store for password.
This value represents the
identifierpart of the secret label for the agent. PingOne Advanced Identity Cloud uses the identifier to generate a secret label in the following format:am.application.agents.identifier.secret. Learn more in Secret labels.After setting this, add an ESV secret for the password and map the ESV to the secret label.
igUse secure passwords in a production environment. Consider using a password manager to generate secure passwords. -
Click Save Profile > Done to display the new agent profile.
-
(Optional) Add the list of Redirect URLs used in PingGateway routes and click Save to update the profile.
Use the secret store for the password
When you select Use Secret Store for password and set a secret label for the agent profile, PingOne Advanced Identity Cloud creates the secret label but the secret isn’t yet defined or mapped to the label:
-
Define an ESV secret, such as
esv-ig_agent, holding the password for PingGateway to connect.The examples in the documentation use
password.Learn how in creating ESV secrets. In production deployments, restrict access to the password from configuration placeholder and script contexts.
-
Map the ESV to the label created when you set the Secret Label Identifier:
-
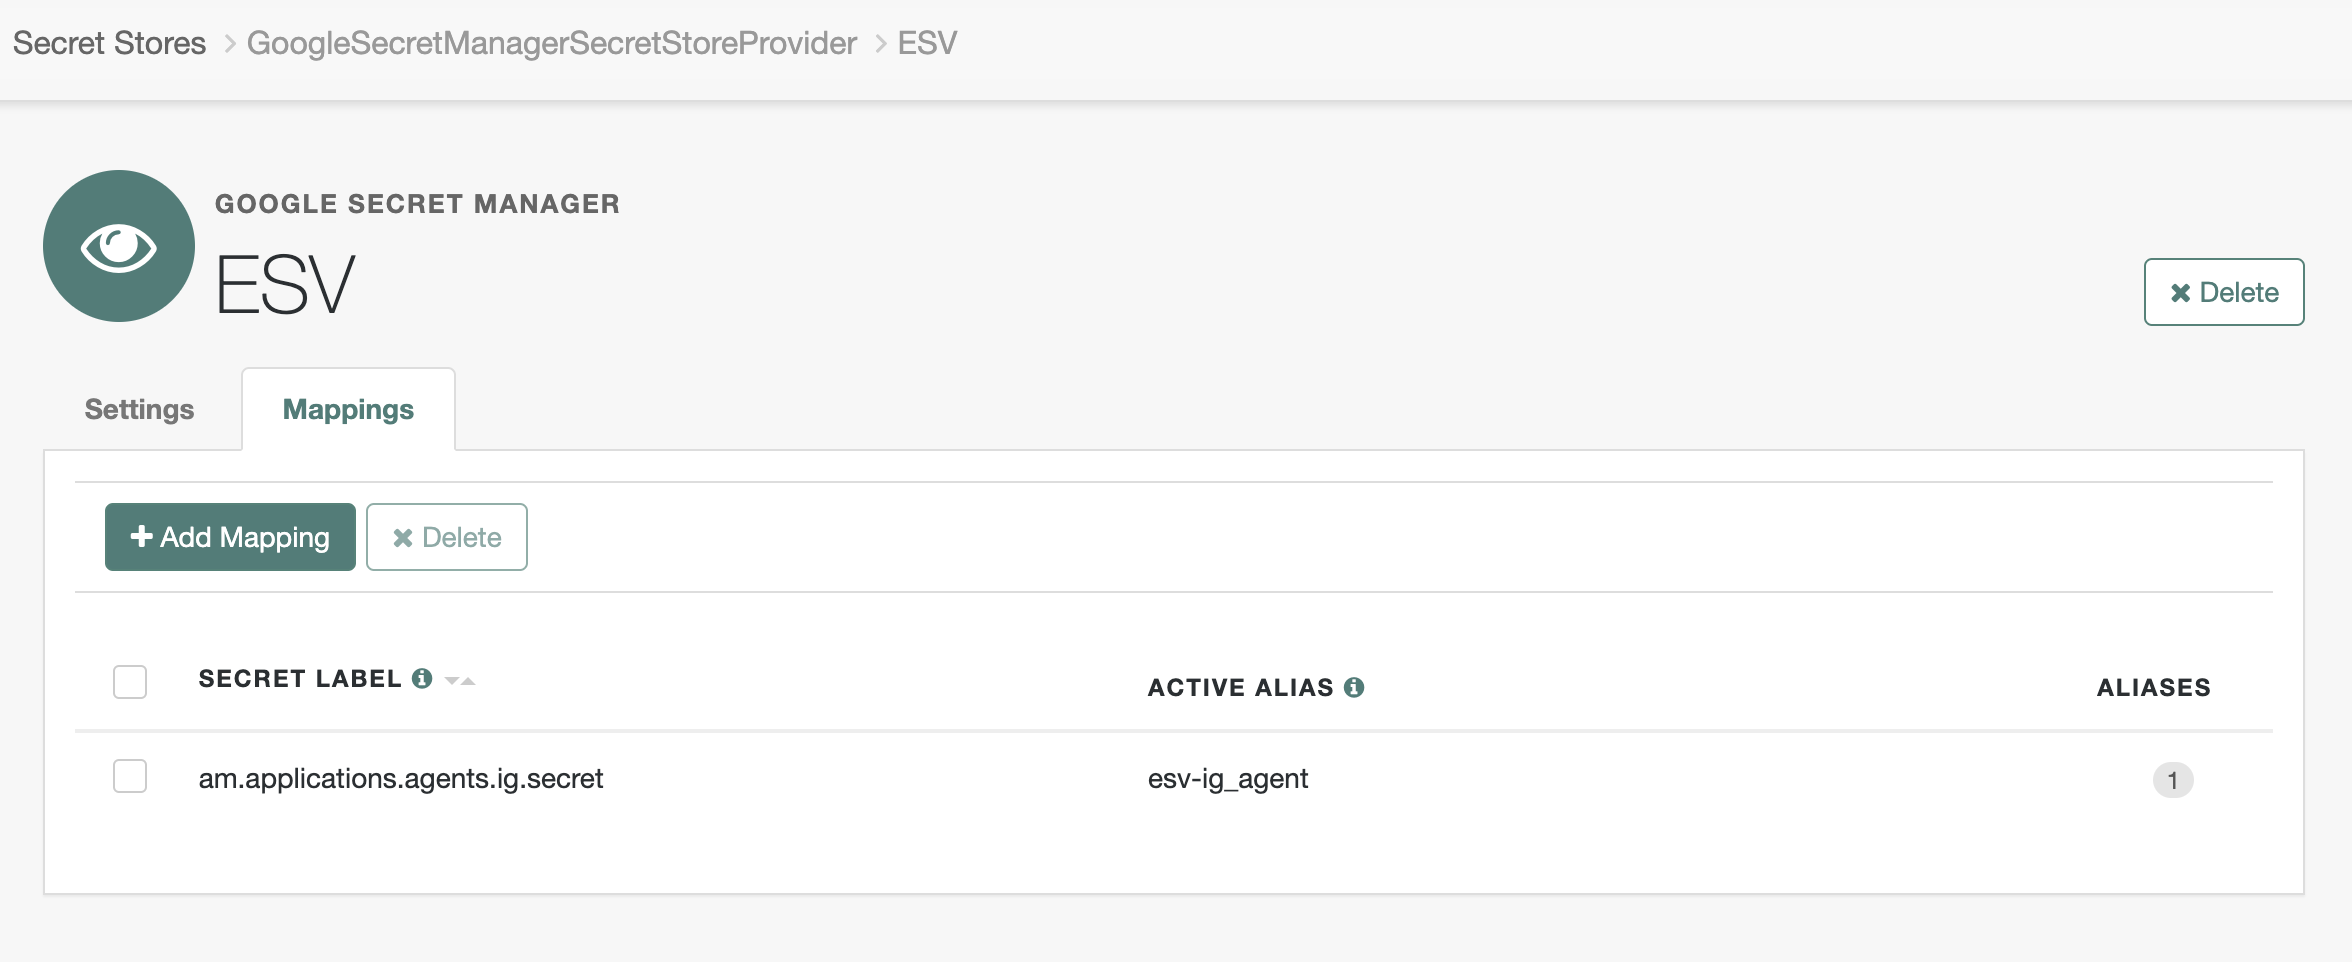
Click Native Consoles > Access Management > Secret Stores > ESV > Mappings > Add mappings.
-
In the Add Mapping modal, select the label, such as
am.application.agents.ig.secret, in the Secret Label list. -
In the aliases field, enter the ESV secret, such as
esv-ig_agent, and click Add. -
Click Create to add the mapping:
Learn more in Map ESV secrets to secret labels.
-
Note the following points:
-
If you update or delete the Secret Label Identifier, AM updates or deletes the corresponding mapping for the previous identifier unless another agent shares the mapping.
-
When you rotate a secret, update the corresponding mapping.
Optional settings
In the AM admin UI, consider the following additional optional settings for the agent profile under Applications > Agents > Identity Gateway > agent ID:
-
To direct login to a custom URL instead of the default AM login page, configure Login URL Template for CDSSO.
-
To apply a different introspection scope, click Token Introspection and select a scope from the list.
-
Click Save to update the profile.
Set up a demo user in PingOne Advanced Identity Cloud
This procedure sets up a demo user in the alpha realm.
-
Log in to the Advanced Identity Cloud admin UI as an administrator.
-
Go to Identities > Manage > Alpha realm - Users, and add a user with the following values:
-
Username:
demo -
First name:
demo -
Last name:
user -
Email Address:
demo@example.com -
Password:
Ch4ng3!t
-
Recommendations
Use PingGateway with PingOne Advanced Identity Cloud as you would with any other service.
-
During updates, individual PingOne Advanced Identity Cloud tenant servers go offline temporarily. PingGateway can receive HTTP 502 Bad Gateway responses for some requests during the update.
In your ClientHandler and ReverseProxyHandler configurations, configure PingGateway to retry operations when this occurs:
"retries": {
    "enabled": true,
    "condition": "${response.status.code == 502}"
}
json -
Update PingGateway to use the latest version you can to benefit from fixes and improvements.
Set up AM
This section helps you prepare to use PingGateway with AM.
About authentication to AM
Unless you upgrade from an earlier version using the file-based configuration, AM 8 and later provide
an authentication tree called Agent.
The Agent tree validates the agent credentials with an
Agent Data Store Decision node.
All PingGateway, Java agent, and Web agent profiles use the Agent tree.
Don’t change its configuration.
For AM 7.3, 7.4, and 7.5, when AM is installed with a default configuration, PingGateway authenticates to AM with a tree. Otherwise, PingGateway authenticates to AM with an AM authentication module. AM 7 deprecated authentication chains and modules and AM 8 removed support for them.
Register PingGateway with AM
Follow these steps to register an PingAM agent that acts on behalf of PingGateway.
-
In the AM admin UI, select the top-level realm, and then select Applications > Agents > Identity Gateway.
-
Add an agent with the following configuration, leaving other options blank or with the default value:
-
For SSO
-
For CDSSO
-
Agent ID :
ig_agent -
Password :
password
-
Agent ID :
ig_agent -
Password :
password -
Redirect URL for CDSSO :
https://ig.ext.com:8443/home/cdsso/redirect -
Login URL Template for CDSSO: Configure this property to direct login to a custom URL instead of the default AM login page.
-
-
(Optional - From AM 7.5) Use AM’s secret service to manage the agent profile password.
If AM finds a matching secret in a secret store, it uses that secret instead of a password in the agent profile.
-
In the agent profile page, set a label for the agent password in Secret Label Identifier.
AM uses the identifier to generate a secret label for the agent.
The secret label has the format
am.application.agents.identifier.secret, where identifier is the Secret Label Identifier.The Secret Label Identifier can contain only characters
a-z,A-Z,0-9, and periods (.). It can’t start or end with a period. -
Select Secret Stores and configure a secret store.
-
Map the label to the secret. Learn more from AM’s mapping.
Note the following points for using AM’s secret service:
-
Set a Secret Label Identifier that clearly identifies the agent.
-
If you update or delete the Secret Label Identifier, AM updates or deletes the corresponding mapping for the previous identifier provided no other agent shares the mapping.
-
When you rotate a secret, update the corresponding mapping.
-
Set up a demo user in AM
AM is provided with a demo user in the top-level realm, with the following credentials:
-
ID/username:
demo -
Last name:
user -
Password:
Ch4ng31t -
Email address:
demo@example.com -
Employee number:
123
Learn more about managing identities in AM’s Identity stores documentation.
Find the AM session cookie name
In routes that use an AmService, PingGateway retrieves AM’s SSO
cookie name from the ssoTokenHeader property or from AM’s
/serverinfo/* endpoint.
In other circumstances where you need to find the SSO cookie name, access
http://am-base-url/serverinfo/*. For example, access the
AM endpoint with curl:
$ curl http://am.example.com:8088/openam/json/serverinfo/*Download PingGateway
The .zip file unpacks into a /path/to/identity-gateway-2025.3.0 directory with the following content:
-
bin: Start and stop executables -
classes: Initially empty; used to install patches from ForgeRock support -
docker/Dockerfile: Dockerfile and README to build a PingGateway Docker image -
legal-notices: Licenses and copyrights -
lib: PingGateway and third-party libraries-
Create a local installation directory for PingGateway. The examples in this section use
/path/to.The installation directory should be a new, empty directory. Installing PingGateway into an existing installation directory can cause errors. -
Download
PingGateway-2025.3.0.zipfrom the Backstage download site, and copy the .zip file to the installation directory:$ cp PingGateway-2025.3.0.zip /path/to/PingGateway-2025.3.0.zip -
Unzip the file:
$ unzip PingGateway-2025.3.0.zipThe directory
/path/to/identity-gateway-2025.3.0is created.
-
Start and stop PingGateway
Start PingGateway with default settings
Use the following step to start the instance of PingGateway, specifying the configuration directory where PingGateway looks for configuration files.
-
Start PingGateway:
-
Linux
-
Windows
$ /path/to/identity-gateway-2025.3.0/bin/start.shC:\path\to\identity-gateway-2025.3.0\bin\start.batBy default, PingGateway configuration files are located under
$HOME/.openig(on Windows%appdata%\OpenIG). For information about how to use a different location, refer to Configuration location. -
-
Check that PingGateway is running in one of the following ways:
-
Ping PingGateway at
http://ig.example.com:8085/pingand make sure anHTTP 200is returned. -
Display the product version and build information at
http://ig.example.com:8085/api/info.
-
Start PingGateway with custom settings
By default, PingGateway runs on HTTP, on port 8080, from the instance
directory $HOME/.openig.
To start PingGateway with custom settings, add the configuration file
admin.json with the following properties, and restart PingGateway:
-
vertx: Finely tune Vert.x instances. -
connectors: Customize server port, TLS, and Vert.x-specific configurations. Eachconnectorsobject represents the configuration of an individual port.
The following example starts PingGateway on non-default ports, and configures Vert.x-specific options for the connection on port 9091:
{
  "connectors": [{
    "port": 9090
  },
  {
    "port": 9091,
    "vertx": {
      "maxWebSocketFrameSize": 128000,
      "maxWebSocketMessageSize": 256000,
      "compressionLevel": 4
    }
  }]
}For more information, refer to AdminHttpApplication (admin.json).
Allow startup when there is an existing PID file
By default, if there is an existing PID file during startup the startup fails. Use one of the following ways to allow startup when there is an existing PID file. PingGateway then removes the existing PID file and creates a new one during startup.
-
Add the following configuration to
admin.jsonand restart PingGateway:{ "pidFileMode": "override" }jsonSource: admin-pidfilemode.json
-
Define an environment variable for the configuration token
ig.pid.file.mode, and then start PingGateway in the same terminal:-
Linux
-
Windows
$ IG_PID_FILE_MODE=override /path/to/identity-gateway-2025.3.0/bin/start.shC:\IG_PID_FILE_MODE=override C:\path\to\identity-gateway-2025.3.0\bin\start.bat %appdata%\OpenIG -
-
Define a system property for the configuration token
ig.pid.file.modewhen you start PingGateway:-
Linux
-
Windows
$HOME/.openig/env.sh
%appdata%\OpenIG\env.sh
export "IG_OPTS=-Dig.pid.file.mode=override"shell -
Stop PingGateway
Use the stop.sh script to stop an instance of PingGateway, specifying the
instance directory as an argument. If the instance directory isn’t specified,
PingGateway uses the default instance directory:
-
Linux
-
Windows
$ /path/to/identity-gateway-2025.3.0/bin/stop.sh $HOME/.openigC:\path\to\identity-gateway-2025.3.0\bin\stop.bat %appdata%\OpenIGGraceful shutdown
By default, the stop.sh or stop.bat script waits up to 2.5 seconds
before forcing the PingGateway process to terminate.
Technically, the script sleeps 500 milliseconds up to five times.
To give PingGateway more time to shut down gracefully, specify the sleep time in milliseconds and the number of intervals after the instance directory argument. The following example causes the script to wait up to 10 seconds before forcing termination:
-
Linux
-
Windows
$ /path/to/identity-gateway-2025.3.0/bin/stop.sh $HOME/.openig 1000 10C:\path\to\identity-gateway-2025.3.0\bin\stop.bat %appdata%\OpenIG 1000 10When you specify the sleep time in milliseconds without the number of intervals, the number of intervals defaults to five.
Set up environment variables and system properties
Configure environment variables and system properties as follows:
-
By adding environment variables on the command line when you start PingGateway.
-
By adding environment variables in
$HOME/.openig/bin/env.sh, where$HOME/.openigis the instance directory. After changingenv.sh, restart PingGateway to load the new configuration.
Start PingGateway with a customized router scan interval
By default, PingGateway scans every 10 seconds for changes to the route configuration files. Any changes to the files are automatically loaded into the configuration without restarting PingGateway. Learn more about the router scan interval in Router.
The following example overwrites the default value of the Router scan interval to 2 seconds when you start up PingGateway:
-
Linux
-
Windows
$ IG_ROUTER_SCAN_INTERVAL='2 seconds' /path/to/identity-gateway-2025.3.0/bin/start.shC:\IG_ROUTER_SCAN_INTERVAL='2 seconds'
C:\start.bat %appdata%\OpenIGDefine environment variables for startup, runtime, and stop
PingGateway provides the following environment variables for Java runtime options:
- IG_OPTS
-
(Optional) Java runtime options for PingGateway and its startup process, such as JVM memory sizing options.
Include all options that aren’t shared with the
stopscript.The following example specifies environment variables in the
env.shfile to customize JVM options and keys:-
Linux
-
Windows
# Specify JVM options JVM_OPTS="-Xms256m -Xmx2048m" # Specify the DH key size for stronger ephemeral DH keys and to protect against weak keys JSSE_OPTS="-Djdk.tls.ephemeralDHKeySize=2048" # Wrap them up into the IG_OPTS environment variable export IG_OPTS="${IG_OPTS} ${JVM_OPTS} ${JSSE_OPTS}"shellset "JVM_OPTS=-Xms256m -Xmx2048m" set "JSSE_OPTS=-Djdk.tls.ephemeralDHKeySize=2048" set "IG_OPTS=%IG_OPTS% %JVM_OPTS% %JSSE_OPTS%" -
- JAVA_OPTS
-
(Optional) Java runtime options for PingGateway include all options that are shared by the
startandstopscript.
Encrypt and share JWT sessions
PingGateway stateless sessions store session information in JWT cookies on the user-agent. Learn more in Sessions.
This page describes how to set authenticated encryption for stateless sessions using symmetric keys.
With authenticated encryption, PingGateway encrypts data and signs it with HMAC in a single step.
Encrypt JWT sessions
This section describes how to set up a keystore with a symmetric key for authenticated encryption of a JWT session.
-
Set up a keystore to contain the encryption key, where the keystore and the key have the password
password:-
Locate a directory for secrets, and go to it:
$ cd /path/to/secrets -
Generate the key:
$ keytool \ -genseckey \ -alias symmetric-key \ -keystore jwtsessionkeystore.pkcs12 \ -storepass password \ -storetype pkcs12 \ -keyalg HmacSHA512 \ -keysize 512Because keytool converts all characters in its key aliases to lowercase, use only lowercase in alias definitions of a keystore.
-
-
Add the following route to PingGateway:
-
Linux
-
Windows
$HOME/.openig/config/routes/jwt-session-encrypt.json
%appdata%\OpenIG\config\routes\jwt-session-encrypt.json
{ "name": "jwt-session-encrypt", "heap": [{ "name": "KeyStoreSecretStore-1", "type": "KeyStoreSecretStore", "config": { "file": "/path/to/secrets/jwtsessionkeystore.pkcs12", "storeType": "PKCS12", "storePasswordSecretId": "keystore.secret.id", "secretsProvider": ["SystemAndEnvSecretStore-1"], "mappings": [{ "secretId": "jwtsession.symmetric.secret.id", "aliases": ["symmetric-key"] }] } }, { "name": "SystemAndEnvSecretStore-1", "type": "SystemAndEnvSecretStore" } ], "session": { "type": "JwtSessionManager", "config": { "authenticatedEncryptionSecretId": "jwtsession.symmetric.secret.id", "encryptionMethod": "A256CBC-HS512", "secretsProvider": ["KeyStoreSecretStore-1"], "cookie": { "name": "IG", "domain": ".example.com" } } }, "handler": { "type": "StaticResponseHandler", "config": { "status": 200, "headers": { "Content-Type": [ "text/plain; charset=UTF-8" ] }, "entity": "Hello world!" } }, "condition": "${request.uri.path == '/jwt-session-encrypt'}" }jsonSource: jwt-session-encrypt.json
Notice the following features of the route:
-
The route matches requests to
/jwt-session-encrypt. -
The KeyStoreSecretStore uses the SystemAndEnvSecretStore in the heap to manage the store password.
-
The JWTSessionManager uses the KeyStoreSecretStore in the heap to manage the session encryption secret.
-
-
In the terminal where you will run the PingGateway instance, create an environment variable for the value of the keystore password:
$ export KEYSTORE_SECRET_ID='cGFzc3dvcmQ='The password is retrieved by the SystemAndEnvSecretStore, and must be base64-encoded.
Prepare for load balancing and failover
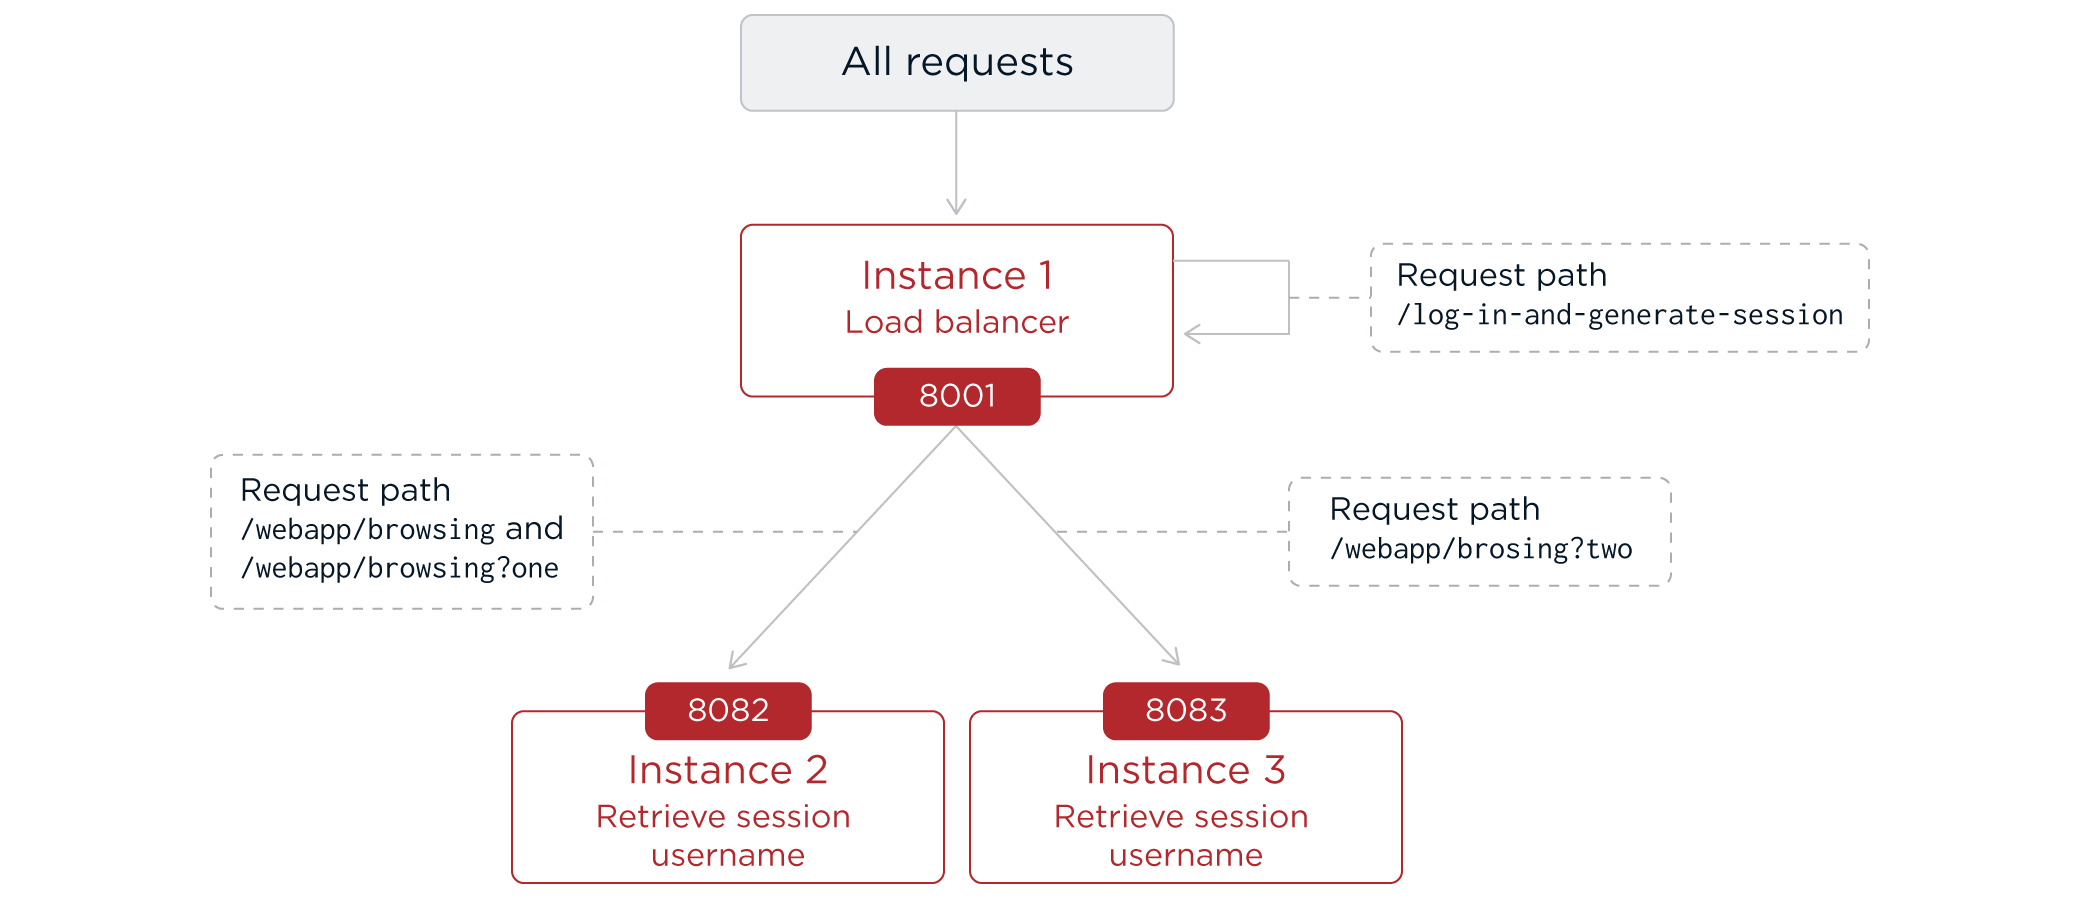
For high scale or highly available deployments, consider using a pool of PingGateway servers with nearly identical configurations. Load balance requests across the pool to handle more load. Route around any servers that become unavailable.
Manage state information
Before spreading requests across multiple servers, decide how to manage state information. PingGateway manages state information in the following ways:
- Stores state information in a context
-
By using filters that can store information in the context. Most filters depend on information in the request, response, or context, some of which is first stored by PingGateway. For a summary of filters that can populate a context, refer to Summary of contexts.
By using a handler such as the ScriptableHandler that can store state information in the context. Most handlers depend on information in the context, some of which is first stored by PingGateway.
- Retrieves state information to local memory
-
By using filters and handlers that depend on the configuration of the local file system, such as the following filters:
When a server becomes unavailable, state information held in local memory is lost. To prevent data loss when a server becomes unavailable, set up failover. Server failover should be transparent to client applications.
Prepare stateless sessions
For example configurations, refer to Encrypt and share JWT sessions.
- Stateless sessions
-
Use a JwtSessionManager. PingGateway stores session content in a JWT cookie on the user-agent.
So that any server can read or update a JWT cookie from any other server in the same cookie domain, encrypt JWT sessions and share keys and secret across all PingGateway configurations.
Encrypt JWT sessions. The maximum size of the JWT session cookie is 4 KBytes, as defined by the browser. If the cookie exceeds this size, PingGateway automatically splits it into multiple cookies.
- Session stickiness
-
Session stickiness helps to ensure that a client request goes to the server holding the original session data.
If data attached to a context must be stored on the server-side, configure session stickiness so that the load balancer sends all requests from the same client session to the same server.
For an example configuration, refer to Share JWT sessions between multiple instances of PingGateway.
SAML in deployments with multiple instances of PingGateway
PingGateway uses AM federation libraries to implement SAML. When PingGateway acts as a SAML service provider, some internal state information is maintained in the fedlet instead of the session cookie. In deployments that use multiple instances of PingGateway as a SAML service provider, set up sticky sessions so that requests go to the server that started the SAML interaction.
For information, refer to Session state considerations in AM’s SAML v2.0 guide.
Secure connections
PingGateway is often deployed to replay credentials or other security information. In a real world deployment, this information must be communicated over a secure connection using HTTPS, meaning HTTP over encrypted Transport Layer Security (TLS). Never send real credentials, bearer tokens, or other security information unprotected over HTTP.
Learn about how to use well-known CA-signed certificates from the documentation for the Java Virtual Machine (JVM).
After installing certificates for client-server trust, consider which cipher suites to use. PingGateway inherits the list of cipher suites from the underlying Java environment.
PingGateway uses the JSSE to secure connections. You can set security and system properties to configure the JSSE. For a list of properties to customize the JSSE in Oracle Java, refer to the Customization section of the JSSE Reference guide.
Configure PingGateway for TLS (client-side)
When PingGateway sends requests over HTTP to a proxied application, or requests services from a third-party application, PingGateway is acting as a client of the application, and the application is acting as a server. PingGateway is client-side.
When PingGateway sends requests securely over HTTPS, PingGateway must be able to trust the server. By default, PingGateway uses the Java environment truststore to trust server certificates. The Java environment truststore includes public key signing certificates from many well-known Certificate Authorities (CAs).
When servers present certificates signed by trusted CAs, then PingGateway can send requests over HTTPS to those servers, without any configuration to set up the HTTPS client connection. When server certificates are self-signed or signed by a CA whose certificate is not automatically trusted, the following objects can be required to configure the connection:
-
KeyStoreSecretStore, to manage a secret store for cryptographic keys and certificates, based on a standard Java keystore.
-
SecretsTrustManager, to manage trust material that verifies the credentials presented by a peer.
-
(Optional) SecretsKeyManager, to manage keys that authenticate a TLS connection to a peer.
-
ClientHandler and ReverseProxyHandler reference to ClientTlsOptions, for connecting to TLS-protected endpoints.
The following procedure describes how to set up PingGateway for HTTPS (client-side), when server certificates are self-signed or signed by untrusted CAs.
-
Locate or set up the following directories:
-
Directory containing the sample application .jar: sampleapp_install_dir
-
Directory to store the sample application certificate and PingGateway keystore: /path/to/secrets
-
-
Extract the public certificate from the sample application:
$ cd /path/to/secrets$ jar --verbose --extract \ --file sampleapp_install_dir/PingGateway-sample-application-2025.3.0-jar-with-dependencies.jar tls/sampleapp-cert.pemOutputinflated: tls/sampleapp-cert.pem
The file
/path/to/secrets/tls/sampleapp-cert.pemis created. -
Import the certificate into the PingGateway keystore, and answer
yesto trust the certificate:$ keytool -importcert \ -alias ig-sampleapp \ -file tls/sampleapp-cert.pem \ -keystore reverseproxy-truststore.p12 \ -storetype pkcs12 \ -storepass passwordOutput... Trust this certificate? [no]: yes Certificate was added to keystoreBecause keytool converts all characters in its key aliases to lowercase, use only lowercase in alias definitions of a keystore. -
List the keys in the PingGateway keystore to make sure that a key with the alias
ig-sampleappis present:$ keytool -list \ -v \ -keystore /path/to/secrets/reverseproxy-truststore.p12 \ -storetype pkcs12 \ -storepass passwordOutputKeystore type: PKCS12 Keystore provider: SUN Your keystore contains 1 entry Alias name: ig-sampleapp ...
-
Add the following route to PingGateway to serve the sample application .css and other static resources:
-
Linux
-
Windows
$HOME/.openig/config/routes/00-static-resources.json
%appdata%\OpenIG\config\routes\00-static-resources.json
{ "name" : "00-static-resources", "baseURI" : "http://app.example.com:8081", "condition": "${find(request.uri.path,'^/css') or matchesWithRegex(request.uri.path, '^/.*\\\\.ico$') or matchesWithRegex(request.uri.path, '^/.*\\\\.gif$')}", "handler": "ReverseProxyHandler" }jsonSource: 00-static-resources.json
-
-
Add the following route to PingGateway:
-
Linux
-
Windows
$HOME/.openig/config/routes/client-side-https.json
%appdata%\OpenIG\config\routes\client-side-https.json
{ "name": "client-side-https", "condition": "${find(request.uri.path, '/home/client-side-https')}", "baseURI": "https://app.example.com:8444", "heap": [ { "name": "Base64EncodedSecretStore-1", "type": "Base64EncodedSecretStore", "config": { "secrets": { "keystore.secret.id": "cGFzc3dvcmQ=" } } }, { "name": "KeyStoreSecretStore-1", "type": "KeyStoreSecretStore", "config": { "file": "/path/to/secrets/reverseproxy-truststore.p12", "storeType": "PKCS12", "storePasswordSecretId": "keystore.secret.id", "secretsProvider": "Base64EncodedSecretStore-1", "mappings": [ { "secretId": "trust.manager.secret.id", "aliases": [ "ig-sampleapp" ] } ] } }, { "name": "SecretsTrustManager-1", "type": "SecretsTrustManager", "config": { "verificationSecretId": "trust.manager.secret.id", "secretsProvider":"KeyStoreSecretStore-1" } }, { "name": "ReverseProxyHandler-1", "type": "ReverseProxyHandler", "config": { "tls": { "type": "ClientTlsOptions", "config": { "trustManager": "SecretsTrustManager-1", "hostnameVerifier": "ALLOW_ALL" } } }, "capture": "all" } ], "handler": "ReverseProxyHandler-1" }jsonSource: client-side-https.json
Notice the following features of the route:
-
The route matches requests to
/home/client-side-https. -
The
baseURIchanges the request URI to point to the HTTPS port for the sample application. -
The Base64EncodedSecretStore provides the keystore password.
-
The SecretsTrustManager points to the secret bound to the sample application certificate, coming from the KeyStoreSecretStore.
-
The KeyStoreSecretStore contains the sample application certificate to validate the TLS connection. The password to access the keystore is provided by the SystemAndEnvSecretStore.
-
The ReverseProxyHandler uses the SecretsTrustManager for the connection to TLS-protected endpoints. All hostnames are allowed.
-
-
Test the setup:
-
Start the sample application.
$ java -jar sampleapp_install_dir/PingGateway-sample-application-2025.3.0-jar-with-dependencies.jar -
Go to http://ig.example.com:8080/home/client-side-https.
The request is proxied transparently to the sample application, on the TLS port
8444. -
Check the route log for a line like this:
GET https://app.example.com:8444/home/client-side-https
-
Configure PingGateway for TLS (server-side)
When PingGateway is server-side, applications send requests to PingGateway or request services from PingGateway. PingGateway is acting as a server of the application, and the application is acting as a client.
To run PingGateway as a server over TLS:
-
In the
admin.jsonheap, add a SecretsKeyManager to authenticate PingGateway to the client. Key material is a private key and its certificate for PingGateway. -
In
admin.json, update theconnectorslist to include a connector for the HTTPS port. The connectortlsproperty must refer to a ServerTlsOptions. -
The ServerTlsOptions must configure
keyManagerto refer to the SecretsKeyManager.
The following example connector includes a ServerTlsOptions that refers to a SecretsKeyManager in the heap:
"connectors": [
  {
    "port": 8443,
    "tls": {
      "type": "ServerTlsOptions",
      "config": {
        "keyManager": "SecretsKeyManager-1"
      }
    }
  }
]
Learn more from About keys and certificates.
Serve one certificate for TLS connections to all server names
This example uses PEM files and a PKCS#12 keystore for self-signed certificates, but you can adapt it to use official (non self-signed) keys and certificates.
Before you start, install PingGateway, as described in the Install.
-
Locate a directory for the secrets, for example,
/path/to/secrets. -
Create self-signed keys in one of the following ways. If you have your own keys, use them and skip this step.
Use your own keys
If you have your own keys, use them and skip this step.
Set up a self-signed certificate in a (PKCS#12) keystore
-
Create the keystore, replacing
/path/to/secretswith your path:$ keytool \ -genkey \ -alias https-connector-key \ -keyalg RSA \ -keystore /path/to/secrets/keystore.pkcs12 \ -storepass password \ -keypass password \ -dname "CN=ig.example.com,O=Example Corp,C=FR"Because keytool converts all characters in its key aliases to lowercase, use only lowercase in alias definitions of a keystore. -
In the secrets directory, add a file called
keystore.pass, containing the keystore passwordpassword:$ cd /path/to/secrets/ $ echo -n 'password' > keystore.passMake sure the password file contains only the password, with no trailing spaces or carriage returns.
Set up self-signed certificate stored in PEM file
-
Locate a directory for secrets, and go to it:
$ cd /path/to/secrets -
Create the following secret key and certificate pair as PEM files:
$ openssl req \ -newkey rsa:2048 \ -new \ -nodes \ -x509 \ -days 3650 \ -subj "/CN=ig.example.com/OU=example/O=com/L=fr/ST=fr/C=fr" \ -keyout ig.example.com-key.pem \ -out ig.example.com-certificate.pemTwo PEM files are created, one for the secret key, and another for the associated certificate.
-
Map the key and certificate to the same secret ID in PingGateway:
$ cat ig.example.com-key.pem ig.example.com-certificate.pem > key.manager.secret.id.pem
-
-
Set up TLS on PingGateway in one of the following ways:
Keys stored in a (PKCS#12) keystore
Add the following file to PingGateway, replacing
/path/to/secretswith your path:-
Linux
-
Windows
$HOME/.openig/config/admin.json
%appdata%\OpenIG\config\admin.json
{ "connectors": [ { "port": 8080 }, { "port": 8443, "tls": "ServerTlsOptions-1" } ], "heap": [ { "name": "ServerTlsOptions-1", "type": "ServerTlsOptions", "config": { "keyManager": { "type": "SecretsKeyManager", "config": { "signingSecretId": "key.manager.secret.id", "secretsProvider": "ServerIdentityStore" } } } }, { "type": "FileSystemSecretStore", "name": "SecretsPasswords", "config": { "directory": "/path/to/secrets", "format": "PLAIN" } }, { "name": "ServerIdentityStore", "type": "KeyStoreSecretStore", "config": { "file": "/path/to/secrets/IG-keystore", "storePasswordSecretId": "keystore.pass", "secretsProvider": "SecretsPasswords", "mappings": [ { "secretId": "key.manager.secret.id", "aliases": ["https-connector-key"] } ] } } ] }jsonSource: admin-https.json
Notice the following features of the file:
-
PingGateway listens for:
-
Administrative HTTP requests on port
8085(default). -
HTTP requests on port
8080. -
HTTPS requests on port
8443.
-
-
PingGateway’s private keys for TLS are managed by the SecretsKeyManager, whose ServerIdentityStore references a KeyStoreSecretStore.
-
The KeyStoreSecretStore maps the keystore alias to the secret ID for retrieving the server keys (private key + certificate).
-
The password of the KeyStoreSecretStore is provided by the FileSystemSecretStore.
Keys stored in PEM file
Add the following file to PingGateway, replacing
/path/to/secretswith your path:-
Linux
-
Windows
$HOME/.openig/config/admin.json
%appdata%\OpenIG\config\admin.json
{ "connectors": [ { "port": 8080 }, { "port": 8443, "tls": "ServerTlsOptions-1" } ], "heap": [ { "name": "ServerTlsOptions-1", "type": "ServerTlsOptions", "config": { "keyManager": { "type": "SecretsKeyManager", "config": { "signingSecretId": "key.manager.secret.id", "secretsProvider": "ServerIdentityStore" } } } }, { "name": "ServerIdentityStore", "type": "FileSystemSecretStore", "config": { "format": "PLAIN", "directory": "/path/to/secrets", "suffix": ".pem", "mappings": [{ "secretId": "key.manager.secret.id", "format": { "type": "PemPropertyFormat" } }] } } ] }jsonSource: admin-https-pem.json
Notice how this file differs to that for the keystore-based approach:
-
The ServerIdentityStore is a FileSystemSecretStore.
-
The FileSystemSecretStore reads the keys that are stored as file in the PEM standard format.
-
-
Start PingGateway:
-
Linux
-
Windows
$ /path/to/identity-gateway-2025.3.0/bin/start.shC:\path\to\identity-gateway-2025.3.0\bin\start.batBy default, PingGateway configuration files are located under
$HOME/.openig(on Windows%appdata%\OpenIG). For information about how to use a different location, refer to Configuration location. -
-
Test the connection by going to the PingGateway welcome page, https://ig.example.com:8443/.
The browser won’t recognize the certificate, but you can safely access the page.
Use Server Name Indication (SNI) to serve different certificates for TLS connections to different server names
This example uses PEM files for self-signed certificates, but you can adapt it to use official (non self-signed) keys and certificates.
Before you start, install PingGateway, as described in the Install.
-
Locate a directory for secrets, for example,
/path/to/secrets, and go to it.$ cd /path/to/secrets -
Create the following secret key and certificate pair as PEM files:
-
For
ig.example.com:-
Create a key and certificate:
$ openssl req \ -newkey rsa:2048 \ -new \ -nodes \ -x509 \ -days 3650 \ -subj "/CN=ig.example.com/OU=example/O=com/L=fr/ST=fr/C=fr" \ -keyout ig.example.com-key.pem \ -out ig.example.com-certificate.pemTwo PEM files are created, one for the secret key, and another for the associated certificate.
-
Map the key and certificate to the same secret ID in PingGateway:
$ cat ig.example.com-key.pem ig.example.com-certificate.pem > key.manager.secret.id.pem
-
-
For servers grouped by a wildcard:
-
Create a key and certificate:
$ openssl req \ -newkey rsa:2048 \ -new \ -nodes \ -x509 \ -days 3650 \ -subj "/CN=*.example.com/OU=example/O=com/L=fr/ST=fr/C=fr" \ -keyout wildcard.example.com-key.pem \ -out wildcard.example.com-certificate.pem -
Map the key and certificate to the same secret ID in PingGateway:
$ cat wildcard.example.com-key.pem wildcard.example.com-certificate.pem > wildcard.secret.id.pem
-
-
For other, unmapped servers
-
Create a key and certificate:
$ openssl req \ -newkey rsa:2048 \ -new \ -nodes \ -x509 \ -days 3650 \ -subj "/CN=un.mapped.com/OU=example/O=com/L=fr/ST=fr/C=fr" \ -keyout default.example.com-key.pem \ -out default.example.com-certificate.pem -
Map the key and certificate to the same secret ID in PingGateway:
$ cat default.example.com-key.pem default.example.com-certificate.pem > default.secret.id.pem
-
-
-
Add the following file to PingGateway, replacing
/path/to/secretswith your path, and then restart PingGateway:-
Linux
-
Windows
$HOME/.openig/config/admin.json
%appdata%\OpenIG\config\admin.json
{ "connectors": [ { "port": 8080 }, { "port": 8443, "tls": "ServerTlsOptions-1" } ], "heap": [ { "name": "ServerTlsOptions-1", "type": "ServerTlsOptions", "config": { "sni": { "serverNames": { "ig.example.com": "key.manager.secret.id", "*.example.com": "wildcard.secret.id" }, "defaultSecretId" : "default.secret.id", "secretsProvider": "ServerIdentityStore" } } }, { "name": "ServerIdentityStore", "type": "FileSystemSecretStore", "config": { "format": "PLAIN", "directory": "path/to/secrets", "suffix": ".pem", "mappings": [ { "secretId": "key.manager.secret.id", "format": { "type": "PemPropertyFormat" } }, { "secretId": "wildcard.secret.id", "format": { "type": "PemPropertyFormat" } }, { "secretId": "default.secret.id", "format": { "type": "PemPropertyFormat" } } ] } } ] }jsonSource: admin-https-sni.json
Notice the following features of the file:
-
The ServerTlsOptions object maps two servers to secret IDs, and includes a default secret ID
-
The secret IDs correspond to the secret IDs in the FileSystemSecretStore, and the PEM files generated in an earlier step.
-
-
Run the following commands to request TLS connections to different servers, using different certificates:
-
Connect to
ig.example.com, and note that the certificate subject corresponds to the certificate created forig.example.com:$ openssl s_client -connect localhost:8443 -servername ig.example.comOutput... Server certificate -----BEGIN CERTIFICATE----- MII...dZC -----END CERTIFICATE----- subject=/CN=ig.example.com/OU=example/O=com/L=fr/ST=fr/C=fr issuer=/CN=ig.example.com/OU=example/O=com/L=fr/ST=fr/C=fr
-
Connect to
other.example.com, and note that the certificate subject corresponds to the certificate created with the wildcard,*.example.com:$ openssl s_client -connect localhost:8443 -servername other.example.comOutput... Server certificate -----BEGIN CERTIFICATE----- MII...fY= -----END CERTIFICATE----- subject=/CN=*.example.com/OU=example/O=com/L=fr/ST=fr/C=fr issuer=/CN=*.example.com/OU=example/O=com/L=fr/ST=fr/C=fr
-
Connect to
unmapped.site.com, and note that the certificate subject corresponds to the certificate created for the default secret ID:$ openssl s_client -connect localhost:8443 -servername unmapped.site.comOutput... Server certificate -----BEGIN CERTIFICATE----- MII..rON -----END CERTIFICATE----- subject=/CN=un.mapped.com/OU=example/O=com/L=fr/ST=fr/C=fr issuer=/CN=un.mapped.com/OU=example/O=com/L=fr/ST=fr/C=fr
-
Configure PingGateway for mutual TLS (server-side)
When PingGateway is server-side, applications send requests to PingGateway or request services from PingGateway. PingGateway is acting as a server of the application, and the application is acting as a client.
To run PingGateway as a server for mutual TLS:
-
Using information from Configure PingGateway for TLS (server-side), configure PingGateway for TLS connections.
-
In
admin.json, add a SecretsTrustManager to verify the credentials presented by the client:-
The trust material is a public key certificate for a client or certificate authority.
-
The SecretsTrustManager must refer to a secret in a secrets store, where the secret is mapped to the certificate.
-
ServerTlsOptions must configure
trustManagerto refer to that SecretsTrustManager andclientAuthto require or request the client to authenticate.
The following example is used in Mutual TLS.
-
Linux
-
Windows
$HOME/.openig/config/admin.json
%appdata%\OpenIG\config\admin.json
{ "mode": "DEVELOPMENT", "properties": { "ig_keystore_directory": "/path/to/ig/secrets", "oauth2_client_keystore_directory": "/path/to/client/secrets" }, "connectors": [ { "port": 8080 }, { "port": 8443, "tls": { "type": "ServerTlsOptions", "config": { "alpn": { "enabled": true }, "clientAuth": "REQUEST", "keyManager": "SecretsKeyManager-1", "trustManager": "SecretsTrustManager-1" } } } ], "heap": [ { "name": "SecretsPasswords", "type": "FileSystemSecretStore", "config": { "directory": "&{ig_keystore_directory}", "format": "PLAIN" } }, { "name": "SecretsKeyManager-1", "type": "SecretsKeyManager", "config": { "signingSecretId": "key.manager.secret.id", "secretsProvider": "ServerIdentityStore" } }, { "name": "SecretsTrustManager-1", "type": "SecretsTrustManager", "config": { "verificationSecretId": "trust.manager.secret.id", "secretsProvider": { "type": "KeyStoreSecretStore", "config": { "file": "&{oauth2_client_keystore_directory}/cacerts.p12", "storePasswordSecretId": "keystore.pass", "secretsProvider": "SecretsPasswords", "mappings": [ { "secretId": "trust.manager.secret.id", "aliases": ["client-cert"] } ] } } } }, { "name": "ServerIdentityStore", "type": "FileSystemSecretStore", "config": { "format": "PLAIN", "directory": "&{ig_keystore_directory}", "suffix": ".pem", "mappings": [{ "secretId": "key.manager.secret.id", "format": { "type": "PemPropertyFormat" } }] } } ] }jsonSource: admin-mtls.json
-
FIPS 140–3 compliance
To achieve FIPS 140–3 compliance, configure the Bouncy Castle FIPS libraries with PingGateway. This enables the use of the Bouncy Castle FIPS keystore and security provider in FIPS-approved mode.
Bouncy Castle FIPS is useful when dealing with government data, where meeting the FIPS 140–3 security requirements is necessary for regulatory compliance. Bouncy Castle FIPS doesn’t require use of an HSM through a PKCS#11 interface.
|
Bouncy Castle FIPS is less performant than other keystores. The destroyable keys can’t be cached and must be read from the keystore with every use. |
To configure PingGateway to use Bouncy Castle FIPS:
Download the Bouncy Castle libraries
Before you begin, download the Bouncy Castle FIPS libraries:
| File | Description |
|---|---|
|
Bouncy Castle FIPS security provider implementation |
|
PKI support |
|
TLS support |
Ping Identity supports PingGateway and its use of the Bouncy Castle libraries. Ping Identity doesn’t support third-party libraries themselves.
Add the libraries to PingGateway
-
Create an
extrafolder to hold additional.jarfiles:-
Linux
-
Windows
$HOME/.openig/extra%appdata%\OpenIG\extra -
-
Copy the Bouncy Castle libraries you downloaded into the PingGateway
extrafolder. -
Create Bouncy Castle FIPS format keystores or truststores from any PingGateway keystores or truststores.
The following example command creates a BCFKS keystore from a PKCS12
gateway-keystorefile, where thegateway-keystore.pinfile holds the keystore password:$ keytool \ -importkeystore \ -srckeystore /path/to/secrets/gateway-keystore \ -srcstoretype PKCS12 \ -srcstorepass:file /path/to/secrets/gateway-keystore.pin \ -destkeystore /path/to/secrets/gateway-keystore.bcfks \ -deststoretype BCFKS \ -deststorepass:file /path/to/secrets/gateway-keystore.pin \ -providerpath $HOME/.openig/extra/bc-fips-2.0.0.jar \ -providerclass org.bouncycastle.jcajce.provider.BouncyCastleFipsProvider \ -nopromptMake sure you do this for all your PingGateway keystore and truststore files.
Enable the Bouncy Castle FIPS provider
Update the PingGateway Java settings to use Bouncy Castle FIPS support:
-
Copy the
$JAVA_HOME/conf/security/java.securityfile into the PingGateway$HOME/.openig(Linux) or%appdata%\OpenIG(Windows) folder. -
Update the
java.securityfile you copied to use the Bouncy Castle FIPS provider:-
Replace the list of security providers with the following:
security.provider.1=org.bouncycastle.jcajce.provider.BouncyCastleFipsProvider
# If entropy in the system is too limited to use the default
# deterministic random bits generator, try with C:HYBRID;ENABLE{All};
#security.provider.1=org.bouncycastle.jcajce.provider.BouncyCastleFipsProvider C:HYBRID;ENABLE{All};
security.provider.2=org.bouncycastle.jsse.provider.BouncyCastleJsseProvider BCFIPS
security.provider.3=SUN
properties -
Update the default key manager factory algorithm:
ssl.KeyManagerFactory.algorithm=PKIXproperties -
Save your work.
-
-
Update the PingGateway IG_OPTS environment variable to use the Bouncy Castle FIPS provider:
-
Linux
-
Windows
export IG_OPTS="${IG_OPTS} -Dorg.bouncycastle.fips.approved_only=true -Djava.security.properties=$HOME/.openig/java.security"set "IG_OPTS=%IG_OPTS% -Dorg.bouncycastle.fips.approved_only=true -Djava.security.properties=%appdata%\OpenIG\java.security" -
-
Start PingGateway.
You have successfully configured PingGateway to use Bouncy Castle FIPS.