Identity Verification Use Case Connector
The Identity Verification Use Case connector lets you use PingOne Verify in a PingOne DaVinci flow to improve the user onboarding or re-verification experience, reduce identity fraud, and validate government IDs and facial liveness in high-risk situations.
Why use the Identity Verification Use Case connector?
Use case connectors, such as the Identity Verification Use Case connector, make common identity verification patterns faster and easier to implement. Instead of building flows using many granular nodes, you can achieve the same outcomes with just a few nodes, significantly reducing setup time.
There are a few key differences:
-
Unlike the standard connector, you don’t need to manually add extra nodes to evaluate verification results or update user attributes. This is handled automatically.
-
The actions and rules configured in your PingOne Verify policy appear directly as ready-to-connect paths in your DaVinci flow.
The Identity Verification Use Case connector connector is ideal for quickly adding government ID validation and facial liveness checks. For highly customized flows that require more control, use the granular PingOne Verify connector or DaVinci templates instead.
Setup
Resources
Learn more in the following documentation:
-
PingOne Verify documentation:
-
PingOne DaVinci documentation:
Requirements
To add and use the Identity Verification Use Case connector, you’ll need:
-
A PingOne Verify license.
-
A PingOne environment with PingOne Verify added. Learn more in Adding an environment.
-
A PingOne Verify policy configured with validation requirements. Learn more in PingOne Verify policies.
Setting up the connector
-
Follow the instructions in Getting started with DaVinci.
-
In PingOne DaVinci, add a connector.
Using the connector in a flow
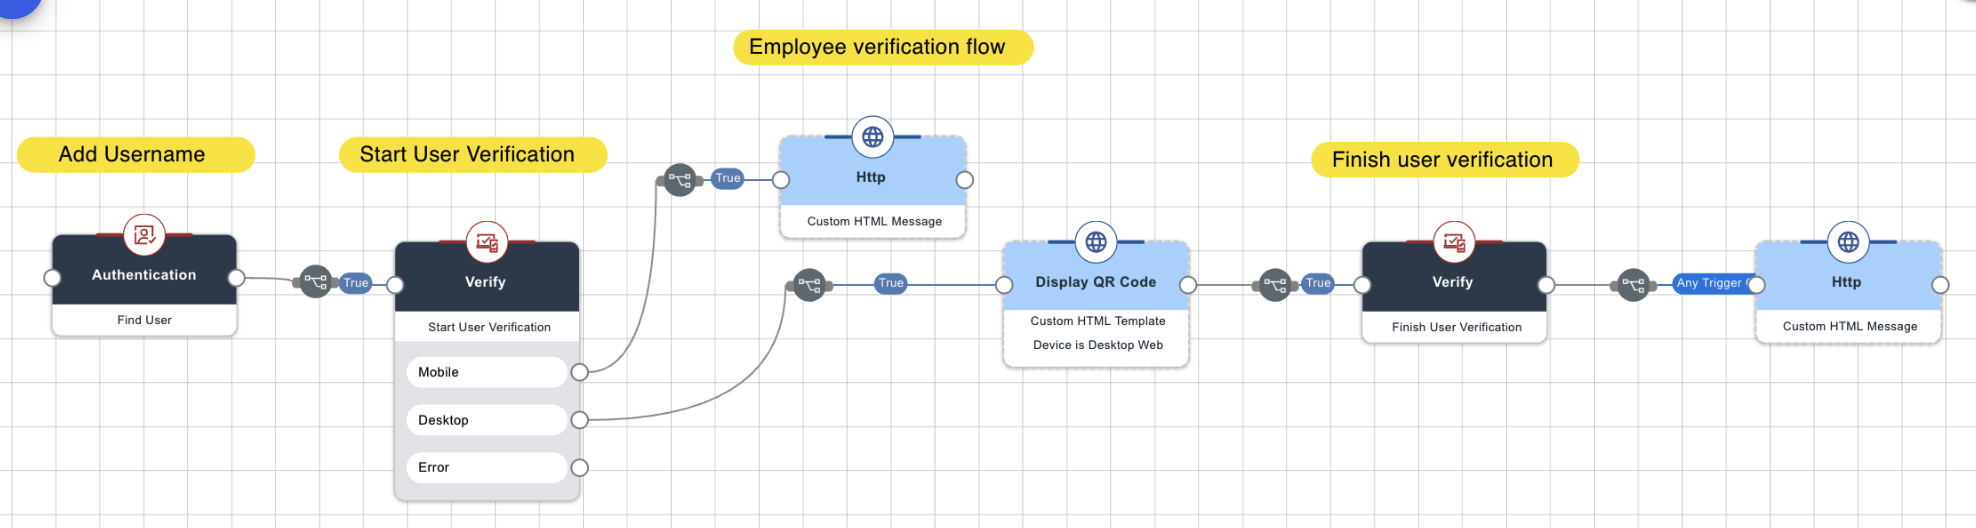
The Identity Verification Use Case connector breaks the verification journey into two simple capabilities: Start User Verification and Finish User Verification. This reduces flow complexity by handling transaction creation and transaction lookup within the connector.
Steps
-
In your flow, add the Identity Verification Use Case Connector and select the Start User Verification capability.
-
Make sure your flow has already established the PingOne user context. The connector resolves the user ID from
global.p1UserId, so you don’t manually enter it in the node configuration. -
Configure the PingOne Verify policy to use, along with any optional settings your use case requires, such as notification contact information, a reference image, biographic fields, or redirect settings.
-
Click Apply to save the node configuration.
-
Connect the Start node to the next step in your flow.
The Start node capability automatically detects the user’s device type to branch down the appropriate Mobile, Desktop, or Error outcome path. It also returns handoff values such as
qrUrl,webVerificationUrl, andwebVerificationCode. -
Use a custom HTML step to present the returned handoff data and guide the user through verification.
PingOne Verify supports verification through mobile web, the mobile SDK, and desktop browsers with a camera.
-
After the user completes the verification journey, add another Identity Verification Use Case Connector connector node and click Finish User Verification.
This capability reads the existing transaction, and the connector resolves the stored transaction ID implicitly from flow state.
-
Configure whether to return verified data and metadata, and optionally specify which verified data types to include.
Both verified data and metadata are returned directly in the node’s API response payload, and can also be viewed within the user’s profile in the PingOne directory.
-
Use the outcome paths returned by the Finish User Verification node to complete the flow, such as routing the user to a success page or displaying an error message
Capabilities
Start User Verification
Create a PingOne Verify transaction.
Show details
-
Properties
-
Input Schema
-
Output Schema
- Verification Settings sectionLabel
- Show advanced fields toggleSwitch
-
Show advanced fields.
- Verify Policy dropDown
-
Name of the verify policy.
-
Use Verify Policy ID
-
- Verify Policy ID textField
-
ID of the verify policy.
- Verification Phone Number multipleTextFields
-
The phone number(s) to be verified for phone-verification-required policy.
- Verification Email Address multipleTextFields
-
The email address(es) to be verified for email-verification-required policy.
- Identity Data selectNameValueListColumn
-
Use this section to add biographic fields
-
Given Name
-
Family Name
-
Full Name
-
Address
-
Date of Birth
-
- Redirect URL textField
-
The Redirect URL where the user is returned to after document collection. Only secure (https://) URLs are allowed.
- Redirect Message textField
-
Displayed after document collection and before redirecting to the specified URL. Requires a configured Redirect URL. Limited to 256 characters.
- Notification Settings sectionLabel
- Notification Phone Number textField
-
The phone number to receive SMS notifications during verification.
- Notification Email Address textField
-
The email address to receive email notifications during verification.
-
default object
-
p1UserId string
PingOne User ID
-
userAgent string
User Agent of the user device
-
language string
Language for localized content in verify experience
-
flowId string
ID of the flow in which this capability is executed
-
properties object
-
verifyPolicy string minLength: 0 maxLength: 100
verify policy
-
verifyPolicyId string minLength: 0 maxLength: 100
verify policy ID
-
notifyPhone string
phone number for notification
-
notifyEmail string
email address for notification
-
verifyPhone array uniqueItems: true
phone number(s) for verification
-
verifyEmail array uniqueItems: true
email address(es) for verification
-
biographic array
biographic info
-
redirectUrl string
-
redirectMessage string
-
-
-
output object
-
transaction object
-
id string
-
verifyPolicy object
-
id string
-
-
transactionStatus object
-
status string
-
-
qrUrl string
-
webVerificationUrl string
-
webVerificationCode string
-
createdAt string
-
updatedAt string
-
expiresAt string
-
-
challenge string
-
Finish User Verification
Read verify transaction and verified data.
Show details
-
Properties
-
Input Schema
-
Output Schema
- Verification Results Data sectionLabel
- Include Metadata toggleSwitch
-
Include metadata in the output. Enabling this will show additional fields related to metadata in the output.
- Verified Type(s) dropDownMultiSelect
-
Select the verified types to be returned in the output.
-
Selfie
-
Government ID
-
Front Image
-
Back Image
-
Barcode
-
Cropped Portrait
-
Cropped Document
-
Cropped Signature
-
End User Client
-
-
default object
-
p1UserId string
-
language string
-
properties object
-
showAdvancedFieldsForMetaData boolean
-
includeVerifiedData boolean
-
verifiedDataTypes array
-
-
-
output object
-
transactionStatus string
-
verifiedData object
-
size number
-
_embedded object
-
verifiedData array
-
-
-
metadata object
-
size number
-
_embedded object
-
metaData array
-
-
-
Troubleshooting
To start troubleshooting issues with the Identity Verification Use Case connector, try the following:
-
Ensure your flow logic and verification policies account for the following runtime scenarios:
Scenarios Solutions Camera access denied
When camera access is denied by the user’s browser or device permissions, prompt the user to accept camera access to continue with the flow.
Low image quality
Examples of low image quality are:
-
Blur
-
Glare
-
Poor lighting
Prompt the user to re-take the image. If verification failures happen too frequently, you can adjust the PingOne Verify policy settings to accept lower image quality thresholds.
Session transaction timeout
Increase the maximum session duration limits within your Verify policy.
-
-
If transactions are failing or not initiating, go to Environment > Audit in the PingOne admin console. Filter the report by Event Type and search for
verifyto check the specific error responses and scores returned.