Authenticating using your iPhone (Mac Login) (legacy)
You can authenticate using the following options:
If your organization allows you to authenticate using more than one device type, you can also add a device, and decide which device you want to use as your primary (default) authentication method. For more information, see Managing your devices.
The options available to you are defined by your organization’s policy.
Authenticating using swipe authentication for iOS (Mac Login)
Using PingID mobile app swipe authentication so you can access your Apple Mac machine.
Before you begin
To authenticate using PingID mobile app, make sure:
-
Your Apple Mac is running Mac OS v10.13 or later.
-
You have paired your iOS device (iPhone, or iPad).
About this task
If you have the PingID app running on your mobile device, and your organization is using swipe authentication, when signing on to your resources, you are prompted to swipe to authenticate.
Steps
-
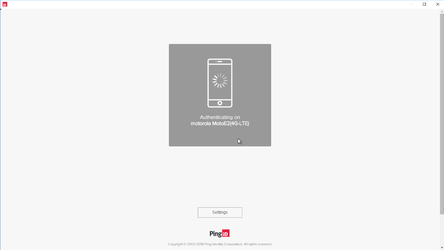
Sign on to your Mac machine.

Result:
The Authenticating window opens, and an authentication notification request is sent to your mobile device.
-
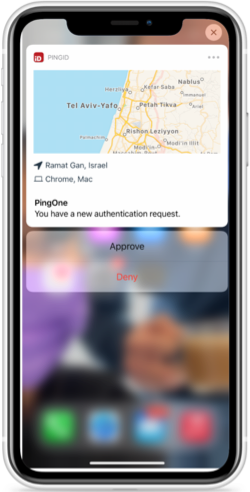
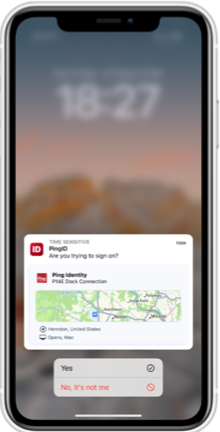
Accept the authentication notification, depending on your mobile’s notification settings:
Choose from:
-
If your device is locked, long press the notification until it shows the option to approve or deny the request, and then tap Approve.
-
If your device is unlocked, pull down the notification until it shows the option to Approve or Deny the request, and then tap Approve.
If configured by your organization, you’ll see a map on the notification screen, showing the location, device type, and browser used by the device attempting to accessing your account or app. This can help you identify a fraudulent authentication attempt.
-
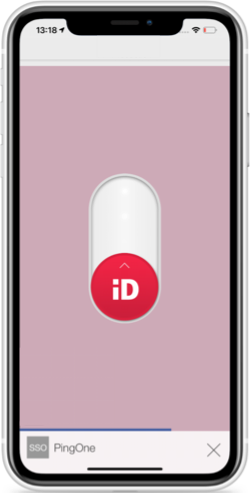
If your mobile phone is unlocked and PingID is open, swipe to authenticate.
Result:
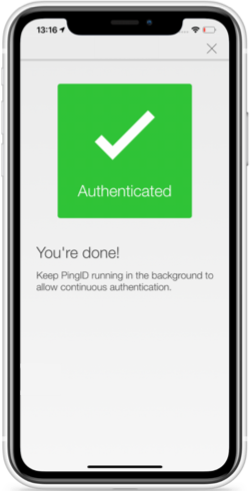
You’ll see the green checkmark indicating authentication is successful.
Result
You’re signed on to your Mac machine.
-
Authenticating using biometrics authentication for iPhone (Mac Login)
Using PingID mobile app biometrics authentication on your iOS device so you can access your Apple Mac machine.
Before you begin
To authenticate using PingID mobile app, make sure:
-
Your Apple Mac is running Mac OS v10.13 or later.
-
You have registered biometrics on your iPhone, such as fingerprints or FaceID.
-
You have paired your iOS device (iPhone, or iPad) from a browser on a different machine (not your Mac).
About this task
Authenticating using your device biometrics is simple using PingID mobile app. Authentication varies slightly depending on your phone model, phone settings, and whether your device is locked or unlocked when the authentication request is sent.
|
Biometrics authentication is only available if the option is enabled by your organization. |
Steps
-
Sign on to your Mac machine.
Result:
The Authenticating window opens, and an authentication notification request is sent to your mobile device.
-
Accept the authentication notification, depending on your mobile’s notification settings:
Choose from:
-
If your device is locked, long press the notification until it shows the option to approve or deny the request, and then tap Approve.
-
If your device is unlocked, pull down the notification until it shows the option to Approve or Deny the request, and then tap Approve.
If configured by your organization, you’ll see a map on the notification screen, showing the location, device type, and browser used by the device attempting to accessing your account or app. This can help you identify a fraudulent authentication attempt.
-
If your mobile phone is unlocked and PingID is open, you’ll be prompted to authenticate with your biometrics.
-
Face ID: Tap the message asking you to authorize scanning with Face ID, if prompted, or your face is scanned automatically.
-
Fingerprint: To scan your fingerprint, touch the Home button lightly.
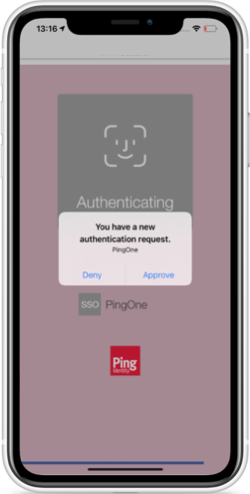
Result:
The green Authenticated screen appears with a check mark, indicating successful authentication.
-
Result
You’re signed on to your Mac machine.
Authenticating using your Apple Watch (legacy)
You can authenticate with PingID mobile app using your Apple watch. For current content, see Authenticating using a smart watch.
About this task
If you have an Apple Watch paired with your iPhone, the PingID mobile app automatically presents the Approve or Deny authentication notification on the Apple Watch, in parallel with your iPhone, so you can authenticate without taking your iPhone out of your pocket.
|
You do not need to install the PingID app on your Apple watch to receive notifications. However, if you do install the app on your watch, you can also access a one-time passcode (OTP) from the app on your Apple watch. |
Steps
-
If your mobile device is inactive and your Apple Watch is on your wrist, when you sign on, a notification appears on your Apple Watch, as well as your mobile device.Swipe up to view the message, and then tap Approve.
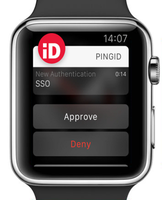
-
If you see three numbers displayed on your Apple Watch, your company also requires you to authenticate by number matching. If so, to complete authentication, select the number on your Apple watch that matches the number displayed on the Authentication screen.
Result
You’ll see the green checkmark, indicating authentication is successful and you’re signed in to your account.
Enabling and disabling passcodes on your Apple watch
Enable the use of PingID one-time passcodes (OTPs) on your Apple watch.
About this task
If you have installed the PingID app on your device, the PingID Apple Watch app is automatically installed on your watch and you will start receiving notifications to your watch. You can also open the PingID app on your watch to receive a one-time passcode (OTP). If the Apple watch app is disabled, you will not be able to access a one-time passcode from your watch.
|
The Apple watch only receives notifications when your mobile device is locked, and the mobile device screen is in sleep mode. |
Steps
-
On your iPhone, tap the Watch app, and then tap PingID.
-
To enable or disable the app on your Apple watch, tap Show App on Apple Watch.
Result:
The PingID app is installed on your Apple watch, and the PingID icon appears.
-
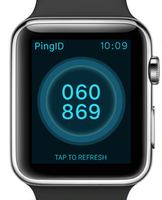
To view the current one-time passcode, on your Apple watch, tap the PingID icon.
-
(Optional) To get a new passcode, tap Refresh.
Authenticating using a one-time passcode (Mac Login)
Using PingID mobile app on your Android to get a one-time passcode with which to authenticate, so you can access your Apple Mac machine.
Before you begin
To authenticate using PingID mobile app, make sure:
About this task
If you don’t have internet access from your mobile device temporarily, you can still authenticate using PingID mobile app by generating a one-time passcode (OTP). The one-time passcode is unique, and can only be used once. Only the one-time passcode that appears on your device at the time that you sign on to your account is valid for authentication.
|
You’ll only be able to view and use the one-time passcode if permitted by your organization’s policy. |
Steps
-
Sign on to your Mac machine.
Result:
The Authenticating window opens, and an authentication notification request is sent to your mobile device.
-
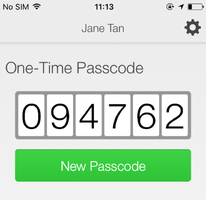
On your mobile device, open the PingID mobile app and enter the one-time passcode into the passcode field on the authentication screen. Press Enter.
-
When opening PingID mobile app, update your location permissions to Allow all the time, if prompted to do so.
-
The one-time passcode refreshes each time you open the PingID app. To generate a new one-time passcode, tap New Passcode.
Result:
You’re signed on to your Mac machine.
-
Authenticating manually with PingID mobile app (Mac Login)
Authenticate using PingID mobile app when your
Before you begin
To authenticate manually using PingID mobile app, make sure:
-
Your Apple Mac is running Mac OS v10.13 or later.
-
Your device has PingID mobile app V1.8 or higher paired with your account.
-
You have paired your device and authenticated online with PingID at least once to the Mac machine that you are trying to access.
-
You have a working camera on your device, with PingID mobile app camera permissions set to Approve. For more information, see PingID mobile app management (legacy).
About this task
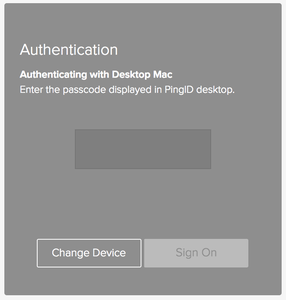
If you try to sign on to your Mac machine without having a network connection (e.g., in airplane mode, or when without Wi-Fi connection), you might be asked to authenticate manually using the PingID mobile app. Authenticating manually is slightly different than the way you usually sign on.
|
If you have paired a security key for offline authentication, you also see the option to choose your security key to authenticate. |
Steps
-
Sign on to your Mac machine.
Result:
You’ll see a notice telling you that you need to manually authenticate.
If you have more than one device paired with your account, you’ll see a list of your devices. Select the device you want to use to authenticate.
-
Click Next.
Result:
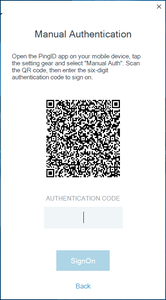
You’ll see a Manual Authentication message, displaying a QR code, requesting that you authenticate manually.
-
On your mobile device, open PingID mobile app.
-
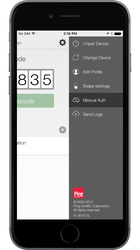
Tap

and select Manual Auth. Authenticate with your device biometrics, if required.
Result:
The QR code scanner for manual authentication opens.
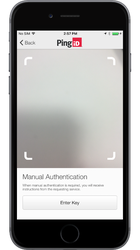
-
Use your mobile device to scan the QR code displayed on the Manual Authentication window.
Result:
You’ll receive an authentication code.
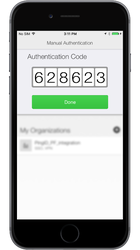
-
Enter the authentication code into the Manual Authentication window, and click Sign on.
Result:
You’re signed on to your machine.