Advanced Identity Cloud identity schema
PingOne Advanced Identity Cloud uses a default identity schema to organize users, roles, assignments, groups, organizations, and applications. The following diagram shows the identity schema relationships:

Learn more about the Advanced Identity Cloud identity schema in Summary of the identity schema.
You can customize the default identity schema to your business needs in the following ways:
-
Create custom attributes to store identity information specific to your business.
-
Create indexable custom attributes that let you search your identities and create customized segments.
-
Create organizations to structure your identities in a flexible and performant way.
For examples of customizing the Advanced Identity Cloud identity schema, learn more in Use cases for customizing the identity schema.
Summary of the identity schema
-
Users, roles, assignments, groups, organizations, and applications form the default identity schema. Their relationships are also part of the default schema.
-
Users are hybrid identity objects:
-
Their default attributes are explicitly defined in the schema with indexes also explicitly defined for these attributes:
-
givenName -
mail -
passwordLastChangedTime -
passwordExpirationTime -
sn -
userName
-
-
You can add custom attributes to them. However, the attributes are stored in an unindexed JSON data structure.
-
If you need a custom attribute for a user to be searchable, use an indexed general purpose extension attribute instead of a custom attribute.
-
-
Roles, assignments, groups, and organizations are generic identity objects:
-
None of their attributes are explicitly defined in the schema, and instead they are entirely stored in an indexed JSON data structure.
-
You can add custom attributes to them, and they will also be indexed.
-
-
You can create custom identity objects. These custom identity objects are also generic. This means that they are entirely stored in an indexed JSON data structure.
-
Applications are also generic identity objects. However, you should not alter these in any way as they are reserved for modification by Ping Identity to support workforce use cases. You should not add custom attributes to them, repurpose their default attributes, or reconcile data into them.
|
The following table summarizes the identity schema:
| Identity object | Type | Indexes on default attributes? | Indexes on custom attributes? |
|---|---|---|---|
Users |
Hybrid |
Yes (where defined) |
No |
Roles |
Generic |
Yes (all) |
Yes (all) |
Applications |
Generic |
Yes (all) |
n/a (customer modifications not supported) |
Custom |
Generic |
n/a |
Yes (all) |
Use cases for customizing the identity schema
The following are examples of how you might customize the default schema to support a media service:
-
Add a custom attribute for membership level to user identities to support subscription-level access or rate limiting. For example, the membership levels might be "gold", "silver", and "bronze".
-
Add a custom attribute for registration level to user identities to support access to premium content or to support progressive profiling in journeys. For example, the registration levels might be "guest", "pending", and "registered".
-
Adapt a general purpose extension attribute to be a searchable user attribute for date of birth to support age-restricted access. Use the attribute to support delegated administration for different age segments, allowing separate users to administrate adults and children.
-
Create organizations to structure user relationships between family members to support parental control.
The following are examples of how you might customize the default schema to support workforce:
-
Add custom attributes for job code, department number, or cost center to user identities to support the automatic provisioning of birthright roles.
-
Add custom attributes for external ID and metadata to user identities to support synchronisation using System for Cross-domain Identity Management (SCIM).
Customize user identities
You can customize user identities by adding your own attributes. This lets you store more useful information about each user such as the user’s department, cost centers, application preferences, device lists, and so on.
Advanced Identity Cloud offers the following strategies to customize user identities:
Customize user identities using custom attributes
You can create new custom attributes directly on user identities. Custom attributes on user identities must be
prefixed with custom_; for example, custom_department.
| Advanced Identity Cloud does not support searching on user identity custom attributes, which can sometimes render an environment unresponsive. Instead, if you need to make a particular user identity attribute searchable, use an indexed extension attribute. Learn more in Customize user identities using general purpose extension attributes. |
To create a user identity custom attribute:
-
In the Advanced Identity Cloud admin console, click Native Consoles > Identity Management.
-
In the IDM admin console, go to Configure > Managed Objects.
-
Click Alpha_user or Bravo_user.
-
Click + Add a Property. This scrolls the page to the bottom and automatically focuses on the Name input field.
-
In the Name input field, enter a new attribute name prefixed with
custom_; for example, entercustom_department. -
In the Label input field, optionally enter a display name for the new attribute.
-
Click Save.
Customize user identities using general purpose extension attributes
You can use the general purpose extension attributes that already exist on user identities. These attributes are predefined as part of the default identity schema. The following extension attributes are indexed, so you can use them as searchable attributes:
-
Generic Indexed String 1–20
-
Generic Indexed Multivalue 1–5
-
Generic Indexed Date 1–5
-
Generic Indexed Integer 1–5
To use an extension attribute:
-
In the Advanced Identity Cloud admin console, click Native Consoles > Identity Management.
-
In the IDM admin console, go to Configure > Managed Objects.
-
Click Alpha_user or Bravo_user.
-
Find an extension attribute that has one of the following default labels:
-
Generic Indexed String 1–20 or Generic Unindexed String 1–5
-
Generic Indexed Multivalue 1–5 or Generic Multivalue String 1–5
-
Generic Indexed Date 1–5 or Generic Date String 1–5
-
Generic Indexed Integer 1–5 or Generic Integer String 1–5
If you need to make the attribute searchable, make sure you use an indexed extension attribute.
-
-
Click the pen icon () to edit the attribute.
-
In the Readable Title input field, enter a custom label. For example,
Department. -
Click Save.
Roles and assignments
Roles and assignments let you create an entitlements structure that fits the needs of each realm in PingOne Advanced Identity Cloud.
Identity architects usually build the entitlements structure, and may also use the native AM and IDM consoles to put more complex entitlements in place.
Once your entitlements structure is in place, you can use the Advanced Identity Cloud admin console to:
-
Add new user profiles, device profiles, or roles
-
Add assignments to roles
-
Make changes to existing user profiles, device profiles, roles, or assignments
-
Provision identities with role-based permissions
Roles
Roles define privileges for user and device identities. Roles let you automatically update privileges in numerous identity profiles. All role members receive the same permissions you’ve defined for the role. When you change the privileges for that role, you change the permissions for all role members.
When you add a role to an identity profile, the user or device becomes a member of the role. A user or device can belong to many roles.
A role won’t work until you link it to at least one assignment. During the authorization process, Advanced Identity Cloud evaluates permissions based on:
-
Roles a user or device belongs to
-
Assignments attached to their roles
Internal roles
Internal roles, also called authorization roles, control access to your identity platform. You use internal roles to authorize administrators to manage your tenant or identities contained in it.
External roles
External roles, also called provisioning roles, give users and devices the permissions they need to access apps and services. You use external roles to let employees access intranet applications. You can also use external roles to let your customers and their end users access web services and mobile apps in your tenant.
Assignments
You create an assignment when you want to give a user or device permission to access a resource they need to do a job. A resource might be any application or service, data contained in a document or a database, or a device such as a printer or cell phone.
An assignment won’t work without a role. A role-assignment relationship is not fully formed until you do two things:
Assignment linked to role
Link an assignment to a role. Advanced Identity Cloud grants the permissions defined in the assignment to all members of the linked role.
Assignment mapped to attribute
Map your tenant assignment to an attribute stored in an external system. An external system can be, for example, an intranet Reporting App with its own database of user accounts.
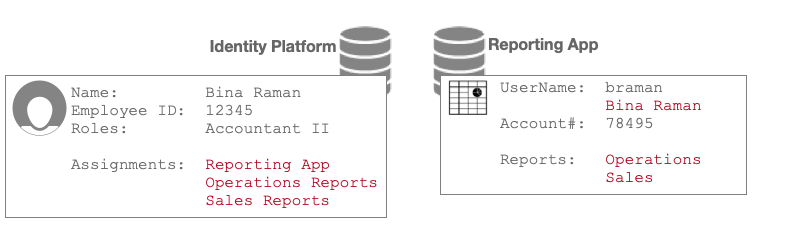
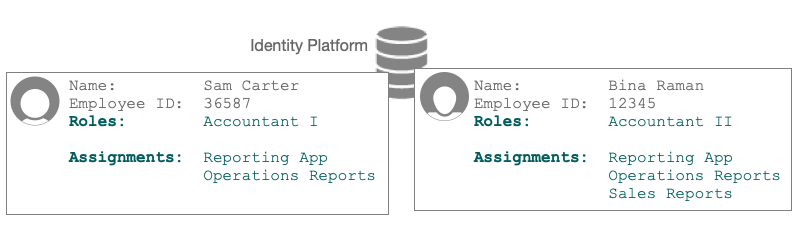
In this illustration, Bina’s Accountant II role links to three assignments. During data store sync, Advanced Identity Cloud provisions her Reporting App user account based on assignment-attribute mappings:
| Mapping From Assignment Attribute | Mapping To Reporting App | Description and Provisioning Outcome |
|---|---|---|
Assignments: Reporting App |
UserName |
The mapping sets the value of Bina’s Name ("Bina Raman") in the UserName attribute in the Reporting App. |
Assignments: Operations Reports |
Reports: Operations |
The mapping adds the value "Operations" to the Reports attribute in the Reporting App. |
Assignments: Sales Reports |
Reports: Sales |
The mapping adds the value "Sales" to the Reports attribute in the Reporting App. |
You can create any number of assignments in your tenant. You can link an assignment to one or more external roles. You cannot link assignments to internal roles.
How provisioning works
When you add a user or device to a role, Advanced Identity Cloud updates the user or device profile with the role information. The update gives, or provisions, the user or device with the permissions that come with the role and its assignments.
Here’s a simple entitlement schema example:
- Roles
-
Accountant-I
Accountant-II - Accountant-I Assignments
-
Reporting App
Operations Reports - Accountant-II Assignments
-
Reporting App
Operations Reports
Sales Reports
Sam and Bina are co-workers. Their identity profiles are provisioned with permissions based on the entitlements schema example.
-
Sam is a member of the Accountant I role.
The Accountant I role assignments give Sam permission to use the Reporting app to access only Operations Reports. -
Bina is a member of the Accountant II role.
The Accountant II role assignments give Bina permission to use the Reporting app to access both Operations Reports and Sales Reports.
|
For a deep dive, learn more in the following documents: |
Organizations
Create organizations in PingOne Advanced Identity Cloud when you want to group identities to suit your business needs.
For example, you can build an organization structure modeled after your brand hierarchy. This lets you control access to business applications with tailored login experiences. You can also use organizations to delegate user administration.
Organization use case
Here’s an example to help explain organization concepts. MightyBank is a conglomeration of independently-operated banks. MightyBank organizes its business units into two locales based on banking regulations associated with each locale. Within a business unit, each bank brand is a self-contained organization.
This diagram depicts MightyBank’s hierarchy of realms and organizations for identity management:

MightyBank organized their Advanced Identity Cloud tenant similarly to their business units. The Alpha realm contains MightyBank identities in the Americas. The Bravo realm contains MightyBank identities in Europe, the Middle East, and Africa (EMEA). Identities represent all employees, contractors, partners, vendors, customers—anyone who conducts business for or with MightyBank.
Each organization in the hierarchy has a designated owner. An owner can create child organizations, or sub-organizations. Owners can also add administrators to their organizations and sub-organizations.
Organization administrators manage user identities within organizations. Administrators also delegate administration to individual users through roles and assignments.
Users who belong to an organization are known as members of the organization.
Top-level organizations
Only Advanced Identity Cloud tenant administrators can create top-level organizations. In this example, Sam Carter is an Advanced Identity Cloud tenant administrator. Sam has created a top-level organization in each realm.
Sam can view and manage all identities within both the Alpha and Bravo realms:

Sam delegates organization administration by setting up organization owners, who in turn set up organization administrators.
Owners
The main job of organization owners is to create organizations and sub-organizations. They also designate users, within the organizations they own, as administrators. Users who are authorized to manage identities within organizations are called organization administrators.
In this example, Sam designated Alma as owner of the top-level organization in the Alpha realm. Alma grouped identities into sub-organizations. One sub-organization contains Acme Bank identities. A second sub-organization contains MexBanco identities.
Alma is authorized to manage the MightyBank Americas organization, and all its sub-organizations.

Organization owners can do the following, but only within the organizations and sub-organizations they own:
-
Add an administrator to an organization or sub-organization.
-
An owner can add an existing user profile to a sub-organization only if the user already belongs to a parent organization.
-
An owner can create a new user profile in a sub-organization if the user doesn’t already belong to a parent organization.
-
In this example, before Alma can add a user profile to the Acme Bank organization, the user must belong to MightyBank Americas, the parent organization. If a user doesn’t belong to the parent organization, then Alma can open the Acme Bank organization, and create a new user profile directly in the organization.
Administrators
The main job of organization administrators is to manage user identities within an organization or sub-organization.
In this example, Alma designated Barbara as the administrator for MightyAmericas. Barbara is authorized to manage all identities in the MightyAmericas organization, and in all of its sub-organizations.
Barbara then delegated administration to two employees in the Acme Bank organization, and two employees in the MexBanco organization. These delegated administrators share responsibility for managing identities.

Organization administrators can do the following, but only within the organizations they are authorized to manage:
-
Delegate user identity administration through roles and assignments.
-
An administrator can add an existing user profile to an organization only if the user already belongs to a parent organization.
-
An administrator can create a new user profile in an organization if the user doesn’t already belong to a parent organization.
-
In this example, before an administrator can add a user profile to the Acme Bank organization, the user profile must already belong to MightyBank Americas, the parent organization. If a user profile does not already belong in MightyBank Americas, then the administrator can open the Acme Bank organization and create a new user profile directly in the organization.
Each organization administrator can manage user profiles, but in only the organization they’re authorized to manage.
More information
-
For steps to create and manage organizations using Advanced Identity Cloud admin console, learn more in Organizations on the Manage identities page.
-
For a deep dive into organizations, learn more in Organizations.
-
To manage organizations using the REST API, learn more in Manage organizations over REST.
-
To add the organization model to your environment, learn more in How do I get the organization model in my Advanced Identity Cloud environment?.
-
For a deep dive into roles and assignments, learn more in Authorization and roles and Use assignments to provision users.
Manage identities
A PingOne Advanced Identity Cloud tenant can contain data about people (such as employees, customers, or vendors) and devices (such as cell phones or printers), each of which has a unique combination of defining attributes. Advanced Identity Cloud stores these attributes in identity profiles.
In an identity profile, roles and assignments define the type and extent of access permissions given to users and devices. Advanced Identity Cloud uses roles and assignments to provision identity profiles with permissions.
For quick takes, learn more in About roles and assignments and How provisioning works. To view a list of tenant admin console users, learn more in View the tenant administrators list. To view realm settings, learn more in Realm settings.
Note that identity resources are grouped by realm. If you can’t find a resource, make sure that you’re looking in the right realm.
Users
A user is a person, such as a customer, employee, or vendor, whose identity profile is stored in a tenant. A user identity profile is also called a user profile.
For a deep dive into Advanced Identity Cloud user identities, learn more in Manage identities.
Create a user profile
-
In the Advanced Identity Cloud admin console, go to Identities > Manage.
-
On the Manage Identities page, click Alpha realm - Users and New Alpha realm - User.
-
On the New Alpha realm - User page, enter information for the user, and then click Save. For a list of user attributes, learn more in User identity attributes and properties reference.
Edit a user profile
-
In the Advanced Identity Cloud admin console, go to Identities > Manage.
-
On the Manage Identities page, click Alpha realm - Users, and click on a username.
-
Edit information for the user, and then click Save. For a list of user attributes, learn more in User identity attributes and properties reference.
Reset a user password
-
In the Advanced Identity Cloud admin console, go to Identities > Manage.
-
On the Manage Identities page, click Alpha realm - Users, and click on a username.
-
Click Reset Password.
-
Enter a new password, and click Reset Password to save the new password.
Delete a user
-
In the Advanced Identity Cloud admin console, go to Identities > Manage.
-
On the Manage Identities page, click Alpha realm - Users, and click on a username.
-
At the bottom of the page, click Delete Alpha realm - User. The Delete operation cannot be undone.
Add an application to a user
When you add an application to a user, Advanced Identity Cloud automatically provisions an account for them in the target application.
-
In the Advanced Identity Cloud admin console, go to Identities > Manage.
-
On the Manage Identities page, click Alpha realm - Users, and click a username.
-
Click the Applications tab.
-
Click + Add Application.
-
On the Account Details page, in the Application drop-down field, select an application.
-
Click Assign. Afterward, in the Users & Roles tab, the Assignment column shows the user has a Direct assignment to the application.
Manage trusted devices
| To populate the Trusted Devices tab, add the Device Profile Collector node to your authentication journeys to collect end-user device information. |
You can view and delete the list of trusted devices on a user account.
-
In the Advanced Identity Cloud admin console, go to Identities > Manage.
-
On the Manage Identities page, click Alpha realm - Users, and click a username.
-
Click the Trusted Devices tab to view a list of devices that the end user has used to log in to their account.
-
Click a device from the list to open its Device Details modal window. The modal displays device information such as operating system and browser. The modal may also display location information for the device if the Device Profile Collector node is configured to collect it and if the end user consented to the information being collected by their browser.
-
Choose one of the following options:
-
To close the modal, click Done.
-
To remove the device from the list of trusted devices:
-
Click Remove device.
-
In the Delete Device? modal window, click Delete.
-
-
Roles
Create an external role
-
In the Advanced Identity Cloud admin console, go to Identities > Manage.
-
On the Manage Identities page, click Alpha Realm - Roles and New Alpha realm - Role.
-
On the role page, enter the following information for the role, and then click Next:
-
Name: Unique identifier to display in the roles list.
-
Description: String to describe the role, such as Sales.
-
-
(Optional) Assign the role only to identities with specified attributes:
-
On the Dynamic Alpha realm - role Assignment page, use the slider to create a conditional filter for the role.
-
Use the choosers to specify conditions that an identity must meet.
-
(Optional) Click Advanced Editor to create a query-based condition.
-
Click Next.
-
-
(Optional) Assign the role only at specified times:
-
On the Time Constraint page, use the slider to enable a start and end date during which the role is active.
-
Use the calendar, clock choosers, and time zone offset.
-
Click Save.
-
Edit an external role
-
In the Advanced Identity Cloud admin console, go to Identities > Manage.
-
On the Manage Identities page, click Alpha Realm - Roles, and click on a role name.
-
Add managed assignments to the role:
-
On the role page, click Managed Assignments and Add Managed Assignments.
-
Select a managed assignment from the drop-down list, and click Save.
-
-
Add members to the role:
-
On the role page, click Role Members and Add Role Members.
-
Select an identity from the members list.
-
(Optional) Use the slider to assign the role only at specified times, and then add the dates, times, and timezone offset.
-
-
Change the time constraints or conditions of a role.
-
On the Internal Role page, click Settings.
-
In Time Constraint or Condition, click Set Up to edit the parameters, and then click Save.
-
Add an application to a role
When you add an application to a role and then assign a user to the role, Advanced Identity Cloud automatically provisions the user in the target application.
-
In the Advanced Identity Cloud admin console, go to Identities > Manage.
-
On the Manage Identities page, click Alpha Realm - Roles, and click on a role name.
-
Click the Applications tab.
-
Click + Add Application.
-
On the Account Details page, in the Application drop-down field, select an application.
-
Click Assign. Afterward, in the Users & Roles tab, the Assignment column shows the user has a Role-based assignment to the application.
Create an internal role
-
In the Advanced Identity Cloud admin console, go to Identities > Manage.
-
Click Internal Roles.
-
Click + New Internal Role.
-
In the New Internal role screen, enter role details:
-
Name: Unique identifier to display in the Roles list.
-
Description (optional): String that’s meaningful to your organization.
Examples: Employee, Customers, Sales Department, and Europe.
-
-
Click Next.
-
To choose an identity object that the role should grant permissions to, on the Internal role Permissions dialog, choose an identity object.
-
To add the identity, click Add.
-
Set the permission for the identity:
-
View: Grant the identity object view access.
-
Create: Grant the identity object create access.
-
Update: Grant the identity object update access.
-
Delete: Grant the identity object delete access.
-
-
To add another identity, repeat the above three steps.
-
Click Next.
-
To optionally assign a user to a role based on specific attributes, on the Dynamic Internal role Assignment screen:
-
Enable A conditional filter for this role.
-
Use the choosers and drop-down lists to specify conditions for assigning a user to a role.
-
To create a query-based condition, click Advanced Editor, and edit the query code.
-
Click Next.
-
-
To assign a role on a temporary basis, on the Time Constraint screen:
-
Enable Set a start and end date during which this role will be active.
-
Use the calendar and date pickers to define when the role is in effect:
-
Specify the time zone to be used for the start date/time and end/date you specified. Choose a time zone relative to Greenwich Mean Time (GMT). GMT is the same as Universal Time Coordinated (UTC).
-
To view a worldwide list of offset times, click Time zones chart to calculate the offset time.
-
-
-
Click Save.
Edit an internal role
-
In the Advanced Identity Cloud admin console, go to Identities > Manage.
-
On the Manage Identities page, click Internal Roles, and click on a role name.
-
To edit role details:
-
Click the Details tab.
-
Edit the Name field and possibly the Description field.
-
Click Save.
-
-
To edit a privilege:
-
Click the Privileges tab.
-
Click a privilege.
-
Edit the privilege details.
-
Click Save.
-
-
To add a privilege:
-
Click the Privileges tab.
-
Click + Add Privileges.
-
To choose an identity that this role should grant administration privileges to, use the drop-down list field to choose an identity object.
-
To add the identity, click Add.
-
Set the permission for the identity:
-
View: Grant the identity object view access.
-
Create: Grant the identity object create access.
-
Update: Grant the identity object update access.
-
Delete: Grant the identity object delete access.
-
-
To add another identity, repeat the above three steps.
-
Click Save.
-
-
To edit a member:
-
Click the Members tab.
-
Click a member.
-
Edit the member’s information.
-
Click Save.
-
-
To add a member:
-
Click the Members tab.
-
Click + Add Members.
-
Use the drop-down field to choose a member.
-
Click Save.
-
-
To set a start and end date for when the role is active:
-
On the Internal Role page, click Settings.
-
In the Time Constraint section, click Set Up.
-
Enable Set a start and end date during which this role will be active.
-
Set the time parameter fields.
-
Click Save.
-
-
To set a conditional filter for the role:
-
On the Internal Role page, click Settings.
-
In the Condition section, click Set Up.
-
Enable A conditional filter for this role.
-
Set the condition fields.
-
Click Save.
-
-
To use JSON to configure internal role details, privileges, and other information:
-
On the Internal Role page, click Raw JSON.
-
Edit the JSON sample.
-
-
For a deep dive into roles, learn more in Roles.
Assignments
For a quick take, learn more in Assignments. For a deep dive into roles and assignments, learn more in Use assignments to provision users.
Create a mapping
Before you create an assignment, make sure that you have a mapping, or create a mapping as described in this section.
A mapping specifies a relationship between an object and its attributes, in two data stores. Learn more in Resource mapping.
-
In the Advanced Identity Cloud admin console, go to Native Consoles > Identity Management. The Identity Management console is displayed.
-
Click Create Mapping, and add a mapping using information from Configure mappings using the admin UI.
Create an assignment
-
In the Advanced Identity Cloud admin console, go to Identities > Manage.
-
On the Manage Identities page, click Alpha realm - Assignments and New Alpha realm - Assignments.
-
On the assignment page, enter the following information for the assignment, and then click Next:
-
Name: Unique identifier to display in the assignments list.
-
Description: String to describe the assignment, such as Sales reporting.
-
Mapping: Select a mapping to which the assignment applies.
-
-
(Optional) Add an attribute to map to the target system. Learn more in provision an attribute in the target data store.
-
On the Assignment Attributes page, click Add an Attribute.
-
Select an attribute from the drop-down list, and enter a value for the attribute. The attribute-value pair is synchronized with user accounts in the target data store.
-
(Optional) Click , and in the Assignment Operation window specify how Advanced Identity Cloud synchronizes assignment attributes on the target data store:
-
On assignment
-
Merge with target: The attribute value is added to any existing values for that attribute.
-
Replace target: The attribute value overwrites any existing values for that attribute. The value from the assignment becomes the authoritative source for the attribute.
-
-
On unassignment
-
Remove from target: The attribute value is removed from the system object when the user is no longer a member of the role, or when the assignment itself is removed from the role definition.
-
No operation: Removing the assignment from the user’s effectiveAssignments has no effect on the current state of the attribute in the system object.
-
-
-
-
Click to add the assignment, and then click Save.
-
(Optional) Add an event script.
Groovy scripts are not supported. -
One the Alpha realm - Assignment page, click Add an event script.
-
Choose whether to trigger the script on assignment or unassignment.
-
Enter the script in the text box or upload it.
-
(Optional) Define custom variables to pass to your script. To enter variables in JSON format, use the JSON slider.
-
Click Save.
-
-
(Optional) Add managed roles to the assignment
-
On the Alpha realm - Assignment page, click the Manage Roles tab, and click Add Manage Roles.
-
Select a managed role from the drop-down list, and click Save.
-
Organizations
For a quick take, learn more in Organizations.
Organizations can be managed in the following ways:
-
By tenant administrators, using the REST APIs:
Before you can use the IDM REST APIs, you’ll have to get an access token and authenticate to the IDM API server. Learn more in Accessing the IDM REST APIs.
For examples of API calls for organizations, learn more in Manage Organizations Over REST.
-
By tenant administrators, using the Advanced Identity Cloud admin console as described on this page.
-
By organization owners and organization administrators, using the Advanced Identity Cloud end-user UI as described on this page.
Import identities into an organization
You can build organizations in different ways. For example, you can start with a parent organization that contains all user identities, and then build your organization hierarchy. Alternatively, you can start with a hierarchy of empty organizations, and then add users. Whatever approach you take, at some point you’ll have to import identities into an organization.
| Tenant administrators | Organization owners | Organization administrators |
|---|---|---|
Only tenant administrators can import identities into an organization.
For this example, it is assumed that the following items already exist:
-
A .csv file containing 100 user identities
-
A parent organization with no members
-
In the Advanced Identity Cloud admin console, go to Identities > Import.
-
On the Bulk Import page, click New Import.
-
On the Upload CSV page, select Alpha realm - Users, and then click Next.
-
In the Upload CSV page, Enter the following information and then click Next:
-
CSV File: Browse to your file
-
Match Using: Add a property name to use for a unique record match
-
-
When the Import Complete dialog box is displayed, and you can confirm that the import was successful, click Done.
You can confirm the import in the following ways:
-
Go to Identities > Manage > Alpha realm - Users, and open any user profile. Click Organizations to which I Belong, and make sure that the organization you created is displayed.
-
Go to Identities > Manage > Alpha realm - Organizations, and make sure that the organization you created is displayed.
-
Click the name of the organization you created, click Members, and then make sure that all the imported user identities are displayed.
-
Create a parent organization
| Tenant administrators | Organization owners | Organization administrators |
|---|---|---|
Only tenant administrators can create a parent organization.
-
In the Advanced Identity Cloud admin console, go to Identities > Manage.
-
On the Manage Identities page, click Alpha realm - Organizations and New Alpha realm - Organizations.
-
On the New Alpha realm - Organizations page, enter a name for the organization. Uppercase, lowercase, alphanumeric, special characters, and white spaces are allowed.
-
Click Save.
-
In the organization page, change the name, add a description, or assign a parent organization. To designate this organization as the parent, leave the Parent Organization field blank.
-
Click Save.
Create an organization owner
| Tenant administrators | Organization owners | Organization administrators |
|---|---|---|
Only tenant administrators can create an organization owner.
-
In the Advanced Identity Cloud admin console, go to Identities > Manage.
-
On the Manage Identities page, click Alpha realm - Organizations and click on an organization name.
-
Click Owner and Add Owner.
-
In the Add Owner page, select an identity from the drop-down list.
Make sure that the organization owner is not also an organization member. This can result in giving the organization administrator greater control of the organization than its owner. -
Click Save.
Create an organization administrator
| Tenant administrators | Organization owners | Organization administrators |
|---|---|---|
-
Tenant administrators can create an organization administrator in any organization.
-
Organization owners can create organization administrators only within organizations or sub-organization where they are owner.
-
Organization administrators cannot create other organization administrators.
-
On the Manage Identities page, click Alpha realm - Organizations and click on an organization name.
-
Click Administrators and Add Administrators.
-
In the Add Administrators page, select a user from the drop-down list. The user must already belong to the organization.
-
Click Add Administrators. The username is displayed in the members list.
Create a sub-organization
| Tenant administrators | Organization owners | Organization administrators |
|---|---|---|
-
Tenant administrators can create sub-organizations within any organization.
-
Organization owners can create sub-organizations only within organizations or sub-organizations where they are owner.
-
Organization administrators can create sub-organizations only within organizations or sub-organizations where they are administrator.
Tenant administrators
| Tenant administrators can view all organizations. |
Follow the steps in to create a parent organization, and then set a parent organization that is:
-
An existing organization
-
One level of hierarchy higher than this child organization
Organization owners and organization administrators
| Organization owners and organization administrators can view only the organizations and sub-organizations that they own or administrate. |
-
In the Advanced Identity Cloud end-user UI, go to Alpha realm - Organizations and New Alpha realm - Organizations.
-
On the New Alpha realm - Organizations, page enter a name for the organization. Uppercase, lowercase, alphanumeric, special characters, and white spaces are allowed.
-
Click Save.
-
In the organization page, optionally change the name, and add a description.
-
Assign a parent organization that is One level of hierarchy higher than this child organization.
-
Click Save.
|
While privileges for default attributes are automatically included when setting up a sub-organization, custom attributes need to be manually added to your privileges configuration before creating the sub-organization. Do this by adding the custom attribute to the |
Edit an organization or sub-organization
| Tenant administrators | Organization owners | Organization administrators |
|---|---|---|
-
Tenant administrators can edit any organization or sub-organization.
-
Organization owners can edit only organizations or sub-organization where they are owner.
-
Organization administrators can edit only organizations or sub-organizations where they are administrator.
Tenant administrators
-
In the Advanced Identity Cloud admin console, go to Identities > Manage.
-
On the Manage Identities page, click Alpha realm - Organizations and click on an organization name.
-
In the organization page, change the name, add a description, or assign a parent organization.
Uppercase, lowercase, alphanumeric, special characters, and white spaces are allowed in the organization name.
To designate this organization as the parent, leave the Parent Organization field blank.
-
Click Save.
Organization owners and organization administrators
-
In the Advanced Identity Cloud end-user UI, go to Alpha realm - Organizations, and click on an organization name.
-
In the organization page, change the name, add a description, or assign a parent organization.
Uppercase, lowercase, alphanumeric, special characters, and white spaces are allowed in the organization name.
To designate this organization as the parent, leave the Parent Organization field blank.
-
Click Save.
Add or create organization members
| Tenant administrators | Organization owners | Organization administrators |
|---|---|---|
-
Tenant administrators can access all members of all organizations.
-
Organization owners can access only members of organizations they own.
-
An organization owner can add a user profile to their organization only if the user profile exists inside their ownership area.
-
An organization owner can create a new user profile as a member of their organization.
-
-
Organization administrators can access only members in their administrative area.
-
An organization administrator can add a user profile to their organization only if the user profile exists inside their administrative area.
-
An organization administrator can create a new user profile as a member of their organization.
-
Add a member to an organization
Tenant administrators
-
In the Advanced Identity Cloud admin console, go to Identities > Manage.
-
On the Manage Identities page, click Alpha realm - Organizations and click on an organization name.
-
On the organization page, click Members and Add Members.
-
Select an identity from the members list, and then click Save. The username or usernames you added are now displayed in the members list.
Organization owners and organization administrators
-
In the Advanced Identity Cloud end-user UI, go to Alpha realm - Organizations.
-
Follow steps in the tenant administrator instructions.
Create a new user profile in an organization
Tenant administrators
-
Add a user profile, as described in Create a user profile.
-
In the user profile, click Organizations to which I Belong and Add Organizations to which I Belong.
-
In the add organization dialog box, choose one or more organizations from the drop-down list, and click Save.
Organization owners and organization administrators
-
In the Advanced Identity Cloud end-user UI, go to Alpha realm - Users.
-
Follow steps in the tenant administrator instructions.
Delete an organization
| Tenant administrators | Organization owners | Organization administrators |
|---|---|---|
-
Tenant administrators can delete any organization or sub-organization.
-
Organization owners can delete only organizations or sub-organizations where they are owner.
-
Organization administrators can delete only organizations or sub-organization where they are administrator.
Tenant administrators
-
In the Advanced Identity Cloud admin console, go to Identities > Manage.
-
On the Manage Identities page, click Alpha realm - Organizations and click on an organization name.
-
On the organization page, click Delete Alpha realm - Organization.
This operation cannot be undone.
Organization owners and organization administrators
-
In the Advanced Identity Cloud end-user UI, go to Manage.
-
Follow steps in the tenant administrator instructions.
Constrain identity queries in the UI
PingOne Advanced Identity Cloud lets you constrain queries in two ways when managing identities with the Advanced Identity Cloud admin console:
-
By requiring all Advanced Identity Cloud admin console users to provide a minimum number of characters when searching for identities.
-
By forbidding delegated administrators from sorting and searching resource collections.
Constraining how the Advanced Identity Cloud admin console can be used can improve overall Advanced Identity Cloud performance because the constraints forbid queries that might inadvertently use a large amount of computing resources.
|
If you encounter slow or failed searches when searching for users in the IDM admin UI, learn more in Searching for users in the UI is very slow in Advanced Identity Cloud. |
Require a minimum length search string
You can require Advanced Identity Cloud administrators to enter a minimum length string when querying identities using the Advanced Identity Cloud admin console. This setting also disables sorting search results unless a minimum length string has been specified in the search box.
Applying this setting can speed up the time it takes to retrieve records from large identity data sets.
This setting only affects queries performed in the Advanced Identity Cloud admin console. It does not affect Advanced Identity Cloud REST API queries.
To apply the setting:
-
In the Advanced Identity Cloud admin console, go to Identities > Configure to access the Configure Identities page.
-
Click on an identity profile. For example, if you want to configure the UI for managing identities in the Alpha realm, click Alpha realm - User.
-
Enter a number greater than zero in the Minimum Characters field.
-
Click Save.
To verify that the setting is in effect:
-
Go to Identities > Manage.
-
Select the identity profile that corresponds to the one you configured when you applied the setting.
-
Click one of the column titles at the top of the search results to attempt to sort the results.
You should not be able to sort the results. Sorting by column should have been disabled.
-
Specify a string in the Search field that has fewer characters than the minimum number of characters you specified in the profile’s configuration. Then, press Enter.
The search operation should not be permitted.
-
Specify a string in the Search field that has the minimum number of characters you specified in the profile’s configuration. Then, press Enter.
The search operation should be permitted.
-
Click one of the column titles at the top of the search results to sort the results.
Sorting the search results should now be permitted.
Forbid sorting or searching resource collections
A resource collection is a set of identities that has a relationship with another identity. For example:
-
All the users with a particular role assignment
-
All the users who are members of an organization
You can forbid Advanced Identity Cloud delegated administrators from sorting resource collections and performing searches within resource collections in the Advanced Identity Cloud admin console.
This setting only affects delegated administrators using the Advanced Identity Cloud end-user UI. It does not affect tenant administrators using the Advanced Identity Cloud admin console.
To apply the setting:
-
In the Advanced Identity Cloud admin console, go to Identities > Configure to access the Configure Identities page.
-
Click on an identity profile. For example, if you want to configure the UI for managing identities in the Alpha realm, click Alpha realm - User.
-
Click the Disable sorting and searching on grids that use this object as a resource collection toggle.
-
Click Save.
To verify that the setting is in effect:
-
Log out of Advanced Identity Cloud.
-
Log in to Advanced Identity Cloud as a delegated administrator.
-
Select an identity profile that has a relationship with the profile you configured when you applied the setting.
For example, if you disabled sorting and search for Alpha realm - User grids, then you could select Alpha realm - organization because organizations have members (which are users).
-
Find the name of an organization for which you’re the delegated administrator.
-
Click its More () menu, and choose Edit.
-
Click Members to bring up the collection of users that are members of your organization.
-
Click First Name to attempt to sort the identities by first name.
Sorting the search results should not be permitted.
User identity attributes and properties reference
You might need to work with user identity attributes in PingOne Advanced Identity Cloud for the following reasons:
-
To customize the identity attribute display names shown in the user profile in the UI
-
To reference the identity attributes in scripts and API calls
|
The attribute and property names are not consistent between the underlying AM and IDM services. To address this, the reference tables depict the equivalent attribute. |
Using the reference tables
-
If you write scripts for AM that access user profiles, then use AM attribute names. User profile script examples: OAuth2 access token modification; OIDC claims; decision node scripts for authentication journeys (trees).
-
If you write scripts for IDM that access managed objects, then use IDM property names. Managed object script examples:
onUpdate,onCreate,onDelete, and so forth. -
If you use APIs to access managed objects or user profiles:
-
Calls to
/amAPIs must use AM attribute names. -
Calls to
/openidmAPIs must use IDM property names.
-
|
If you use the IDM admin console to change the display name of a property, the change is reflected in both the IDM admin console and the Advanced Identity Cloud admin console; however, on the API side and in scripts, the generic names remain unchanged. |
Reference tables
Basic user attributes
| Display Name | IDM Property | AM Attribute |
|---|---|---|
Username[1] |
|
|
Common Name |
|
|
Display Name |
|
|
Password |
|
|
Status |
|
|
First Name[1] |
|
|
Last Name[1] |
|
|
Email Address[1] |
|
|
Description |
|
|
Telephone Number |
|
|
Address 1 |
|
|
City |
|
|
State/Province |
|
|
Postal Code |
|
|
Country |
|
|
Additional user attributes
| Description | IDM Property | AM Attribute |
|---|---|---|
Alias list |
|
|
Applications |
|
|
Applications I Own |
|
|
Assigned dashboard |
|
|
Assignments |
|
|
Consented Mappings |
|
|
Custom attributes |
|
|
Direct Reports |
|
|
Manager |
|
|
Authorization Roles |
|
not available[3] |
Effective Assignments |
|
|
Effective Applications |
|
|
Effective Groups |
|
|
Effective Roles |
|
|
Groups |
|
|
KBA |
|
|
Preferences |
|
|
Profile image |
|
|
Provisioning Roles |
|
|
Organizations I Administer |
|
|
Organizations I Own |
|
|
Organizations to which I Belong |
|
|
Password Last Changed Time[1] |
|
|
Password Expiration Time[1] |
|
|
Task Proxies[4] |
|
n/a |
Task Principals[4] |
|
|
| Description | IDM Property | AM Attribute |
|---|---|---|
Notifications |
|
|
Revision |
|
|
User Metadata |
|
|
UUID |
|
|
General purpose extension attributes
Strings
| Display Name | IDM Property | AM Attribute |
|---|---|---|
Generic Indexed String 1 |
|
|
Generic Indexed String 2 |
|
|
Generic Indexed String 3 |
|
|
Generic Indexed String 4 |
|
|
Generic Indexed String 5 |
|
|
Generic Indexed String 6[5] |
|
|
Generic Indexed String 7[5] |
|
|
Generic Indexed String 8[5] |
|
|
Generic Indexed String 9[5] |
|
|
Generic Indexed String 10[5] |
|
|
Generic Indexed String 11[5] |
|
|
Generic Indexed String 12[5] |
|
|
Generic Indexed String 13[5] |
|
|
Generic Indexed String 14[5] |
|
|
Generic Indexed String 15[5] |
|
|
Generic Indexed String 16[5] |
|
|
Generic Indexed String 17[5] |
|
|
Generic Indexed String 18[5] |
|
|
Generic Indexed String 19[5] |
|
|
Generic Indexed String 20[5] |
|
|
Generic Unindexed String 1 |
|
|
Generic Unindexed String 2 |
|
|
Generic Unindexed String 3 |
|
|
Generic Unindexed String 4 |
|
|
Generic Unindexed String 5 |
|
|
Multivalues
| Display Name | IDM Property | AM Attribute |
|---|---|---|
Generic Indexed Multivalue 1 |
|
|
Generic Indexed Multivalue 2 |
|
|
Generic Indexed Multivalue 3 |
|
|
Generic Indexed Multivalue 4 |
|
|
Generic Indexed Multivalue 5 |
|
|
Generic Unindexed Multivalue 1 |
|
|
Generic Unindexed Multivalue 2 |
|
|
Generic Unindexed Multivalue 3 |
|
|
Generic Unindexed Multivalue 4 |
|
|
Generic Unindexed Multivalue 5 |
|
|
Dates
| Display Name | IDM Property | AM Attribute |
|---|---|---|
Generic Indexed Date 1 |
|
|
Generic Indexed Date 2 |
|
|
Generic Indexed Date 3 |
|
|
Generic Indexed Date 4 |
|
|
Generic Indexed Date 5 |
|
|
Generic Unindexed Date 1 |
|
|
Generic Unindexed Date 2 |
|
|
Generic Unindexed Date 3 |
|
|
Generic Unindexed Date 4 |
|
|
Generic Unindexed Date 5 |
|
|
Integers
| Display Name | IDM Property | AM Attribute |
|---|---|---|
Generic Indexed Integer 1 |
|
|
Generic Indexed Integer 2 |
|
|
Generic Indexed Integer 3 |
|
|
Generic Indexed Integer 4 |
|
|
Generic Indexed Integer 5 |
|
|
Generic Unindexed Integer 1 |
|
|
Generic Unindexed Integer 2 |
|
|
Generic Unindexed Integer 3 |
|
|
Generic Unindexed Integer 4 |
|
|
Generic Unindexed Integer 5 |
|
|
Multivalue 2FA profile attributes
| Display Name | IDM Property | AM Attribute |
|---|---|---|
|
|
|
|
|
|
|
|
|
|
|
|
|
|
|
Import & Sync Identities
Bulk import identities
You can use a CSV file to bulk import identities into PingOne Advanced Identity Cloud. This is useful when you want to add a large number of identities to a role or assignment in a single operation.
Import identities in bulk
Before you begin:
You’ll need a CSV file containing the identity profiles you want
to import. The file must comply with this CSV template example:
CSV template example
{
  "_id": "template",
  "header": "\"userName\",\"givenName\",\"sn\",\"mail\",\"description\",\"accountStatus\",\"telephoneNumber\",
 \"postalAddress\",\"address2\",\"city\",\"postalCode\",\"country\",\"stateProvince\",\"preferences/updates\",
 \"preferences/marketing\""
}
Be sure to use commas as separators. Any other separator may cause errors.
Learn more about generating this file in Import bulk data.
-
In the Advanced Identity Cloud admin console, go to Identities > Import.
-
On the Import Identities page, click + New Import.
-
On the New Import dialog box, select the realm-target you want to import to.
Tell me more
The target can be any managed object such as a user, role, or assignment defined within a realm. For example, you could import ten user profiles to the Bravo realm - Roles target. The imported roles are added to the
bravo_rolemanaged object in Advanced Identity Cloud. -
Click Next.
-
(Optional) If you haven’t already generated a CSV file, click CSV Template. to download an example file.
If you use this file:
-
Replace the attributes in this file with attributes in your identity resource server.
-
Delete all unused attributes.
-
-
Enter the name of the CSV file to upload.
-
Choose a property Advanced Identity Cloud can use to match an entry in the CSV file to an identity profile in your realm-target.
Tell me more
For example, you could choose the username property. If username
bjensenexists in your CSV file, Advanced Identity Cloud tries to verify that a user profile with the usernamebjensenalso exists in your tenant. If verified, then Advanced Identity Cloud updates the entirebjensenuser profile. If no match is found, then Advanced Identity Cloud creates a user profile forbjensen. -
Click Next.
The Import Complete dialog box indicates real-time import progress. When the import is complete, Advanced Identity Cloud displays the number of new, updated, unchanged, and failed imports.
-
(Optional) To download a CSV file containing a list of identity profiles that failed to import, click Download CSV.
-
Click Done.
Sync identities
Before you can sync identities with a remote server or use load balancing and failover in PingOne Advanced Identity Cloud, you must register a remote server with your tenant.
Connectors can read data in your tenant and in external resources (an app or service that runs on a server outside your tenant). Use connectors to convert your identity profiles, as well as user accounts in a resource server, into a format that both data stores can use.
| Advanced Identity Cloud provides built-in connectors for synchronization with data stores in other cloud services. |
Process overview
Before you can make a connection, you must register a remote connector server with your tenant. You also need to have a connector service up and running.
To configure connectors that aren’t built in to Advanced Identity Cloud, complete this list of tasks in order:
-
Change the client secret by resetting it.
-
Download a remote server from Backstage.
-
Install and configure a connector, if needed.
You can also create a connector configuration over REST. -
Configure the remote server to connect to Advanced Identity Cloud (optional).
-
Create a mapping between identities in Advanced Identity Cloud and identities in your identity resource server.
-
If you plan to set up load balancing or failover, then register a remote server cluster (optional).
For troubleshooting advice, learn more in the knowledge base article How do I troubleshoot the Java Remote Connector Service (RCS)?.
Tasks
Task 1: Register a remote server
-
To create a connector server in your development or sandbox[7] environments:
-
In the Advanced Identity Cloud admin console, go to Identities > Connect > Connector Servers.
-
Click + New Connector Server.
-
In the New Connector Server dialog box:
-
Enter a Name for the connector server. Use only lowercase letters, numbers, underscores, or hyphens. No other special characters or spaces are allowed.
-
Choose how you want your remote server (configured in later steps) to connect to the connector server:
-
By default, the connector server is configured to use a built-in OAuth 2.0 client called RCSClient. Your remote server uses the RCSClient credentials to connect.
-
(Optional) Select the Create a new OAuth Client checkbox to create a specific OAuth 2.0 client. The connector server uses this specific OAuth 2.0 client instead of RCSClient. Your remote server uses the credentials of the specific OAuth 2.0 client to connect.
-
Enter a Client ID for the specific OAuth 2.0 client. Use only lowercase letters, numbers, underscores, or hyphens. No other special characters or spaces are allowed.
-
Enter a Client Secret for the specific OAuth 2.0 client and note the value you entered.
-
-
-
-
Click Save.
-
-
To create a connector server in your UAT[8], staging, or production environments:
-
Follow the instructions in step 1 to create a connector server in your development environment.
-
Run a series of promotions to promote the connector server configuration from your development environment to your upper environments.
-
Task 2: Reset the client secret
-
Skip to Task 3: Download a remote server if either of these conditions apply:
-
If you selected the Create a new OAuth Client checkbox when creating the connector server in the previous step.
-
If you already know the client secret of the RCSClient.
-
-
In the Advanced Identity Cloud admin console, go to OAuth2 Clients.
-
Click RCSClient.
-
Click Reset to change the client secret.
RCSClient is a built-in OAuth 2.0 client that is the default client for connector servers in Advanced Identity Cloud. If you reset its client secret, you must update the configuration of any remote connectors configured to use it to connect to the tenant environment. -
In the Reset Client Secret dialog box, enter a strong password.
-
Read the warning, and then click Save.
Task 3: Download a remote server
You’re directed to the
IDM Cloud Connectors download page. You must sign in to Backstage to view this page and download the connectors.
-
Download the Remote Connector Server to the host that will run the connector server.
Ping Identity recommends using the Java version of the Remote Connector Server. Only download the .NET version if you need to use a PowerShell connector. Learn about the differences between the RCS types in Install a Remote Connector Server (RCS).
You can run the connector server on the same host as the identity resource server or you can run it on a different host. For example, you could run the connector server on a host that’s dedicated to only connectors.
Task 4: Install and configure a connector
If the connector you want to use is not bundled with the remote server you downloaded in Task 2, you’ll need these instructions. Follow the instructions in the ICF documentation to download and install the remote connector you need.
After you complete the Next Steps, click Done in the Next Steps window.
Task 5: Configure a remote server
-
Unpack the OpenICF package you downloaded from the IDM Connectors download page.
-
Edit the
ConnectorServer.propertiesfile.ConnectorServer.propertiesdetails:-
Add the OAuth2 Client credentials used to obtain an OAuth2 token. The client uses the Client Credentials grant type.
-
connectorserver.clientId=<client-id>-
If you chose to create a specific OAuth 2.0 client in Task 1: Register a remote server, enter that client’s client ID.
-
Otherwise, enter
RCSClient.
-
-
connectorserver.clientSecret=<client-secret>-
If you chose to create a specific OAuth 2.0 client in Task 1: Register a remote server, enter that client’s client secret.
-
Otherwise, enter the client secret for
RCSClient.
-
-
-
Uncomment these settings and edit them for your tenant:
-
connectorserver.url
This is the Advanced Identity Cloud OpenICF endpoint.
Usewssover HTTPS so the client can obtain a bearer token through OpenID.-
In UAT[8], staging and production environments, use three URLs in a space-delimited list. Example:
connectorserver.url=wss://<tenant-env-fqdn>/openicf/0 wss://<tenant-env-fqdn>/openicf/1 wss://<tenant-env-fqdn>/openicf/2 -
In a development environment, use only one URL. Example:
connectorserver.url=wss://<tenant-env-fqdn>/openicf/0
-
-
connectorserver.connectorServerName=<remote-server-name>
This is the remote server name you set through the Advanced Identity Cloud admin console. Be sure the name includes only lowercase letters and numerals. No special characters or spaces are allowed. -
connectorserver.pingPongInterval=60
The WebSocket Ping/Pong interval (seconds). -
connectorserver.housekeepingInterval=20
The WebSocket connections housekeeping interval (seconds). -
connectorserver.groupCheckInterval=60
WebSocket groups check interval, in seconds. -
connectorserver.webSocketConnections=3
Specifies the number of sockets the connector server establishes and maintains to each Advanced Identity Cloud (IDM) backend instance. -
connectorserver.connectionTtl=300
WebSocket connection’s time to live (seconds). -
connectorserver.newConnectionsInterval=10
Time between new connections (seconds). -
connectorserver.tokenEndpoint=https://<tenant-env-fqdn>/am/oauth2/realms/root/realms/alpha/access_token
Token endpoint to retrieve access token. -
connectorserver.scope=fr:idm:*
OAuth2 token scope. -
connectorserver.loggerClass=org.forgerock.openicf.common.logging.slf4j.SLF4JLog
You don’t need to set the
connectorserver.usesslproperty; the remote server determines connection security from the value of theconnectorserver.urlproperty. -
-
-
When you’re satisfied with your changes, save the file.
-
Start the remote server on the OAuth 2.0 client:
-
Windows
-
Linux
bin\ConnectorServer.bat /rundosbin/ConnectorServer.sh /runbash -
-
To verify the connection is working, view the remote server status in the Remote Servers list.
Task 6: Create a mapping
Create a mapping between identities in Advanced Identity Cloud and identities in your identity resource server.
-
In the Advanced Identity Cloud admin console, go to Native Consoles > Identity Management.
-
In the IDM admin console, click Create Mapping.
For detailed information and instructions, learn more in Configure a resource mapping.
After you’ve tested your mapping configuration per the instructions, you can make connections for synchronizing and provisioning user profiles.
Task 7: Register a server cluster
This is optional. Use a cluster of remote servers when you want to set up load balancing or failover among multiple resource servers.
-
In the Advanced Identity Cloud admin console, go to Identities > Connect > Server Clusters.
-
Click + New Server Cluster.
-
Provide Server Cluster Details:
-
Name: Identifier to display in the Server Clusters list.
-
Algorithm:
-
Choose Failover if you want requests to be redirected to a designated server only when the primary server fails.
-
Choose Round Robin if you want to continuously load-balance among two or more servers regardless of service status.
-
-
-
Click Next.
-
In the Choose Servers dialog box, enable the connectors you want to include in the server cluster.
Every connector associated with a server cluster must have an identical set of JAR files and scripts in its /path/to/openicf/lib directory. All JAR files must be at the same version. If you make any changes to the JAR files and scripts in this directory, you must propagate the changes to all the other connectors in the server cluster.
-
Click Create Cluster.
Synchronize passwords
You can synchronize hashed user passwords from your PingDS deployment into Advanced Identity Cloud.
Password synchronization relies on an LDAP connector configured to synchronize accounts from your DS servers. Advanced Identity Cloud password synchronization does not use a password synchronization plugin. Instead, it synchronizes hashed passwords as strings in the same way it synchronizes other LDAP attributes.
This feature depends on having compatible one-way hash password storage schemes in Advanced Identity Cloud and in your DS password policies. DS servers in Advanced Identity Cloud verify user-provided plaintext passwords against the password hash, just as the DS servers in your deployment.
-
Verify that your DS service stores the passwords you want to synchronize only with DS password storage schemes that are also enabled in Advanced Identity Cloud.
The following DS password storage schemes are enabled in Advanced Identity Cloud:
-
Bcrypt
-
PBKDF2
-
PBKDF2-HMAC-SHA256
-
PBKDF2-HMAC-SHA512
-
PBKDF2-HMAC-SHA512T256 (for interoperability only)
-
Salted SHA-256
-
Salted SHA-512
-
SCRAM-SHA-256
-
SCRAM-SHA-512
-
-
Verify that account synchronization works properly from your DS service to Advanced Identity Cloud.
For example, modify a test user’s entry in your DS server and check that the corresponding account in Advanced Identity Cloud is updated correctly after reconciliation runs.
-
In the native IDM admin console, configure the LDAP connector to synchronize
userPasswordattributes as strings:-
Delete
__PASSWORD__from the list of LDAP connector properties. -
Add
userPasswordwith Native type:stringand Run as User enabled.
-
-
In the native IDM admin console, configure the mapping from your remote DS system resource to Advanced Identity Cloud managed users:
-
Map
userPasswordin your remote DS system resource topasswordin managed users. -
Set the transformation script for the synchronization to the following inline script:
// Set the text of DS userPassword as the value of the password:
if (source != null) {
  var base64 = Packages.org.forgerock.util.encode.Base64url;
  decodedTarget = new Packages.java.lang.String(base64.decode(source));
  target = decodedTarget;
}
javascript
-
-
Verify that password synchronization is working correctly.
For example, modify a test user’s password in your DS server, and check that the user can authenticate in Advanced Identity Cloud after reconciliation runs.
About Advanced Identity Cloud connectors
Apps and services that run and store data outside your tenant exist as external resources relative to Advanced Identity Cloud.
Advanced Identity Cloud provides connectors to synchronize your identity profiles with data stored in your resource servers.
Connectors work differently based on the capabilities of the connected resource server. For a summary of supported connectors and their capabilities, learn more in ICF documentation.
Syncing and provisioning
Here’s how Advanced Identity Cloud synchronizes user data. In this diagram, an identity resource server hosts an app and a data store containing user accounts. The resource server also hosts a connector server. The connector server runs a connector.
When you edit a user’s account on the resource server, the connector makes the change in the user’s profile in your tenant.
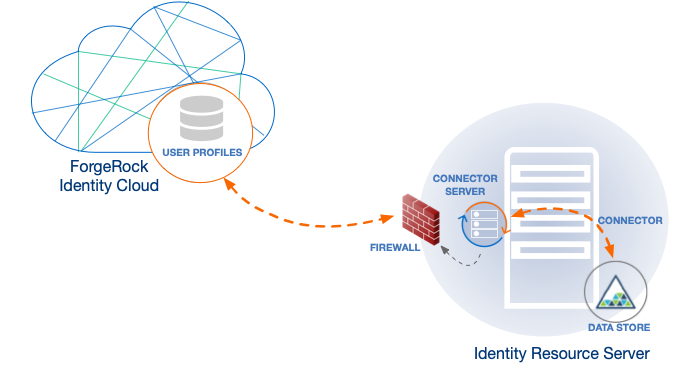
The opposite also happens. When you edit a user’s profile in your tenant, the connector makes the change in the user’s account in your resource server. For a quick take on Advanced Identity Cloud syncing and provisioning, refer to a related example in "Assignments".
Data reconciliation
Advanced Identity Cloud reconciles data when changes occur in your identity profiles or in user accounts stored in resource servers.
An Advanced Identity Cloud connector first compares an identity profile to its corresponding user account in the resource server. If conflicting information exists, Advanced Identity Cloud resolves the conflicts based on your preferences. Then Advanced Identity Cloud updates both the identity profile and the user account.
Load balancing and failover
Use a connector server cluster (a cluster of connector servers) when you want to set up load balancing or failover. A connector server cluster connects to multiple resource servers.
When you configure the connector server cluster for load balancing, Advanced Identity Cloud distributes incoming authentication or authorization requests among the clustered servers. The connector service determines where a request is directed. Request traffic flows evenly, and no single connector works faster or more slowly than others in the server cluster. This ensures requests are handled with the greatest efficiency.
When you configure connector servers for failover, if one resource server stops, then your Advanced Identity Cloud redirects requests to a standby resource server. This ensures your end users don’t experience a loss of service. When the stopped resource server restarts, Advanced Identity Cloud directs requests to the restarted server.
Deactivate the RCS OAuth 2.0 client
The RCS OAuth 2.0 client is activated by default. If you do not need to synchronize your tenant data using a connector, you can deactivate the client:
-
In the Advanced Identity Cloud admin console, go to OAuth2 Clients.
-
Click RCSClient.
-
Click Active, then select Inactive.
-
The client is immediately deactivated.
If you deactivate the RCS OAuth 2.0 client, you can reactivate it at any time.
Configure scheduled jobs
PingOne Advanced Identity Cloud lets you view, schedule, and manage scheduled jobs and scanning tasks using the Jobs page. You can use jobs to run scripts or reconciliation. You can use scanning tasks to query objects and run a script on the results. Learn more about scripts in Scripting.
Although application reconciliation jobs display in the list, you must create and edit them from the application provisioning settings.
Schedule a job
-
In the Advanced Identity Cloud admin console, click Jobs.
-
Click Schedule a Job.
-
In the Schedule a Job window, select Script, and click Next.
-
On the Script Job Details page, enter a name for the job in the Job Name field.
-
To configure the job frequency, do one of the following:
-
To use
cron, enable Use cron, and enter a validcronstring in the Frequency field.To validate a
cronschedule expression, learn more in Validate cron trigger expressions. -
In the Frequency area, set the applicable fields and options:
Field, drop-down, option Description Run Every
The schedule run frequency.
value
The time period for the adjacent Run every field:
-
day(s)
-
hour(s)
-
week(s)
-
month(s)
Set a Start Time
A start time for the first job run. Selecting this option displays the following additional fields:
-
Date picker
-
Time picker
-
Timezone
Repeat
How the job repeats:
-
X Times
-
Until specific date
If you do not set either value, Advanced Identity Cloud saves the schedule with a Times value of -1(infinite repeat). -
-
-
To configure variables, in the Script area, click Variables, and do one of the following:
-
For each variable, enter a Name and Value, and click .
-
To specify the variables in JSON format, enable JSON, and enter your JSON data in the PASSED VARIABLES field.
-
-
In the Script field, enter your script. For example:
java.lang.System.out.println('Job executing on ' + identityServer.getProperty('openidm.node.id') + ' at: ' + java.lang.System.currentTimeMillis());javascriptLearn more about scripts in Scripting.
-
Click Save.
Schedule a scanning task
Perform the following steps to scan a set of properties with a query filter at a scheduled interval, and execute a script on the objects returned by the query.
-
In the Advanced Identity Cloud admin console, click Jobs.
-
Click Schedule a Job.
-
In the Schedule a Job window, select Task Scanner, and click Next.
-
In the Choose Entity to Scan window, from the Entity to Scan drop-down list, select an entity to scan at a scheduled interval. The default options are:
-
realm-name - User
-
realm-name - Role
-
realm-name - Group
-
realm-name - Organization
-
realm-name - Application
-
-
Click Next.
-
On the Task Scanner Job Details page, enter a name for the job in the Job Name field.
-
To configure the job frequency, do one of the following:
-
To use
cron, enable Use cron, and enter a validcronstring in the Frequency field.To validate a
cronschedule expression, learn more in Validate cron trigger expressions. -
In the Frequency area, set the applicable fields and options:
Field, drop-down, option Description Run Every
The schedule run frequency.
value
The time period for the adjacent Run every field:
-
day(s)
-
hour(s)
-
week(s)
-
month(s)
Set a Start Time
A start time for the first job run. Selecting this option displays the following additional fields:
-
Date picker
-
Time picker
-
Timezone
Repeat
How the job repeats:
-
X Times
-
Until specific date
If you do not set either value, Advanced Identity Cloud saves the schedule with a Times value of -1(infinite repeat). -
-
-
To limit the task to a subset of entities, select Filter realm-name - Entity, and do one of the following:
-
Use the basic editor to create the query conditions.
Show Me
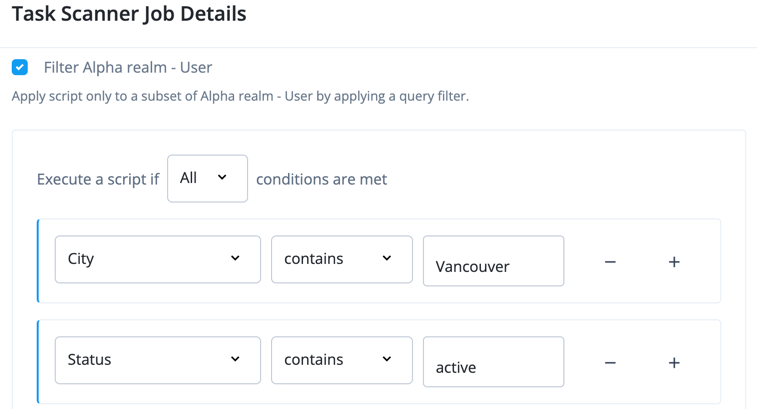
-
Click Advanced Editor to enter the query code. For example:
(/city co "Vancouver" and /accountStatus co "active")javascript
-
-
Complete the fields in the Task State area:
- Started
-
Specifies the field that stores the timestamp for when the task begins.
- Completed
-
Specifies the field that stores the timestamp for when the task completes its operation. The
completedfield is present as soon as the task has started, but its value isnulluntil the task has completed.
The Task State indicates the names of the fields in which the start message and completed message are stored. These fields are used to track the status of the task.
-
To configure variables, in the Script area, click Variables, and do one of the following:
-
For each variable, enter a Name and Value, and click +.
-
To specify the variables in JSON format, enable JSON, and enter your JSON data in the PASSED VARIABLES field.
-
-
In the Script field, enter your script. For example:
java.lang.System.out.println('Job executing on ' + identityServer.getProperty('openidm.node.id') + ' at: ' + java.lang.System.currentTimeMillis());javascriptLearn more about scripts in Scripting.
-
Click Save.
Manage jobs
-
In the Advanced Identity Cloud admin console, click Jobs.
The Jobs page displays a list of jobs, the next scheduled run, and the status.
Show Me
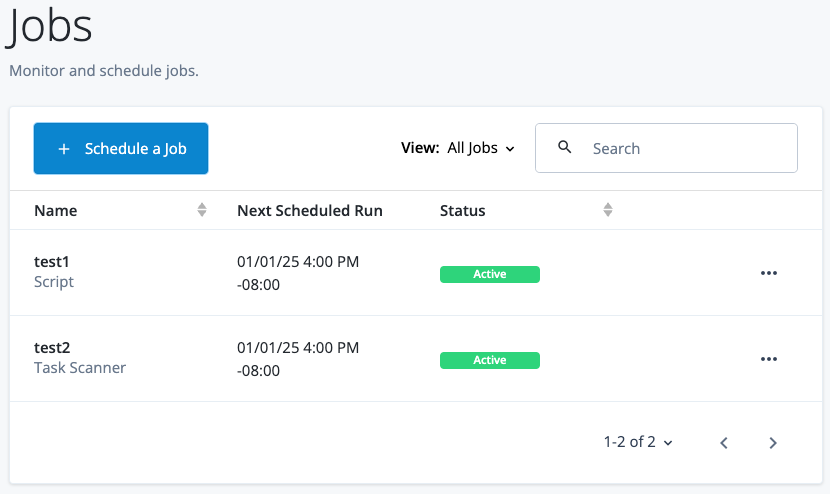
-
To filter job types, click the View drop-down list and select a job type. For example, Task Scanner.
-
To search for jobs by name, enter text in the Search field, and press Enter.
-
To view details about a job, click the More () menu adjacent to a job, and click View Details.
-
To edit a job, click it from the jobs list.
-
To manually trigger a job, click the More () menu adjacent to a job, and click Run Now.
-
In the Run Scheduled Job window, click Run Job.
-
-
To deactivate a job, click the More () menu adjacent to a job, and click Deactivate.
-
To activate a job, click the More () menu adjacent to a job, and click Activate.
-
To delete a job, click the More () menu adjacent to a job, and click Delete.
-
In the Delete Scheduled Job? window, click Delete.
-
Pass-through authentication
PingOne Advanced Identity Cloud pass-through authentication lets you validate passwords with a remote service. Common use cases include:
-
Migrating passwords to Advanced Identity Cloud as part of authentication (just-in-time synchronization).
-
Retaining a remote service for authentication.
Secure systems typically store passwords using one-way hash algorithms to make the passwords hard to crack. But, unless all systems support the same one-way hash algorithms, using this security measure alone can impede password synchronization.
A better security practice is to synchronize hashed passwords only between services that support the same password storage schemes. This ensures that the target service will always get passwords that it can read or compare. Only synchronize hashed passwords directly between services that support the same password storage schemes. Otherwise, the target service will get passwords that it cannot read or compare!
For example, Active Directory stores passwords using a hash algorithm that Advanced Identity Cloud doesn’t support. So when you import identities based on Active Directory accounts, Advanced Identity Cloud can’t synchronize the users' passwords. As a result, these users have no local credentials to authenticate to Advanced Identity Cloud.
The Advanced Identity Cloud Passthrough Authentication node uses a connector to validate credentials against the remote Active Directory service. The remote system verifies the user’s password even if Advanced Identity Cloud doesn’t support the hash algorithm.
For a list of DS schemes Advanced Identity Cloud supports, see Synchronize passwords.
Prepare for pass-through authentication
Before using pass-through authentication:
-
Set up an Advanced Identity Cloud connector to the remote authentication service:
-
To set up a connector using an application, learn more in Provision an application.
-
To set up a connector without an application, learn more in Sync identities.
-
-
If Advanced Identity Cloud will save a copy of the password on successful authentication, align password policies so the remote password is certain to pass Advanced Identity Cloud password validation.
-
If you import or synchronize Advanced Identity Cloud profiles from the remote accounts, do not synchronize the passwords from the remote service to Advanced Identity Cloud.
Advanced Identity Cloud uses the local account to find the appropriate identifier, and the connector to authenticate remotely.
For details, see Sync identities.
Migrate passwords
When you cannot synchronize hashed passwords, you can use the pass-through authentication node to capture them. The following example journey demonstrates password capture and storage.
Advanced Identity Cloud performs authentication through a connector. It also stores the captured password securely using a strong, one-way hash algorithm. Advanced Identity Cloud can then act as the service of record for authentication of that account. After the user has authenticated successfully through this journey, the user can authenticate locally in Advanced Identity Cloud. The user no longer needs to authenticate using the remote service:
Here’s what happens in this example journey:
-
The Platform Username and Platform Password in the Page Node prompt the user for credentials.
-
The Data Store Decision node attempts local authentication.
-
If authentication succeeds, the Data Store Decision node processes the authentication like the default Login journey.
-
If authentication fails, the Passthrough Authentication node attempts remote authentication.
When configuring the Pass-through Authentication node, you must identify the connector to the remote authentication service in the node’s System Endpoint field.
-
-
The Identify Existing User and Required Attributes Present nodes ensure that Advanced Identity Cloud has the data needed to update the account.
-
The Patch Object updates the account with the password used for successful remote authentication.
When configuring this node, be sure to select
Patch As Object. -
The rest of the journey processes the authentication like the default Login journey.
|
This journey can fail when the remote password does not respect Advanced Identity Cloud policy. This results in a 
To avoid this problem, align password policies so that the remote password is sure to pass Advanced Identity Cloud password validation. For details, see Password policy. |
Remote authentication
You can use the Passthrough Authentication node for remote authentication. This is useful when you can neither synchronize hashed passwords, nor use Advanced Identity Cloud as the service of record for authentication.
The example journey below does not capture the password on successful authentication. But, you could adapt the journey to capture the password. Then you could the cache authentication credentials in Advanced Identity Cloud temporarily. Advanced Identity Cloud then serves as a backup authentication service when the remote service is not available. If you adapt the journey in this way, be sure to configure the journey to authenticate periodically with the remote service, and to refresh the cached password.
The following journey demonstrates remote authentication when local authentication fails:
-
The Platform Username and Platform Password in the Page Node prompt the user for credentials.
-
The Data Store Decision node attempts local authentication.
-
If authentication succeeds, the Data Store Decision node processes the authentication like the default Login journey.
-
If authentication fails, the Passthrough Authentication node attempts remote authentication.
-
-
The rest of the journey processes the authentication like the default Login journey.