About reports
Advanced Identity Cloud provides a reporting infrastructure to help you gain better insights into your IAM activities. The reports cover a wide range of services including application access, IDM syncs, journeys, user statistics to assist in making critical business decisions and monitor compliance policies.
Tenant administrators can use the Reports page to view template drafts, view previous report runs, and generate new reports. You can also export the reports as a CSV or JSON file for further analysis.
-
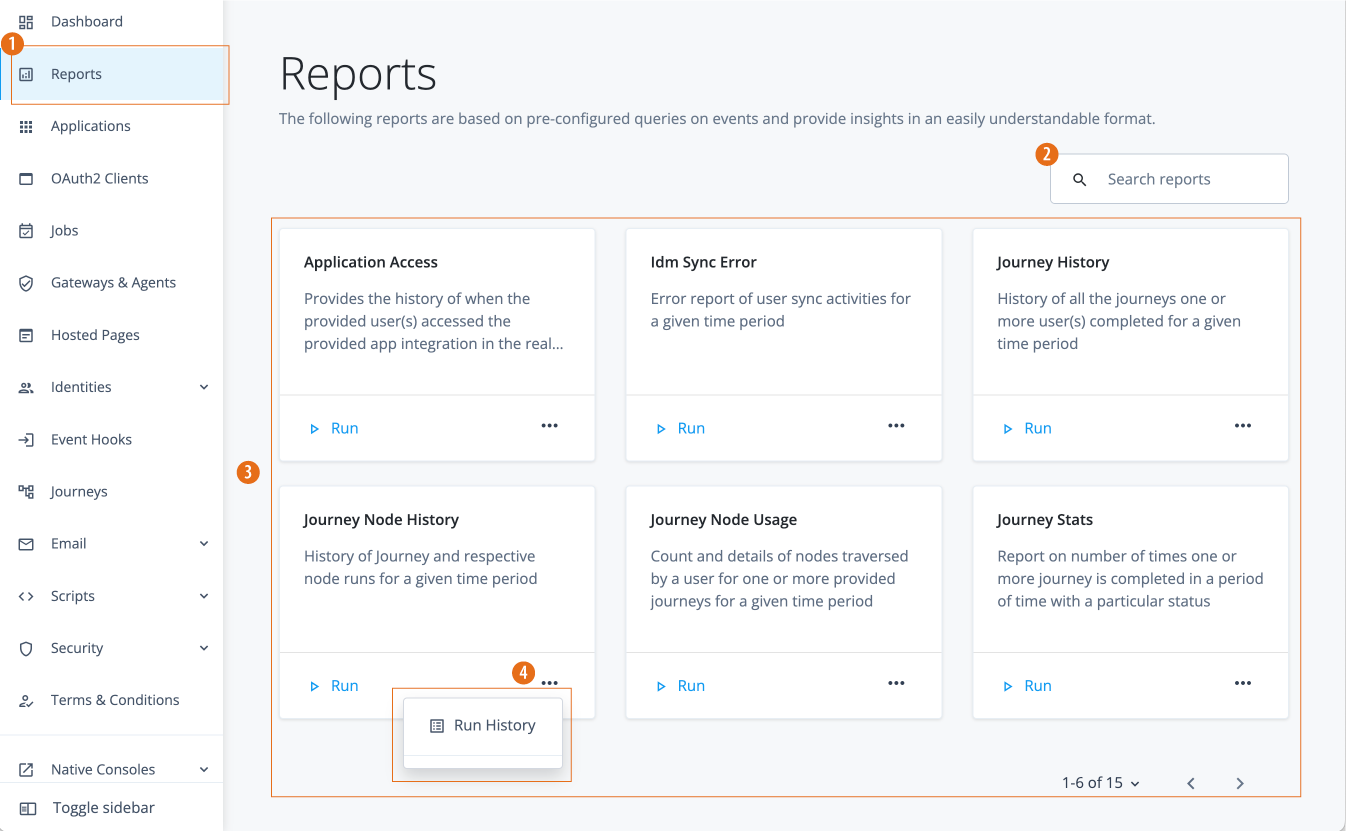
1 On the Advanced Identity Cloud admin console, click Reports to access Advanced Identity Cloud reports. All Advanced Identity Cloud customers (new or existing) get access to the out-of-the-box reports.
-
2 Enter a report name, case-insensitive, to search for a report.
-
3 Click Run on any report to generate a reporting run.
-
4 Click ellipsis (), and then click Run History to view the report, export the file, and view information about past reporting runs.
Manage reports
Generate and view reports using the Advanced Identity Cloud admin console
Use the Advanced Identity Cloud admin console reports page to generate the pre-configured reports or run a history for a particular reporting run.
Run and view a report
-
Log in to the Advanced Identity Cloud, and then click Reports.
-
Select a report, and then click Run.
-
For a specific report, enter or select the parameter values in the report.
-
Click Run Report.
-
Click the Run History tab, do the following:
-
Click View Report to view the report.
-
Click to export the report as JSON or CSV.
-
Click the ellipsis (), and then click Run Details to view information about the reporting run.
After you generate a report, the report is available for download and view for 24 hours. If you have downloaded the report, the same report is available for additional downloads for 30 days.
Data is stored in the Advanced Identity Cloud for 30 days for general Advanced Identity Cloud customers. For customers who have the advanced reporting add-on capability, application report data is stored for 90 days.
-
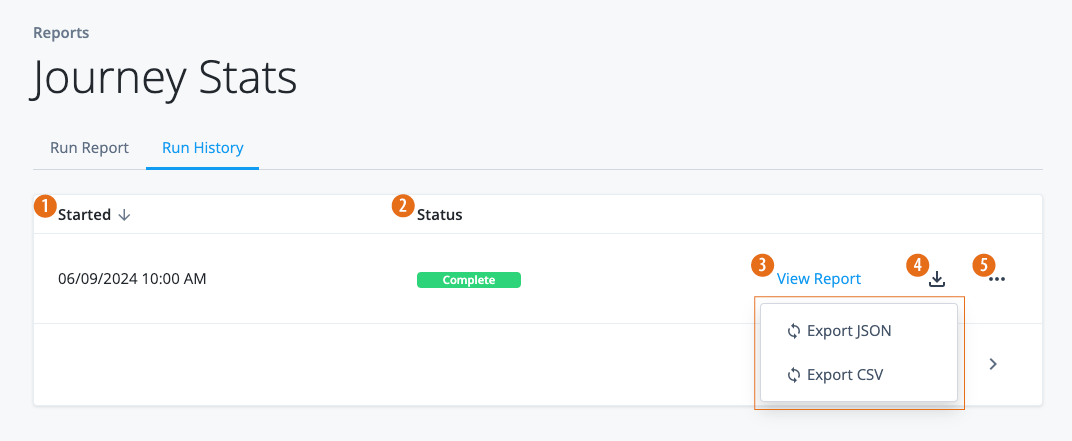
1 Started: Date and time the reporting run started.
-
2 Status: If the reporting run is successful, the Status displays
Complete; if it fails,Error. -
3 Click View Report to open it.
-
4 Click the download icon () to export the report as JSON or CSV.
-
5 Click ellipsis () to view the run history details.
-
-
Available reports
Advanced Identity Cloud provides the following out-of-the-box report types:
Activity:
End user insights:
Journey:
Managed object:
Governance[1]:
Active users report
The active users report provides a unique user count with at least one activity like sign-in, set or update password, or token requests.
|
This report has a data query limit depending on your add-on capabilities:
|
The report can be used to understand the count of unique users interacting with Advanced Identity Cloud during go-live or new application onboarding events.
The report options are:
| Field | Description |
|---|---|
Timeframe |
Select a report time frame:
|
The report output contains the following columns:
| Field | Description |
|---|---|
Report From |
Start date for the report. |
Report To |
End date for the report. |
User Activity Count |
Number of unique user activity events like sign-in, set or update password, or access token requests. |

Application access for OAuth report
The application access for OAuth report provides a history of who and how many users accessed an application associated with an OAuth2 client in the realm for a given time period.
|
This report has a data query limit depending on your add-on capabilities:
|
The report helps understand the list of users who access Advanced Identity Cloud using the access details.
|
Currently, only OAuth2 client IDs are supported. The application name cannot be used for the query. |
The report options are:
| Field | Description |
|---|---|
Timeframe |
Select a report time frame:
|
OAuth2 Applications |
Select one or more applications. |
Users |
Select one or more users who accessed the application. |
The report output contains the following columns:
| Field | Description |
|---|---|
OAuth2 Applications |
Select OAuth2 application(s) for the report. |
Users |
Select users for the report. |
Report From |
Start date for the report range. |
Report To |
End date for the report range. |
Event Time |
Date and time when the application was accessed. |
User Name |
Selected username for the report. |
User Id |
UUID of the user who access the application. |
Application Name |
Selected application name for the report. |
Scope |
Scope of the authentication. |
Token Type |
Type of access token. |
Status |
Status of the operation:
|

Administrator activity report
The administrator activity report provides a history of tenant administrator creation and update activities on identities for a given time period.
The report is useful as an audit report of all end user profile changes made by a tenant administrator.
|
Currently, only tenant administrator activity on identities is supported. |
The report options are:
| Field | Description |
|---|---|
Timeframe |
Select a report time frame:
|
The report output contains the following columns:
| Field | Description |
|---|---|
Report From |
Start date for the report. |
Report To |
End date for the report. |
Entity |
Tenant. |
Operation |
Type of operation. |
Timestamp |
Timestamp of the operation. |
Admin |
Name of the admin running the operation. |

IDM sync report
The IDM sync report provides an error report of user sync activities for a given time period.
|
This report has a data query limit depending on your add-on capabilities:
|
The report is useful to understand the errors that occurred during provisioning.
The report options are:
| Field | Description |
|---|---|
Timeframe |
Select a report time frame:
|
The report output contains the following columns:
| Field | Description |
|---|---|
Report From |
Selected campaign name for the report. |
Report To |
Selected status for the report. |
User Name |
Username who ran the sync operation. |
Application Name |
Name of application for the report. |
Action |
Type of action for the Advanced Identity Cloud sync. |
Message |
Any comments attached to the reports. |
Exception |
Any exceptions discovered during the sync. |
Event Time |
Date and time of the sync event. |

User count by status report
The user count by status report provides the number of users in an active, inactive, or blocked status.
The report can be used to query on more than one status to provide an aggregated count. To get numbers for each status, run multiple reports.
The report options are:
| Field | Description |
|---|---|
Status |
Select a status option:
|
The report output contains the following columns:
| Field | Description |
|---|---|
Status |
Selected status to include in the report. |
Count |
Number of users with the selected status. |

User last login report
The user last login report lists the users in a particular status, along with their last login time.
|
This report has a data query limit depending on your add-on capabilities:
|
The report is based on the successful journey completion of the selected journeys.
The report can be used to get the journey names designated as login journeys.
The report options are:
| Field | Description |
|---|---|
Timeframe |
Select a report time frame:
|
Status |
Select a status option:
|
Journeys |
Enter or select one or more journeys. |
The report output contains the following columns:
| Field | Description |
|---|---|
Account Status |
Status included in the report. |
Journeys |
Journeys tracked in the report. |
Report From |
Start date for the report. |
Report To |
End date for the report. |
Last Name |
Surname of the user. |
First Name |
First name of the user. |
User Name |
Username of the user. |
JourneyName |
Journey name for the last login. |
Timestamp |
Timestamp of the last login. |

User current access report
The user current access report lists a user’s current assigned applications, organizations, and role assignments.
|
Currently, the report is only available in JSON format. |
The report options are:
| Field | Description |
|---|---|
Users |
Select one or more users who may have accessed the application. |
The report output contains the following columns:
| Field | Description |
|---|---|
Users |
User selected for the report. |
User Name |
Username of the user. |
First Name |
First name of the user. |
Last Name |
Surname of the user. |
Role Names |
Any role names assigned to the user. |
Application Names |
Application name of the accessed resource. |
Org Names |
Organization name of the user who accesses the resource. |

Journey usage report
The journey Usage report provides a count of the times one or more journeys completed in a period of time with a particular status.
|
This report has a data query limit depending on your add-on capabilities:
|
The report can be used to query on more than one outcome to provide an aggregated count. To get numbers for each outcome, run multiple reports.
|
This report only includes information about the main journey. It doesn’t include details about child/inner journeys. To view child/inner journey details, run the Journey node history report. |
The report options are:
| Field | Description |
|---|---|
Timeframe |
Select a report time frame:
|
Outcomes |
Select a journey outcome:
|
Journeys |
Select one or more journeys for the report. |
The report output contains the following columns:
| Field | Description |
|---|---|
Journeys |
Journeys tracked in the report. |
Outcomes |
Outcome of the journey covered in the report:
|
Report From |
Start date for the report. |
Report To |
End date for the report. |
User Name |
Username for the person owning the journey. |
Journey Name |
Name of the journey. |
Count |
Number of journeys for the user. |

User journey usage report
The user journey Usage report lists the number of times a user completed or did not complete a journey.
|
This report has a data query limit depending on your add-on capabilities:
|
The report can be used to query on more than one outcome to provide an aggregated count. To get numbers for each outcome, run multiple reports.
|
This report only includes information about the main journey. It doesn’t include details about child/inner journeys. To view child/inner journey details, run the Journey node history report. |
The report options are:
| Field | Description |
|---|---|
Timeframe |
Select a report time frame:
|
Outcomes |
Select a journey outcome
|
Journeys |
Select one or more journeys for the report. |
The report output contains the following columns:
| Field | Description |
|---|---|
Journeys |
Selected journeys included in the report. |
Outcomes |
Selected outcomes included in the report. |
Report From |
Start date for the report. |
Report To |
End date for the report. |
Username |
Username of the user who ran the journey. |
Journey Name |
Name of the journey. |
Count |
Number of times the user ran the journey successfully or not. |
Journey node usage report
The journey node usage report provides the count and details of nodes traversed by a user for one or more journeys for a given time period.
|
This report has a data query limit depending on your add-on capabilities:
|
The report shows when a user used a journey, such as One Time Password (OTP), in a given time period and when the user last used the journey.
|
This report only includes information about the main journey. It doesn’t include details about child/inner journeys. To view child/inner journey details, run the Journey node history report. |
The report options are:
| Field | Description |
|---|---|
Timeframe |
Select a report time frame:
|
Journeys |
Select one or more journeys for the report. |
The report output contains the following columns:
| Field | Description |
|---|---|
Journeys |
Selected journey(s) for the report. |
Report From |
Start date for the report. |
Report To |
End date for the report. |
Journey Name |
Name of the journey. |
Journey Status |
Status of the journey. |
User Name |
Username for the person running the report. |
Node Name |
Name of the specific node. |
Node type |
Type of node. |
Node Outcome |
Outcome of the node: |
Node Usage Count |
Number of times the node was used. |
Last Usage |
Date and time of the latest node usage. |

User journey history report
The user journey history report provides a history of all journeys one or more user(s) completed for a given time period.
|
This report has a data query limit depending on your add-on capabilities:
|
The report can be used to understand when one or more users have registered, logged in, or reset their password.
|
This report only includes information about the main journey. It doesn’t include details about child/inner journeys. To view child/inner journey details, run the Journey node history report. |
The report options are:
| Field | Description |
|---|---|
Timeframe |
Select a report time frame:
|
Users |
Select one or more users who may have accessed the application. |
The report output contains the following columns:
| Field | Description |
|---|---|
Users |
Selected users for the report. |
Report From |
Start date for the report range. |
Report To |
End date for the report range. |
Users |
Selected users for the report. |
Journey Name |
Name of the journey. |
Journey Result |
Displays the result of the journey: |
Timestamp |
Date and time for the journey. |

Journey node history report
The journey node history report provides a history of a user’s journey and nodes traversed for a given time period.
|
This report has a data query limit depending on your add-on capabilities:
|
The report can be used to understand login or churn issues. To understand a user’s journeys and node traversal history, download the report and filter on the user.
The report options are:
| Field | Description |
|---|---|
Timeframe |
Select a report time frame:
|
Journeys |
Select one or more journeys for the report. |
The report output contains the following columns:
| Field | Description |
|---|---|
Journeys |
Selected journey(s) for the report. |
Report From |
Start date for the report. |
Report To |
End date for the report. |
Tracking Id |
Tracking ID for the journey. |
Journey Name |
Name of the journey. |
Journey Status |
Selected journey status. |
User Name |
Username for the person running the report. |
Timestamp |
Date and time. |
Node Details |
Node details used in the journeys:
|

Role composition report
The role composition report provides a list of roles and their metadata.
| Field | Description |
|---|---|
None |
Click Run to generate the report. |
The report output contains the following columns:
| Field | Description |
|---|---|
Role Name |
Name of the role. |
Description |
Description for the role. |
Temporal Constraints |
Any time-limited constraints for the assigned role. |

Role membership report
The role membership report provides a list of roles and their associated members.
The report options are:
| Field | Description |
|---|---|
Roles |
Enter one or more roles for the report. |
The report output contains the following columns:
| Field | Description |
|---|---|
Roles |
Selected roles for the report. |
Role Name |
Name of the role. |
User Name |
Username of the user assigned the role. |
First Name |
First name of the user assigned the role. |
Last Name |
Surname of the user assigned the role. |
Email address of the user assigned the role. |

Organization membership report
The organization membership report provides a list of the organizations in your company and their associated members.
The report options are:
| Field | Description |
|---|---|
Organizations |
Enter one or more organizations. |
The report output contains the following columns:
| Field | Description |
|---|---|
Organizations |
Selected organizations for the report. |
Org Name |
Name of the organization. |
User Name |
Username of a user in the organization. |
First Name |
First name of user in the organization. |
Last Name |
Surname of the user in the organization. |
Email address of the user in the organization. |

Campaign composition report
The campaign composition report[1] provides information on the filters and attributes of campaigns.
The report options are:
| Field | Description |
|---|---|
Campaign Name |
Enter the name of the campaign. |
Campaign Status |
Select one of the following:
|
The report output contains the following columns:
| Field | Description |
|---|---|
Campaign Name |
Selected campaign name for the report. |
Campaign Status |
Selected status for the report. |
Campaign Id |
ID associated with the campaign. |
Description |
Description of the campaign. |
Certification Type |
Type of certification:
|
Escalation Notification |
Notification for any escalation actions. |
Owner |
Owner of the certificate. |
Status |
Selected status for the report:
|
Create Date |
Date and time the campaign was created. |
Target Filter |
Filter made on the campaign. |

Campaign status report
The campaign status report[1] provides the decision details along with reviewer information for a campaign.
The report options are:
| Field | Description |
|---|---|
Campaign Name |
Enter the name of the campaign. |
Campaign Status |
Select one of the following:
|
The report output contains the following columns:
| Field | Description |
|---|---|
Campaign Name |
Selected campaign name for the report. |
Campaign Status |
Selected status for the report. |
Certification Name |
Name of the certification. |
Campaign Id |
ID associated with the campaign. |
User Name |
Selected username for the report. |
Account Name |
Account name for the user. |
Application Name |
Selected application name for the report. |
Type |
Type of campaign. |
Entitlement Name |
Entitlement name if the campaign involves access to an entitlement. |
Decision |
Campaign decision:
|
Decision By |
Reviewer who made the certification decision. |
Completed By |
User who completed the certification decision. |
Completion Date |
Date of the certification completion. |
Decision Data |
Date and time when the decision was made. |
Comments |
Any comments entered for the campaign. |

Advanced Reporting
Advanced Reporting lets you create custom reports on activity in your Advanced Identity Cloud tenant environment. You can query a number of metrics to create useful reports for your company.
|
Advanced Identity Cloud add-on capability
Contact your Ping Identity representative if you want to add Advanced Reporting to your PingOne Advanced Identity Cloud subscription. Learn more in Add-on capabilities. |
Assign report_viewer group
Advanced Identity Cloud provides a group to which users can be assigned to access custom reports.
| Group | Capability |
|---|---|
report_viewer |
A user with this group can do the following:
|
Add a user to the report_viewer group
-
In the Advanced Identity Cloud admin console, go to Identities > Manage.
-
On the Manage Identities page, click Alpha-name - Groups.
-
Click New Alpha realm - Group.
-
On the New Alpha realm - group modal, enter the following:
-
Name: Enter
report_viewer. -
Description: Enter a general description for the group.
-
Click Next.
-
-
On the Dynamic Alpha realm - group Assignment modal, click A filter for conditionally assigned members if you want to add a filter.
-
Select Any or All conditions that must be met to assign to a user.
-
Select a property, such as
username,first nameor others for your condition. -
Select an operator, such as
contains,does not contain, or others for your condition. -
Enter a property value.
-
Click plus:icon[] to add the condition to your filter.
-
-
Click Save.
Create custom reports using Advanced Reporting
-
In the Advanced Identity Cloud admin console, click New Report.
-
On the New Report modal, enter the following properties, and then click Next:
Field Description Name
Name of the report. Follow the naming conventions established by your company.
Description
Optional. Enter a description describing the report.
Who Can Run
Click to set who can run this report.
Groups:
-
Report Viewer
Users:
-
Select the users who can run this report. To select a user, you must have assigned the
report_viewergroup permissions to the user from the Manage Identity page.
-
-
Next, add a data source or select an existing data source:
-
Click Data Source.
-
On the Add a Data Source modal, select a data source to use in this report, and then click Next:
-
-
Next, select the columns in the report in the right pane for your report result. Each data source can have different attributes. When you click an attribute, the column appears on the main window.
-
Click the plus icon () to define parameters that the end user provides or extracted from the end user profile while running the report:
-
On the Add a Parameter modal, enter the following fields:
Field Description Name
Name of the parameter or profile attribute. Also, the name appears on the filter attribute list.
Parameter Type
User provided parameter or a profile attribute.
Input Label
Label for parameter that appears when you do a reporting run.
Input Type
Options are:
-
String
-
Boolean
-
Integer
-
Float
-
Date
Help Text
Optional. Enter any help text for the parameter.
Multivalued
Click Multivalued to allow the end user to provide multiple values while running the report.
Enumerated Values
Click Enumerated Values if the property is an enumerated value. This property creates a drop-down list for the end user to select a value when running the report.
-
-
Click Save.
-
-
Next, click Filters to specify data source attributes for report filtering:
Click to review the filtering options:
Field Description Any|All
Select
AnyorAllconditions that must be met for the filters.Value
List of attributes in the selected data source, including any custom attributes.
Connectors
Options are:
-
has pattern (used for regular expressions)
-
contains
-
does not contain
-
greater than or equal to
-
equals to
-
not equals to
-
less than or equal to
-
less than
-
greater than
-
starts with
-
ends with
-
not starts with
-
not ends with
-
is null
-
is not null
Literal|Variable
Value. End user provided variable. Select a value from the data source attributes or a property value passed by the end user during the report run.
-
Click Save. A
Filter activemessage with a checkmark appears.
-
-
Click Aggregate to define aggregated data counts:
-
On the Add an Aggregate modal, enter the following:
Field Description Name
Enter a descriptive label for the aggregate.
Type
Options are:
-
Count of specific rows
-
Sum of specific rows
-
Distinct count of specific rows
Value
Enter a value for the aggregate.
-
-
Click Save.
-
-
Click Sorting to sort the data tables in the report:
-
On the Sort Data By modal, enter or select the following properties:
Field Description Sort by
Provided a list of attributes from the selected data source.
Sort order
Select the sort order for your data. Options are:
-
Ascending
-
Descending
-
-
Click Save.
-
-
Click Save at the top of the report. Your report draft appears on the Reports page and is only visible to the report template creator.
-
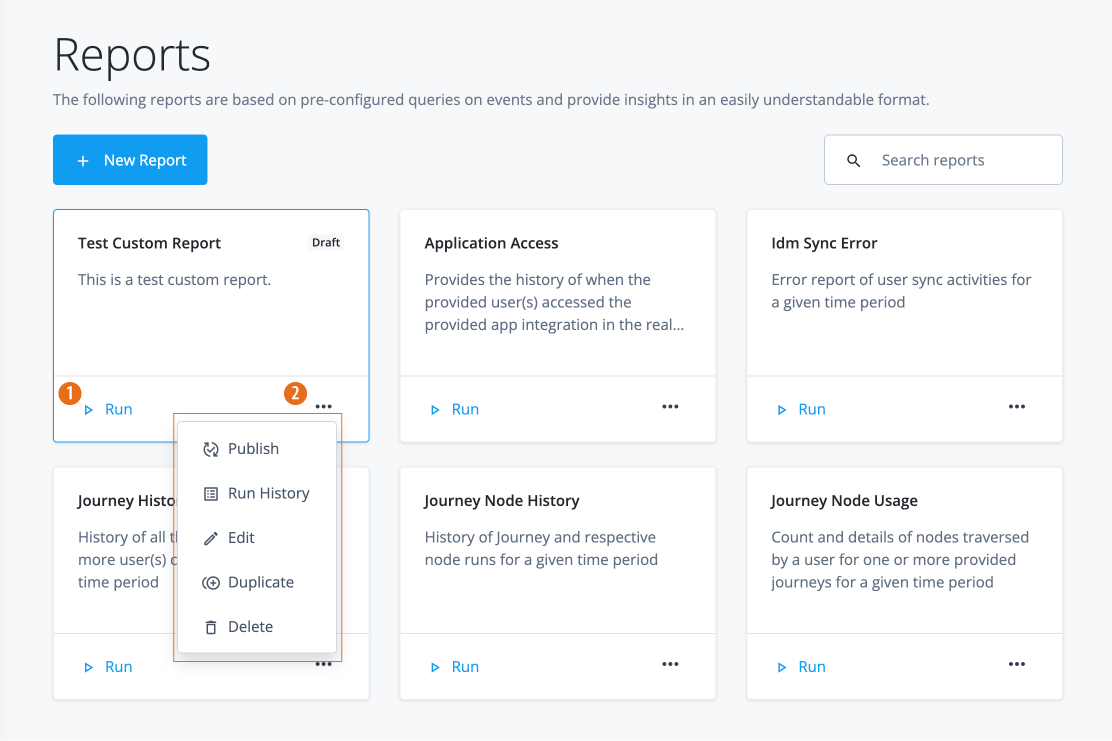
1 Click New Report to create a custom report.
-
2 Search for a report.
-
3 Click Run to generate a reporting run.
-
4 Click ellipsis () to publish the draft, view the reporting run history, edit, duplicate, or delete the draft.
-
Entities and attributes available in advanced reporting
The following entities and attributes are available to tenant administrators when creating advanced reports:
| Entity | Attributes | Query Limited? |
|---|---|---|
Users |
|
N |
Roles |
|
N |
Organizations |
|
N |
Applications |
|
N |
Journeys |
|
Yes |
Nodes |
|
Yes |
AM Access Outcome |
|
Yes |
AM Access Attempt |
|
Yes |
IDM Sync |
|
Yes |
IDM Recon |
|
Yes |
IDM Config |
|
No |
Entitlements |
|
No |
Assignments |
|
No |
Groups |
|
No |
Internal Roles |
|
No |
Accounts |
|
No |
Campaigns |
|
No |
Policy |
|
No |
Policy Rules |
|
No |
Policy Scan |
|
No |
Policy Violation |
|
No |
Account Review Items (Not available as main datasource) |
|
No |
Entitlement Review Items (Not available as main datasource) |
|
No |
Role Membership Review Items (Not available as main datasource) |
|
No |
Custom attributes in Advanced Reporting
When an administrator creates a custom attribute in the native IDM console
for the user identity object, the attribute is available in Advanced Reporting (custom reports) and filters.
|
Any new custom attributes for the |
Custom attribute example
-
Add a custom attribute in the IDM native console:
-
In the Advanced Identity Cloud admin console, go to Native Consoles > Identity Management.
-
Click Configure > Managed Objects and click Alpha_user.
-
On the Alpha_user page, click Add a property.
-
Scroll down to the bottom of the page and enter the following:
-
Name: enter
custom_department.Custom attributes must be prefixed with custom_. Learn more about custom attributes at Customize user identities using custom attributes. -
Label (Optional): enter
Custom department. -
Select String.
-
Click Required if the property is required.
The requiredpolicy is assessed only during object creation, not when an object is updated. You can effectively bypass the policy by updating the object and supplying an empty value for that property. To prevent this inconsistency, set bothrequiredandnotEmptytotruefor required properties. This configuration indicates that the property must exist and must have a value.
-
-
Click Save.
-
-
Next, create a custom report using the Advanced Reporting feature:
-
In the Advanced Identity Cloud admin console, go to Reports.
-
Click New Report.
-
On the New Report modal, enter the following:
-
Name: Enter a descriptive name for the new report.
-
Description (optional): Enter a general description for the report.
-
Who can run: Select Users.
-
-
Click Next.
-
Click Data Source.
-
On the Add a Data Source modal, select Users and click Next.
-
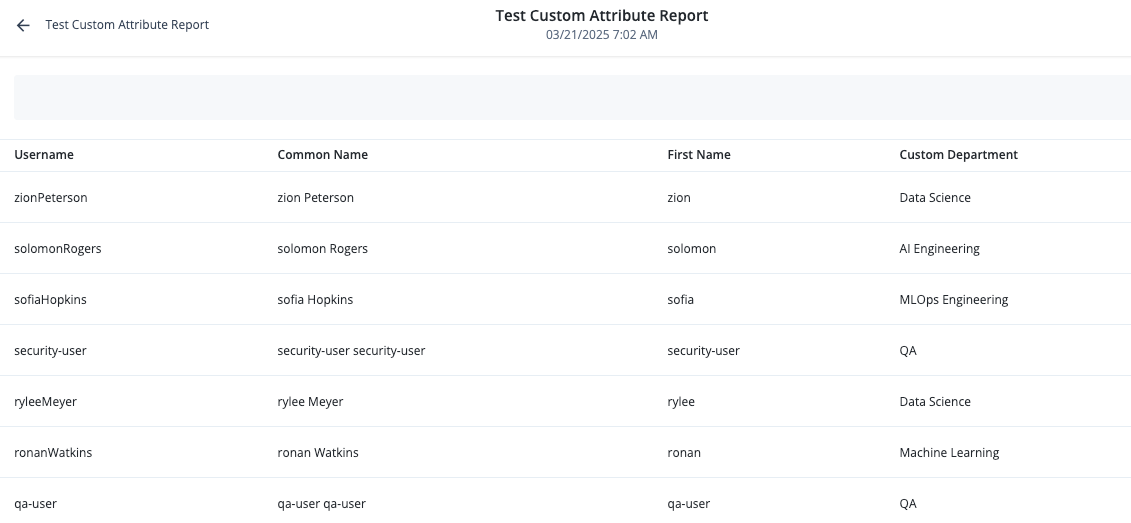
On the draft report page, select the properties in the right column that you want to appear in the report. For example:
-
Username
-
First Name
-
Common Name
-
Custom Department
You can rearrange the columns by dragging and dropping them in the desired order.
-
-
Click Save.
-
-
On the Reports page, locate your custom report and click Run.
-
On your report page, click Run Now.
-
After your report has generated, click View Report.
-
Review your report if you are satisfied with the results, click > Publish to activate it.
-
Custom relationships in Advanced Reporting
Advanced Reporting now supports custom relationships in its reports.
When an administrator creates a custom relationship in the native IDM console
for the user identity object, the relationship is available in Advanced Reporting (custom reports) and filters.
A relationship represents a connection between two identity objects, such as users, devices, groups, or roles. Relationships define how these entities interact, enabling hierarchical structures, access controls, and delegation of responsibilities.
|
Advanced Identity Cloud add-on capability
Contact your Ping Identity representative if you want to add Advanced Reporting to your PingOne Advanced Identity Cloud subscription. Learn more in Add-on capabilities. |
Steps
In this example, you have a user who is a developer lead with an Analyst role.
The user supervises other developers in the company.
The tenant administrator creates a relationship,
custom_alpharoles in IDM that represents the connection between two identity objects,
alpha_user and alpha_role.
The general steps are:
Create a custom relationship
-
Sign on to Advanced Identity Cloud login UI as as tenant administrator.
-
Add a custom relationship in the IDM native console:
-
In the Advanced Identity Cloud admin console, go to Native Consoles > Identity Management.
-
Click Configure > Managed Objects and click Alpha_user.
-
On the Alpha_user page, click Add a property.
-
Scroll down to the bottom of the page and enter the following:
-
For Name, enter
custom_alpharoles.Custom relationships must be prefixed with custom_. Learn more about custom relationships at Create a relationship between two objects. -
For Type, select Relationship.
-
-
Click Next.
-
In the Add Resource modal, select alpha_role for Resource.
-
For Display Properties, select name.
-
-
In the Advanced Identity Cloud admin console, go to Identities > Manage and click Alpha realm - Users.
-
Locate and click your test user to open the Details page.
-
On the Details page, select the Analyst role in the Custom_alpharoles field.
-
Click Save.
-
Create a new report using the custom relationship
-
In the Advanced Identity Cloud admin console, go to Reports.
-
Click New Report.
-
In the New Report modal, enter the following:
-
Name: Enter a descriptive name for the new report.
-
Description (optional): Enter a general description for the report.
-
Who can run: Select Users.
-
-
Click Next.
-
-
Click Data Source.
-
In the Add a Data Source modal, select Users and click Next.
-
On the draft report page, select the properties in the right pane you want to appear in the report. For example:
-
Username
-
First Name
-
Last Name
-
-
-
On the same page in the right pane, scroll down to Related Data Sources.
-
Next to Custom_alpharoles, click and then click Add as Data Source.
-
Scroll down to users/custom_alphaRoles and click Role Name.
You can rearrange the columns by dragging and dropping them in the desired order. -
Click Save.
-
Generate your custom relationship report
-
On the Reports page, locate your custom report and click Run.
-
On your report page, click Run Now.
-
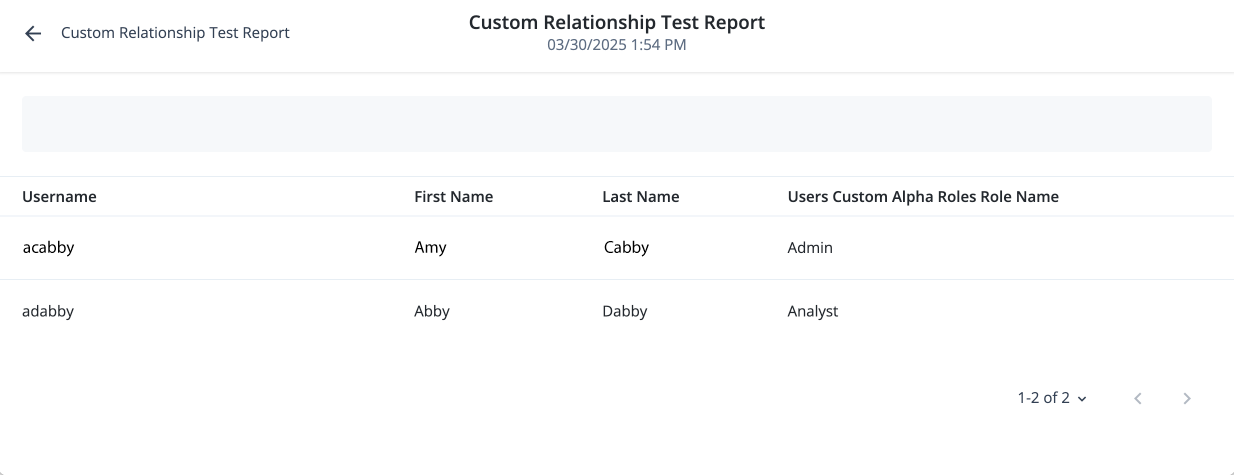
After your report has generated, click View Report.
The report displays all users with a custom relationship.
-
Review your report if you are satisfied with the results, click > Publish to activate it.