DS for AM CTS
Show how to replicate AM core token service (CTS) data and fail over when a DS server is unavailable.
Description
Estimated time to complete: 45 minutes
AM uses DS to store CTS data, such as session tokens, data for SAML v2.0 and OAuth 2.0 applications, and push notifications.
Replicate the CTS data as you would any other directory data for availability, but realize AM applications are not necessarily built with DS eventual consistency in mind. For this reason, configure AM to use affinity load balancing when connecting to the DS CTS store. Affinity load balancing ensures each request for the same entry goes to the same DS server. If the DS server becomes unavailable, AM fails over to another DS server.
Suppose an AM application makes several AM calls in quick succession, and each call requires AM to retrieve a CTS entry from DS. Without affinity, if AM updates the CTS entry on one DS then reads it from another DS, it’s possible replication won’t have had time to replay the changes between the update and the subsequent read. The application could get a confusing response when it appears AM "forgets" the update.
With affinity, both the update and the read target the same DS server. The AM client application gets the expected response each time.
In this use case, you:
-
Set up DS for AM CTS, configuration, and identity data.
-
Set up and configure AM to use the DS service with affinity and failover.
-
Show AM continues to work as expected when a DS server is unavailable.
Goals
In completing this use case, you learn to:
-
Set up DS and AM together.
-
Configure affinity and failover for AM connections to DS.
-
Replicate CTS data effectively while minimizing the impact on AM clients.
Example scenario
As a directory service administrator, Pat plans to deploy directory services for AM CTS data.
Pat knows AM has a number of configuration options for CTS, but wants to clarify the basic deployment principles before tuning the service for their specific deployment.
Pat plans to show the AM administrators the basic approach, and then discuss additional options.
Prerequisites
Knowledge
Before you start:
-
Make sure you are familiar with the command line on your operating system.
-
If you’re new to directory services, consider working through the examples to learn LDAP and to learn replication.
-
If you’re new to AM, consider working through the AM evaluation tasks.
Tasks
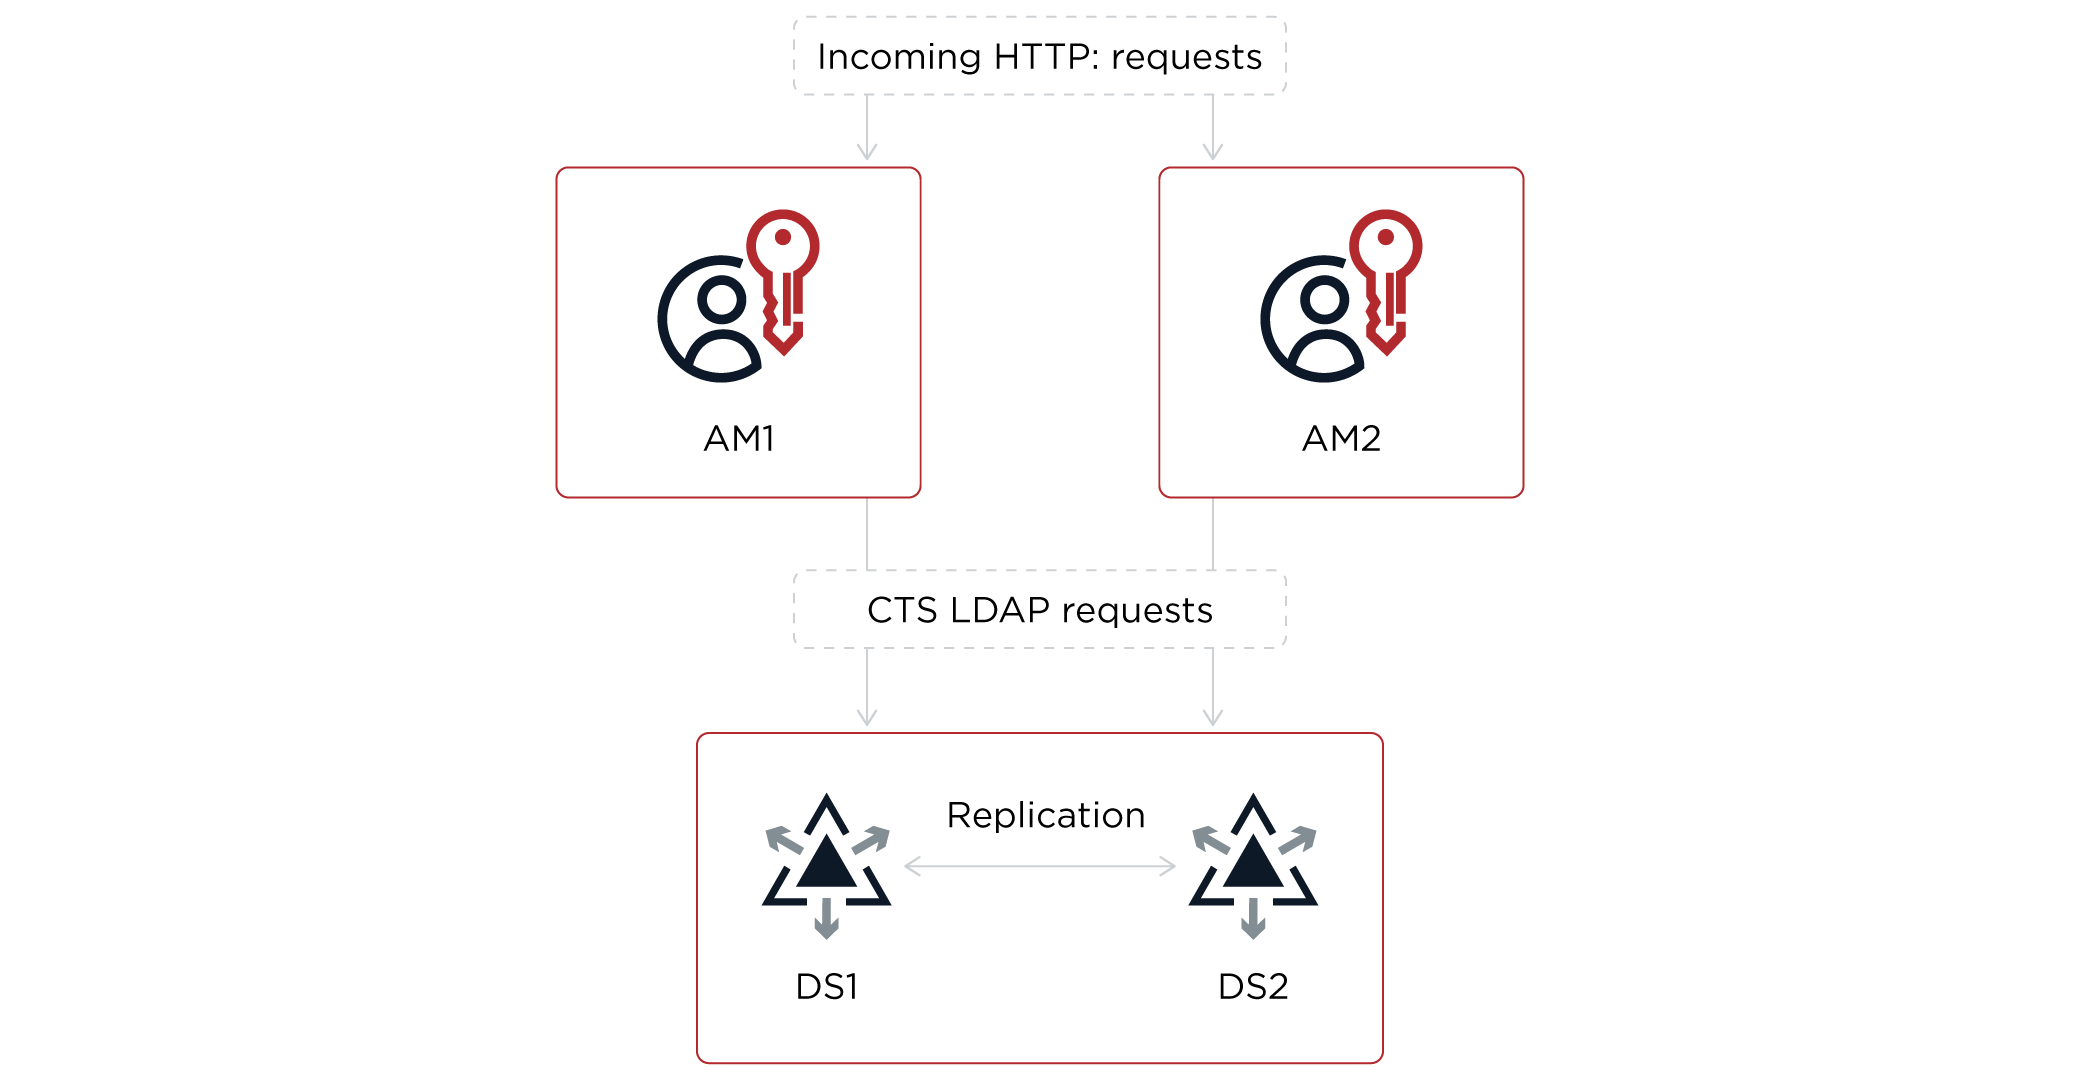
This sample deployment shows the steps to replicate CTS data on your computer. Use the same steps with geographically distributed computers or virtual machines for a real deployment.
-
Two AM servers each run in their own Apache Tomcat and serve HTTP requests from AM client applications.
-
Two replicated DS servers provide storage for AM.
-
Each AM server makes LDAP requests to DS for CTS data.
Task 1: Prepare for installation
-
Make sure there’s an FQDN for AM.
The cookie domain for AM session cookies depends on the FQDN, because the browser uses it to connect to AM.
This sample simulates DNS on your computer by updating the hosts file with an alias for the AM servers:
# Simulate DNS with an FQDN alias for the loopback address:
127.0.0.1       am.example.com
When deploying in a production environment, make sure you have properly configured the DNS.
-
Unpack the server files once for each server to install.
This sample uses folder locations aligned with the hostnames:
Base path Description /path/to/ds1First DS server
/path/to/ds2Second DS server
/path/to/tomcat1First Apache Tomcat server (for the first AM server)
/path/to/tomcat2Second Apache Tomcat server (for the second AM server)
-
Determine the port numbers for the service.
This sample uses different port numbers for each server because all the servers are on the same computer:
Sample server Port numbers ds1LDAP: 1389
LDAPS: 1636
Admin: 4444
Replication: 8989ds2LDAP: 11389
LDAPS: 11636
Admin: 14444
Replication: 18989Tomcat 1
HTTP: 8080
Tomcat 2
HTTP: 8081
When installing each server on a different host, you can reuse the same port numbers.
-
Set the
JAVA_HOMEenvironment variable to a supported JDK home if it isn’t already set:$ export JAVA_HOME=<supported-jdk-home> -
Define how the DS servers trust DS server certificates.
This sample uses a private PKI based on the deployment ID. You generate a deployment ID for all DS servers using the
dskeymgrcommand:$ /path/to/ds1/bin/dskeymgr \ create-deployment-id \ --deploymentIdPassword password <deployment-id>The deployment ID is a string. To use it, you must have the deployment ID password.
Once you generate the ID, set a
DEPLOYMENT_IDenvironment variable for use in other steps of this sample:$ export DEPLOYMENT_ID=<deployment-id> -
Make sure Tomcat and AM trust DS server certificates for secure LDAPS connections.
This sample uses the private PKI based on the deployment ID you generated. Prepare a truststore with the DS CA certificate for Tomcat:
$ /path/to/ds1/bin/dskeymgr \
export-ca-cert \
--deploymentId $DEPLOYMENT_ID \
--deploymentIdPassword password \
--outputFile /path/to/ca-cert.pem
$ keytool \
-importcert \
-trustcacerts \
-alias ca-cert \
-file /path/to/ca-cert.pem \
-keystore /path/to/truststore \
-storepass changeit \
-storetype JKS \
-noprompt
$ export TRUSTSTORE=/path/to/truststore
Task 2: Set up DS
These sample commands prepare DS servers for AM CTS, configuration, and identities.
They depend on the DEPLOYMENT_ID environment variable you set.
-
Set up the first DS server:
$ /path/to/ds1/setup \ --deploymentId $DEPLOYMENT_ID \ --deploymentIdPassword password \ --rootUserDN uid=admin \ --rootUserPassword password \ --monitorUserPassword password \ --hostname localhost \ --adminConnectorPort 4444 \ --ldapPort 1389 \ --enableStartTls \ --ldapsPort 1636 \ --replicationPort 8989 \ --bootstrapReplicationServer localhost:8989 \ --bootstrapReplicationServer localhost:18989 \ --profile am-config \ --set am-config/amConfigAdminPassword:5up35tr0ng \ --profile am-cts \ --set am-cts/amCtsAdminPassword:5up35tr0ng \ --profile am-identity-store \ --set am-identity-store/amIdentityStoreAdminPassword:5up35tr0ng \ --acceptLicense \ --start -
Set up the second DS server:
$ /path/to/ds2/setup \
--deploymentId $DEPLOYMENT_ID \
--deploymentIdPassword password \
--rootUserDN uid=admin \
--rootUserPassword password \
--monitorUserPassword password \
--hostname localhost \
--adminConnectorPort 14444 \
--ldapPort 11389 \
--enableStartTls \
--ldapsPort 11636 \
--replicationPort 18989 \
--bootstrapReplicationServer localhost:8989 \
--bootstrapReplicationServer localhost:18989 \
--profile am-config \
--set am-config/amConfigAdminPassword:5up35tr0ng \
--profile am-cts \
--set am-cts/amCtsAdminPassword:5up35tr0ng \
--profile am-identity-store \
--set am-identity-store/amIdentityStoreAdminPassword:5up35tr0ng \
--acceptLicense \
--start
At this point, both DS servers are running and replicating changes to each other.
Task 3: Set up AM
About this task
These steps deploy AM using a passive installation with file-based configuration (FBC). Setting environment variables before startup connects AM to the DS stores, without needing to use the interactive setup wizard.
Steps
-
Unpack two Tomcat servers to
/path/to/tomcat1and/path/to/tomcat2. -
Update the configuration for the second Tomcat server,
/path/to/tomcat2/conf/server.xml, to avoid using the default ports the first Tomcat uses:Port Number Shutdown
8006
HTTP
8081
HTTP redirect
8444
-
Copy the AM
.warfile to/path/to/tomcat1/webapps/am.warand/path/to/tomcat2/webapps/am.war. -
Configure each Tomcat for AM:
These commands use the
TRUSTSTOREenvironment variable you set and a sample encryption key. The two Tomcat servers use different port numbers but share the same store connection details and encryption key.First AM server:
echo "export CATALINA_OPTS=\"\$CATALINA_OPTS \
-Dcom.sun.identity.sm.sms_object_filebased_enabled=true \
-Dcom.sun.identity.configuration.directory=/path/to/am1-config \
-Dam.server.protocol=http \
-Dam.server.fqdn=am.example.com \
-Dam.server.port=8080 \
-Dam.server.context=/am \
-Dam.encryption.key=w72dwbuhsLQzFNcUftA8eMCaw3a5ayhL \
-Dam.stores.user.servers=localhost:1636 \
-Dam.stores.user.username=uid=am-identity-bind-account,ou=admins,ou=identities \
-Dam.stores.user.password=5up35tr0ng \
-Dam.stores.user.ssl.enabled=true \
-Dam.stores.application.servers=localhost:1636 \
-Dam.stores.application.password=5up35tr0ng \
-Dam.stores.cts.servers=localhost:1636,localhost:11636 \
-Dam.stores.cts.username=uid=openam_cts,ou=admins,ou=famrecords,ou=openam-session,ou=tokens \
-Dam.stores.cts.password=5up35tr0ng \
-Djavax.net.ssl.trustStore=${TRUSTSTORE} \
-Djavax.net.ssl.trustStorePassword=changeit \
-Djavax.net.ssl.trustStoreType=jks \
-server \
-Xmx2g \
-XX:MetaspaceSize=256m \
-XX:MaxMetaspaceSize=256m\"" > /path/to/tomcat1/bin/setenv.sh
Second AM server:
echo "export CATALINA_OPTS=\"\$CATALINA_OPTS \
-Dcom.sun.identity.sm.sms_object_filebased_enabled=true \
-Dcom.sun.identity.configuration.directory=/path/to/am2-config \
-Dam.server.protocol=http \
-Dam.server.fqdn=am.example.com \
-Dam.server.port=8081 \
-Dam.server.context=/am \
-Dam.encryption.key=w72dwbuhsLQzFNcUftA8eMCaw3a5ayhL \
-Dam.stores.user.servers=localhost:1636 \
-Dam.stores.user.username=uid=am-identity-bind-account,ou=admins,ou=identities \
-Dam.stores.user.password=5up35tr0ng \
-Dam.stores.user.ssl.enabled=true \
-Dam.stores.application.servers=localhost:1636 \
-Dam.stores.application.password=5up35tr0ng \
-Dam.stores.cts.servers=localhost:1636,localhost:11636 \
-Dam.stores.cts.username=uid=openam_cts,ou=admins,ou=famrecords,ou=openam-session,ou=tokens \
-Dam.stores.cts.password=5up35tr0ng \
-Djavax.net.ssl.trustStore=${TRUSTSTORE} \
-Djavax.net.ssl.trustStorePassword=changeit \
-Djavax.net.ssl.trustStoreType=jks \
-server \
-Xmx2g \
-XX:MetaspaceSize=256m \
-XX:MaxMetaspaceSize=256m\"" > /path/to/tomcat2/bin/setenv.sh
In production, use your own secrets, not the samples listed here. Don’t set passwords, encryption keys, or other secrets directly in Java system properties. Learn more in Hardening and security.
-
Make the Tomcat scripts executable:
chmod +x /path/to/tomcat1/bin/*.sh chmod +x /path/to/tomcat2/bin/*.sh -
Start both Tomcat servers:
/path/to/tomcat1/bin/startup.sh
/path/to/tomcat2/bin/startup.sh
Result
The AM servers are running at http://am.example.com:8080/am and http://am.example.com:8081/am, with DS connection details configured through FBC.
Task 4: Configure affinity load balancing
About this task
After AM starts, configure affinity load balancing for the CTS store and the identity store so that each request for the same entry always goes to the same DS server. These settings are shared across both AM servers because they share the same DS configuration store.
Steps
Update the affinity configuration of each AM server at http://am.example.com:8080/am and http://am.example.com:8081/am:
-
Sign on to the AM admin UI as
amadmin.The default password set during FBC startup is
password. -
Go to Configure > Server Defaults > CTS, enable External Store Configuration, enable Affinity Enabled, and click Save Changes.
-
Go to Top Level Realm > Identity Stores > OpenDJ > Server Settings, update the following identity settings, and click Save Changes:
Setting Choice Affinity Enabled
Enable
Affinity Level
Bind
At this point, AM is ready to use.
Task 5: Create a test user
You will use this account for validation. DS replicates the account, so you only need to create it once.
Steps
-
In the AM admin go to Top Level Realm > Identities, click + Add Identity, and create a test user with the following settings:
Setting Choice User ID
bjensenPassword
Ch4ng31tEmail Address
bjensen@example.comFirst Name
BabsLast Name
JensenFull Name
Barbara Jensen -
Sign off so you can sign in next as the test user.
Validation
To validate your work, check:
-
The test user can sign on to one AM server and access the other with the same session while all servers are up.
-
AM honors the session when one CTS store is unavailable.
The following sections show how to do this in detail.
Access AM as the test user
Steps
-
Sign on to AM at http://am.example.com:8080/am/XUI/ as
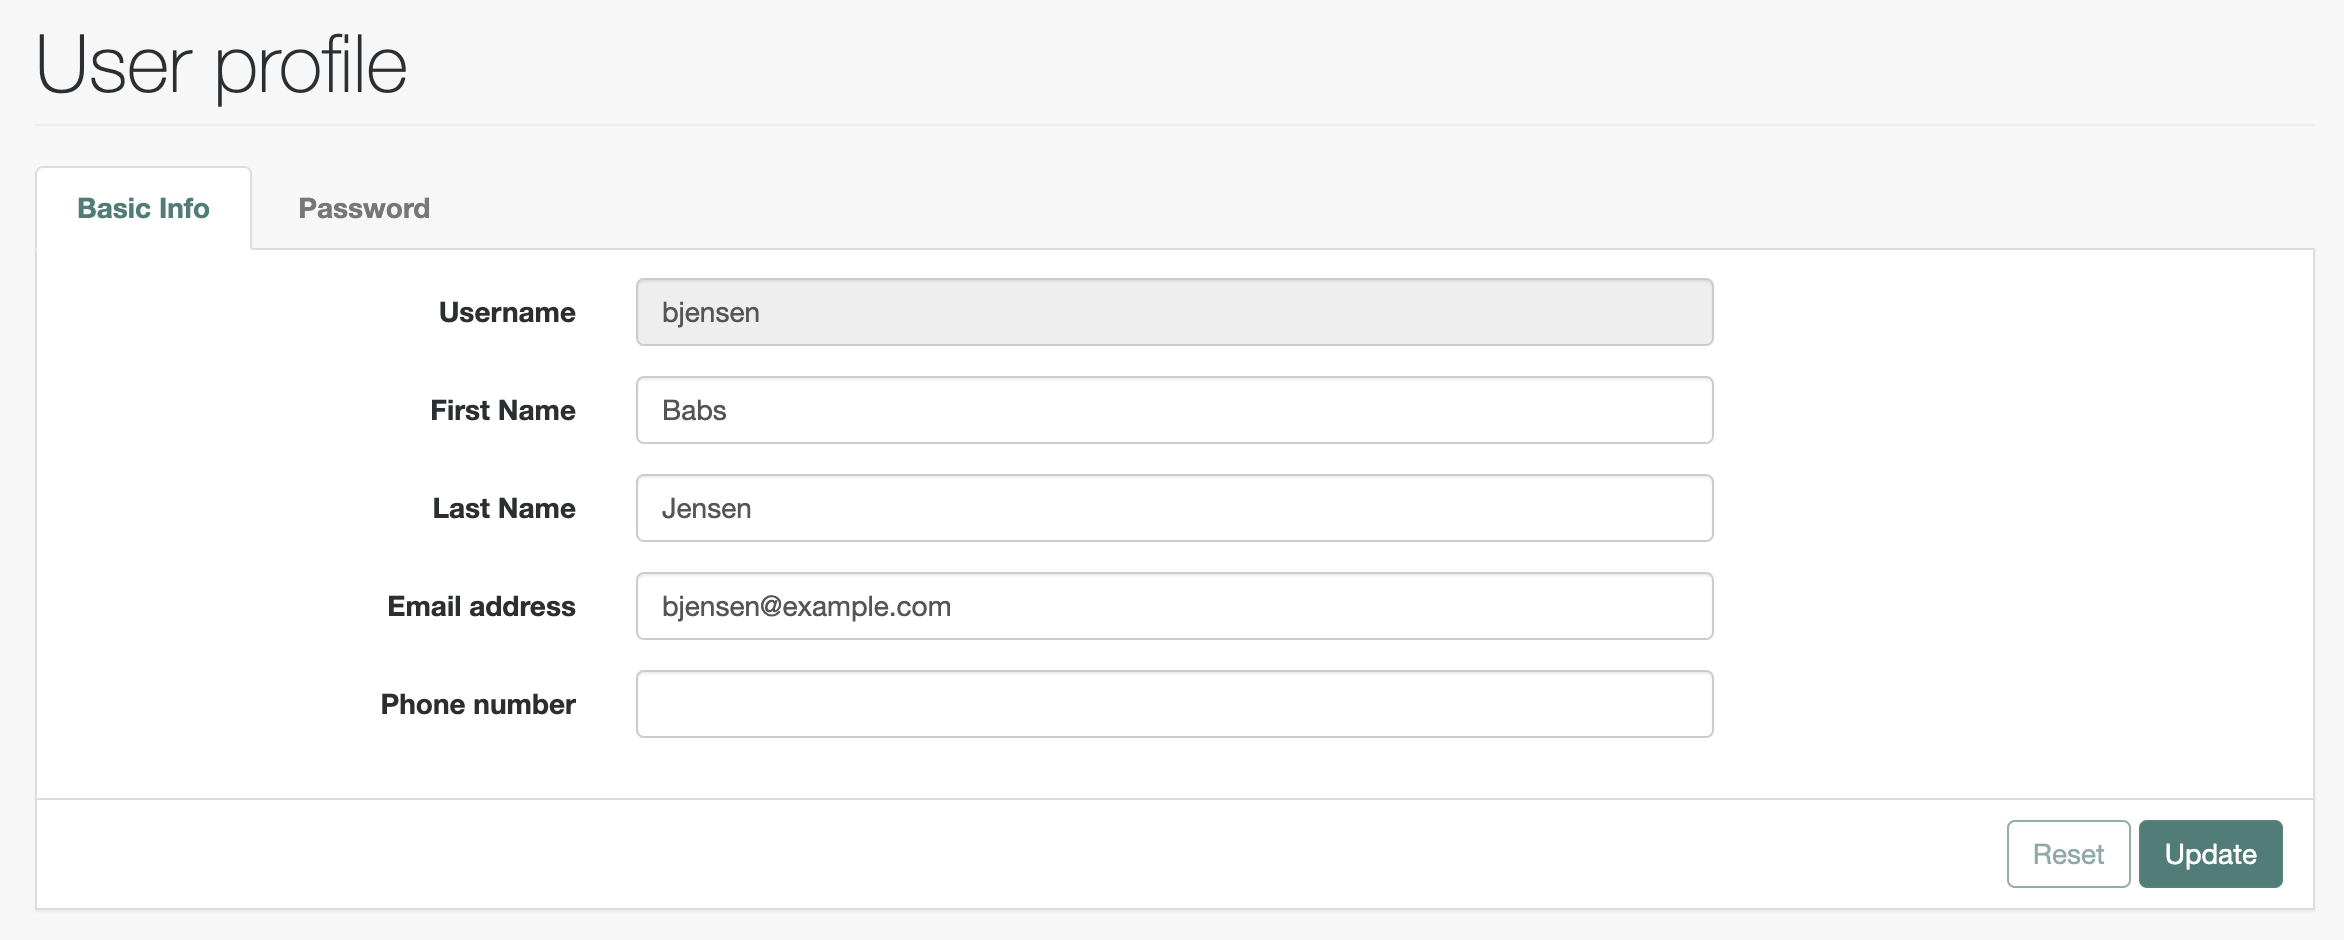
bjensenwith passwordCh4ng31t.The AM UI shows the user profile page:
-
Switch AM servers by updating the URL in the browser address bar, replacing port
8080with8081.The AM UI shows the same user profile page again.
-
On the command line, find the associated CTS token in DS:
$ /path/to/ds1/bin/ldapsearch \ --hostname localhost \ --port 1636 \ --useSsl \ --trustStorePath "${TRUSTSTORE}" \ --trustStoreType JKS \ --trustStorePassword changeit \ --bindDn uid=openam_cts,ou=admins,ou=famrecords,ou=openam-session,ou=tokens \ --bindPassword 5up35tr0ng \ --baseDn ou=famrecords,ou=openam-session,ou=tokens \ "(coreTokenUserId=id=bjensen,ou=user,ou=am-config)" \ coreTokenObjectOutputdn: coreTokenId=<token-id>,ou=famrecords,ou=openam-session,ou=tokens coreTokenObject: {"clientDomain":"ou=am-config","clientID":"id=bjensen,ou=user,ou=am-config","...":...}Notice the CTS does not reference the test user account by its DN, but instead by its AM universal ID.
Show sample core token object
{
    "clientDomain": "ou=am-config",
    "clientID": "id=bjensen,ou=user,ou=am-config",
    "creationTimeInMillis": 1785824397488,
    "listeners": {
        "a97dc88b-a23d-4a42-9b47-ed69007def34": true,
        "d3f91614-00c9-43ac-ac2e-7d35fce53e07": true,
        "c1752b7c-56ba-43e7-9703-be4af53238b6": true,
        "3681647e-210d-4229-b3c4-3966aeca4aeb": true
    },
    "maxCachingTimeInMinutes": 3,
    "maxIdleTimeInMinutes": 30,
    "maxSessionTimeInMinutes": 120,
    "restrictedTokensBySessionID": {},
    "sessionEventURLs": {},
    "sessionID": {
        "encryptedString": "<encrypted-string>"
    },
    "sessionProperties": {
        "Locale": "en_US",
        "authInstant": "<datestamp>",
        "Organization": "ou=am-config",
        "Principals": "bjensen",
        "UserProfile": "Required",
        "successURL": "/am/console",
        "CharSet": "UTF-8",
        "Service": "ldapService",
        "Host": "127.0.0.1",
        "FullLoginURL": "/am/UI/Login?realm=%2F",
        "AuthLevel": "0",
        "clientType": "genericHTML",
        "AMCtxId": "<uuid>",
        "loginURL": "/am/UI/Login",
        "UserId": "bjensen",
        "sun.am.UniversalIdentifier": "id=bjensen,ou=user,ou=am-config",
        "HostName": "127.0.0.1",
        "amlbcookie": "01",
        "Principal": "id=bjensen,ou=user,ou=am-config",
        "UserToken": "bjensen"
    },
    "sessionState": "VALID",
    "sessionType": "USER",
    "timedOutTimeInSeconds": 0
}
Result
You have shown the test user session works for either AM server.
Test CTS failover
-
Stop the first DS server to force AM to use the second DS server:
$ /path/to/ds1/bin/stop-ds -
Verify you can still access both AM servers as
bjensen.At http://am.example.com:8080/am and http://am.example.com:8081/am, the AM UI shows the user profile page.
-
Start the first DS server and stop the second:
$ /path/to/ds1/bin/start-ds $ /path/to/ds2/bin/stop-ds -
Verify again you can still access both AM servers as
bjensen.At http://am.example.com:8080/am and http://am.example.com:8081/am, the AM UI shows the user profile page.
Result
You have demonstrated that AM can use DS as a CTS store with affinity load balancing and failover.
What’s next
After successfully showing the sample to AM administrators, Pat leads a discussion to review the tradeoffs they can choose to make for the production deployment. Some of the questions to discuss include the following:
-
Do we back up CTS data?
If CTS data is lost, users must authenticate again.
If that’s acceptable, then we won’t back up CTS data, which is volatile and potentially large.
-
Should there be a separate DS service for CTS data?
CTS access patterns are very different from identity store access patterns. They cause DS to fill and empty its database cache in very different ways.
In a high-volume deployment, it may make sense to split the data up.
-
What AM features are in use?
Could we have DS reap expired tokens (optional) instead of AM (default)?
AM administrators can bring their own questions to the discussion.