Custom attributes in Advanced Reporting
When an administrator creates a custom attribute in the native IDM console
for the user identity object, the attribute is available in Advanced Reporting (custom reports) and filters.
|
Any new custom attributes for the |
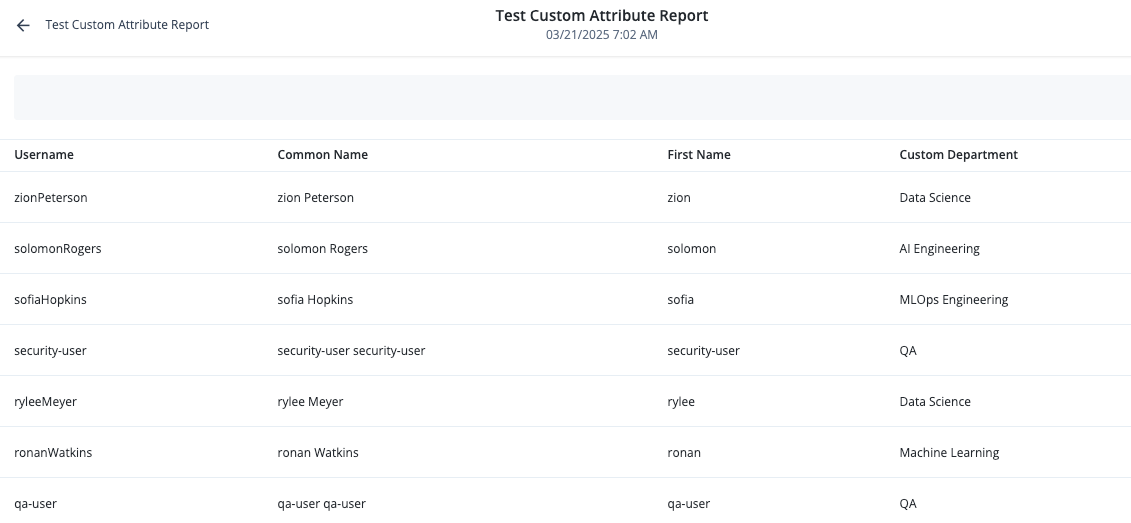
Custom attribute example
-
Add a custom attribute in the IDM native console:
-
In the Advanced Identity Cloud admin console, go to Native Consoles > Identity Management.
-
Click Configure > Managed Objects and click Alpha_user.
-
On the Alpha_user page, click Add a property.
-
Scroll down to the bottom of the page and enter the following:
-
Name: enter
custom_department.Custom attributes must be prefixed with custom_. Learn more about custom attributes at Customize user identities using custom attributes. -
Label (Optional): enter
Custom department. -
Select String.
-
Click Required if the property is required.
The requiredpolicy is assessed only during object creation, not when an object is updated. You can effectively bypass the policy by updating the object and supplying an empty value for that property. To prevent this inconsistency, set bothrequiredandnotEmptytotruefor required properties. This configuration indicates that the property must exist and must have a value.
-
-
Click Save.
-
-
Next, create a custom report using the Advanced Reporting feature:
-
In the Advanced Identity Cloud admin console, go to Reports.
-
Click New Report.
-
On the New Report modal, enter the following:
-
Name: Enter a descriptive name for the new report.
-
Description (optional): Enter a general description for the report.
-
Who can run: Select Users.
-
-
Click Next.
-
Click Data Source.
-
On the Add a Data Source modal, select Users and click Next.
-
On the draft report page, select the properties in the right column that you want to appear in the report. For example:
-
Username
-
First Name
-
Common Name
-
Custom Department
You can rearrange the columns by dragging and dropping them in the desired order.
-
-
Click Save.
-
-
On the Reports page, locate your custom report and click Run.
-
On your report page, click Run Now.
-
After your report has generated, click View Report.
-
Review your report if you are satisfied with the results, click > Publish to activate it.
-