Manage relationships using the Platform admin UI or the legacy admin UI
This section describes how to set up relationships between managed objects using the Platform admin UI or the legacy admin UI. You can set up a relationship between any object types. The examples in this section demonstrate how to set up a relationship between users and devices, such as IoT devices.
For illustration purposes, these examples assume that you have started IDM and already have some managed users. If this is not the case, start the server with the sample configuration described in Synchronize data from a CSV file to IDM, and run a reconciliation to populate the managed user repository.
In the following procedures, you will:
-
Create a new managed object type named Device and add a few devices, each with unique serial numbers (refer to Create a New Device Object Type).
-
Set up a bidirectional relationship between the Device object and the managed User object (refer to Configure the Relationship Between a Device and a User).
-
Demonstrate the relationships, assign devices to users, and show relationship validation (refer to Demonstrate the Relationship).
Create a new Device object type
This procedure illustrates how to set up a new Device managed object type, and add properties to collect information such as model, manufacturer, and serial number for each device.
|
Starting with IDM 8.1, the legacy admin UI is deprecated and is no longer bundled with IDM. New deployments should use the Platform admin UI, which is the replacement for the legacy admin UI. Both UIs are available as separate downloads from the Backstage download site:
|
Using the Platform admin UI
-
From the sidebar, click Identities > Configure.
-
Click Managed Object Type.
-
In the New Managed Object Type modal, enter information in the following fields, and click Save:
Field Value Object Type Key
DeviceDisplay Label
DeviceDescription (optional)
DevicesIcon Code
phoneThe Managed Object Type page for Device displays.
-
Click the Properties tab.
-
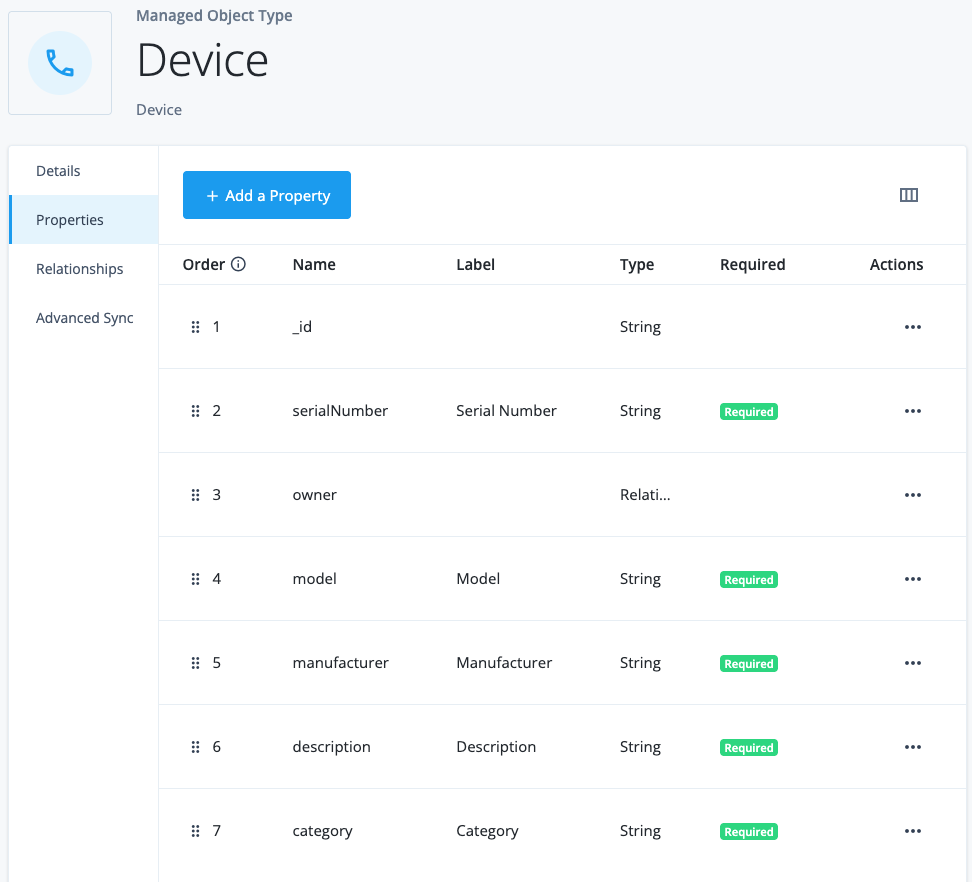
For each following property, click Add a Property, select String, enter the information, enable Required, and click Save:
Property Key Display Label Required model
Model
Yes
serialNumber
Serial Number
Yes
manufacturer
Manufacturer
Yes
description
Description
Yes
category
Category
Yes
After you finish, the properties list should look like this:
-
To have a property display as a column when you list devices in Identities > Manage, click the property, click the Display tab, and enable Show in Admin List View.
-
From the sidebar, click Identities > Manage.
-
On the Manage Identities page, click Devices.
-
For each of the following devices, click New Device, enter the applicable information, and click Save:
-
Device 1
-
Device 2
-
Device 3
-
Device 4
Field Value Model
Generic PhoneSerial Number
Phone-1Manufacturer
PhoneCoDescription
Entry level phoneCategory
Smart PhoneField Value Model
Generic WatchSerial Number
Watch-1Manufacturer
WatchCoDescription
Entry level watchCategory
Smart WatchField Value Model
Special PhoneSerial Number
Phone-2Manufacturer
PhoneCoDescription
Intermediate level phoneCategory
Smart PhoneField Value Model
Special WatchSerial Number
Watch-2Manufacturer
WatchCoDescription
Intermediate level watchCategory
Smart Watch -
-
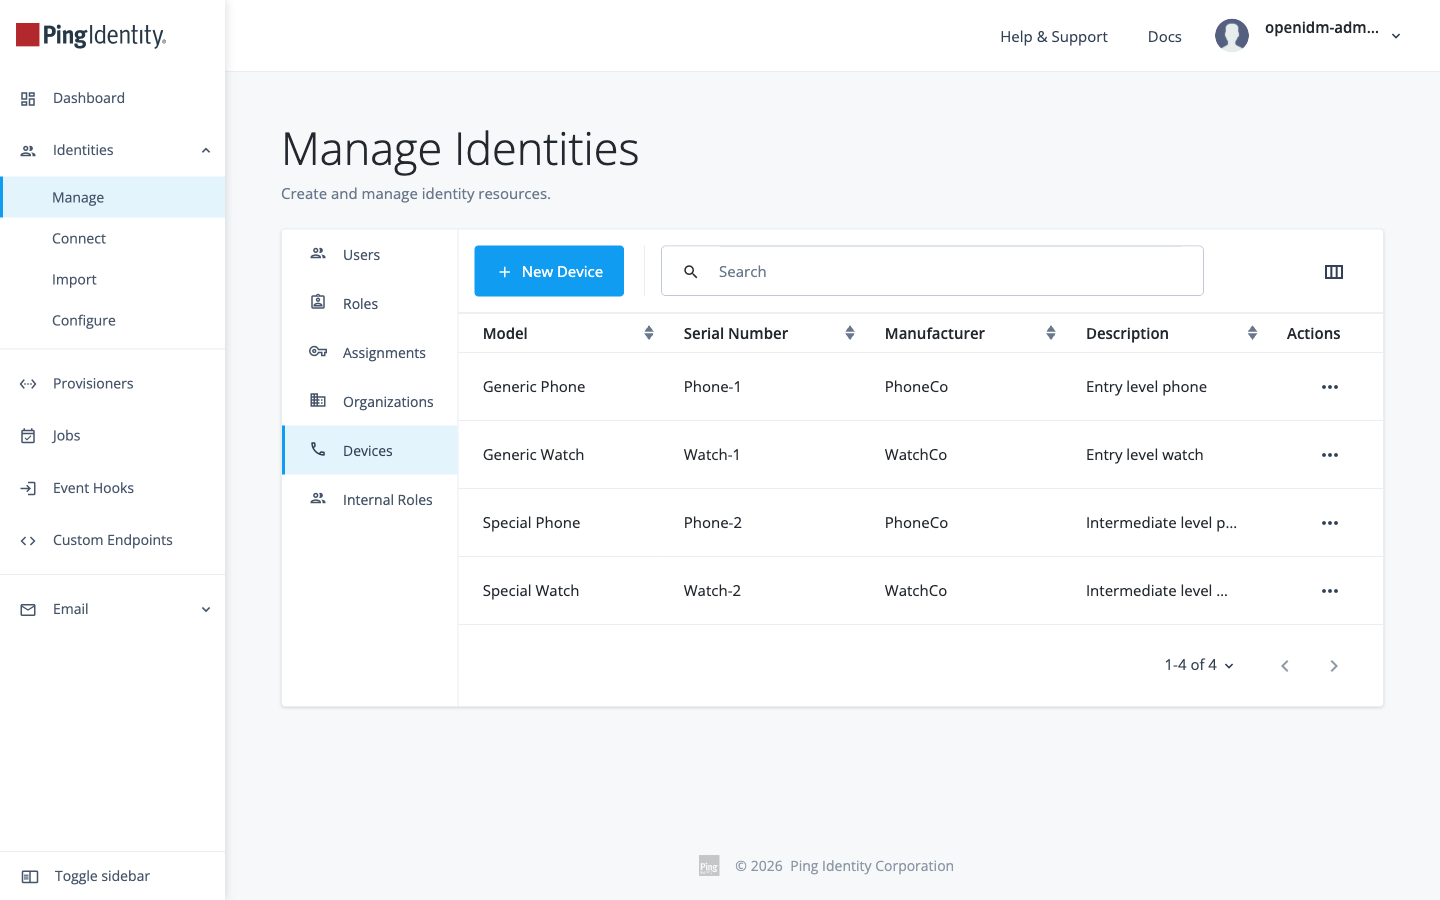
From the sidebar, click Identities > Manage, and select the Devices tab.
The Devices page should list the devices you created:
The other procedures in this topic assume that you’ve added these devices.
Using the legacy admin UI
-
From the navigation bar, click Configure > Managed Objects.
-
On the Managed Objects page, click New Managed Object.
-
On the New Managed Object page, enter information in the following fields, and click Save:
Field Value Managed Object Name
DeviceReadable Title
DeviceManaged Object Icon
fa-mobile-phoneMaterial Design Icon
phoneDescription
DevicesThe Managed Objects > Device page displays.
-
Click the Properties tab.
-
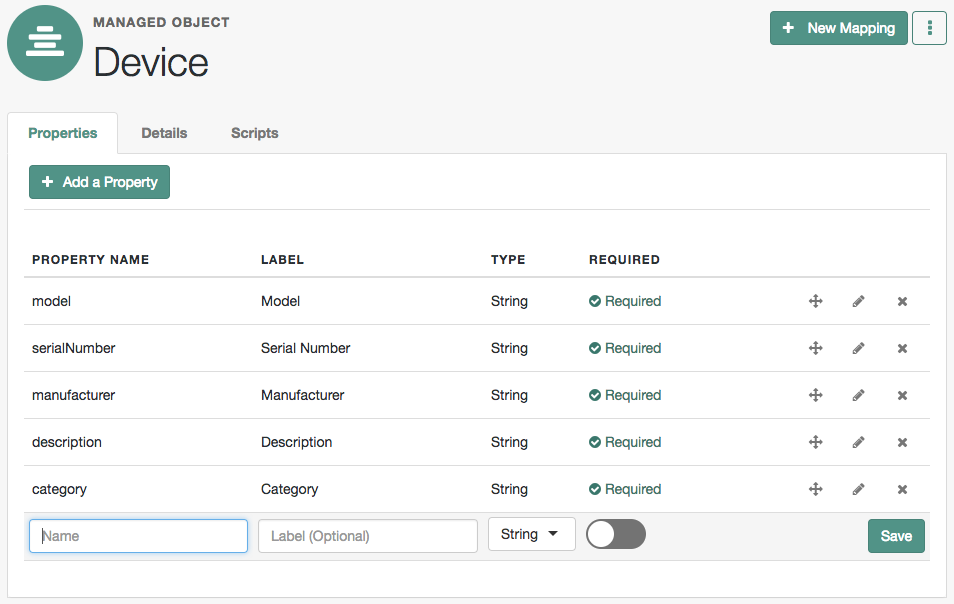
For each following property, click Add a Property, enter the information, and click Save:
Property Name Label Type Required model
Model
String

serialNumber
Serial Number
String
manufacturer
Manufacturer
String
description
Description
String
category
Category
String
After you finish, the properties list should look like this:
-
From the navigation bar, click Manage > Device.
-
For each of the following devices, on the Device List page, click New Device, enter the applicable information, and click Save:
-
Device 1
-
Device 2
-
Device 3
-
Device 4
Field Value Model
Generic PhoneSerial Number
Phone-1Manufacturer
PhoneCoDescription
Entry level phoneCategory
Smart PhoneField Value Model
Generic WatchSerial Number
Watch-1Manufacturer
WatchCoDescription
Entry level watchCategory
Smart WatchField Value Model
Special PhoneSerial Number
Phone-2Manufacturer
PhoneCoDescription
Intermediate level phoneCategory
Smart PhoneField Value Model
Special WatchSerial Number
Watch-2Manufacturer
WatchCoDescription
Intermediate level watchCategory
Smart Watch -
-
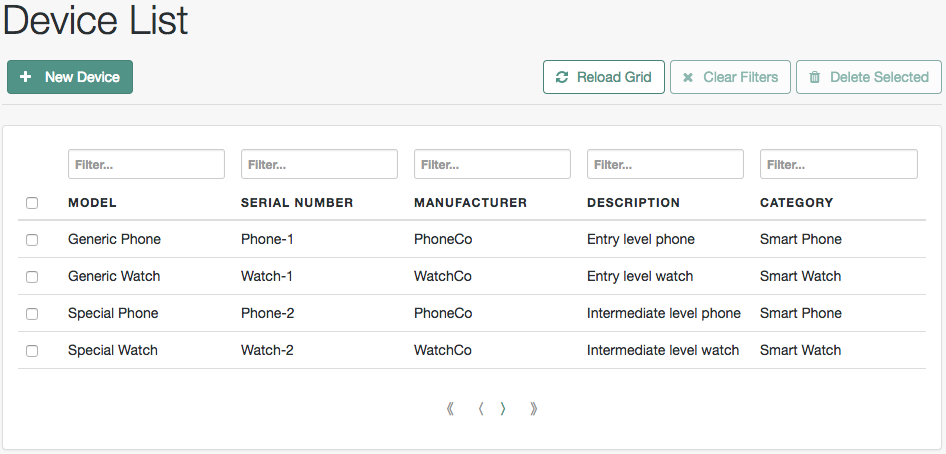
From the navigation bar, click Manage > Device.
The Device List page should look similar to the following:
The other procedures in this topic assume that you’ve added these devices.
Configure the relationship between a device and a user
To set up a relationship between the Device object type and the User object type, you must identify the specific property on each object that will form the basis of the relationship. For example, a device must have an owner and a user can own one or more devices. The property type for each of these must be relationship.
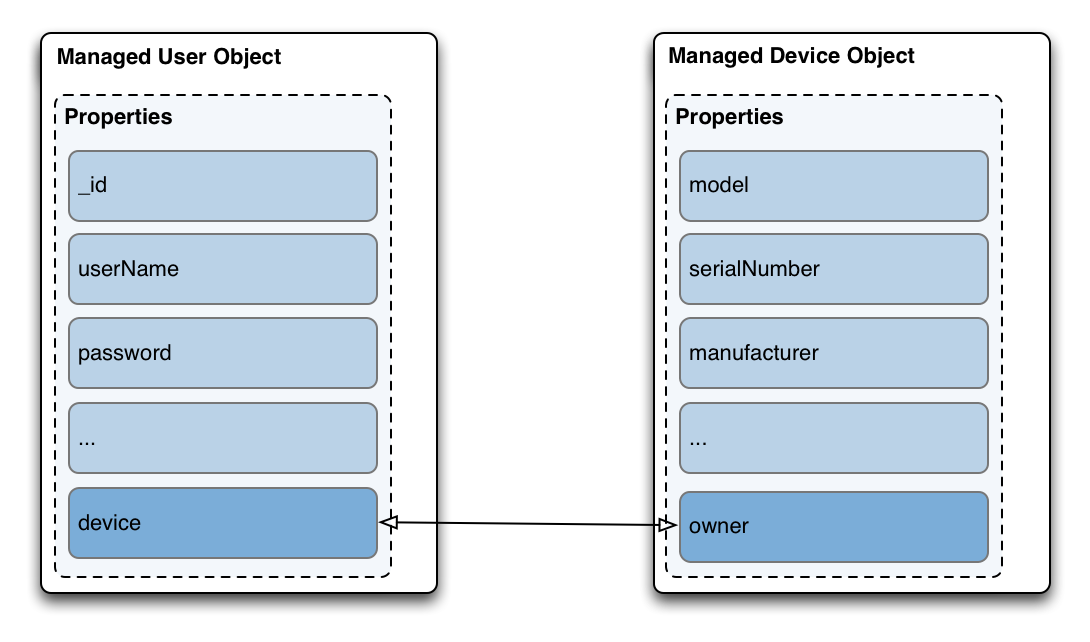
In this procedure, you will update the managed Device object type to add a new Relationship type property named owner. You will then link that property to a new property on the managed User object, named device. At the end of the procedure, the updated object types will look as follows:
|
Starting with IDM 8.1, the legacy admin UI is deprecated and is no longer bundled with IDM. New deployments should use the Platform admin UI, which is the replacement for the legacy admin UI. Both UIs are available as separate downloads from the Backstage download site:
|
Using the Platform admin UI
Unlike the legacy admin UI, the Platform admin UI configures both sides of a relationship, and their cardinality, in a single guided flow, on either object type’s Relationships tab.
-
From the sidebar, click Identities > Configure, and select the Device object type.
-
Click the Relationships tab, then click Relationship.
-
From the Object Type list, select User.
-
Set the cardinality on each side of the relationship: leave the Device side set to Has one (a device has one owner), and set the User side to Has many (a user can own more than one device).
-
Click Next.
-
On the Relationship Property step, configure each side of the relationship:
Side Configuration Device
Enter
ownerin Property Name. From Display Properties, select the User properties to display when viewing a device’s owner, such as userName, mail, and telephoneNumber.User
Enter
devicein Property Name. From Display Properties, select the Device properties to display when viewing a user’s devices, such as model and serialNumber.Set Display Properties on both sides. If you leave it unset, the relationship picker for that side can’t display a label for each related object.
-
Click Next to skip the optional Derived Properties step.
-
On the Relationship Settings step, leave Validate Relationship enabled.
This setting ensures the relationship is valid when a device is assigned to a user. IDM verifies the user and device objects exist, and that the device hasn’t already been assigned to another user.
-
Click Save.
The new relationship displays on the Relationships tab of both the Device and User object types.
|
Unlike built-in relationships such as Manager, a custom relationship you configure this way doesn’t automatically get a dedicated tab on either object’s detail page in Identities > Manage. The |
Using the legacy admin UI
-
Create a new relationship property on the Device object:
-
From the navigation bar, click Configure > Managed Objects, and select the Device object.
-
On the Managed Objects > Device page, click the Properties tab.
-
-
Click Add a Property, enter the information, and click Save
Property Name Label Type Required owner
Owner
Relationship
You cannot change the property Type after creation. If you create a property with an incorrect Type, you must delete the property and recreate it. -
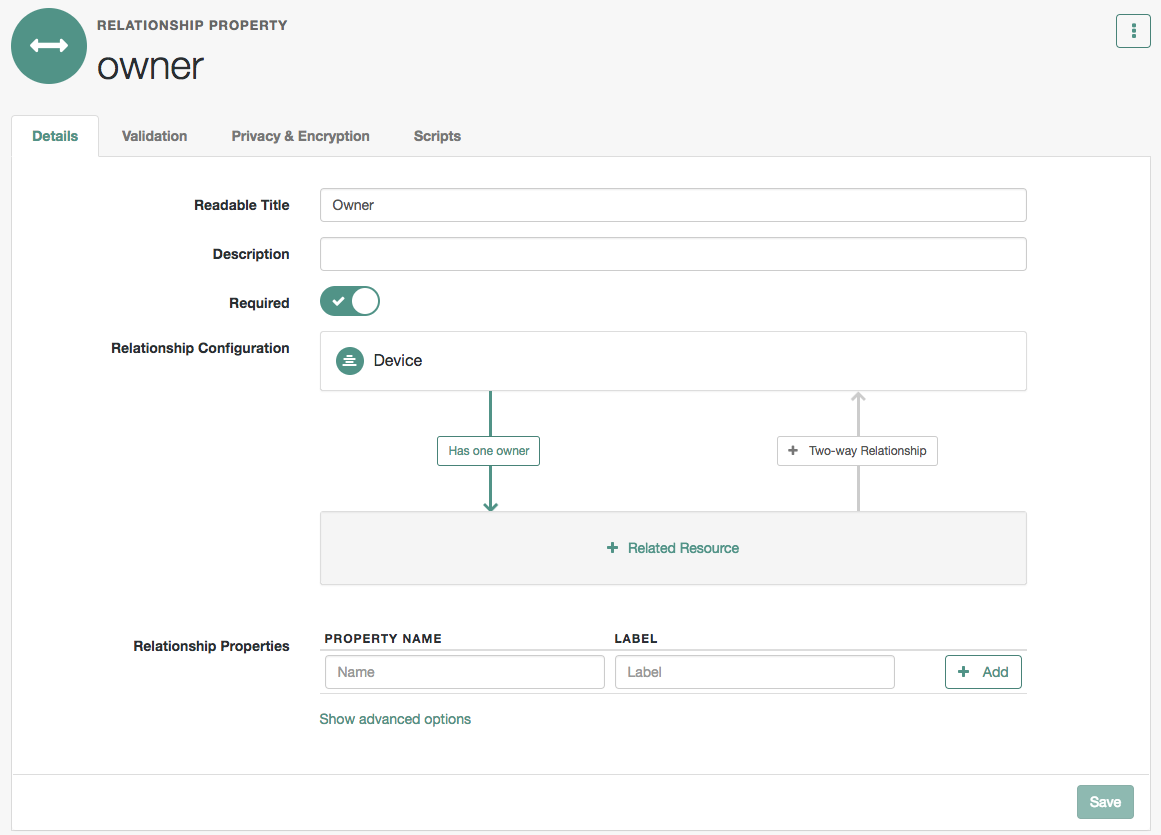
Click the owner property row.
The Details tab displays the current Relationship Configuration:
-
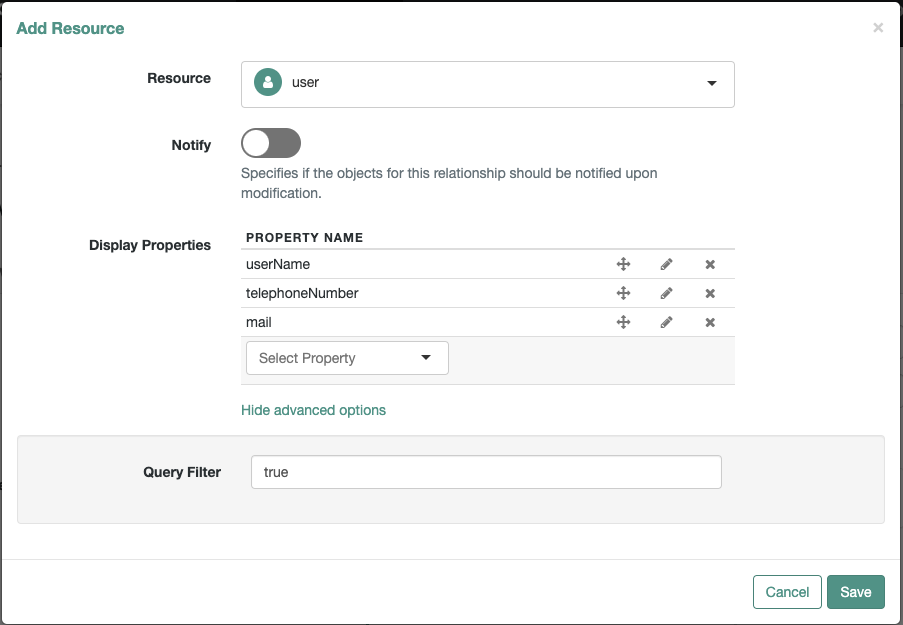
Click the + Related Resource area.
-
In the Add Resource window, select user from the Resource list.
This sets up a relationship between the Device object and the managed user object.
-
From the Display Properties list, select the user object properties to display when viewing a user’s devices in the UI. For example, you may want to access a user’s userName, mail, and telephoneNumber.
-
Click Show advanced options. Notice that the Query Filter field is set to true. This setting lets you search on any selected Display Properties when assigning a device to a user.
-
Click Save.
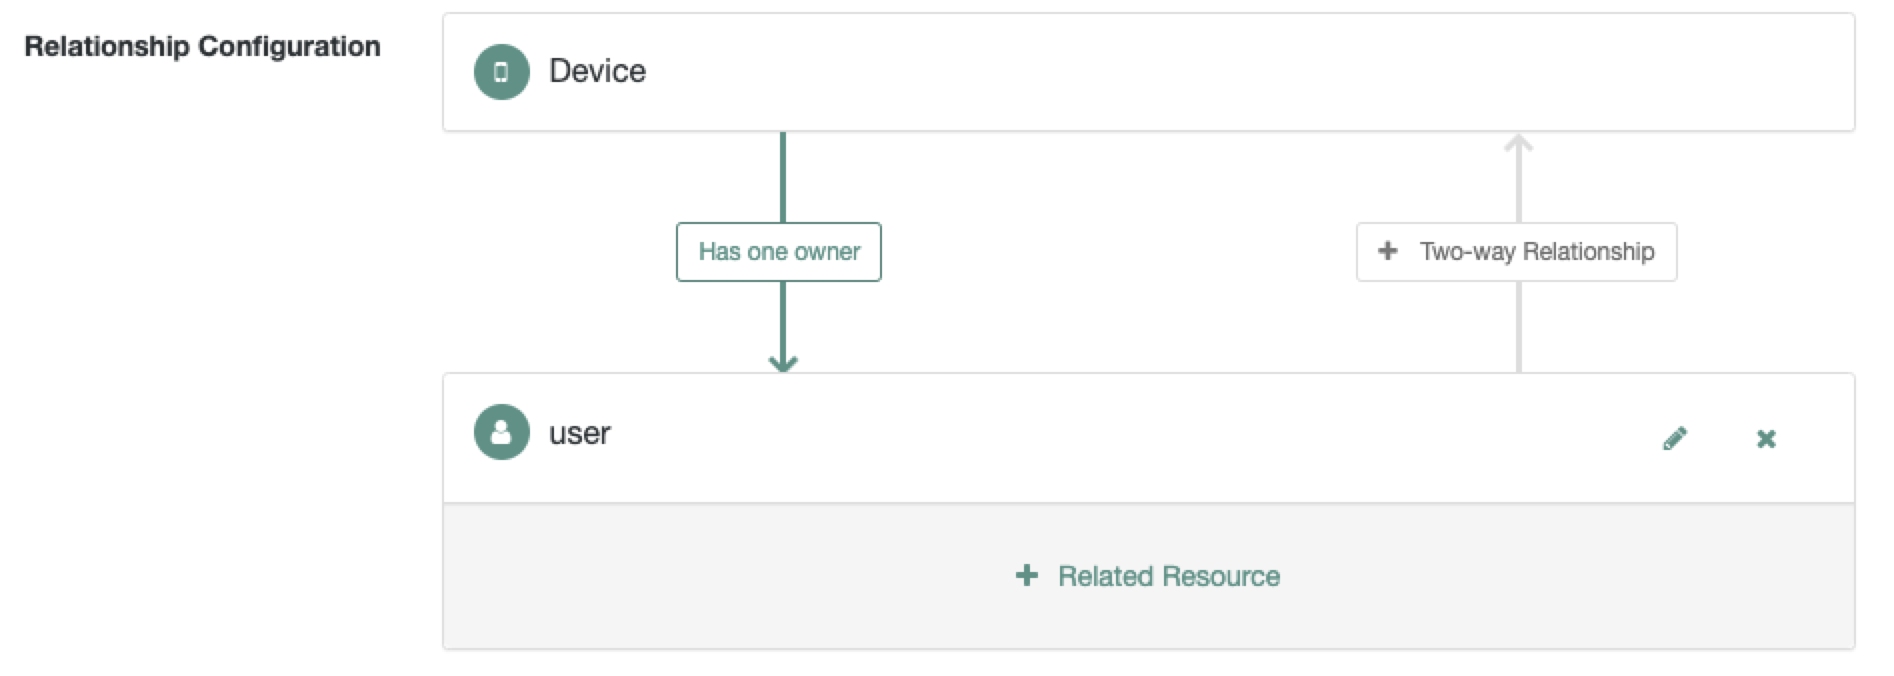
The Managed > Device > owner page now displays the one-way relationship between a device and a user.
-
Click Save.
-
To configure the reverse relationship, click + Two-way Relationship:
-
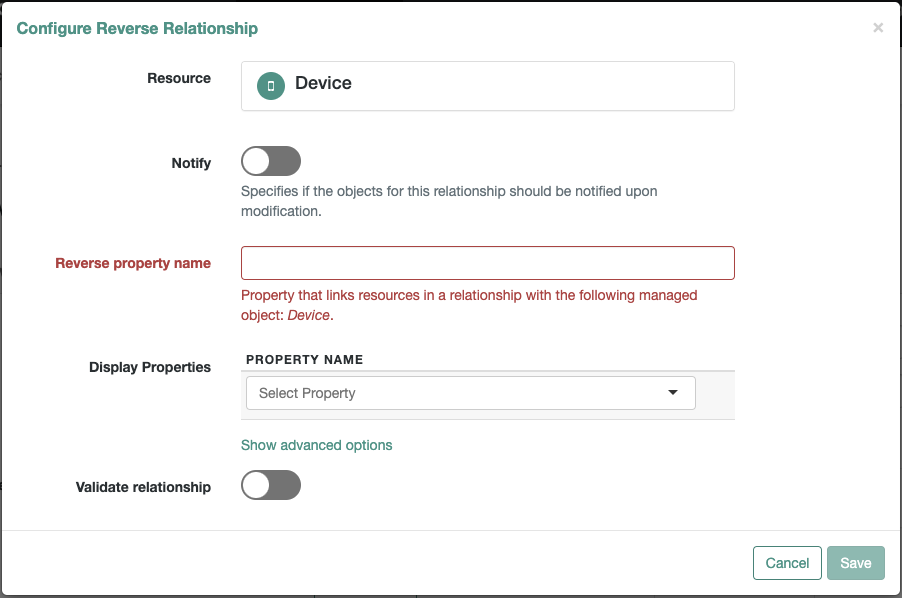
In the Reverse Relationship pop-up, select Has Many. This indicates a single user can have more than one device.
The Configure Reverse Relationship window displays.
-
In the Reverse property name field, enter the new property name that will be created in the managed user object type, device for this example.
-
From the Display Properties list, select the properties of the device object to display when viewing a user in the UI. For example, you might want to access the model and serialNumber of each device.
-
Click Show advanced options. Notice that the Query Filter field is set to true. This setting allows you to search on any of the selected Display Properties when assigning a device to a user.
-
Enable Validate relationship.
This setting ensures the relationship is valid when a device is assigned to a user. IDM verifies the user and device objects exist, and that the device hasn’t already been assigned to another user.
-
Click Save.
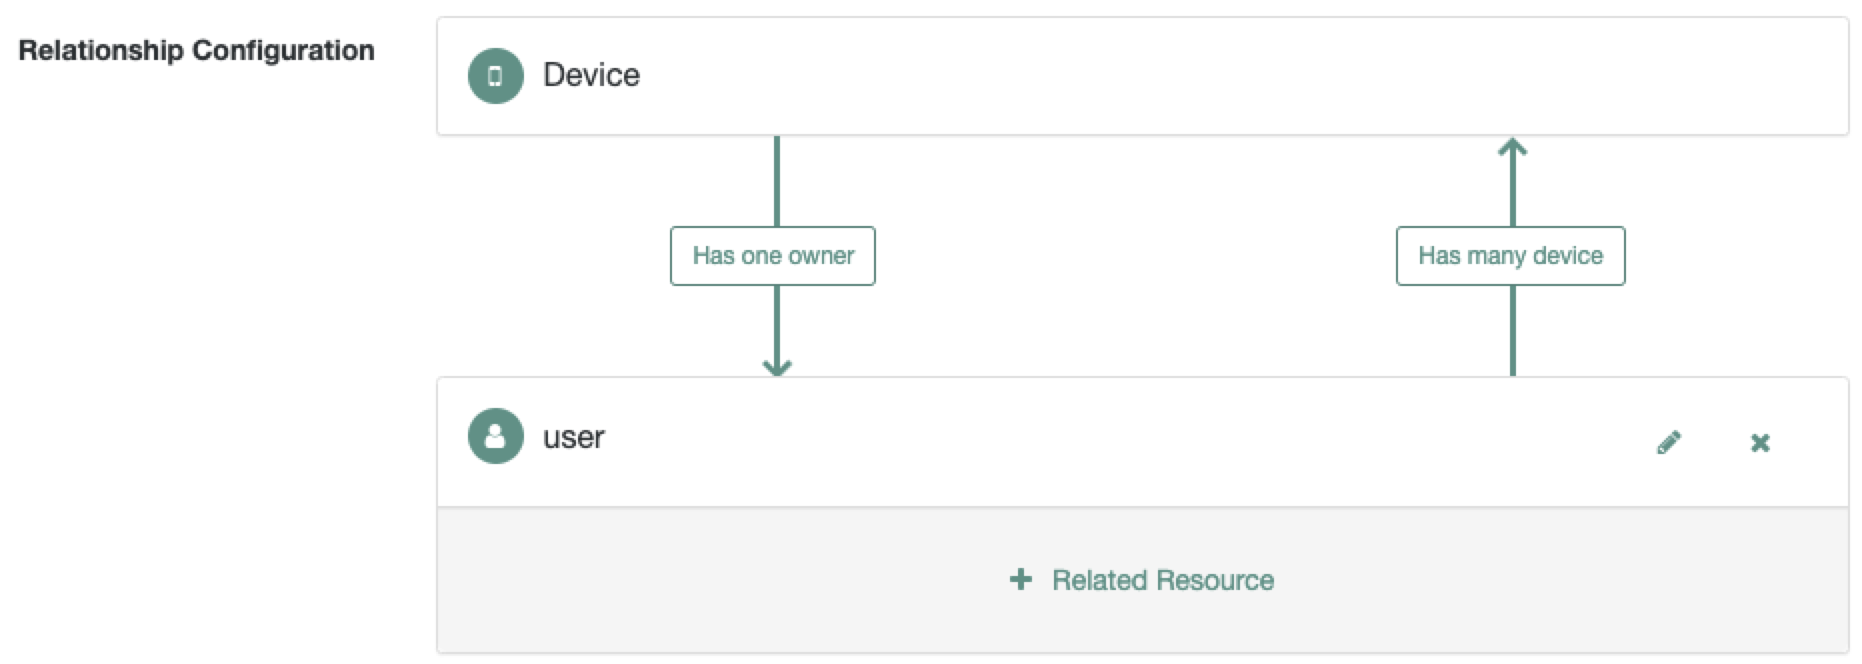
The Managed > Device > owner page now displays the two-way relationship showing that a user objects can have many devices.
-
Click Save.
-
-
From the navigation bar, click Configure > Managed Objects.
-
On the Managed Objects page, click User.
-
On the Managed Objects > user page, click the Properties tab.
Notice the device property was created automatically when you configured the relationship.
Demonstrate the relationship
This procedure demonstrates how devices can be assigned to users, based on the relationship configuration that you set up in the previous procedures.
|
Starting with IDM 8.1, the legacy admin UI is deprecated and is no longer bundled with IDM. New deployments should use the Platform admin UI, which is the replacement for the legacy admin UI. Both UIs are available as separate downloads from the Backstage download site:
|
Using the Platform admin UI
The device property you created on User doesn’t have its own tab in Identities > Manage (refer to the note in Configure the Relationship Between a Device and a User). Assign the relationship from the Device side instead, using its owner property:
-
From the sidebar, click Identities > Manage, and select the Devices tab.
-
Select a device.
-
On the device’s Details tab, select the Owner field, and search for the user to assign as owner.
-
Click Save.
-
Repeat for a second device, assigning it to the same user.
If you select a device that’s already assigned to a different user, and Validate Relationship is enabled for the
ownerrelationship, the UI displays a validation error when you try to save.
Using the legacy admin UI
-
From the navigation bar, click Manage > User.
-
On the User List page, click a user entry.
-
On the User > userName page, click the Device tab, and then click Add Device.
-
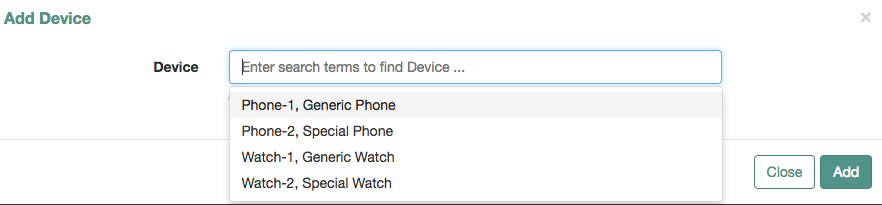
In the Add Device window, click the Device field to display the list of devices that you added in the previous procedure.
-
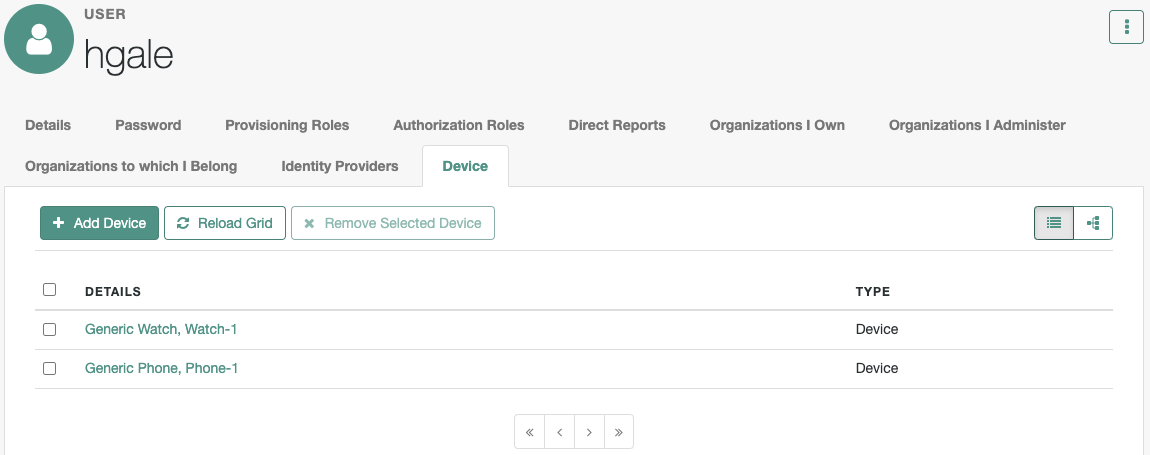
Select two devices, and click Add.
The Device tab displays the added devices.
-
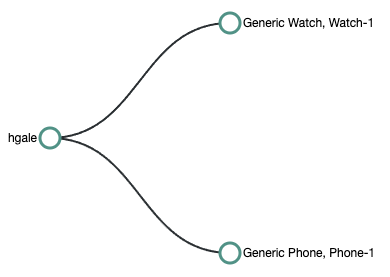
Click the Show Chart button.
A graphical representation of the relationship between the user and her devices is displayed:
-
You can also assign an owner to a device.
From the navigation bar, click Manage > Device, and click a device that you did not assign in the previous step.
-
On the Device > model page, click Add Owner.
-
In the Add Owner window, select a user, and click Add.
-
Click Save.
|
To demonstrate the relationship validation, try to assign a device that has already been assigned to a different user. The UI displays the error message Conflict with Existing Relationship. |
View the relationship configuration in the UI
| Widgets are deprecated and will be removed in a future release of IDM. For more information, refer to Deprecation. |
The Managed Objects Relationship Diagram provides a visual display of the relationship configuration between managed objects. Unlike the Identity Relationships widget, described in View relationships in graph form, this widget does not show the actual relationship data, but rather shows the configured relationship types.
This widget is not displayed on any dashboard by default. You can add it as follows:
-
Sign on to the legacy admin UI.
-
From the navigation bar, click Dashboards, and select a dashboard. Alternatively, create a dashboard.
-
On the applicable dashboard page, click Add Widget.
-
In the Add Widget window, click the list, scroll down to the Utilities item, and select Managed Objects Relationship Diagram.
There are no configurable settings for this widget. -
The Preview button shows the current relationship configuration. The following image shows the relationship configuration for a basic IDM installation with no specific configuration:
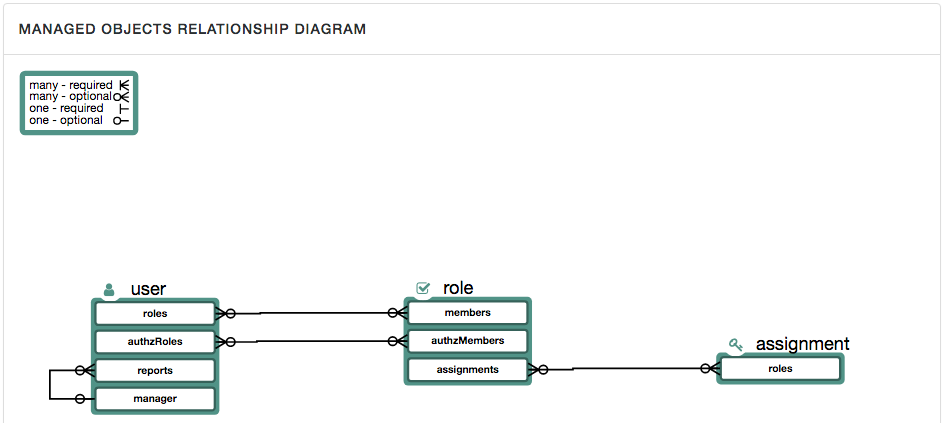
The legend indicates which relationships are required, optional, one-to-one, and one-to-many.