Ping (ForgeRock) Authenticator module
Ping (ForgeRock) Authenticator module
The Ping (ForgeRock) Authenticator module helps you build the functionality of the ForgeRock Authenticator application into your own Android and iOS apps.
The module supports:
-
Time-based one-time passwords (TOTP)
-
HMAC-based one-time passwords (HOTP)
-
Push notifications
Topics
Getting started
Learn how to get started with the Ping (ForgeRock) Authenticator module in your Android and iOS app projects.
Use cases
Discover how to integrate some common use case scenarios into your applications by using the Ping (ForgeRock) Authenticator module.
API Reference
Browse API reference documentation for the Ping (ForgeRock) Authenticator module.
Getting started with the Ping (ForgeRock) Authenticator module
Refer to the following topics to set up and get started with the Ping (ForgeRock) Authenticator module in your Android and iOS app projects:
- Set up your Ping (ForgeRock) Authenticator module project
-
Learn how to configure compile options, add module dependencies, and declare the permissions required to run the Ping (ForgeRock) Authenticator module in your Android and iOS apps.
- Initialize the Ping (ForgeRock) Authenticator module
-
After setting up your project, find out how to start the Ping (ForgeRock) Authenticator module so you can begin implementing your MFA use cases.
Optional tasks
- Customize the storage client
-
Optionally, implement and register your own
StorageClientinterface to override the default storage mechanisms.For example, you could use an SQLite database or other storage destination.
Set up your Ping (ForgeRock) Authenticator module project
Set compile options
The Ping SDK for Android requires at least Java 8 (v1.8). Configure the compile options in your project to use this version, or newer.
For example, to specify Java 17, in your build.gradle file, add the following code at the top level:
kotlin {
  jvmToolchain {
    languageVersion.set(JavaLanguageVersion.of(17))
  }
}Add module dependencies
Add the following dependency to use the Ping (ForgeRock) Authenticator module in your Android applications:
dependencies {
    ...
    implementation 'org.forgerock:forgerock-authenticator:4.7.0'
}Additional dependencies you may require:
| Feature | Dependency |
|---|---|
Push notifications |
|
Request notification permissions
To process push notifications successfully on Android 13 (API level 33) and later, the app must request the new Notification runtime permission for sending non-exempt notifications from an app.
Declare the permission
To request the new notification permission from your app,
update your app to target Android 13 (API level 33) and declare POST_NOTIFICATIONS in your app’s manifest file,
as in the following code snippet:
<manifest ...>
    <uses-permission android:name="android.permission.POST_NOTIFICATIONS"/>
    <application ...>
        ...
    </application>
</manifest>Install the Ping (ForgeRock) Authenticator module using CocoaPods
CocoaPods is a dependency manager for iOS projects, and is a simple way to integrate the Ping (ForgeRock) Authenticator module into your application.
-
If you do not already have CocoaPods, install the latest version.
-
In a terminal window, run the following command to create a new Podfile:
pod init
-
Add the following lines to your Podfile:
pod 'FRAuthenticator'
-
Run the following command to install pods:
pod install
Install the Ping (ForgeRock) Authenticator module using Swift Package Manager (SPM)
-
With your project open in Xcode, select File > Add Package Dependencies.
-
In the search bar, enter the Ping SDK for iOS repository URL:
https://github.com/ForgeRock/forgerock-ios-sdk. -
Select the
forgerock-ios-sdkpackage, and then click Add Package. -
In the Choose Package Products dialog, ensure that the
FRAuthenticatorlibrary is added to your target project: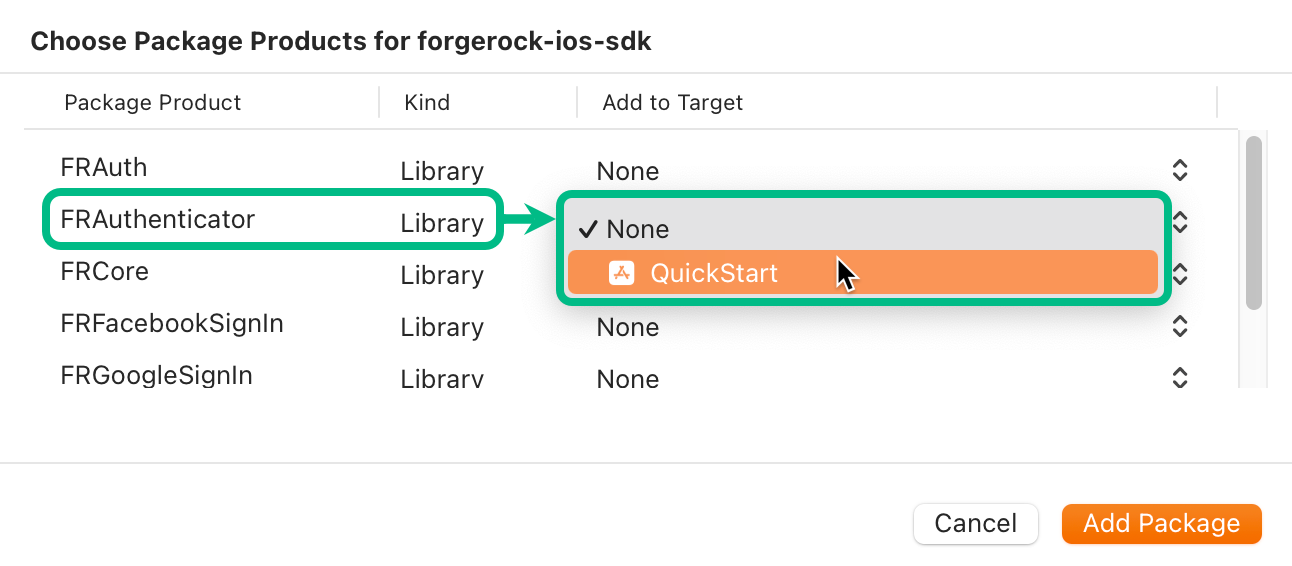 Figure 1. Adding the 'FRAuthenticator' module to an iOS project.
 -
Click Add Package.
-
In your project, import the module:
// Import the Ping (ForgeRock) Authenticator module
import FRAuthenticator
swift
Initialize the Ping (ForgeRock) Authenticator module
Customize the storage client
The Ping (ForgeRock) Authenticator module lets you customize the storage client and manages all data through that client.
Android
The Ping (ForgeRock) Authenticator module offers a default storage client that uses SecuredSharedPreferences,
an encrypted storage mechanism built on Android
SharedPreferences.
It is available in the forgerock-core module.
SecuredSharedPreferences stores and manages all shared secret account information and notifications.
The Authenticator module lets you customize the StorageClient.
You can implement the StorageClient interface, and register your own StorageClient in the module.
|
For maximum compatibility with devices from different manufacturers we highly recommend that you implement your own custom storage client. The default client that is built on For example, you might not be able to access the registered PUSH or OATH accounts. |
You can implement your custom storage client in any location you choose, for example you could use the SQLite-based EncryptedSharedPreferences.
The Ping (ForgeRock) Authenticator module uses your storage client and manages all data through that client.
To customize the StorageClient, implement the following interfaces:
public interface StorageClient {
    /**
     * Get the Account object with its id
     * @param accountId The account unique ID
     * @return The account object.
     */
    Account getAccount(String accountId);
    /**
     * Get all accounts stored in the system.
     * @return The complete list of accounts.
     */
    List<Account> getAllAccounts();
    /**
     * Delete the Account that was passed in.
     * @param account The account object to delete.
     * @return boolean as result of the operation
     */
    boolean removeAccount(Account account);
    /**
     * Add or Update the Account to the storage system.
     * @param account The Account to store or update.
     * @return boolean as result of the operation
     */
    boolean setAccount(Account account);
    /**
     * Get the mechanisms associated with an account.
     * @param account The Account object
     * @return The list of mechanisms for the account.
     */
    List<Mechanism> getMechanismsForAccount(Account account);
    /**
     * Get the mechanism by UUID.
     * @param mechanismUID The uniquely identifiable UUID for the mechanism
     * @return The mechanism object.
     */
    Mechanism getMechanismByUUID(String mechanismUID);
    /**
     * Delete the mechanism uniquely identified by an id.
     * @param mechanism The mechanism object to delete.
     * @return boolean as result of the operation
     */
    boolean removeMechanism(Mechanism mechanism);
    /**
     * Add or update the mechanism to the storage system.
     * If the owning Account is not yet stored, store that as well.
     * @param mechanism The mechanism to store or update.
     * @return boolean as result of the operation
     */
    boolean setMechanism(Mechanism mechanism);
    /**
     * Get all notifications for within the mechanism.
     * @param mechanism The mechanism object
     * @return The list of notifications for the mechanism.
     */
    List<PushNotification> getAllNotificationsForMechanism(Mechanism mechanism);
    /**
     * Delete the pushNotification uniquely identified by an id.
     * @param pushNotification The pushNotification object to delete.
     */
    boolean removeNotification(PushNotification pushNotification);
    /**
     * Add or update the pushNotification to the storage system.
     * @param pushNotification The pushNotification to store.
     * @return boolean as result of the operation
     */
    boolean setNotification(PushNotification pushNotification);
    /**
     * Whether the storage system currently contains any data.
     * @return True if the storage system is empty, false otherwise.
     */
    boolean isEmpty();
}|
For each method of getting an For example, when retrieving |
After implementing your custom StorageClient, register it to FRAClient as follows:
// Initiate your custom StorageClient
StorageClient customStorageClient = CustomStorageClient()

// Register it to FRAClient
FRAClient fraClient = new FRAClient.FRAClientBuilder()
                .withContext(this)
                .withStorage(customStorageClient)
.start();|
You must register the The |
iOS
The ForgeRock Authenticator default storage client utilizes both Apple’s Keychain Service, and Secure Enclave.
This means that the Ping (ForgeRock) Authenticator module safely stores all shared secrets, account information, and notifications.
You can also customize the StorageClient.
You can implement the StorageClient protocol,
and register your own StorageClient with the Ping (ForgeRock) Authenticator module.
For example, you could customize StorageClient to use SQLite, CoreData, or any other storage destination.
The Ping (ForgeRock) Authenticator module uses your storage client and manages all data through that client.
To customize StorageClient you must implement the following interfaces:
/// StorageClient protocol represents predefined interfaces and protocols for FRAuthenticator's storage method.
public protocol StorageClient {

    /// Stores Account object into Storage Client and returns discardable Boolean result of operation.
    /// - Parameter account: Account object to store.
    @discardableResult func setAccount(account: Account) -> Bool

    /// Removes Account object from Storage Client, and returns discardable Boolean result of operation.
    /// - Parameter account: Account object to remove.
    @discardableResult func removeAccount(account: Account) -> Bool

    /// Retrieves Account object with its unique identifier.
    /// - Parameter accountIdentifier: String value of Account's unique identifier.
    func getAccount(accountIdentifier: String) -> Account?

    /// Retrieves all Account objects stored in Storage Client.
    func getAllAccounts() -> [Account]

    /// Stores Mechanism object into Storage Client, and returns discardable Boolean result of operation.
    /// - Parameter mechanism: Mechanism object to store.
    @discardableResult func setMechanism(mechanism: Mechanism) -> Bool

    /// Removes Mechanism object from Storage Client, and returns discardable Boolean result of operation.
    /// - Parameter mechanism: Mechanism object to remove.
    @discardableResult func removeMechanism(mechanism: Mechanism) -> Bool

    /// Retrieves all Mechanism objects stored in Storage Client.
    /// - Parameter account: Account object that is associated with Mechanism(s).
    func getMechanismsForAccount(account: Account) -> [Mechanism]

    /// Retrieves Mechanism object with given Mechanism UUID.
    /// - Parameter uuid: UUID of Mechanism.
    func getMechanismForUUID(uuid: String) -> Mechanism?

    /// Stores PushNotification object into Storage Client, and returns discardable Boolean result of operation.
    /// - Parameter notification: PushNotification object to store.
    @discardableResult func setNotification(notification: PushNotification) -> Bool

    /// Removes PushNotification object from Storage Client, and returns discardable Boolean result of operation.
    /// - Parameter notification: PushNotification object to remove.
    @discardableResult func removeNotification(notification: PushNotification) -> Bool

    /// Retrieves all Notification objects from Storage Client with given Mechanism object.
    /// - Parameter mechanism: Mechanism object that is associated with Notification(s).
    func getAllNotificationsForMechanism(mechanism: Mechanism) -> [PushNotification]

    /// Returns whether or not StorageClient has any data stored.
    @discardableResult func isEmpty() -> Bool
}|
For each method of getting an For example, when retrieving |
After implementing your custom StorageClient, register it with your FRAClient as follows:
// Initiate your custom StorageClient
let customStorageClient = CustomStorageClient()
// Register it with your FRAClient
FRAClient.setStorage(storage: customStorageClient)
// Initiate the SDK
FRAClient.start()|
You must register the Once the SDK starts, the |
Implement your use cases with the Ping (ForgeRock) Authenticator module
Find out how to integrate some common use case scenarios into your applications by using the Ping (ForgeRock) Authenticator module.
In this use case, you integrate the ability to authenticate a user with push notifications into your app.
To receive push notifications when authenticating, end users must register an Android or iOS device running your app built with the Ping (ForgeRock) Authenticator module.
In this use case you integrate the ability to generate a single-use, one-time password into your application by using the Ping (ForgeRock) Authenticator module.
The Ping (ForgeRock) Authenticator module supports time-based and HMAC-based one-time passwords.
You can build and distribute your own authenticator app to your users so that they can participate in multi-factor authentication journeys, by using the Ping (ForgeRock) Authenticator module.
To help ensure the security of your app—and therefore your system—you can enable authenticator app policies.
Integrate MFA using push notifications
This use case explains how to integrate support for push authentication into your Android or iOS projects that use the Ping (ForgeRock) Authenticator module.
Tasks
- Step 1. Configure Push notifications for Android
-
In this step, you configure Google Firebase Cloud Messaging (FCM), which handles sending the push notifications to Android devices.
You create a service account that provides access to the service for third-parties.
- Step 2. Configure Push notifications for iOS
-
In this step, you configure Apple Push Notification service (APNS), which handles sending the push notifications to iOS devices.
You create a key that provides access to the service for third-parties.
- Step 3. Configure Push notifications in AWS
-
In this step, you use the service account and key created in the previous steps to set up Amazon Simple Notification Service (SNS) to be able to route push notification messages to Android and iOS devices.
You also create a service account and associated access token to provide access to the service to your server.
- Configure a server for push notifications
-
In this step, you configure your server to connect to SNS so that it can send out push notifications.
You also create an authentication journey that will register your client application as an MFA device, and send out push notifications.
- Step 5: Configure the app for push notifications
-
In this step, you configure your application projects to use either Firebase Cloud Messaging or the Apple Push Notification service.
- Step 6. Configure the Ping (ForgeRock) Authenticator module for push notifications
-
In this final step, you add the code to your application that obtains the unique device code required to ensure push notifications reach their intended audience.
You also add code that leverages the Ping (ForgeRock) Authenticator module to handle the push registration and authentication journey you created earlier.
Step 1. Configure Push notifications for Android
In this step, you configure Google Firebase Cloud Messaging (FCM), which handles sending the push notifications to Android devices.
You create service account that provides access to the service for third-parties.
Prerequisites
-
A Google cloud account, with access to the Firebase console.
-
An Android application into which you want to integrate push notifications.
For development purposes, you can download the Ping (ForgeRock) Authenticator module sample app from GitHub.
Create a project in Google Firebase
-
Log in to the Google Firebase console.
-
Click Add project.
-
Enter a name for the project, for example
sdk-authenticator-push, and then click Continue. -
Disable Google Analytics for the project, and then click Create project.
-
When your Firebase project is ready, click Continue.
Add your Android app to the Firebase project
-
Log in to the Google Firebase console.
-
In the left menu, in Project Overview, click the gear icon () and then click Project settings.
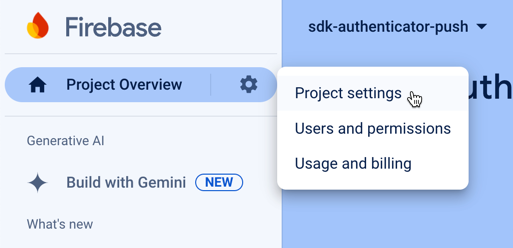 Figure 2. Opening the project settings panel in the Firebase console.
 -
In Your apps, click Add app.
-
Click the Android icon ().
-
In the Register app section:
-
In Android package name, enter the package of the app into which you are integrating push notifications.
For example,
org.forgerock.authenticator.sample. -
In App nickname, enter a user-friendly name for the app.
For example,
Authenticator Push Sample. -
Click Register app.
-
-
In the Download and then add config file section:
-
Click Download google-services.json, and keep the file somewhere safe.
You will need the file when configuring your application to access Firebase Cloud Messaging in a later step.
-
Click Next.
-
-
In the Add Firebase SDK section, click Next.
You will add the Firebase SDKs to your application in a later step.
-
In the Next steps section, click Continue to the console.
Create a key for the Firebase service account
-
Log in to the Google Firebase console.
-
In the left menu, in Project Overview, click the gear icon () and then click Project settings.
Figure 3. Opening the project settings panel in the Firebase console. -
On the Cloud Messaging tab, click Manage service accounts.
The link opens the Google Cloud IAM & Admin page, and displays the service accounts automatically generated when you created the Firebase project:
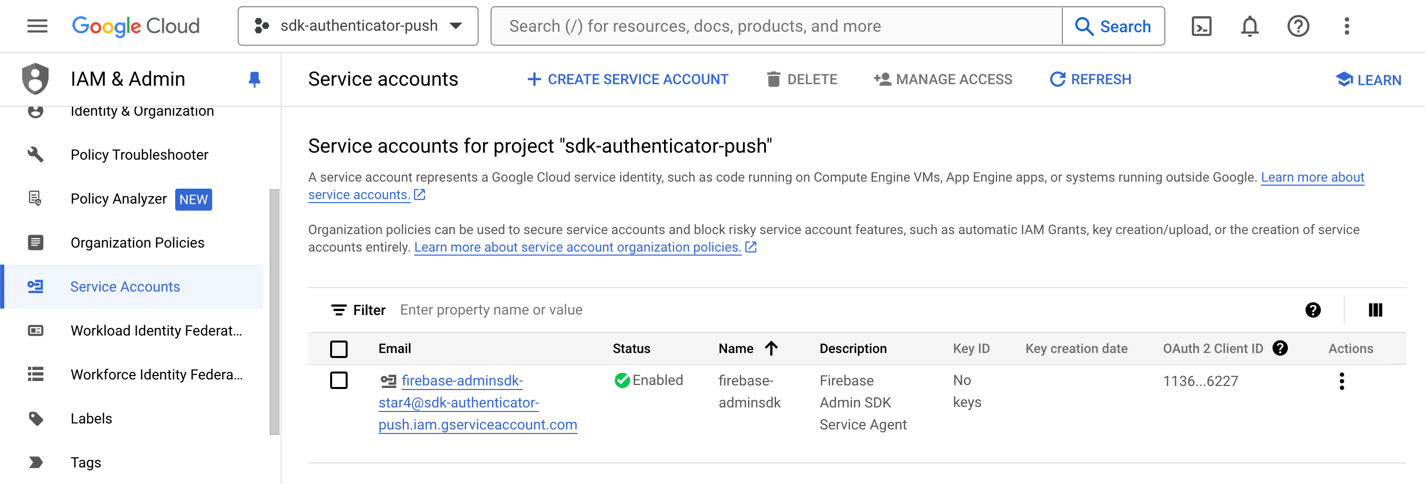 Figure 4. Google Cloud console showing the generated Firebase service account.
 -
In the Actions column, click the vertical ellipsis icon ( ) next to the service account, and then click Manage keys.
-
On the Keys page, click Add key, and then click Create new key.
-
Select JSON, and then click Create.
The page generates a key for the Firebase service account, and downloads the JSON file.
You will upload this file when you configure Push notifications in AWS.
Step 2. Configure Push notifications for iOS
In this step, you configure Apple Push Notification service (APNS), which handles sending the push notifications to iOS devices.
You create a key that provides access to the service for third-parties.
Prerequisites
-
An Apple developer Admin account.
Developer accounts cannot create the required keys.
-
An iOS application in XCode configured with the Push Notifications capability.
You can add capabilities when creating an iOS app project, or add them to an existing project. Refer to Adding capabilities to your app in the Apple developer documentation.
For development purposes, you can download the Ping (ForgeRock) Authenticator module sample app from GitHub.
Register a new key for APNs
-
With an admin account, log in to the Apple Developer console.
-
Navigate to Program resources > Certificates, IDs & Profiles > Keys.
-
Next to the Keys label, click the Add icon ().
-
Enter a Key Name.
For example,
APNs key for Push. -
Select Apple Push Notifications service (APNs).
-
Click Continue.
-
Check the details of the key, and then click Register.
-
On the Download Your Key page:
-
Make a note of the 10-character Key ID.
For example,
YCH15BO820. -
Click Download and keep a copy of the
.p8file safe.You cannot download or view the key again, so ensure you have a local copy.
-
-
Click Done.
You will upload the .p8 file and use the key ID when you configure Push notifications in AWS.
Step 3. Configure Push notifications in AWS
In this step, you use the service account and key created in the previous steps to set up Amazon Simple Notification Service (SNS) to be able to route push notification messages to Android and iOS devices.
You also create a service account and associated access token to provide access to the service to your server.
Set up AWS for Android push notifications
-
Log in to the AWS console: https://console.aws.amazon.com/console/home
-
In the search bar, enter
SNS, and then select Simple Notification Service from the list of results.Click the star icon () to pin the service to the toolbar in the AWS console. -
In the left menu, navigate to .
-
In the Platform applications panel, click Create platform application.
-
On the Create platform application page:
-
In Application name, enter a name for the platform application.
For example,
Android_Push_Messaging. -
In Push notification platform, select Firebase Cloud Messaging (FCM).
The page displays the Firebase Cloud Messaging Credentials section.
-
In Authentication method, select Token.
The page displays additional fields.
-
In Service JSON, click Choose file, and navigate to the JSON file that you downloaded from Firebase when you created a Firebase key previously.
-
-
Click Create platform application.
The page creates the application and displays the details pane:
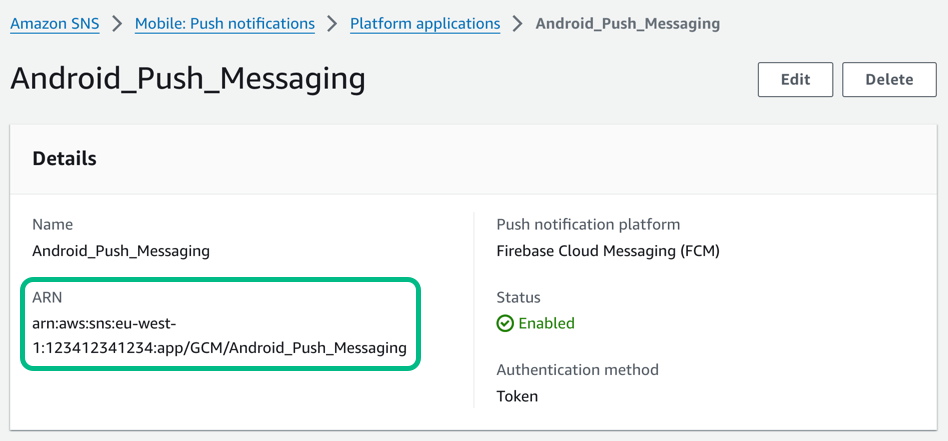 Figure 5. An Android platform application in AWS, showing the ARN.
-
-
Make a note of the ARN value. You need this value when you Configure a server for push notifications.
Set up AWS for iOS push notifications
-
Log in to the AWS console: https://console.aws.amazon.com/console/home
-
In the search bar, enter
SNS, and then select Simple Notification Service from the list of results.Click the star icon () to pin the service to the toolbar in the AWS console. -
In the left menu, navigate to .
-
In the Platform applications panel, click Create platform application.
-
On the Create platform application page:
-
In Application name, enter a name for the platform application.
For example,
iOS_Push_Messaging. -
In Push notification platform, select Apple iOS/VoIP/MacOS.
The page displays the Apple credentials section.
-
In the Apple credentials section:
-
In Push service, select iOS.
-
In Authentication method, select Token.
The page displays additional fields.
-
In Signing key, click Choose file, and navigate to the
.p8file that you downloaded from Apple when you registered a new key for APNs.After selecting the file, the page populates the Signing key text field with the private key from the
.p8file. -
In Signing key ID, enter the 10-digit ID of the key you created when you registered a new key for APNs.
For example,
YUGX2BO820. -
In Team ID, enter the ID of your team in the Apple Developer Program.
You can view your Team ID on the Membership details page in the Apple developer console. -
In Bundle ID, enter the bundle ID of the iOS application you are adding push notifications to.
For example,
com.forgerock.authenticator.sample.
-
-
Click Create platform application.
The page creates the application and displays the details pane:
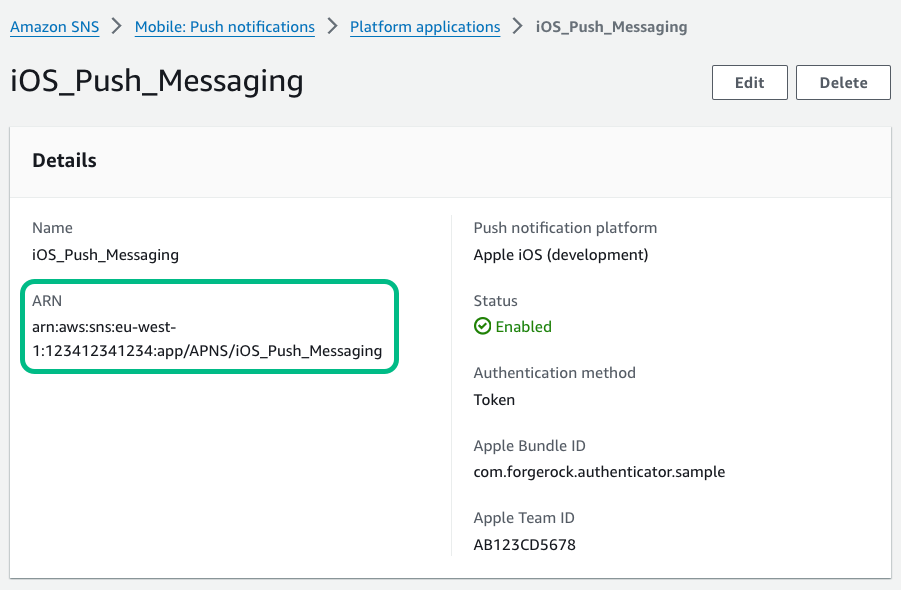 Figure 6. An iOS platform application in AWS, showing the ARN.
-
-
Make a note of the ARN value. You need this value when you Configure a server for push notifications.
Create a service account with access to the ARN endpoints
-
Log in to the AWS console: https://console.aws.amazon.com/console/home
-
In the search bar, enter
IAM, and then select IAM from the list of results.Click the star icon () to pin the service to the toolbar in the AWS console. -
In the left menu, navigate to .
-
Click Create user.
-
In User name, enter a name for the user account that the access key will represent.
For example,
sns_arn_user. -
Click Next.
-
In Permissions options, select Attach policies directly.
The page displays additional fields.
-
In Permissions policies, in the search bar, enter
SNSFull, and then select the checkbox next toAmazonSNSFullAccess.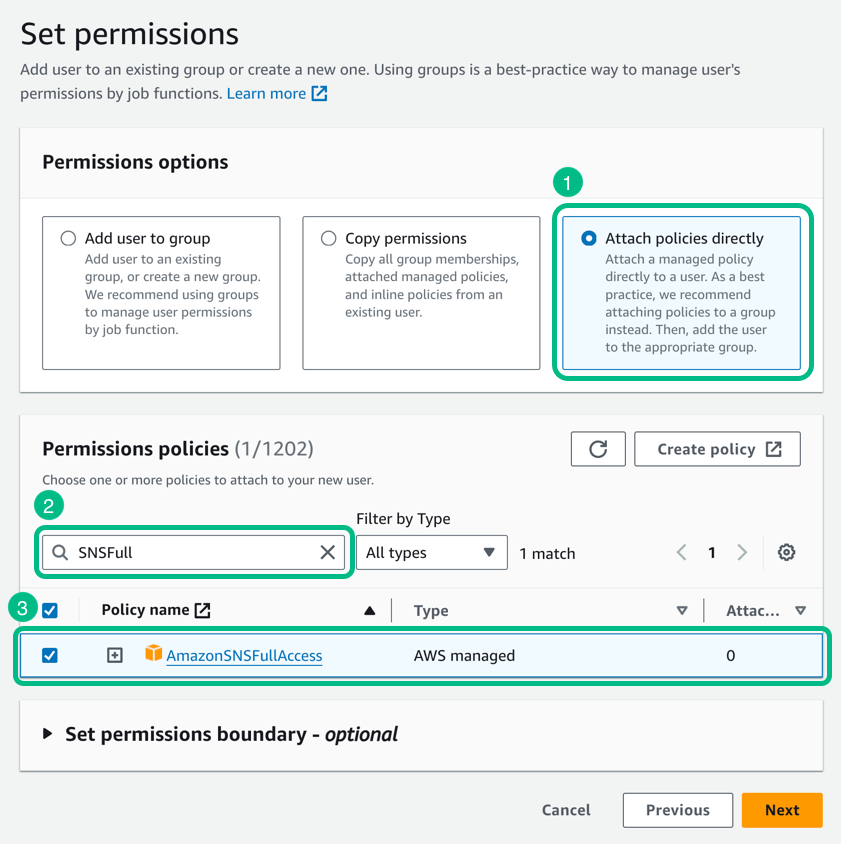 Figure 7. Adding the SNS permission policy to a user in AWS IAM.
 -
Click Next, review the details of the account, and then click Create user.
Create an access token for the service account
-
Log in to the AWS console: https://console.aws.amazon.com/console/home
-
In the search bar, enter
IAM, and then select IAM from the list of results.Click the star icon () to pin the service to the toolbar in the AWS console. -
In the left menu, navigate to , and then click the service account you created previously.
-
In the Summary pane, click Create access key.
-
On the Access key best practices & alternatives page:
-
In Use case, select Third-party service
-
Under Confirmation, select the I understand the above recommendation and want to proceed to create an access key checkbox.
-
Click Next.
-
-
In Description tag value, enter the purpose of the access key.
For example,
server access to SNS ARN endpoints -
Click Create access key.
-
Make a note of the provided values:
-
Access Key ID.
For example,
AKIAXOSPRCH15LEES -
Secret access key.
For example,
9eF7EcWMZzChI51BBHkLeElXk8R3XHv7/n7QSiwoUFJ
Click Download .csv file to download a file containing the values for safe-keeping. -
-
Click Done.
Step 4. Configure an PingOne Advanced Identity Cloud or PingAM server for push notifications
In this step, you configure your server to connect to SNS so that it can send out push notifications.
You also create an authentication journey that will register your client application as an MFA device, and send out push notifications.
Add the Authenticator (Push) service
In this step you configure your server to operate with the Ping (ForgeRock) Authenticator module.
-
Advanced Identity Cloud
-
Self-managed PingAM server
-
Log in to the PingOne Advanced Identity Cloud admin UI as an administrator.
-
In the left menu pane, select Native Consoles > Access Management.
The realm overview for the Alpha realm displays.
-
Select Services, and then click Add a Service.
-
In Choose a service type, select ForgeRock Authenticator (Push) Service, and then click Create.
-
Click Save Changes to accept the default settings.
-
Log in to the AM admin UI as an administrator.
The realm overview for the Top Level Realm displays.
-
Select Services, and then click Add a Service.
-
In Choose a service type, select ForgeRock Authenticator (Push) Service, and then click Create.
-
Click Save Changes to accept the default settings.
Connect your server to Amazon SNS
In this step you configure your server with the settings it needs to be able to contact Amazon SNS to send push notifications to mobile devices.
-
Advanced Identity Cloud
-
Self-managed PingAM server
-
Log in to the PingOne Advanced Identity Cloud admin UI as an administrator.
-
In the left menu pane, select Native Consoles > Access Management.
The realm overview for the Alpha realm displays.
-
Select Services, and then click Add a Service.
-
In Choose a service type, select Push Notification Service.
-
In SNS Access Key ID, enter the Access key ID value of the access token you created previously.
For example,
AKIAXOSPRCH15LEES.If you downloaded the CSV file when you created the access key, the first value in the file is the Access Key ID. -
In SNS Access Key Secret, enter the Access key value from the access token you created previously.
For example,
9eF7EcWMZzChI51BBHkLeElXk8R3XHv7/n7QSiwoUFJ.If you downloaded the CSV file when you created the access key, the second value in the CSV file is the Secret access key. -
In SNS Endpoint for APNS, enter the iOS ARN endpoint generated by Amazon SNS.
For example,
arn:aws:sns:eu-west-1:123412341234:app/APNS/iOS_Push_Messaging. -
In SNS Endpoint for GCM, enter the Android ARN endpoint generated by Amazon SNS.
For example,
arn:aws:sns:eu-west-1:123412341234:app/GCM/Android_Push_Messaging. -
Click Create, and then click Save Changes.
-
Log in to the AM admin UI as an administrator.
The realm overview for the Top Level Realm displays.
-
Select Services, and then click Add a Service.
-
In Choose a service type, select Push Notification Service.
-
In SNS Access Key ID, enter the Access key ID value of the access token you created previously.
For example,
AKIAXOSPRCH15LEES.If you downloaded the CSV file when you created the access key, the first value in the file is the Access Key ID. -
In SNS Access Key Secret, enter the Access key value from the access token you created previously.
For example,
9eF7EcWMZzChI51BBHkLeElXk8R3XHv7/n7QSiwoUFJ.If you downloaded the CSV file when you created the access key, the second value in the CSV file is the Secret access key. -
In SNS Endpoint for APNS, enter the iOS ARN endpoint generated by Amazon SNS.
For example,
arn:aws:sns:eu-west-1:123412341234:app/APNS/iOS_Push_Messaging. -
In SNS Endpoint for GCM, enter the Android ARN endpoint generated by Amazon SNS.
For example,
arn:aws:sns:eu-west-1:123412341234:app/GCM/Android_Push_Messaging. -
Click Create, and then click Save Changes.
Create a push registration and authentication journey
In this step you create an authentication journey that registers a device running an app built with the Ping (ForgeRock) Authenticator module to the user’s profile if they have not done so already, then send a push notification to that device.
The journey then polls until it receives a response or timeout from the device. It verifies the returned data and completes the authentication journey if valid.
Choose whether you are creating the journey in PingOne Advanced Identity Cloud or a self-managed PingAM server, and follow the instructions to create the required authentication journey:
-
Advanced Identity Cloud
-
Self-managed PingAM server
-
In the PingOne Advanced Identity Cloud admin UI
-
Select the realm that will contain the authentication journey.
-
Select Journeys, and click New Journey.
-
Enter a name for your tree in Name page; for example,
MFAwithPush -
In Identity Object, select the identity type that will be authenticating, for example
Alpha realm - Users. -
Click Save.
The authentication journey designer page is displayed with the default Start, Failure, and Success nodes.
-
-
Add the following nodes to the designer area:
-
Connect the nodes as shown:
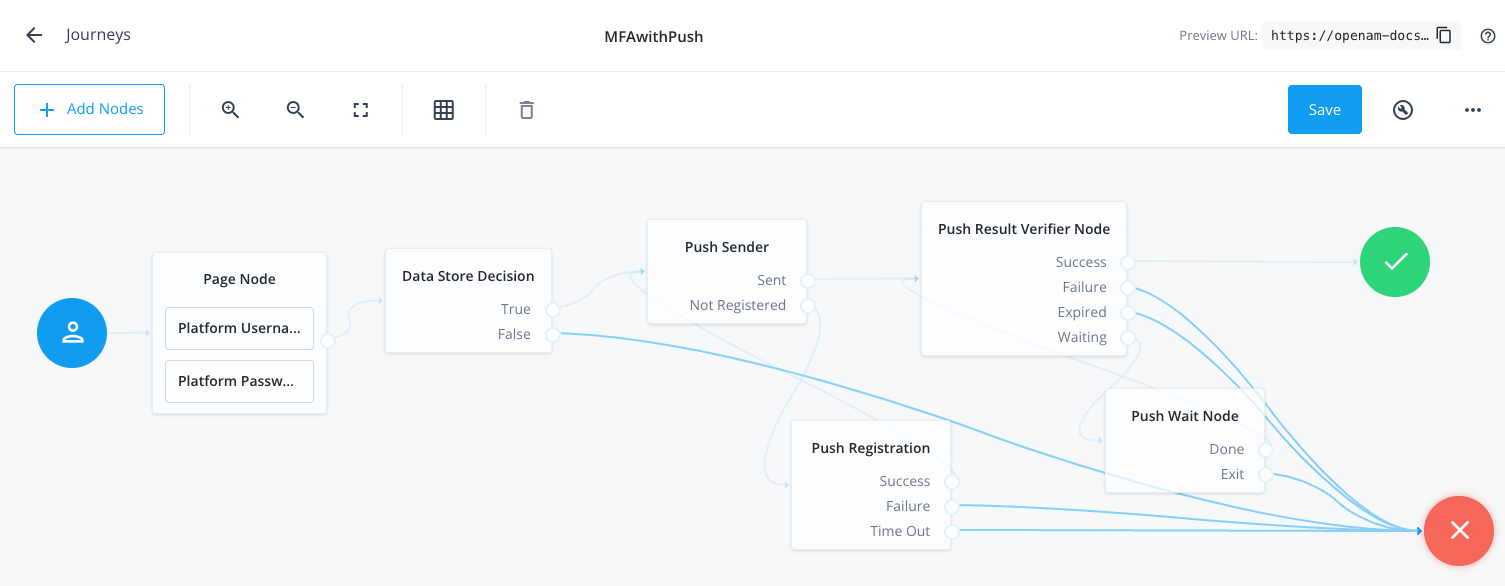 Figure 8. Connect the nodes to identify the user, send a push notification, and very the result.
 -
In the Push Sender node, select the type of push notification the journey sends to the ForgeRock Authenticator:
- Tap to Accept
-
Requires the user to tap to accept.
- Display Challenge Code
-
Requires the user to select one of three numbers displayed on their device. This selected number must match the code displayed in the browser for the request to be verified.
- Use Biometrics to Accept
-
Requires the user’s biometric authentication to process the notification.
For information on how these options appear in the ForgeRock Authenticator, refer to Authenticate using a push notification.
-
Save your changes.
-
In the AM admin UI:
-
Select the realm that will contain the authentication tree.
-
Select Authentication > Trees, and click Create Tree.
-
Enter a name for your tree in the New Tree page; for example,
MFAwithPush, and click Create.The authentication tree designer page is displayed with the default Start, Failure, and Success nodes.
-
-
Add the following nodes to the designer area:
-
Connect the nodes as shown:
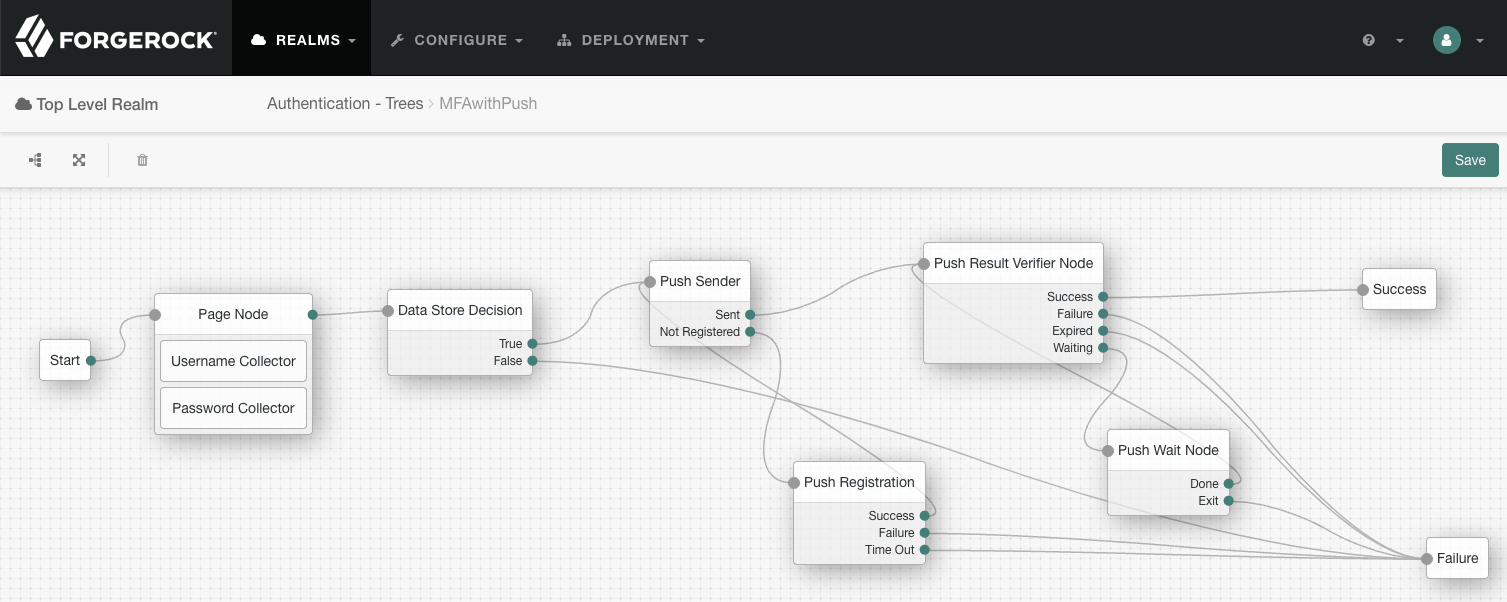 Figure 9. Connect the nodes to identify the user, send a push notification, and very the result.
 -
In the Push Sender node, select the type of push notification the journey sends to the ForgeRock Authenticator:
- Tap to Accept
-
Requires the user to tap to accept.
- Display Challenge Code
-
Requires the user to select one of three numbers displayed on their device. This selected number must match the code displayed in the browser for the request to be verified.
- Use Biometrics to Accept
-
Requires the user’s biometric authentication to process the notification.
For information on how these options appear in the ForgeRock Authenticator, refer to Authenticate using a push notification.
-
Save your changes.
The tree you create is a simple example for the purposes of demonstrating a basic push authentication journey. In a production environment, you could include additional nodes, such as:
- Get Authenticator App node
-
Provides links to download the ForgeRock Authenticator for Android and iOS.
- MFA Registration Options node
-
Provides options for users to register a multi-factor authentication device, get the authenticator app, or skip the registration process.
- Opt-out Multi-Factor Authentication node
-
Sets an attribute in the user’s profile which lets them skip multi-factor authentication.
- Recovery Code Display node
-
Lets a user view recovery codes to use in case they lose or damage the authenticator device they register.
- Recovery Code Collector Decision node
-
Lets a user enter their recovery codes to authenticate in case they have lost or damaged their registered authenticator device.
- Retry Limit Decision node
-
Lets a journey loop a specified number of times, for example, in case the user’s device is experiencing connectivity issues, for example.
Step 5: Configure the app for push notifications
In this step, you configure your application projects to use either Firebase Cloud Messaging or the Apple Push Notification service.
Enabling push notification support in an Android app
-
In Android Studio, open your authenticator app project and switch to the Project view.
-
Copy the
google-services.jsonfile that you downloaded from the Firebase console into the app-level root directory of your authenticator app: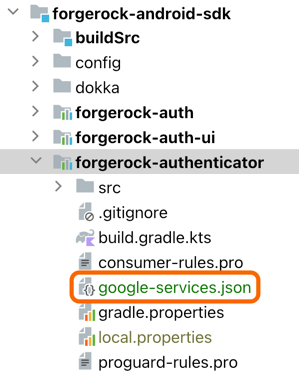 Figure 10. Adding the
google-services.jsonto the app root in Android Studio. -
To make the file available to the app, add the Google services Gradle plugin (
com.google.gms.google-services) as a dependency to your project.-
In your root-level Gradle file:
-
Kotlin
-
Groovy
build.gradle.ktsplugins { id("io.github.gradle-nexus.publish-plugin") version "1.1.0" id("org.sonatype.gradle.plugins.scan") version "2.4.0" id("org.jetbrains.dokka") version "1.9.10" id("com.android.application") version "8.3.2" apply false id("com.android.library") version "8.3.2" apply false id("org.jetbrains.kotlin.android") version "1.9.22" apply false // ... // Add the dependency for the Google services Gradle plugin id("com.google.gms.google-services") version "4.4.2" apply false }kotlinbuild.gradleplugins { id 'io.github.gradle-nexus.publish-plugin' version '1.1.0' id 'org.sonatype.gradle.plugins.scan' version '2.4.0' id 'org.jetbrains.dokka' version '1.9.10' id 'com.android.application' version '8.3.2' apply false id 'com.android.library' version '8.3.2' apply false id 'org.jetbrains.kotlin.android' version '1.9.22' apply false // ... // Add the dependency for the Google services Gradle plugin id 'com.google.gms.google-services' version '4.4.2' apply false }groovy -
-
In your app-level Gradle file:
-
Kotlin
-
Groovy
build.gradle.ktsplugins { id("com.android.library") id("com.adarshr.test-logger") id("maven-publish") id("signing") id("kotlin-android") // ... // Add the Google services Gradle plugin id("com.google.gms.google-services") }kotlinbuild.gradleplugins { id 'com.android.library' id 'com.adarshr.test-logger' id 'maven-publish' id 'signing' id 'kotlin-android' // ... // Add the Google services Gradle plugin id 'com.google.gms.google-services' }groovy -
-
-
Switch to the Android view in Android Studio, and add the following code to the authenticator application manifest file.
Insert the code inside the
<application>tag.AndroidManifest.xml<service android:name=".controller.FcmService" android:exported="false"> <intent-filter> <action android:name="com.google.firebase.MESSAGING_EVENT" /> </intent-filter> </service>xml
Enabling push notification support to an iOS app
-
In Xcode, open your authenticator app project.
-
In the left menu, select the project root folder.
-
In the project pane, under Targets, click your application, then click the Signing & Capabilities tab.
-
Confirm that the application has the Push Notifications capability:
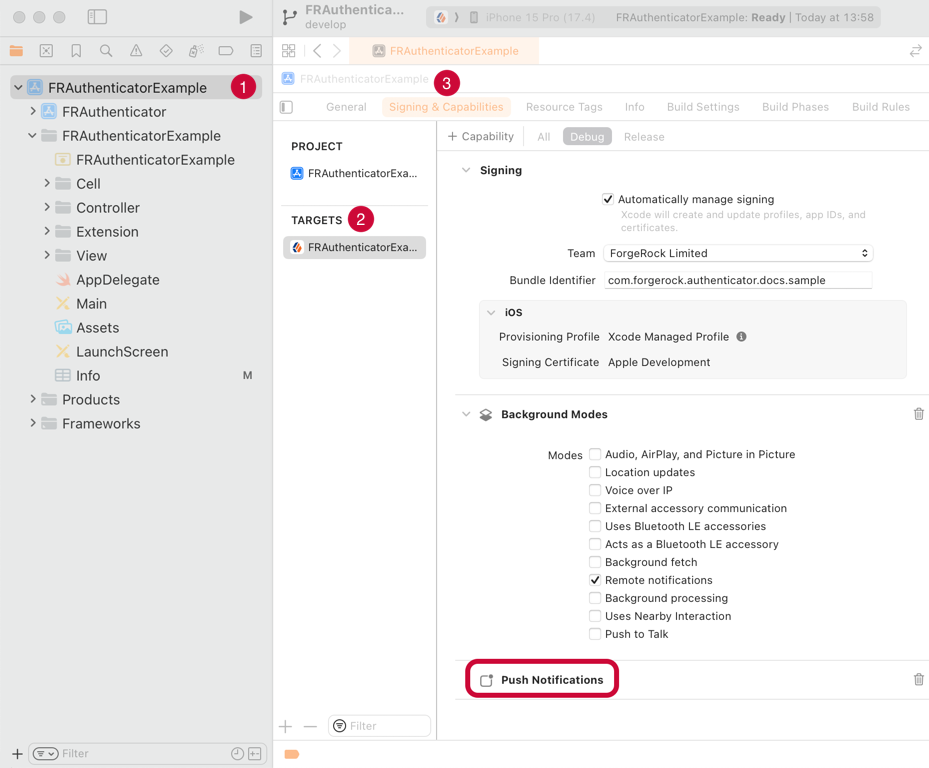 Figure 11. Checking for the Push Notifications capability in Xcode.
 -
With an admin account, log in to the Apple Developer console.
-
Navigate to Program resources > Certificates, IDs & Profiles > Identifiers.
-
Click the name of the application to which you are adding push notification support.
-
On the Capabilities tab, ensure Push Notifications is selected.
Step 6. Configure the Ping (ForgeRock) Authenticator module for push notifications
In this final step, you add the code to your application that obtains the unique device code required to ensure push notifications reach their intended audience.
You also add code that leverages the Ping (ForgeRock) Authenticator module to handle the push registration and authentication journey you created earlier.
Prerequisites
To complete the procedures on this page, you must set up your application to use the Ping (ForgeRock) Authenticator module:
Register a device token to receive notifications
The Ping (ForgeRock) Authenticator module uses an Apple or Google service to receive push notifications sent from your server via Amazon SNS.
Each instance of your application requires a unique device registration token to receive these push notifications.
Use the registerForRemoteNotifications() method to register the token:
-
Android
-
iOS
// Retrieve the FCM token
FirebaseMessaging.getInstance().getToken()
        .addOnCompleteListener(task -> {
            if (!task.isSuccessful()) {
                Log.e(TAG, "getInstanceId failed", task.getException());
                return;
            }

            // Get new Instance ID token
            fcmToken = task.getResult();
            Log.v("FCM token:", fcmToken);

            // Register the token with the SDK to enable Push mechanisms
            try {
                fraClient.registerForRemoteNotifications(fcmToken);
            } catch (AuthenticatorException e) {
                Log.e(TAG,"Error registering FCM token: ", e);
            }
});func application(_ application: UIApplication, didFinishLaunchingWithOptions launchOptions: [UIApplication.LaunchOptionsKey: Any]?) -> Bool {
// Register Push Notification for your app in AppDelegate.swift
let center = UNUserNotificationCenter.current()
center.requestAuthorization(options: [.alert, .sound, .badge]) { (granted, error) in }
application.registerForRemoteNotifications()
return true
}
func application(_ application: UIApplication, didRegisterForRemoteNotificationsWithDeviceToken deviceToken: Data) {
// Upon successful registration and receiving device token from APNs, register the token to the Authenticator module
FRAPushHandler.shared.application(application, didRegisterForRemoteNotificationsWithDeviceToken: deviceToken)
}
func application(_ application: UIApplication, didFailToRegisterForRemoteNotificationsWithError error: Error) {
// Upon receiving an error from APNs, notify Authenticator module to properly update the status
FRAPushHandler.shared.application(application, didFailToRegisterForRemoteNotificationsWithError: error)
}Handle registration of the app for push notifications
The first time you authenticate to your authentication tree, you are asked to register a device by scanning a QR code.
| Your application must implement a QR code scanning mechanism. The QR code contains the URI used for registering the device, although you could also offer a method for entering the URI manually. |
After capturing the URI, register the authentication mechanism in your app:
-
Android
-
iOS
fraClient.createMechanismFromUri("qrcode_scan_result", new FRAListener<Mechanism>() {

    @Override
    public void onSuccess(Mechanism mechanism) {
        // called when device enrollment was successful.
    }

    @Override
    public void onFailure(final MechanismCreationException e) {
        // called when device enrollment has failed.
    }
});guard let fraClient = FRAClient.shared else {
print("FRAuthenticator SDK is not initialized")
return
}
fraClient.createMechanismFromUri(uri: url, onSuccess: { (mechanism) in
// Method call occurs when device enrollment is successful.
}, onError: { (error) in
// Method call occurs when device enrollment fails.
})Handle push notifications from the server
Your app that uses the Ping (ForgeRock) Authenticator module needs to respond to incoming push notifications, and ask the user to either accept or reject the authentication.
-
Android
-
iOS
Receive FCM Push notifications by using FirebaseMessagingService#onMessageReceived.
To handle RemoteMessage, use the FRAClient.handleMessage() method:
public void onMessageReceived(final RemoteMessage message) {
PushNotification notification = fraClient.handleMessage(message);
}Receive Apple push notifications by using the application(_:didReceiveRemoteNotification:fetchCompletionHandler:) method in AppDelegate.
To handle RemoteNotification, use the FRAPushHandler.shared.application(:didReceiveRemoteNotification) method.
The method returns a PushNotification object, which contains the accept and deny methods to handle the authentication request:
func application(_ application: UIApplication, didReceiveRemoteNotification userInfo: [AnyHashable : Any], fetchCompletionHandler completionHandler: @escaping (UIBackgroundFetchResult) -> Void) {
// Once you receive the remote notification, handle it with FRAPushHandler to get the PushNotification object.
// If RemoteNotification does not contain the expected payload structured from {am_name}, the Authenticator module does not return the PushNotification object.
if let notification = FRAPushHandler.shared.application(application, didReceiveRemoteNotification: userInfo) {
// With the PushNotification object, you can either accept or deny
notification.accept(onSuccess: {
}) { (error) in
}
}
}Obtain values from the push notification payload
The pushNotification class provide the following methods for obtaining values from the payload received in the push notification:
| Android method | iOS method | Description |
|---|---|---|
|
|
Returns a JSON string containing the values specified in the Custom Payload Attributes property of the Push Sender node. |
|
|
Returns the string specified in the User Message property of the Push Sender node, such as |
|
|
Returns a JSON string containing additional context information when the Share Context info property is enabled in the Push Sender node. Possible attributes in the JSON string are as follows:
Ensure you check these attributes for Example: json |
|
|
Returns a PushType enum value that specifies the type of push notification to present to the user. This value is based on the configuration of the Push Type property in the Push Sender node. Possible values are:
|
|
|
Returns an array of integers that matches those displayed on the login screen and populates the |
|
|
Returns the timestamp of when the authentication server generated the push authentication payload. |
Handle different push notification types
Use code similar to the following to determine which push type was requested in the payload:
-
Android
-
iOS
if (notification.getPushType() == PushType.CHALLENGE) {
notification.accept(choice, listener);
} else if (notification.getPushType() == PushType.BIOMETRIC) {
notification.accept(null, null, true, activity, listener);
} else {
notification.accept(listener);
}if notification.pushType == .challenge {
notification.accept(
challengeResponse: "34",
onSuccess: successCallback,
onError: errorCallback
)
} else if notification.pushType == .biometric {
notification.accept(
title: "title",
allowDeviceCredentials: true,
onSuccess: successCallback,
onError: errorCallback
)
} else {
notification.accept(
onSuccess: successCallback,
onError: errorCallback
)
}Handle the default push type
The PushNotification class or object provides an accept method for handling a PushType.default authentication request:
-
Android
-
iOS
pushNotification.accept(new FRAListener<Void>() {
@Override
public void onSuccess(Void result) {
// called when accepting the push authentication request was successful.
}
@Override
public void onFailure(final PushAuthenticationException e) {
// called when denying the push authentication request, or it has failed.
}
});pushNotification.accept(onSuccess: {
// called when accepting the push authentication request was successful.
}, onError: { (error) in
// called when denying the push authentication request, or it has failed.
})Handle the challenge push type
For PushType.challenge authentication requests, use the following accept method that receives the challenge as a parameter:
-
Android
-
iOS
public final void accept(
@NonNull String challengeResponse,
@NonNull FRAListener<Void> listener
) {}public func accept(
challengeResponse: String,
onSuccess: @escaping SuccessCallback,
onError: @escaping ErrorCallback
) {}Handle the biometric push type
For PushType.biometric authentication requests, use the following accept method that processes the biometric authentication request:
-
Android
-
iOS
@RequiresApi(Build.VERSION_CODES.M)
public final void accept(
String title,
String subtitle,
boolean allowDeviceCredentials,
@NonNull AppCompatActivity activity,
@NonNull FRAListener<Void> listener
) {}public func accept(
title: String,
allowDeviceCredentials: Bool,
onSuccess: @escaping SuccessCallback,
onError: @escaping ErrorCallback
) {}Integrate MFA using OATH one-time passwords
This topic explains how to integrate support for OATH one-time passwords into your projects that use the Ping (ForgeRock) Authenticator module.
Prerequisites
To integrate OATH one-time passwords into your application that uses the Ping (ForgeRock) Authenticator module, ensure you have completed the following tasks first:
-
Configure your server to request a one-time password during the authentication journey.
-
Integrate the Ping (ForgeRock) Authenticator module into your app.
-
Start the Ping (ForgeRock) Authenticator module in your app.
Sample apps
You can find example source code for integrating one-time passwords in the sample authenticator application repositories on GitHub:
Step 1. Register your app
The first time you authenticate you are asked to register a device by scanning a QR code.
Your application must implement a QR code scanning mechanism. The QR code contains the URI used for registering the device, although you could also offer a method for entering the URI manually.
After obtaining the URI, register the authentication mechanism in your app:
-
Android
-
iOS
Register the OATH mechanism by implementing the FRAClient.createMechanismFromUri() method, and use FRAListener to receive the newly created mechanism:
fraClient.createMechanismFromUri("qrcode_scan_result", new FRAListener<Mechanism>() {
@Override
public void onSuccess(Mechanism mechanism) {
// called when device enrollment was successful.
}
@Override
public void onFailure(final MechanismCreationException e) {
// called when device enrollment has failed.
}
});Implement FRAClient.shared in your ViewController, or View to receive the Mechanism object:
guard let fraClient = FRAClient.shared else {
    print("FRAuthenticator SDK is not initialized")
    return
}

fraClient.createMechanismFromUri(uri: url, onSuccess: { (mechanism) in
    // Method call occurs when device enrollment is successful.
}, onError: { (error) in
    // Method call occurs when device enrollment fails.
})Step 2. Generate one-time passwords
With the OATH mechanisms now registered, your app can obtain the current, and next tokens, as an OathTokenCode object:
-
Android
-
iOS
OathTokenCode token = oath.getOathTokenCode();
String otp = token.getCurrentCode();do {
// Generate OathTokenCode
let code = try mechanism.generateCode()
// Update UI with generated code
codeLabel?.text = code.code
} catch {
// Handle errors for generating OATH code
}Integrate authenticator app policies
You can build and distribute your own authenticator app to your users so that they can participate in multi-factor authentication journeys. To help ensure the security of your app—and therefore your system—you can enable authenticator app policies.
This topic explains how to integrate support for authenticator app policies into your projects that use the Ping (ForgeRock) Authenticator module.
Prerequisites
To integrate app policies into your application that uses the Ping (ForgeRock) Authenticator module, ensure you have completed the following tasks first:
-
Configure your server to apply app policies.
-
Integrate the Ping (ForgeRock) Authenticator module into your app.
-
Start the Ping (ForgeRock) Authenticator module in your app.
Step 1. Handle policies on the client
Policies are associated with an account registered in your authenticator app.
The Account class has the following attributes for handling app policies:
| Attribute | Type | Visibility | Description |
|---|---|---|---|
|
String |
Public |
The policy that caused the account to become locked. Only the first policy that was breached is listed. |
|
String |
Public |
A JSON string containing the policy names to apply, as configured in the combined MFA node. |
|
Boolean |
Private 1 |
Whether the account is currently locked or not. |
1 Use the public isLocked method to determine whether the account is currently locked or not
You can use the lockAccount and unlockAccount methods to manage registered accounts. To lock an account, you need to provide the policy that has been breached, as follows:
-
Android
-
iOS
// Reference to the authenticator object:
FRAClient fraClient = FRAClient.builder()
    .withContext(context)
    .start();

// Reference to the "Device tampering detection" policy:
FRAPolicy policy = new DeviceTamperingPolicy();

// Lock the account:
boolean result = fraClient.lockAccount(account, policy);// Create the authenticator object:
FRAClient.start()
// Reference to the "Device tampering detection" policy:
let policy = DeviceTamperingPolicy()
// Lock the account:
let result = try FRAClient.lockAccount(account: account, policy: policy)Step 2. Create custom policies
You can extend the new abstract class FRAPolicy to create new policies that you can attach to accounts.
In the class, implement the evaluate method which returns true when policy conditions are met or false if the conditions are breached. For example, if the tampered score exceeds the specified value, the evaluator would return false.
-
Android
-
iOS
static class AppIsUpToDatePolicy extends FRAPolicy {
    @Override
    public String getName() {
        return "appIsUpToDate";
    }

    @Override
    public boolean evaluate(Context context) {
        // Policy condition logic here
        return true; // policy conditions met
        // return false; // policy conditions breached - lock account
    }
}class AppIsUpToDatePolicy: FRAPolicy {
public var name: String = "appIsUpToDate"
public var data: Any?
public func evaluate() -> Bool {
// Policy condition logic here
return true // policy conditions met
// return false // policy conditions breached - lock account
}
}To have the SDK evaluate your new policy, create a policy evaluator, as follows:
-
Android
-
iOS
Use FRAPolicyEvaluator.FRAPolicyEvaluatorBuilder and its methods withPolicies and withPolicy to pass policies to the evaluator:
FRAPolicyEvaluator policyEvaluator = new FRAPolicyEvaluator.FRAPolicyEvaluatorBuilder()
    .withPolicies(FRAPolicyEvaluator.DEFAULT_POLICIES)
    .withPolicy(new AppIsUpToDatePolicy())
.build();Use the FRAPolicyEvaluator.registerPolicies() method to pass policies to the evaluator.
Note that the default built-in policies are always evaluated.
To keep any existing registered policies on the account, specify the shouldOverride: false parameter:
let policyEvaluator = FRAPolicyEvaluator()
try policyEvaluator.registerPolicies(policies: [AppIsUpToDatePolicy()], shouldOverride: false)
FRAPolicyEvaluator.DEFAULT_POLICIES includes both of the default built-in policies BiometricAvailablePolicy and DeviceTamperingPolicy.
|
Pass the policy evaluator when building your authenticator client:
-
Android
-
iOS
FRAClient.builder()
    .withContext(context.getApplicationContext())
    .withPolicyEvaluator(policyEvaluator)
.start();try FRAClient.setPolicyEvaluator(policyEvaluator: policyEvaluator)
FRAClient.start()If the policy evaluator fails, the SDK automatically locks the account.
Locked accounts block certain methods, including FRAClient.updateAccount, PushMechanism.accept and OATHMechanism.getNextOathToken. Calling these methods on a locked account throws an AccountLockException.