Configure biometric authentication journeys
To use mobile biometrics with the Ping (ForgeRock) SDK for Android configure the authentication nodes in your journeys as follows:
-
In each WebAuthn Registration node and WebAuthn Authentication node:
-
Ensure the Return challenge as JavaScript option is not enabled
The SDK expects a JSON response from these nodes, enabling this option would cause the journey to fail
-
Set the Relying party identifier option to be the domain hosting the
assetlinks.jsonfileFor example,
openam-docs.forgeblocks.comYou do not need the protocol or the path.
-
-
In each WebAuthn Registration node
-
Set the Authentication attachment option to either
UNSPECIFIEDorPLATFORM -
Ensure the Accepted signing algorithms option includes either
ES256orRS256 -
Ensure the Limit registrations option is not enabled
-
Ensure the Preferred mode of attestation option is set to NONE.
Known limitationWebAuthn registration fails on Android devices when the "Preferred mode of attestation" is set to DIRECT or INDIRECT.
Learn more in Limitations.
-
Configure origin domains
To enable WebAuthn on Android devices, you must configure the nodes with the base64-encoded SHA-256 hash of the signing certificate as the origin domain.
The steps for obtaining the base64-encoded SHA-256 hash depend on the method you use to distribute your application.
-
Android App Bundles
-
Local debug keys
Follow these steps to download the app signing certificate, and then generate a base64-encoded SHA-256 hash:
-
In the Google Play Console:
-
Select the app that will be supporting mobile biometrics.
-
Navigate to Setup > App integrity > App signing.
-
In the App signing key certificate section, click Download certificate.
This downloads a local copy of the signing certificate, named
deployment_cert.der.
-
-
In a terminal window, navigate to the location of the
deployment_cert.derfile, and then run the following command:cat deployment_cert.der | openssl sha256 -binary | openssl base64 | tr '/+' '_-' | tr -d '='The command prints the base64-encode SHA-256 fingerprint of the signing key:
jEFEYh80K55iHYkxsBRLGtAP6wvjOS5Pj-ZKHHjwi0k -
Add a prefix of
android:apk-key-hash:to the base64-encode SHA-256 fingerprint. For example:android:apk-key-hash:jEFEYh80K55iHYkxsBRLGtAP6wvjOS5Pj-ZKHHjwi0k -
In each WebAuthn Registration node and WebAuthn Authentication node, set the Origin domains option to the value created in the previous step:
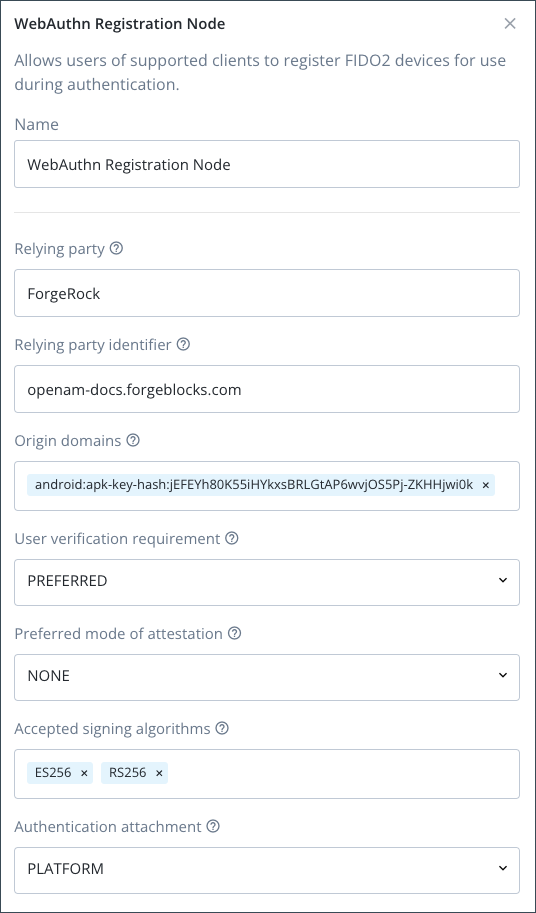 Figure 1. Example WebAuthn Registration node configuration
Follow these steps to extract the app signing certificate from the JKS and generate a base64-encoded SHA-256 hash:
-
In the
build.gradlefile for your application, check the settings defined in thesigningConfigsproperty:Example signingConfigs when using the default debug.jkssigningConfigs { debug { storeFile file('../debug.jks') storePassword 'android' keyAlias 'androiddebugkey' keyPassword 'android' } } -
In a terminal window, navigate to the location of the JKS file, and then run the following command:
keytool -exportcert -alias <keyAlias> -keystore <storeFile> | openssl sha256 -binary | openssl base64 | tr '/+' '_-' | tr -d '='Swap the <keyAlias> and <storeFile> placeholders with the values you obtained from your project. For example:
keytool -exportcert -alias "androiddebugkey" -keystore "./debug.jks" | openssl sha256 -binary | openssl base64 | tr '/+' '_-' | tr -d '=' -
When requested, enter the keystore password, as specified in the
keyPasswordproperty in thebuild.gradlefile.The command prints the base64-encoded SHA-256 fingerprint of the signing key:
Enter keystore password: android jEFEYh80K55iHYkxsBRLGtAP6wvjOS5Pj-ZKHHjwi0k -
Add a prefix of
android:apk-key-hash:to the base64-encode SHA-256 fingerprint. For example:android:apk-key-hash:jEFEYh80K55iHYkxsBRLGtAP6wvjOS5Pj-ZKHHjwi0k -
In each WebAuthn Registration node and WebAuthn Authentication node, set the Origin domains option to the value created in the previous step:
Figure 2. Example WebAuthn Registration node configuration
Summary
You have now configured your WebAuthn journey for use with the Ping (ForgeRock) SDK for Android.
You can now proceed to Configure the Ping (ForgeRock) SDK for Android for WebAuthn.