Step 5. Implement the UI in Flutter
Review how the application renders the home view.
In Android Studio, open sdk-sample-apps/flutter/flutter_todo, and navigate to the lib/main.dart file.
Notice the following:
-
The use of
import 'package:flutter/material.dart';from the Flutter library. -
The
TodoAppclass extendingStatefulWidget. -
The
_TodoAppStateclass extendingState<TodoApp>. -
Building the UI for the navigation bar.
main.dartimport 'package:flutter/material.dart';
import 'home.dart';
import 'login.dart';
import 'todolist.dart';
void main() {
runApp(TodoApp());
}
class TodoApp extends StatefulWidget {
@override
_TodoAppState createState() ⇒ _TodoAppState();
}
class _TodoAppState extends State<TodoApp> {
int _selectedIndex = 0;
final _pageOptions = [
HomePage(),
LoginPage(),
TodoList(),
];
void _onItemTapped(int index) {
setState(() {
_selectedIndex = index;
});
}
@override
Widget build(BuildContext context) {
return MaterialApp(
home: Scaffold(
body: _pageOptions[_selectedIndex],
bottomNavigationBar: BottomNavigationBar(
items: const <BottomNavigationBarItem>[
BottomNavigationBarItem(
icon: Icon(Icons.home),
label: 'Home',
),
BottomNavigationBarItem(
icon: Icon(Icons.vpn_key),
label: 'Sign In',
),
],
currentIndex: _selectedIndex,
selectedItemColor: Colors.blueAccent[800],
onTap: _onItemTapped,
backgroundColor: Colors.grey[200],
)
),
);
}
}Flutter uses something called MethodChannel to communicate between Flutter and the Native layer.
In this application we will define a MethodChannel with the following identifier: forgerock.com/SampleBridge.
The same identifier will be used in the FRSampleBridge so that the two layers communicate and pass information.
To initialize the Ping SDK when the log in view first loads, we call the frStart() method on the bridge code.
|
It’s important to initialize the SDK as early as possible. Call this initialization step, so it resolves before any other native SDK methods can be used. |
Building the login view
Navigate to the app’s login view within the Simulator. You should see an empty screen with a button, since the app doesn’t have the data needed to render the form. To render the correct form, retrieve the initial data from the server. This is our first task.
Open the lib/login.dart file. Integration points in the file are numbered, and described below:
login.dartimport 'dart:async'; (1)
import 'dart:convert';
import 'package:flutter/material.dart';
import 'package:flutter/scheduler.dart';
import 'package:flutter/services.dart';
import 'FRNode.dart'; (2)
import 'register.dart';
import 'todolist.dart';
import 'package:focus_detector/focus_detector.dart';
class LoginPage extends StatefulWidget {
@override
LoginPageState createState() ⇒ new _LoginPageState();
}
class _LoginPageState extends State<LoginPage> {
//Method channel as defined in the native Bridge code
static const platform = MethodChannel('forgerock.com/SampleBridge'); (3)
final List<TextField> _fields = [];
final List<TextEditingController> _controllers = [];
late FRNode? currentNode = null;
// Vital for identifying our FocusDetector when a rebuild occurs.
final Key _focusDetectorKey = UniqueKey();
@override
Widget build(BuildContext context) ⇒ FocusDetector(
key: _focusDetectorKey,
onFocusGained: () {
print('CharacterListPage gains focus');
currentNode = null;
_fields.clear();
_controllers.clear();
_login();
},
onFocusLost: () {
print('CharacterListPage lost focus');
},
child: Scaffold(
appBar: AppBar(
title: Text("Sign-In", style: TextStyle(color: Colors.grey[800]),),
backgroundColor: Colors.grey[200],
),
backgroundColor: Colors.grey[100],
body: Column(
children: [
_listView(),
_okButton(),
_registerButton()
],
)),
);
//Lifecycle Methods
@override
void initState() { (4)
super.initState();
SchedulerBinding.instance.addPostFrameCallback\((_) {
// When the first controller that will use the SDK is created
// call the 'frAuthStart' method to initialise the native SDKs
_startSDK();
});
}
// SDK Calls - Note the promise type responses. Handle errors on the UI layer as required
Future<void> _startSDK() async {
String response;
try {
// Start the SDK. Call the frAuthStart channel method to initialise the native SDKs
final String result = await platform.invokeMethod('frAuthStart');
response = 'SDK Started';
} on PlatformException catch (e) {
response = "SDK Start Failed: '${e.message}'.";
}
}
Future<void> _login() async { (5)
try {
//Call the default login tree.
final String result = await platform.invokeMethod('login'); (6)
Map<String, dynamic> frNodeMap = jsonDecode(result);
var frNode = FRNode.fromJson(frNodeMap);
currentNode = frNode;
//Upon completion, a node with callbacks will be returned, handle that node and present the callbacks to UI as needed.
_handleNode(frNode); (7)
} on PlatformException catch (e) {
debugPrint('SDK Error: $e'); (8)
Navigator.pop(context);
}
}
// Handling methods
void _handleNode(FRNode frNode) { (9)
// Go through the node callbacks and present the UI fields as needed. Check for the type of each callback to determine, what UI element is needed.
frNode.callbacks.forEach((frCallback) {
final controller = TextEditingController();
final field = TextField(
controller: controller,
// If the callback type is 'PasswordCallback', make this a 'secure' textField.
obscureText: frCallback.type == "PasswordCallback", (10)
enableSuggestions: false,
autocorrect: false,
decoration: InputDecoration(
border: OutlineInputBorder(),
labelText: frCallback.output[0].value,
),
);
setState(() {
_controllers.add(controller);
_fields.add(field); (11)
});
});
}
}| 1 | Import async, convert, scheduler, services from the flutter package. |
| 2 | Import 'FRNode.dart' |
| 3 | Create a static reference for the method channel |
| 4 | Override the initState Flutter lifecycle method and initialize the SDK. |
| 5 | After the SDK initialization is complete, call the _login() method. |
| 6 | Use the platform reference to call the Bridge login method platform.invokeMethod('login'). |
| 7 | Parse the response and call _handleNode() method. |
| 8 | Handle any errors that might be returned from the Bridge. |
| 9 | Handle nodes and their callbacks |
| 10 | Use the frCallback.type to differentiate between the two TextField objects and obscure the text of each TextField. |
| 11 | Add the TextField objects to the List and create the accompanying TextEditingControllers. |
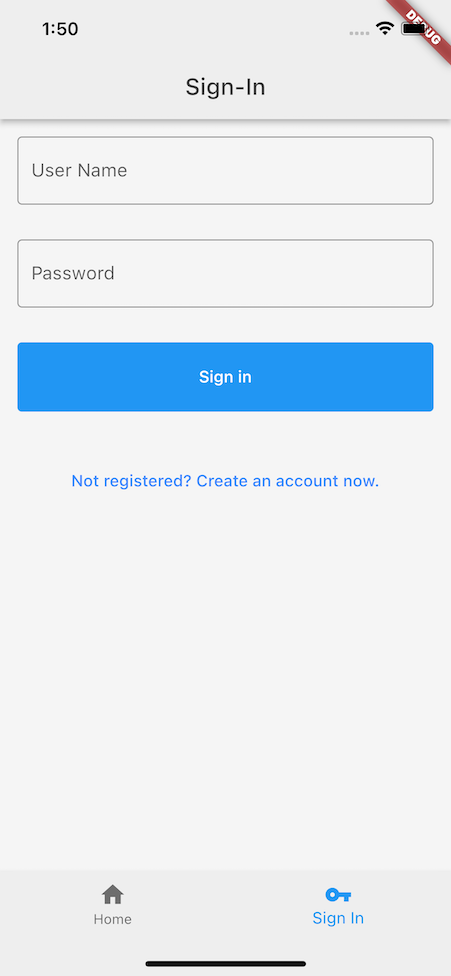
Run the app again, and you should see a dynamic form that reacts to the callbacks returned from our initial call to the authorization server:
Submitting the login form
Since a form that can’t submit anything isn’t very useful,
we’ll now handle the submission of the user input values to ForgeRock.
Continuing in login.dart, edit the current _okButton element,
adding an onPressed handler calling the _next() function.
This function should do the following:
-
Go through the
_controllersarray to capture the values of the form elements. -
Update the
Node callbackswith those values. -
Submit the results to ForgeRock.
-
Check the response for a
LoginSuccessmessage, or if a new node is returned, handle this in a similar way and resubmit the user inputs as needed. -
Handle errors with a generic failure message.
login.dartFuture<void> _next() async { // Capture the User Inputs from the UI, populate the currentNode callbacks and submit back to AM currentNode?.callbacks.asMap().forEach((index, frCallback) { _controllers.asMap().forEach((controllerIndex, controller) { if (controllerIndex == index) { frCallback.input[0].value = controller.text; } }); }); String jsonResponse = jsonEncode(currentNode); try { // Call the SDK next method, to submit the User Inputs to AM. This will return the next Node or a Success/Failure String result = await platform.invokeMethod('next', jsonResponse); Navigator.pop(context); Map<String, dynamic> response = jsonDecode(result); if (response["type"] == "LoginSuccess") { _navigateToNextScreen(context); } else { //If a new node is returned, handle this in a similar way and resubmit the user inputs as needed. Map<String, dynamic> frNodeMap = jsonDecode(result); var frNode = FRNode.fromJson(frNodeMap); currentNode = frNode; _handleNode(frNode); } } catch (e) { Navigator.pop(context); debugPrint('SDK Error: $e'); } } Widget _okButton() { return Container( color: Colors.transparent, width: MediaQuery.of(context).size.width, margin: EdgeInsets.all(15.0), height: 60, child: TextButton( style: ButtonStyle(backgroundColor: MaterialStateProperty.all(Colors.blue)), onPressed: () async { showAlertDialog(context); _next(); }, child: const Text( "Sign in", style: TextStyle(color: Colors.white), ), ), ); }
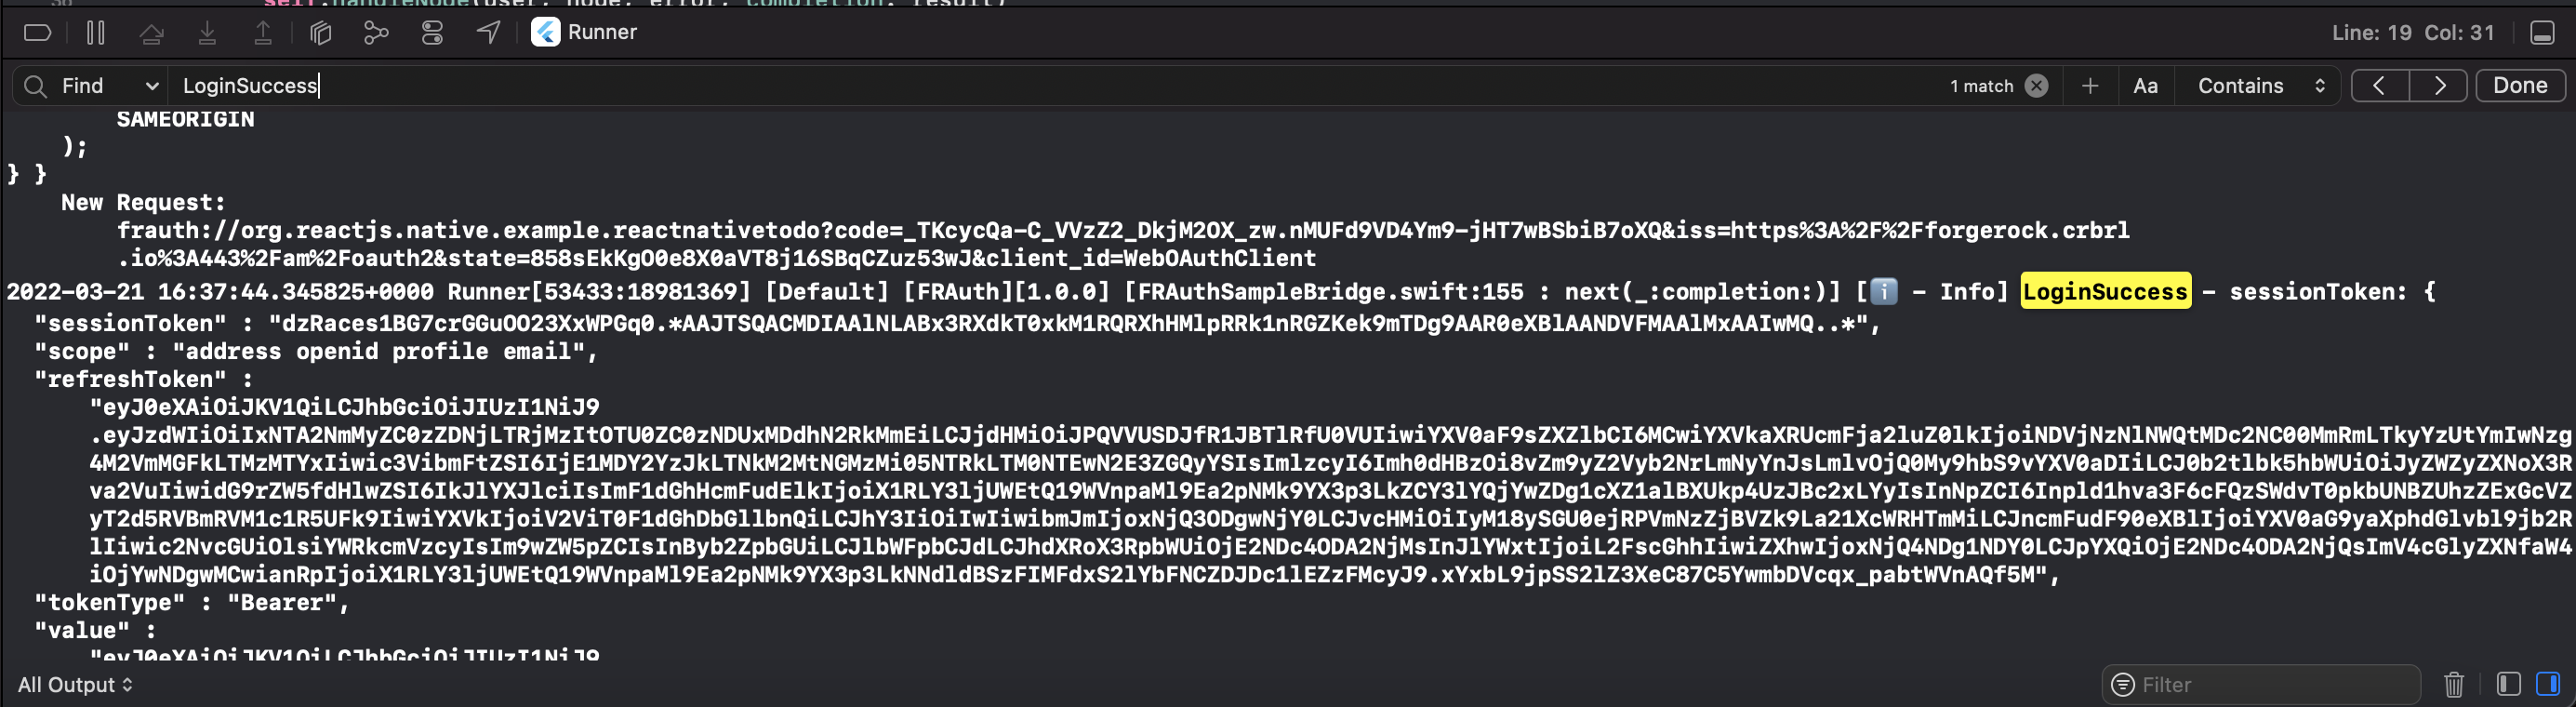
After the app refreshes, use the test user to login. If successful, you should see a success message. Congratulations, you are now able to authenticate users!
What’s more, you can verify the authentication details by going to the Xcode or Android Studio log, and observing the result of the last call to the server.
It should have a type of LoginSuccess with token information.
Handling the user provided values
You may ask, "How did the user’s input values get added to the Node object?"
Let’s take a look at the component for handling the user input submission.
Notice how we loop through the Node Callbacks and the _controllers array.
Each input is set on the frCallback.input[0].value, and then we call FRSampleBridge.next() method.
login.dart@@ collapsed @@
// Capture the User Inputs from the UI, populate the currentNode callbacks and submit back to {am_name}
currentNode.callbacks.asMap().forEach((index, frCallback) {
_controllers.asMap().forEach((controllerIndex, controller) {
if (controllerIndex == index) {
frCallback.input[0].value = controller.text;
}
});
});
String jsonResponse = jsonEncode(currentNode);
@@ collapsed @@
try {
// Call the SDK next method, to submit the User Inputs to {am_name}. This will return the next Node or a Success/Failure
String result = await platform.invokeMethod('next', jsonResponse);
@@ collapsed @@
} catch (e) {
Navigator.pop(context);
debugPrint('SDK Error: $e');
}There are two important items to focus on regarding the FRCallback object.
callback.type-
Retrieves the call back
typeso that can identify how to present the callback in the UI. callback.input-
The input array that contains the inputs that you need to set the values for.
Since the NameCallback and PasswordCallback only have one input,
you can set the value of them by calling frCallback.input[0].value = controller.text;.
Some other callbacks might contain multiple inputs, so some extra code will be required to set the values of those.
Each callback type has its own collection of inputs and outputs.
Those are exposed as arrays that the developer can loop through and act upon.
Many callbacks have common base objects in iOS and Android, like the SingleValueCallback,
but appear as different types NameCallback or PasswordCallback to allow for easier differentiation in the UI layer.
You can find a full list of the supported callbacks of the SDKs here.
Redirecting to the TodoList screen and requesting user info
Now that the user can log in, let’s go one step further and redirect to the TodoList screen.
After we get the LoginSccess message we can call the _navigateToNextScreen() method. This will navigate to the TodoList class.
When the TodoList initializes, we want to request information about the authenticated user to display their name and other information.
We will now utilize the existing FRAuthSampleBridge.getUserInfo() method already included in the bridge code.
Let’s do a little setup before we make the request to the server:
-
Override the
initState()method in the_TodoListStateclass inlib/todolist.dart. -
Create a
SchedulerBinding.instance?.addPostFrameCallbackto execute some code when the state is loaded. -
Call
_getUserInfo().
todolist.dart@override
void initState() {
super.initState();
SchedulerBinding.instance.addPostFrameCallback((_) {
//Calling the userinfo endpoint is going to give use some user profile information to enrich our UI. Additionally, verifies that we have a valid access token.
_getUserInfo();
});
}With the setup complete, implement the request to your server for the user’s information.
Within this empty _getUserInfo(), add an async function
to make that call FRAuthSampleBridge.getUserInfo() and parse the response.
todolist.dartFuture<void> _getUserInfo() async {
showAlertDialog(context);
String response;
try {
final String result = await platform.invokeMethod('getUserInfo');
Map<String, dynamic> userInfoMap = jsonDecode(result);
response = result;
header = userInfoMap["name"];
subtitle = userInfoMap["email"];
Navigator.pop(context);
setState(() {
_getTodos();
});
} on PlatformException catch (e) {
response = "SDK Start Failed: '${e.message}'.";
Navigator.pop(context);
}
debugPrint('SDK: $response');
}In the code above, we collected the user information and set the name and email of the user in some variables.
In addition to updating the user info, we will call the _getTodos() method in order to retrieve ToDos from the server.
Notice that we use the setState() function.
This ensures that our UI is updated based on the newly received information.
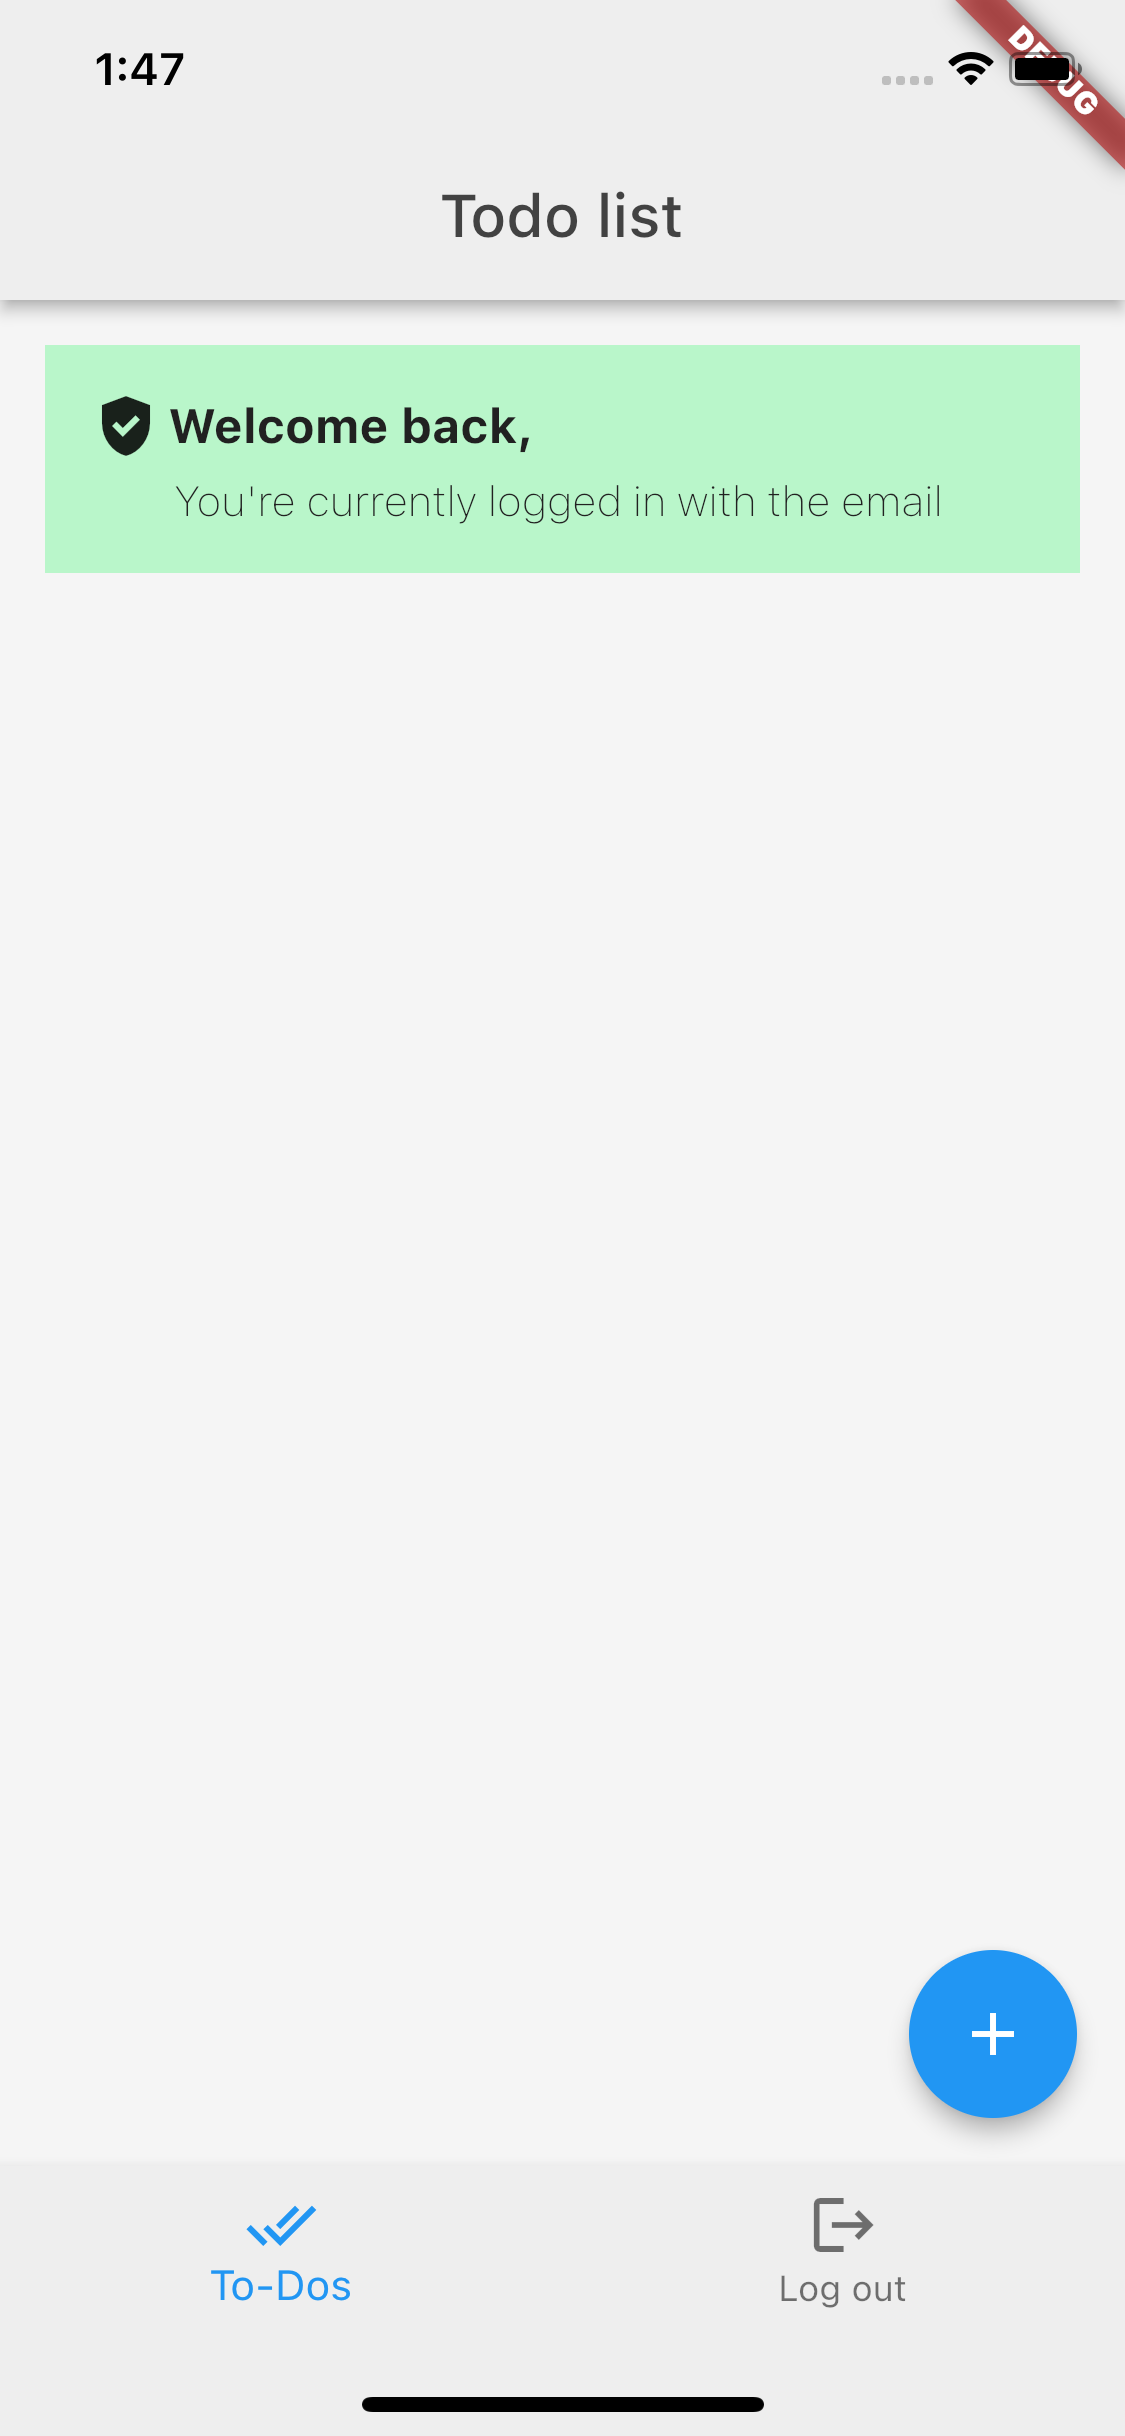
When you test this in the Simulator, completing a successful authentication results in the home screen being rendered with a success message. The user’s name and email are included for visual validation. You can also view the console in Xcode and see more complete logs.
Adding logout functionality
Clicking the Sign Out button results in creating and rendering an alert view asking you if you are sure you want to log out with two options (yes/no). Clicking yes does nothing at the moment. We will now implement that missing logic.
To add the logic into the view to call this new Swift method:
-
Open the
lib/todolist.dartfile, and add the following:todolist.dartFuture<void> _logout() async { final String result = await platform.invokeMethod('logout'); _navigateToNextScreen(context); } -
Revisit the app within the Simulator, and tap the Sign Out button.
This time around when clicking Yes will dispose of the alert and log you out, returning you back to the log in screen.
If you tap No, you will return to the main list screen.