Step 2. Configure connection properties
In this step, you configure the "swiftui-oidc" app to connect to the OAuth 2.0 application you created in PingOne, and display the login UI of the server.
-
In Xcode, on the File menu, click Open.
-
Navigate to the
sdk-sample-appsfolder you cloned in the previous step, navigate toiOS>swiftui-oidc>PingExample>PingExample.xcodeproj, and then click Open. -
In the Project Navigator pane, navigate to PingExample > PingExample > Utilities, and open the
ConfigurationManagerfile. -
Locate the
ConfigurationViewModelfunction which contains placeholder configuration properties.The function is commented with //TODO:in the source to make it easier to locate.return ConfigurationViewModel( clientId: "[CLIENT ID]", scopes: ["openid", "email", "address", "phone", "profile"], redirectUri: "[REDIRECT URI]", signOutUri: "[SIGN OUT URI]", discoveryEndpoint: "[DISCOVERY ENDPOINT URL]", environment: "[ENVIRONMENT - EITHER AIC OR PingOne]", cookieName: "[COOKIE NAME - OPTIONAL (Applicable for AIC only)]", browserSeletorType: .authSession ) -
In the
ConfigurationViewModelfunction, update the following properties with the values you obtained when preparing your environment.- clientId
-
The client ID from your OAuth 2.0 application in PingOne.
For example,
6c7eb89a-66e9-ab12-cd34-eeaf795650b2 - scopes
-
The scopes you added to your OAuth 2.0 application in PingOne.
For example,
openid profile email phone - redirectUri
-
The
redirect_urito return to after logging in with the server UI, for example the URI to your client app.This value must exactly match a value configured in your OAuth 2.0 client. For example,
org.forgerock.demo://oauth2redirect. - signOutUri
-
Leave this property empty.
It signals that the SDK can use the ID token to end the user’s session, and does not need to open and return from a web page to perform log out.
You must have enabled the Terminate User Session by ID Token setting when creating the OAuth 2.0 client in PingOne if you leave this property empty.
- discoveryEndpoint
-
The
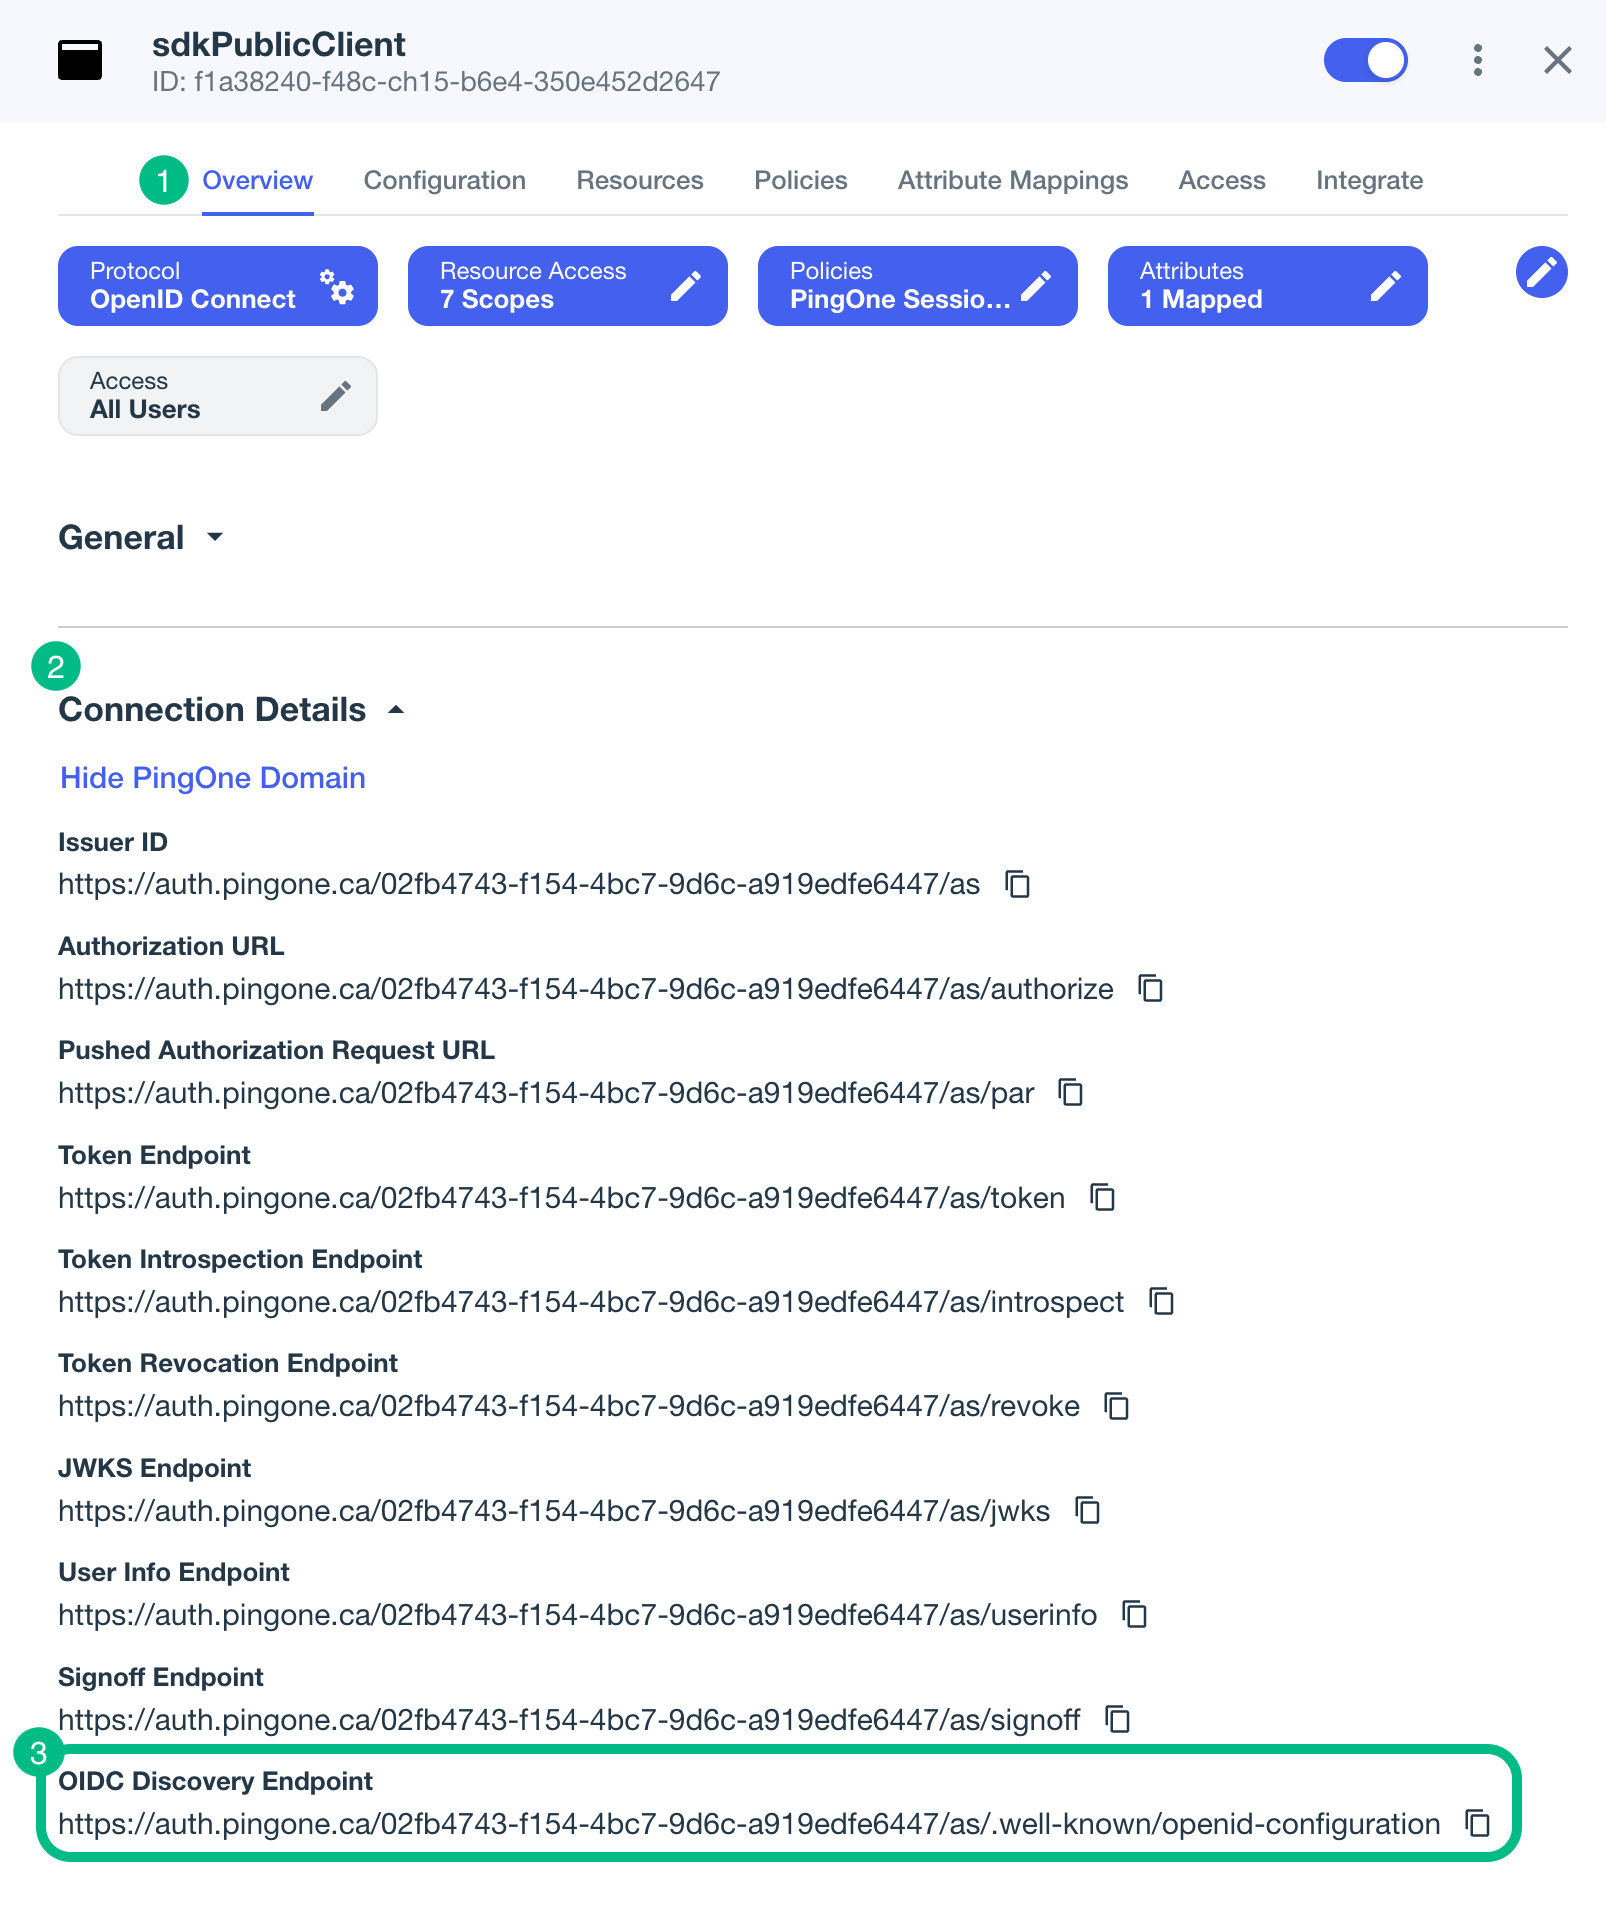
.well-knownendpoint from your PingOne tenant.How do I find my PingOne .well-known URL?
To find the
.well-knownendpoint for an OAuth 2.0 client in PingOne:-
Log in to your PingOne administration console.
-
Go to Applications > Applications, and then select your OAuth 2.0 client.
For example, sdkPublicClient.
-
On the Overview tab, expand the Connection Details section, and then copy the OIDC Discovery Endpoint value.

For example,
https://auth.pingone.com/3072206d-c6ce-ch15-m0nd-f87e972c7cc3/as/.well-known/openid-configuration -
- environment
-
Ensures the sample app uses the correct behavior for the different servers it supports, for example what logout parameters to use.
For PingOne and PingAM servers, specify
AIC. - cookieName
-
Set this property to an empty string.
For example,
"". - *browserSeletorType*
-
You can specify what type of browser the client iOS device opens to handle centralized login.
Each browser has slightly different characteristics, which make them suitable to different scenarios, as outlined in this table:
Browser type Characteristics .authSessionOpens a web authentication session browser.
Designed specifically for authentication sessions, however it prompts the user before opening the browser with a modal that asks them to confirm the domain is allowed to authenticate them.
This is the default option in the Ping SDK for iOS.
.ephemeralAuthSessionOpens a web authentication session browser, but enables the
prefersEphemeralWebBrowserSessionparameter.This browser type does not prompt the user before opening the browser with a modal.
The difference between this and
.authSessionis that the browser does not include any existing data such as cookies in the request, and also discards any data obtained during the browser session, including any session tokens.When is
ephemeralAuthSessionsuitable:-
ephemeralAuthSessionis not suitable when you require single sign-on (SSO) between your iOS apps, as the browser will not maintain session tokens. -
ephemeralAuthSessionis not suitable when you require a session token to log a user out of the server, for example for logging out of PingOne, as the browser will not maintain session tokens. -
Use
ephemeralAuthSessionwhen you do not want the user’s existing sessions to affect the authentication.
.nativeBrowserAppOpens the installed browser that is marked as the default by the user. Often Safari.
The browser opens without any interaction from the user. However, the browser does display a modal when returning to your application.
.sfViewControllerOpens a Safari view controller browser.
Your client app is not able to interact with the pages in the
sfViewControlleror access the data or browsing history.The view controller opens within your app without any interaction from the user. As the user does not leave your app, the view controller does not need to display a warning modal when authentication is complete and control returns to your application.
-
The result resembles the following:
return ConfigurationViewModel( clientId: "6c7eb89a-66e9-ab12-cd34-eeaf795650b2", scopes: ["openid", "email", "phone", "profile"], redirectUri: "org.forgerock.demo://oauth2redirect", signOutUri: "", discoveryEndpoint: "https://auth.pingone.com/3072206d-c6ce-ch15-m0nd-f87e972c7cc3/as/.well-known/openid-configuration", environment: "AIC", cookieName: "", browserSeletorType: .authSession ) -
Optionally, specify ACR values to choose which authentication journey the server uses.
-
Navigate to PingExample > PingExample > ViewModels, and open the
OIDCViewModelfile. -
In the
startOIDC()function, add anacr_valuesparameter to the authorization request by using thesetCustomParam()method:public func startOIDC() async throws → FRUser { return try await withCheckedThrowingContinuation({ (continuation: CheckedContinuation<FRUser, Error>) in Task { @MainActor in FRUser.browser()? .set(presentingViewController: self.topViewController!) .set(browserType: ConfigurationManager.shared.currentConfigurationViewModel?.getBrowserType() ?? .authSession) .setCustomParam(key: "acr_values", value: "sdkUsernamePasswordJourney") .build().login { (user, error) in if let frUser = user { Task { @MainActor in self.status = "User is authenticated" } continuation.resume(returning: frUser) } else { Task { @MainActor in self.status = error?.localizedDescription ?? "Error was nil" } continuation.resume(throwing: error!) } } } }) }Enter one or more of the ACR mapping keys as configured in the OAuth 2.0 provider service.
To learn more, refer to Choose journeys with ACR values.
You can list the available keys by inspecting the acr_values_supportedproperty in the output of your/oauth2/.well-known/openid-configurationendpoint.
-