Step 4. Build and run the apps
Now that everything is set up, you can build and run the todo apps.
To complete this tutorial you’ll run the following apps:
-
Either the Android or iOS native app.
Running the API backend server app
The API backend server app should already be running from a previous step.
To verify it is running, in a web browser, navigate to the IP address and port the server is running on, and add the /healthcheck path.
For example, http://192.168.0.35:9443/healthcheck
How do I find my local IP address?
Complete the following steps to obtain your local IP address:
-
Windows
-
macOS
-
In a command prompt, enter
ipconfig /allWindows displays information about the network adapters in your computer.
Show example output
Windows IP Configuration Host Name . . . . . . . . . . . . : Windows Primary Dns Suffix . . . . . . . : Node Type . . . . . . . . . . . . : Hybrid IP Routing Enabled. . . . . . . . : No WINS Proxy Enabled. . . . . . . . : No Ethernet adapter Ethernet: Media State . . . . . . . . . . . : Media disconnected Description . . . . . . . . . . . : E3100G 2.5 Gigabit Ethernet Controller Physical Address. . . . . . . . . : 74-34-E2-2b-30-44 DHCP Enabled. . . . . . . . . . . : Yes Autoconfiguration Enabled . . . . : Yes Wireless LAN adapter Local Area Connection* 1: Media State . . . . . . . . . . . : Media disconnected Description . . . . . . . . . . . : Microsoft Wi-Fi Direct Virtual Adapter Physical Address. . . . . . . . . : 67-6C-EB-B3-46-82 DHCP Enabled. . . . . . . . . . . : Yes Autoconfiguration Enabled . . . . : Yes Wireless LAN adapter Wi-Fi: Description . . . . . . . . . . . : Wireless Network Adapter (210NGW) Physical Address. . . . . . . . . : 87-6C-DF-C9-17-90 DHCP Enabled. . . . . . . . . . . : Yes Autoconfiguration Enabled . . . . : Yes IPv6 Address. . . . . . . . . . . : 2406:3d08:2f61:1400::2d47 Lease Obtained. . . . . . . . . . : January 27, 2025 11:09:26 AM Lease Expires . . . . . . . . . . : January 28, 2025 6:09:26 AM IPv6 Address. . . . . . . . . . . : 2406:3d08:2f61:1400::2d47 Temporary IPv6 Address. . . . . . : 2604:2b08:2f93:2600:b479:b5b4:25ff:acc8 Link-local IPv6 Address . . . . . : fe54::d9e5:16ff:d9d4:e22%10 IPv4 Address. . . . . . . . . . . : 192.168.0.35 Subnet Mask . . . . . . . . . . . : 255.255.255.0 Lease Obtained. . . . . . . . . . : January 27, 2025 11:09:24 AM Lease Expires . . . . . . . . . . : January 29, 2025 11:09:26 AM Default Gateway . . . . . . . . . : fe80::bb8:c0ee:fea5:8c58%10 192.168.0.1 DHCP Server . . . . . . . . . . . : 192.168.0.1 DHCPv6 IAID . . . . . . . . . . . : 893252287 DHCPv6 Client DUID. . . . . . . . : 00-01-00-01-1b-87-59-2D-74-86-C4-3C-30-88 DNS Servers . . . . . . . . . . . : 2025:4e8:0:230b::11 2025:4e8:0:230c::11 8.8.8.8 NetBIOS over Tcpip. . . . . . . . : Enabled -
Ignoring adapters where the Media State property is listed as
Media Disconnected, locate the ethernet or wireless adapter that connects to your router. -
Make a note of the IPv4 Address field.
The address will often start with
192.168.,10.0., or172.16., which are the first digits of the commonly used reserved private IPv4 addresses.In this case, the local IPv4 IP address is
192.168.0.35.You will use this address to access your custom UI app for this tutorial.
-
In a terminal window, enter
ifconfigmacOS displays information about the network interfaces in your computer.
Show example output
lo0: flags=8049<UP,LOOPBACK,RUNNING,MULTICAST> mtu 16384
	options=1203<RXCSUM,TXCSUM,TXSTATUS,SW_TIMESTAMP>
	inet 127.0.0.1 netmask 0xff000000
	inet6 ::1 prefixlen 128
	inet6 fe80::1%lo0 prefixlen 64 scopeid 0x1
	nd6 options=201<PERFORMNUD,DAD>
gif0: flags=8010<POINTOPOINT,MULTICAST> mtu 1280
stf0: flags=0<> mtu 1280
anpi0: flags=8863<UP,BROADCAST,SMART,RUNNING,SIMPLEX,MULTICAST> mtu 1500
	options=400<CHANNEL_IO>
	ether 22:d0:cb:e5:fd:09
	media: none
	status: inactive
en3: flags=8863<UP,BROADCAST,SMART,RUNNING,SIMPLEX,MULTICAST> mtu 1500
	options=404<VLAN_MTU,CHANNEL_IO>
	ether f8:e4:3b:ad:67:c5
	inet6 fe80::ca4:9a6c:f835:80c9%en8 prefixlen 64 secured scopeid 0x7
	inet6 fd84:bb80:dd60:23b3:855:171f:3651:b7de prefixlen 64 autoconf secured
	inet 192.168.0.35 netmask 0xffffff00 broadcast 192.168.0.255
	nd6 options=201<PERFORMNUD,DAD>
	media: autoselect (1000baseT <full-duplex>)
	status: active
en1: flags=8963<UP,BROADCAST,SMART,RUNNING,PROMISC,SIMPLEX,MULTICAST> mtu 1500
	options=460<TSO4,TSO6,CHANNEL_IO>
	ether 36:e5:80:6e:d1:40
	media: autoselect <full-duplex>
	status: inactive
en2: flags=8963<UP,BROADCAST,SMART,RUNNING,PROMISC,SIMPLEX,MULTICAST> mtu 1500
	options=460<TSO4,TSO6,CHANNEL_IO>
	ether 36:e5:80:6e:d1:44
	media: autoselect <full-duplex>
	status: inactive
bridge0: flags=8863<UP,BROADCAST,SMART,RUNNING,SIMPLEX,MULTICAST> mtu 1500
	options=63<RXCSUM,TXCSUM,TSO4,TSO6>
	ether 36:e5:80:6e:d1:40
	Configuration:
		id 0:0:0:0:0:0 priority 0 hellotime 0 fwddelay 0
		maxage 0 holdcnt 0 proto stp maxaddr 100 timeout 1200
		root id 0:0:0:0:0:0 priority 0 ifcost 0 port 0
		ipfilter disabled flags 0x0
	member: en1 flags=3<LEARNING,DISCOVER>
	        ifmaxaddr 0 port 11 priority 0 path cost 0
	member: en2 flags=3<LEARNING,DISCOVER>
	        ifmaxaddr 0 port 12 priority 0 path cost 0
	member: en3 flags=3<LEARNING,DISCOVER>
	        ifmaxaddr 0 port 13 priority 0 path cost 0
	media: <unknown type>
	status: inactive
ap1: flags=8863<UP,BROADCAST,SMART,RUNNING,SIMPLEX,MULTICAST> mtu 1500
	options=6460<TSO4,TSO6,CHANNEL_IO,PARTIAL_CSUM,ZEROINVERT_CSUM>
	ether d6:0f:2c:90:e9:b6
	nd6 options=201<PERFORMNUD,DAD>
	media: autoselect (none)
	status: inactive
en0: flags=8863<UP,BROADCAST,SMART,RUNNING,SIMPLEX,MULTICAST> mtu 1500
	options=6460<TSO4,TSO6,CHANNEL_IO,PARTIAL_CSUM,ZEROINVERT_CSUM>
	ether c6:2a:06:29:ee:28
	nd6 options=201<PERFORMNUD,DAD>
	media: autoselect
	status: inactive
utun0: flags=8051<UP,POINTOPOINT,RUNNING,MULTICAST> mtu 1500
	inet6 fe80::a19f:5de6:a4ca:fd90%utun0 prefixlen 64 scopeid 0x13
	nd6 options=201<PERFORMNUD,DAD>
-
Looking at interfaces where the status property is listed as
active, locate the ethernet or wireless interface that connects to your router.Often the prefix of the interface is
en. -
Make a note of the IPv4 address in the inet field.
The address will often start with
192.168.,10.0., or172.16., which are the first digits of the commonly used reserved private IPv4 addresses.In this case, the local IPv4 IP address is
192.168.0.35.You will use this address to access your custom UI app for this tutorial.
If the API backend server is running, it returns an Ok message.
If the server is not running, start it as follows:
-
In a terminal window, navigate to
/sdk-sample-apps/javascript. -
Run the API backend server:
npm run todo-apiThe API server starts listening on the
PORTvalue you configured:Node server listening on port: 9443.
Running the Metro server
You will need to start Metro, the JavaScript bundler that ships with React Native.
Complete the following steps to run the Metro server:
-
In a terminal window, navigate to
/sdk-sample-apps/reactnative/reactnative-todo. -
Start the server using either
npmoryarn:-
npm
-
yarn
npm startyarn startThe server starts and the output resembles the following:
info Welcome to React Native v0.76 info Starting dev server on port 8081... ▒▒▓▓▓▓▒▒ ▒▓▓▓▒▒░░▒▒▓▓▓▒ ▒▓▓▓▓░░░▒▒▒▒░░░▓▓▓▓▒ ▓▓▒▒▒▓▓▓▓▓▓▓▓▓▓▓▓▒▒▒▓▓ ▓▓░░░░░▒▓▓▓▓▓▓▒░░░░░▓▓ ▓▓░░▓▓▒░░░▒▒░░░▒▓▒░░▓▓ ▓▓░░▓▓▓▓▓▒▒▒▒▓▓▓▓▒░░▓▓ ▓▓░░▓▓▓▓▓▓▓▓▓▓▓▓▓▒░░▓▓ ▓▓▒░░▒▒▓▓▓▓▓▓▓▓▒░░░▒▓▓ ▒▓▓▓▒░░░▒▓▓▒░░░▒▓▓▓▒ ▒▓▓▓▒░░░░▒▓▓▓▒ ▒▒▓▓▓▓▒▒ Welcome to Metro v0.81.0 Fast - Scalable - Integrated info Dev server ready -
Testing the Android or iOS app
With both the API backend server, and the Metro bundler server running, you can run the Android or iOS apps, to test authentication.
Testing the Android app
To run the Android app, use any of the following methods:
-
Metro server
-
npm
-
Android Studio
To run the Android app using the Metro server:
-
Switch to the same terminal window that is running the Metro server.
You’ll see output similar to the following:
info Dev server ready

i - run on iOS
a - run on Android
r - reload app
d - open Dev Menu
j - open DevTools
-
Enter the letter
a.
To run the Android app using the npm command:
-
In a terminal window, navigate to
/sdk-sample-apps/reactnative/reactnative-todo. -
Enter
npm run android
To open the Android project and run it from within Android Studio:
-
In Android Studio, open the
/sdk-sample-apps/reactnative/reactnative-todo/androidfolder.The project loads in Android Studio, and Gradle synchronizes the dependencies. This can take a few minutes.
-
Ensure you have either created a virtual device in Device Manager, or have attached a physical phone.
Learn more at Create and manage virtual devices in the Android Developers documentation.
-
On the Run menu, click Run 'reactnativetodo.app'.
Each method starts the device if needed, and launches the Android app:
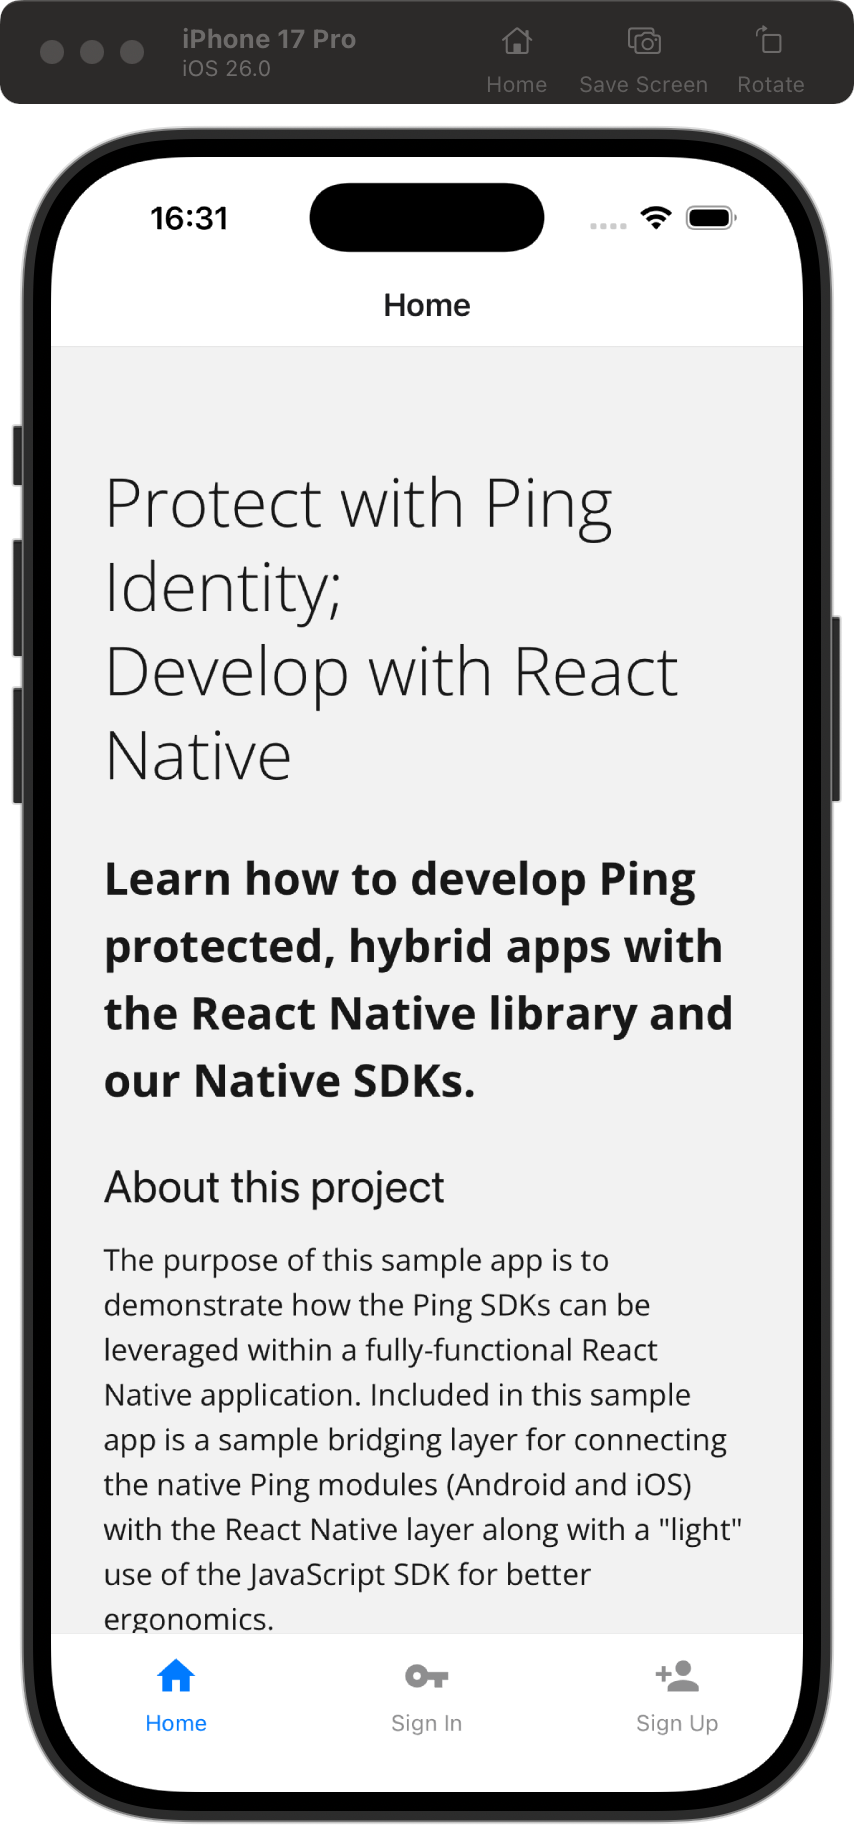
To test the app, perform the following steps:
-
Tap Sign In.
The app starts the journey you configured earlier, handles the callbacks and displays the appropriate user interface:
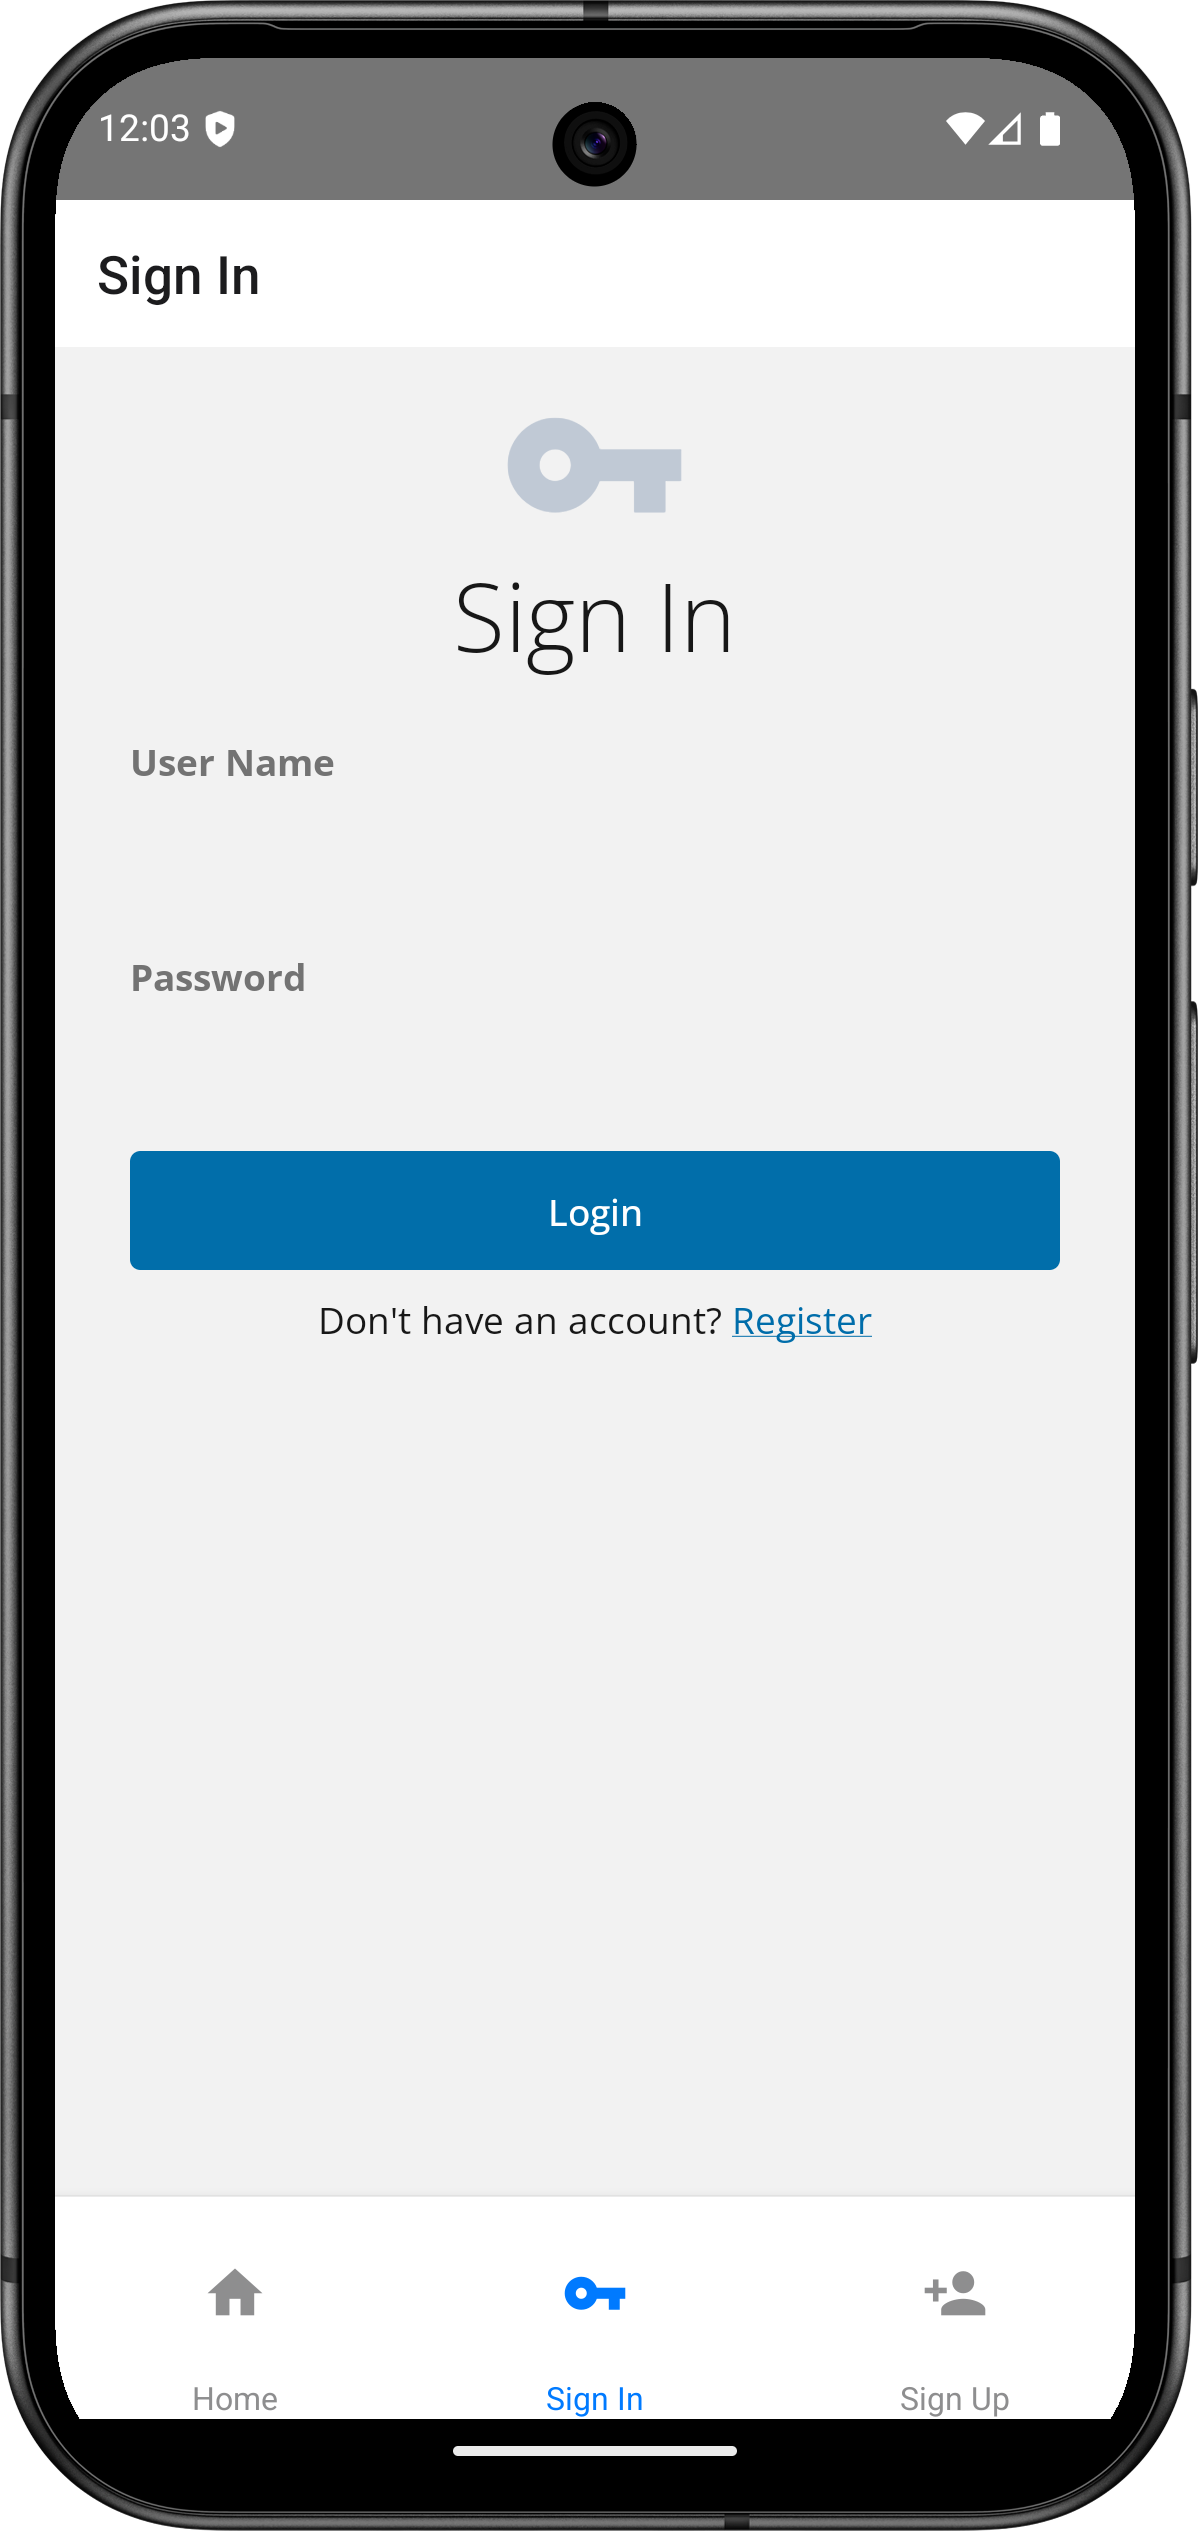 Figure 2. Handling the username and password callbacks of the journey
 -
Sign in using the credentials you created earlier. For example:
-
Username:
demo -
Password:
Ch4ng3it!
If successful, the app retrieves and displays the user’s profile information:
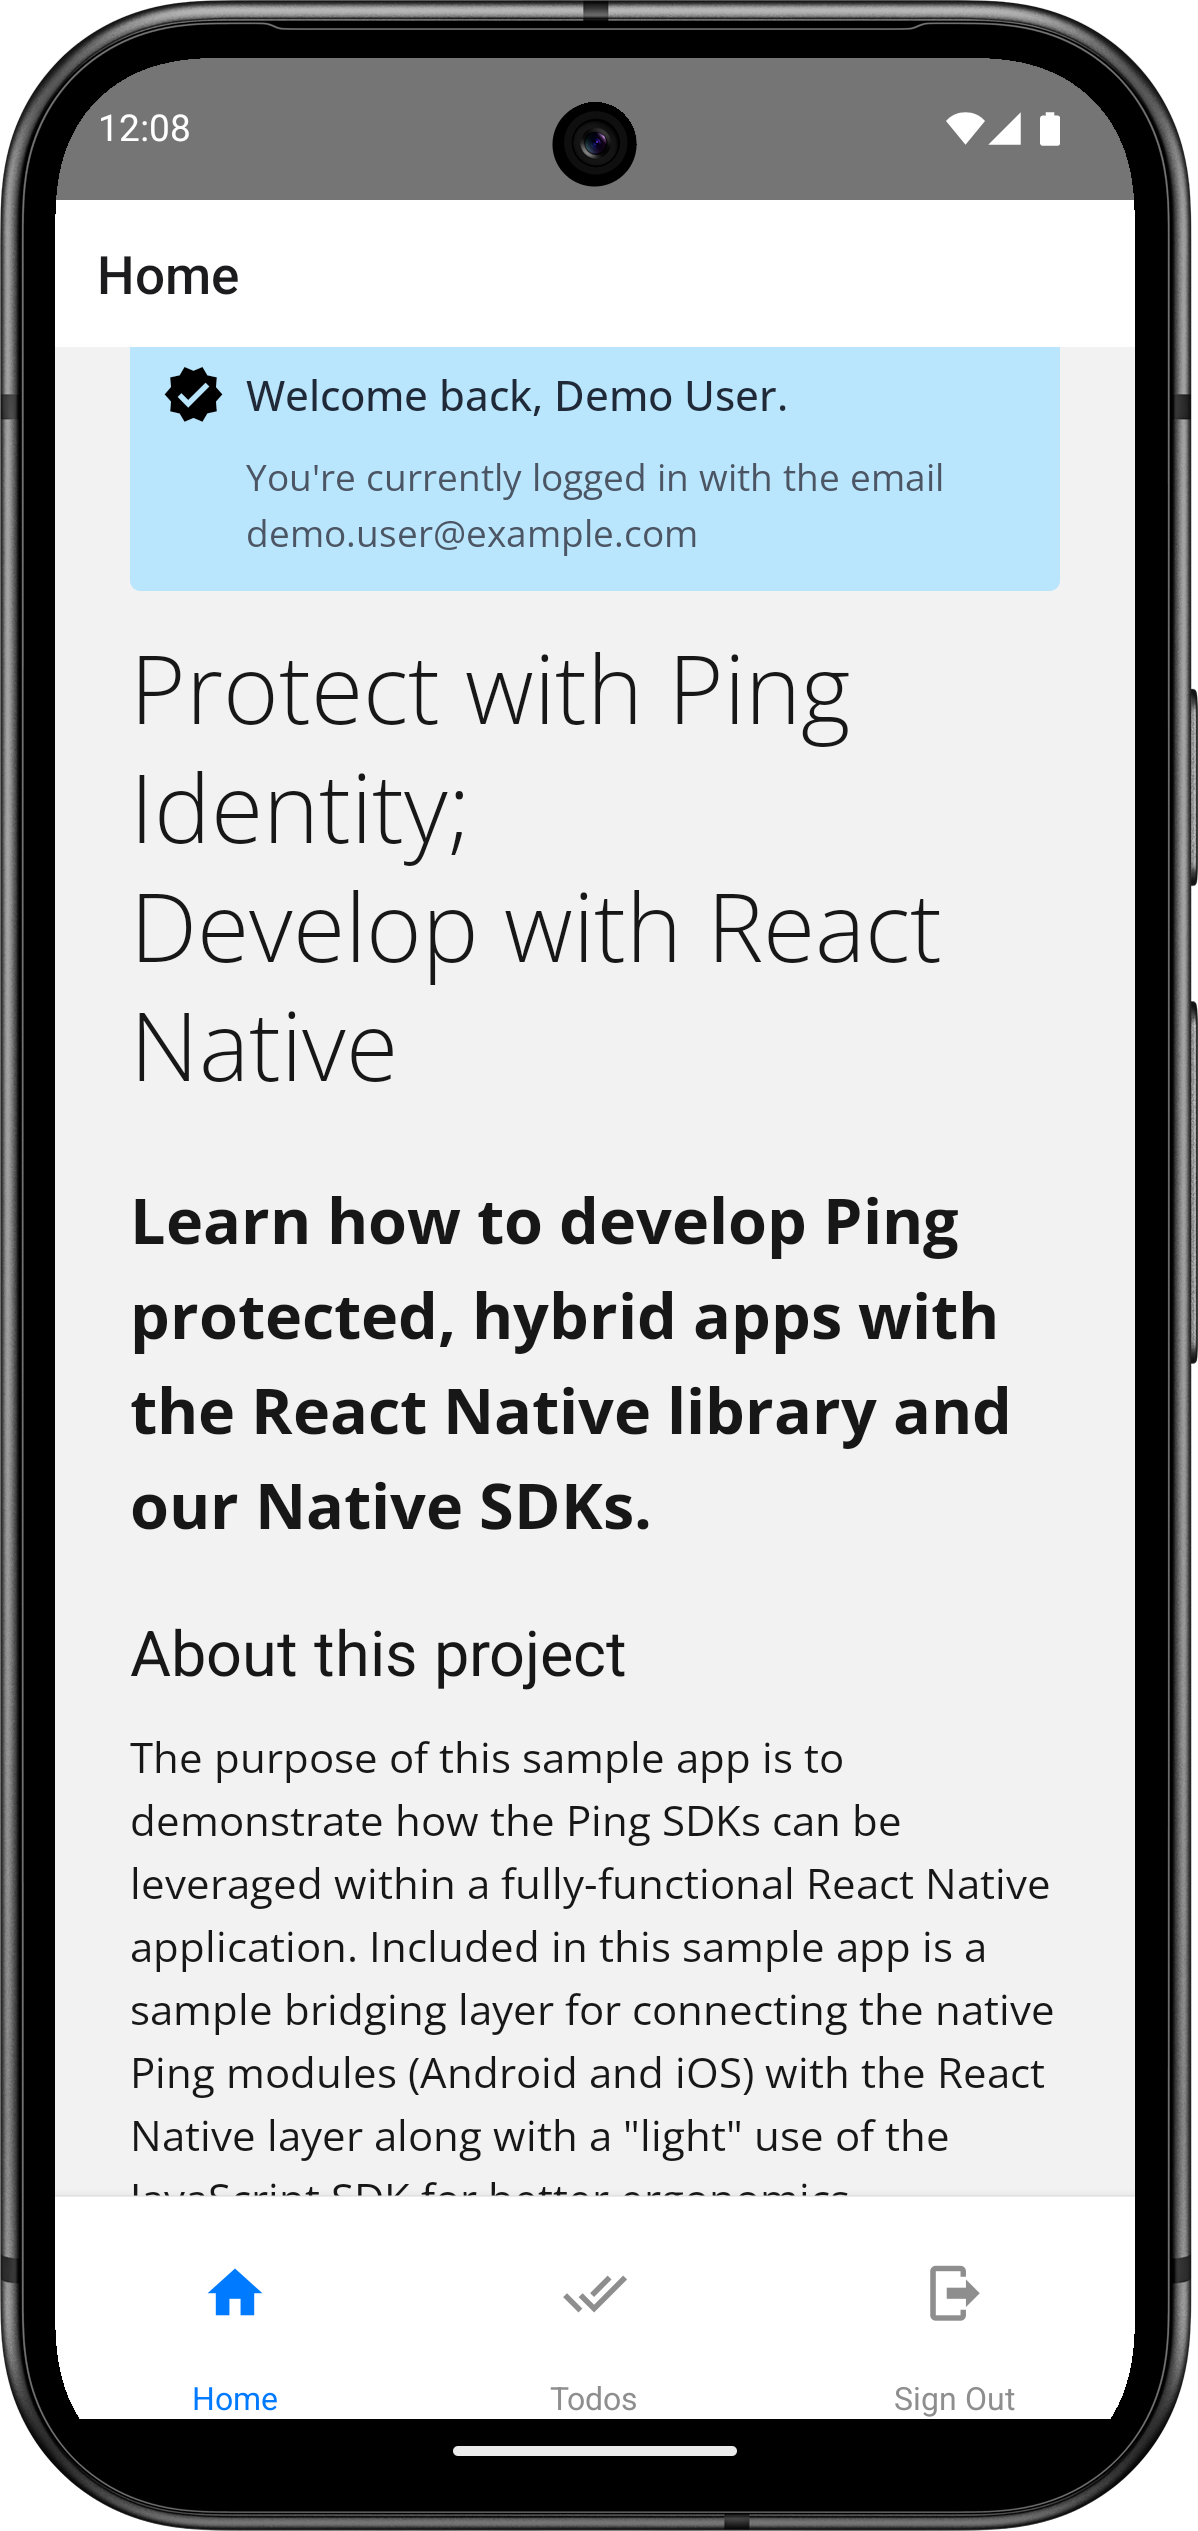 Figure 3. Displaying the user’s profile information
 -
-
Tap Todos.
The app displays any existing todo items, and lets you create new ones:
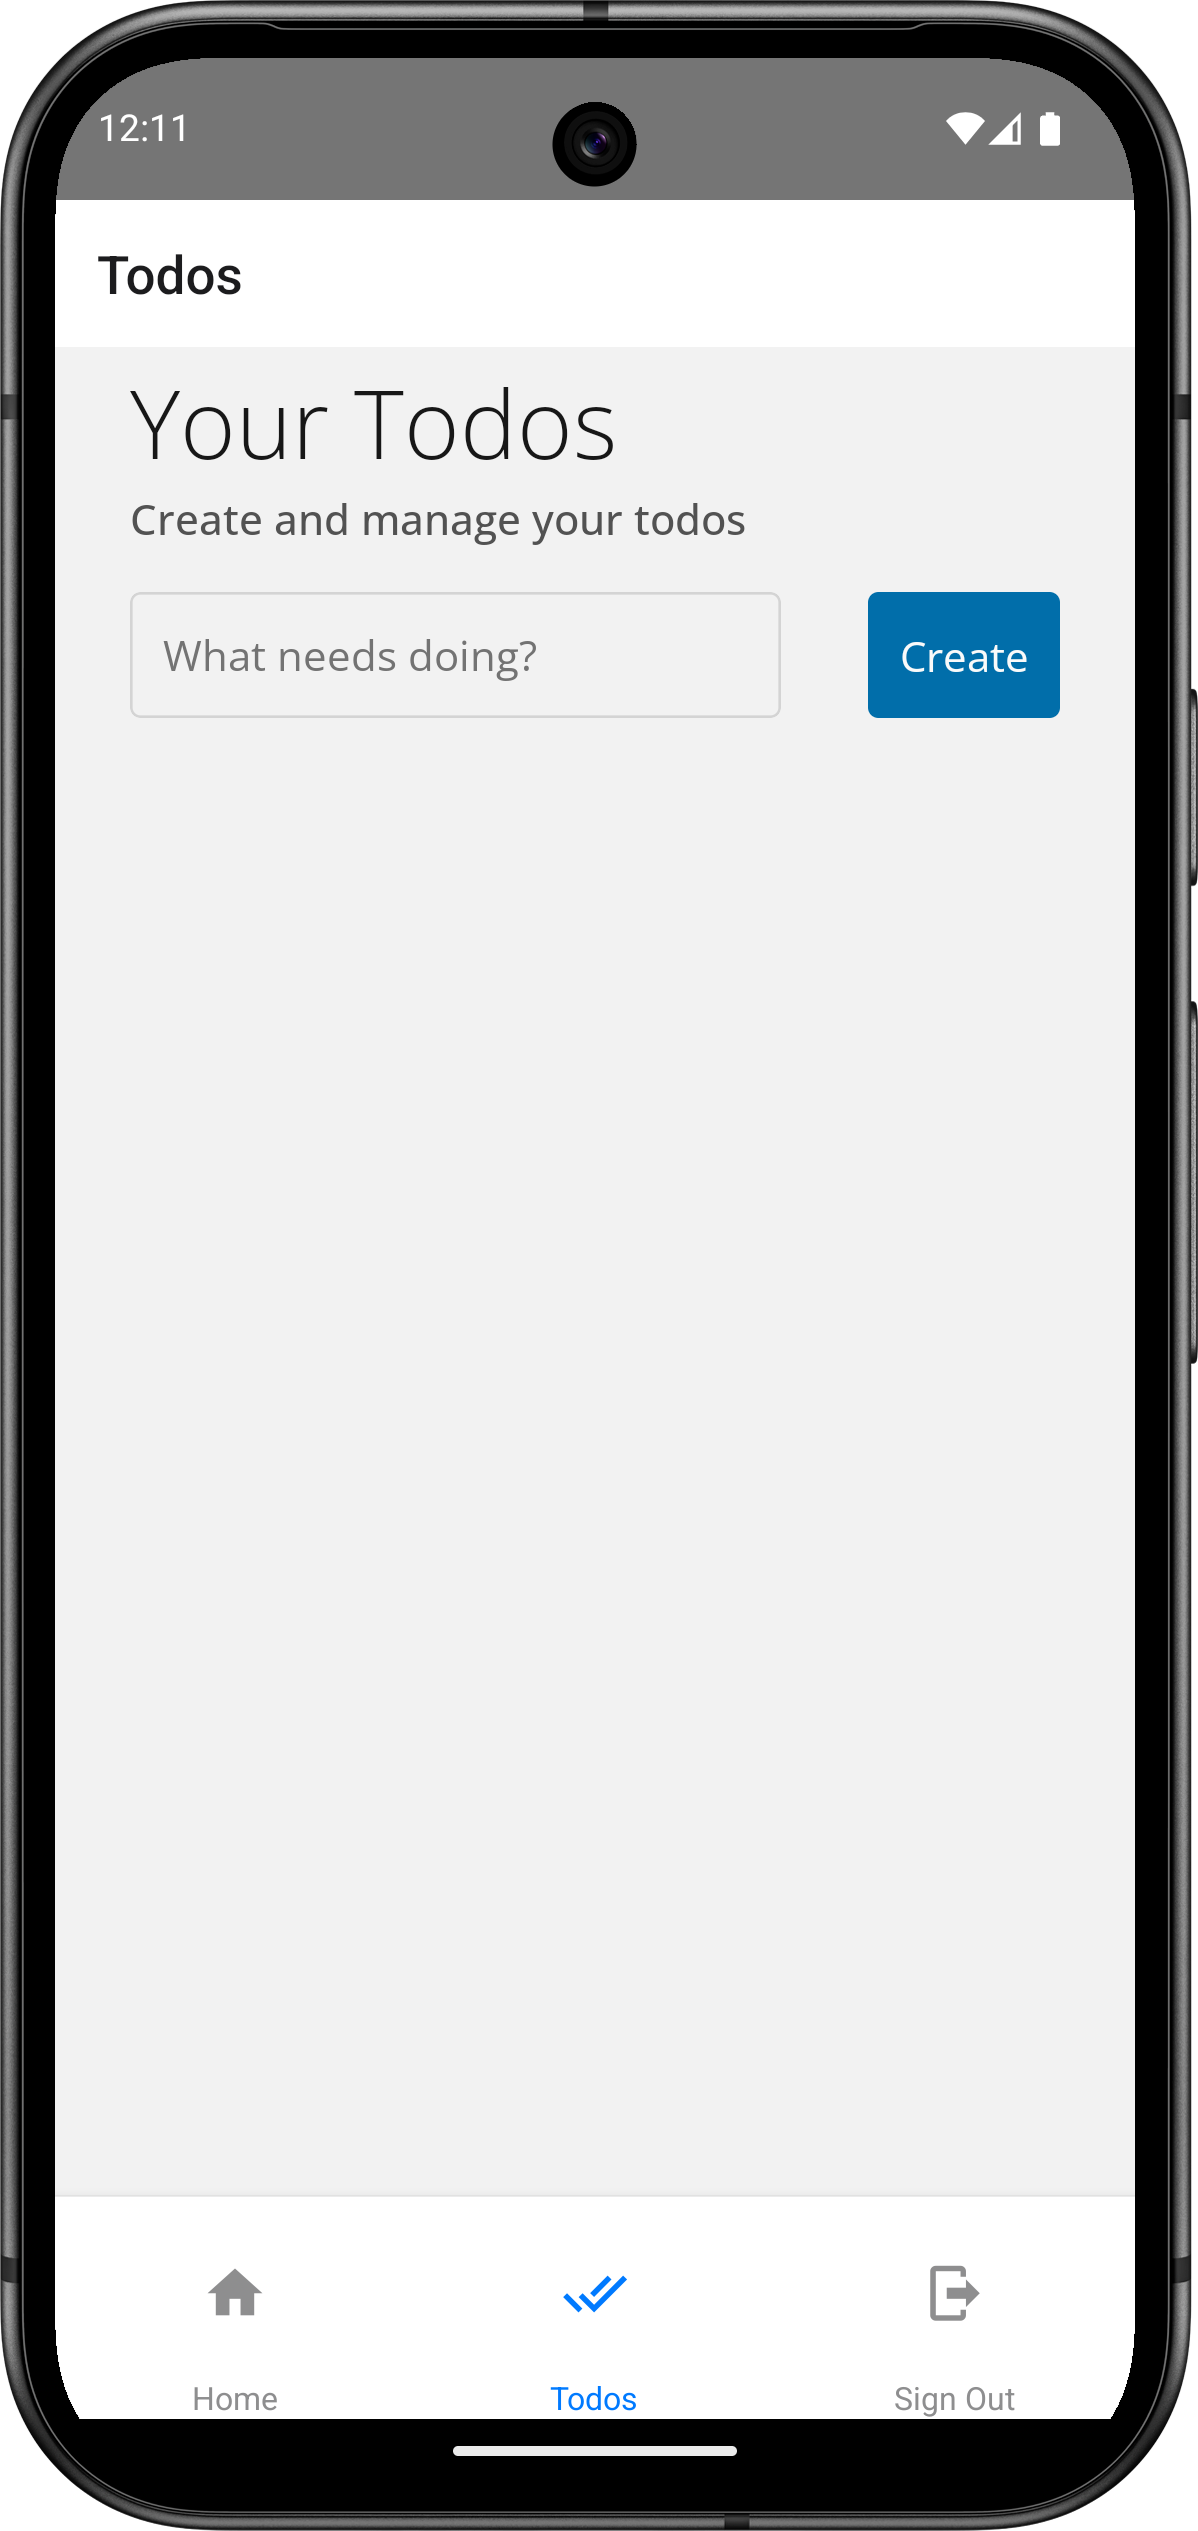 Figure 4. View or add todo items
 -
To test sign out, tap Sign Out.
The app invalidates the tokens and returns to the main screen.
Testing the iOS app
To run the iOS app, use any of the following methods:
-
Metro server
-
npm
-
Xcode
To run the iOS app using the Metro server:
-
Switch to the same terminal window that is running the Metro server.
You’ll see output similar to the following:
info Dev server ready

i - run on iOS
a - run on Android
r - reload app
d - open Dev Menu
j - open DevTools
-
Enter the letter
i.
To run the iOS app using the npm command:
-
In a terminal window, navigate to
/sdk-sample-apps/reactnative/reactnative-todo. -
Enter
npm run ios
To open the iOS project and run it from within Xcode:
-
In Xcode, open the
/sdk-sample-apps/reactnative/reactnative-todo/ios/reactnativetodo.xcworkspacefile. -
Ensure you have either created a virtual device or have attached a physical phone.
Learn more at Running your app in Simulator or on a device in the Apple Developers documentation.
-
On the Debug menu, click Run.
Each method starts the device if needed, and launches the iOS app:
To test the app, perform the following steps:
-
Tap Sign In.
The app starts the journey you configured earlier, handles the callbacks and displays the appropriate user interface:
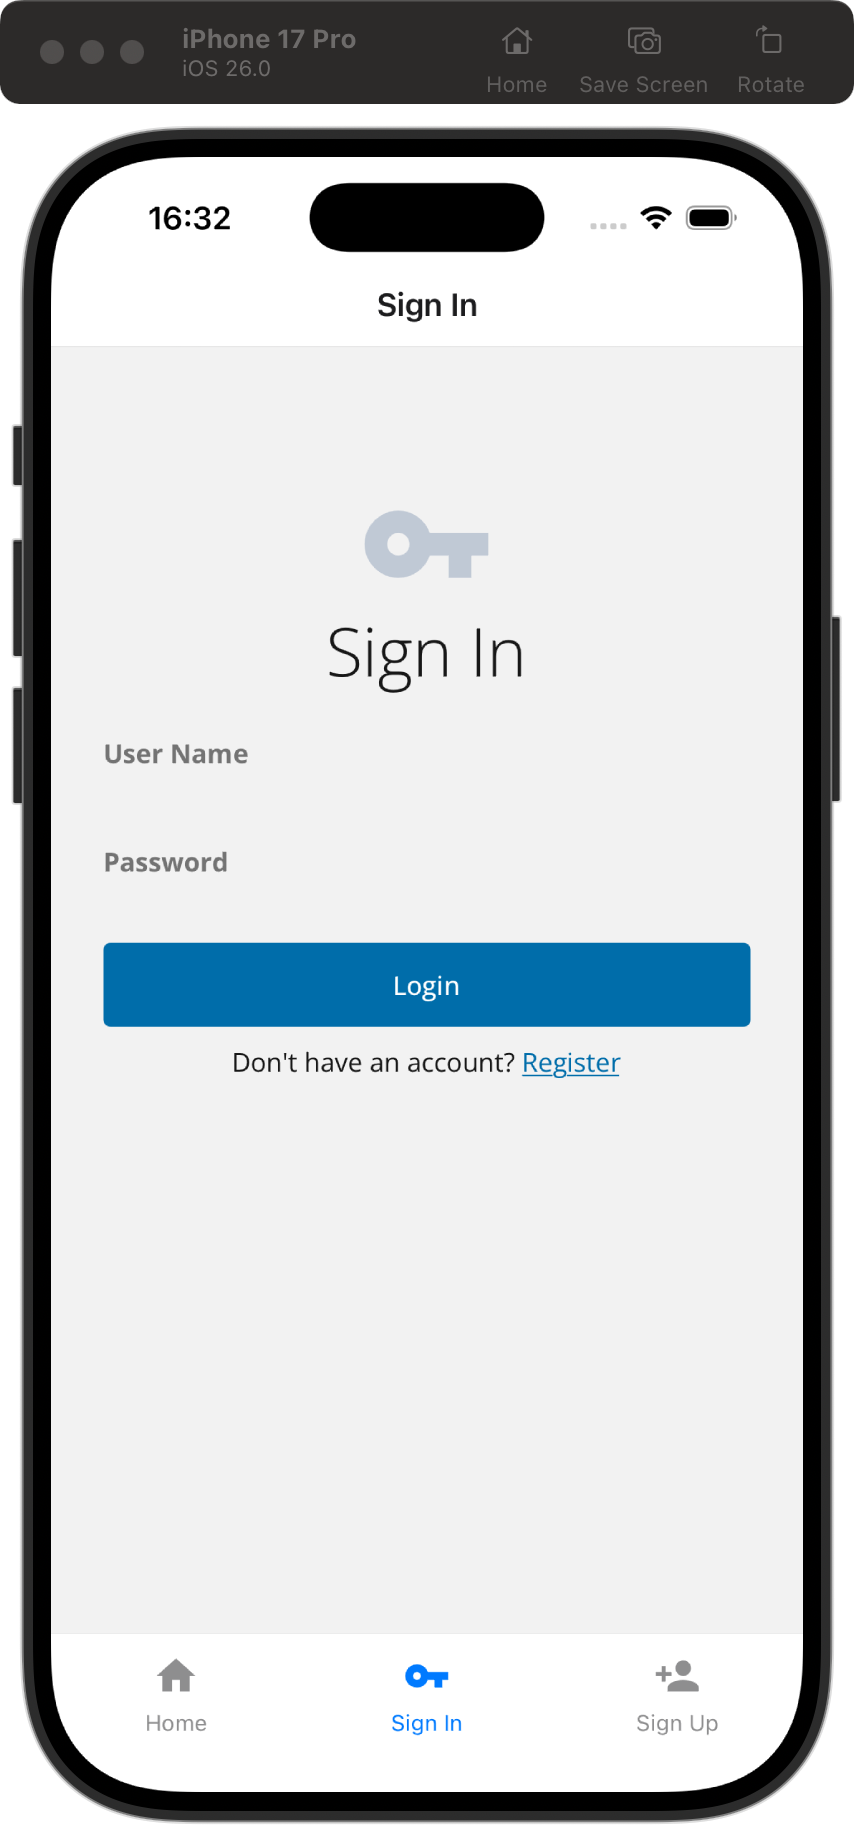 Figure 6. Handling the username and password callbacks of the journey
 -
Sign in using the credentials you created earlier. For example:
-
Username:
demo -
Password:
Ch4ng3it!If successful, the app retrieves and displays the user’s profile information:
Figure 7. Displaying the user’s profile information
-
-
Tap Todos.
The app displays any existing todo items, and lets you create new ones:
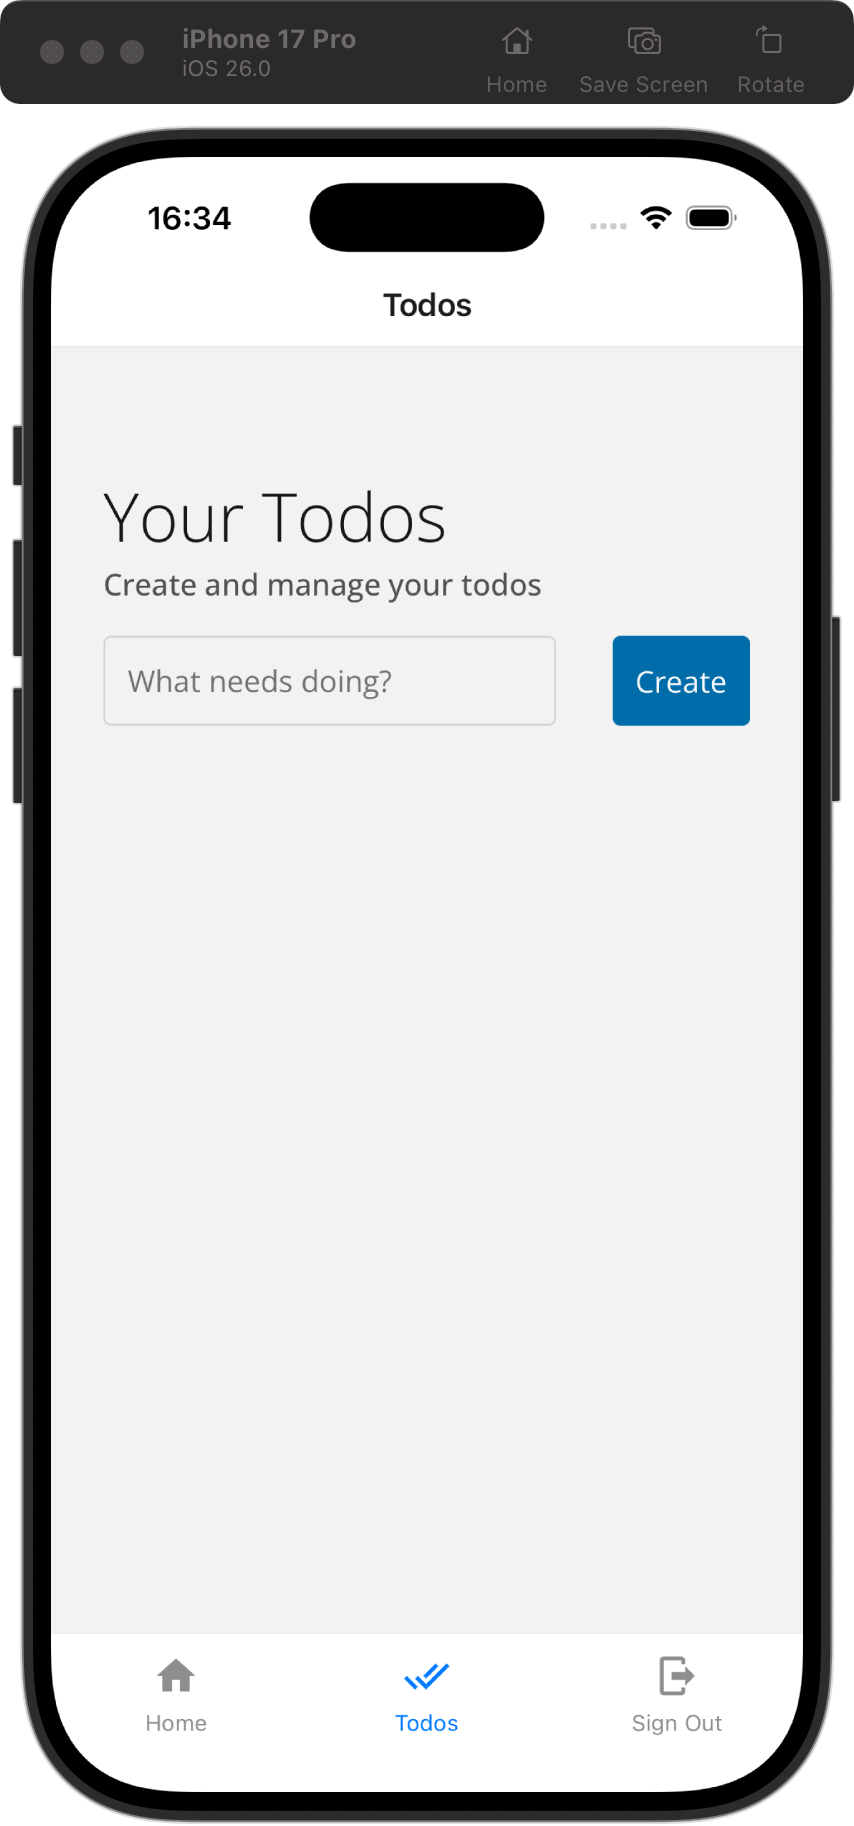 Figure 8. View or add todo items
 -
To test sign out, tap Sign Out.
The app invalidates the tokens and returns to the main screen.