Step 6. Implement the UI in React Native
Let’s review how the application renders the home view:
index.js > src/index.js > src/router.js > src/screens/home.js
Open up the second file in the above sequence, the src/index.js file, and write the following:
-
Import
useEffectfrom the React library. -
Import
NativeModulesfrom thereact-nativepackage. -
Pull
FRAuthSampleBridgefrom theNativeModulesobject. -
Write an
asyncfunction within theuseEffectcallback to call the SDKstart()method.
- import React from 'react';
+ import React, { useEffect } from 'react';
+ import { NativeModules } from 'react-native';
  import { SafeAreaProvider } from 'react-native-safe-area-context';

  import Theme from './theme/index';
  import { AppContext, useGlobalStateMgmt } from './global-state';
  import Router from './router';

+ const { FRAuthSampleBridge } = NativeModules;

  export default function App() {
    const stateMgmt = useGlobalStateMgmt({});

+   useEffect(() => {
+     async function start() {
+       await FRAuthSampleBridge.start();
+     }
+     start();
+   }, []);

    return (
      <Theme>
        <AppContext.Provider value={stateMgmt}>
          <SafeAreaProvider>
            <Router />
          </SafeAreaProvider>
        </AppContext.Provider>
      </Theme>
    );
}FRAuthSampleBridge is the JavaScript representation of the Swift bridge code we developed earlier.
Any public methods added to the Swift class within the bridge code are available in the FRAuthSampleBridge object.
| It’s important to initialize the SDK at a root level. Call this initialization step, so it resolves before any other native SDK methods can be used. |
Build the login view
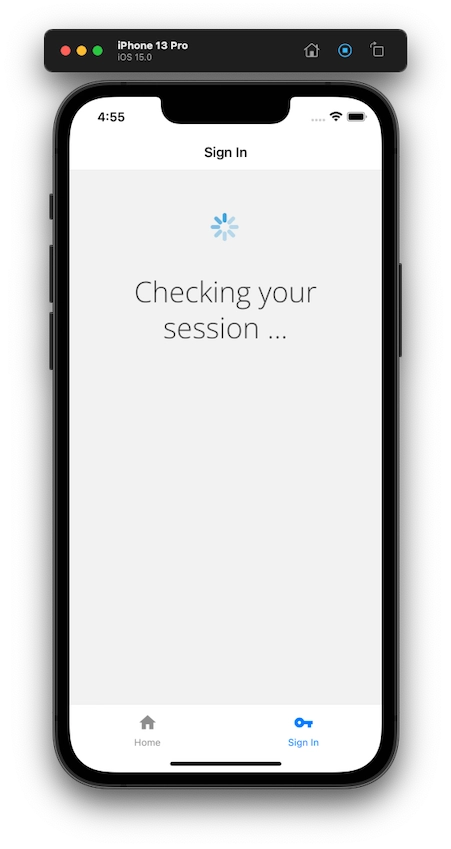
Navigate to the app’s login view within the Simulator. You should see a "loading" spinner and a message that’s persistent, since the app doesn’t have the data needed to render the form. To ensure the correct form is rendered, the initial data needs to be retrieved from the server. That will be the first task.
Since most of the action is taking place in src/components/journey/form.js, open it and add the following:
-
Import
FRStepfrom the@forgerock/javascript-sdkfor improved ergonomics for handling callbacks. -
Import
NativeModulesfrom thereact-nativepackage. -
Pull
FRAuthSampleBridgefrom theNativeModulesobject.
+ import { FRStep } from '@forgerock/javascript-sdk';
  import React from 'react';
+ import { NativeModules } from 'react-native';

  import Loading from '../utilities/loading';

+ const { FRAuthSampleBridge } = NativeModules;

@@ collapsed @@To develop the login functionality, we first need to use the login() method from the bridge code
to get the first set of callbacks, and then render the form appropriately.
This login() method is an asynchronous method, so import a few additional packages from React
to encapsulate this "side effect".
Let’s get started!
Import two new modules from React: useState and useEffect.
The useState() method is for managing the data received from the server,
and the useEffect is for the FRAuthSampleBridge.login() method’s asynchronous, network request.
Compose the data gathering process using the following:
-
Import
useEffectfrom the React library. -
Write the
useEffectfunction inside the component function. -
Write an
asyncfunction within theuseEffectfor callinglogin. -
Write an
asynclogoutfunction to ensure user if fully logged out before attempting tologin. -
Call
FRAuthSampleBridge.login()to initiate the call to the login journey/tree. -
When the
login()call returns with the data, parse the JSON string. -
Assign that data to our component state via the
setState()method. -
Lastly, call this new method to execute this process.
  import { FRStep } from '@forgerock/javascript-sdk';
- import React from 'react';
+ import React, { useEffect, useState } from 'react';
  import { NativeModules } from 'react-native';

  import Loading from '../utilities/loading';

  const { FRAuthSampleBridge } = NativeModules;

  export default function Form() {
+   const [step, setStep] = useState(null);
+   console.log(step);
+
+   useEffect(() => {
+     async function getStep() {
+       try {
+         await FRAuthSampleBridge.logout();
+         const dataString = await FRAuthSampleBridge.login();
+         const data = JSON.parse(dataString);
+         const initialStep = new FRStep(data);
+         setStep(initialStep);
+       } catch (err) {
+         setStep({
+           type: 'LoginFailure',
+           message: 'Application state has an error.',
+         });
+       }
+     }
+     getStep();
+   }, []);

    return <Loading message="Checking your session ..." />;
  }
We are passing an empty array as the second argument into useEffect.
This instructs the useEffect to only run once after the component mounts.
This is functionally is equivalent to a
class component using componentDidMount to run an asynchronous method after the component mounts.
|
The above code will result in two logs to your console:
-
null -
An object with a few properties.
The property to focus on is the callbacks property.
This property contains the instructions for what needs to be rendered to the user for input collection.
Import the components from NativeBase as well as the custom, local components within this journey/ directory:
  import { FRStep } from '@forgerock/javascript-sdk';
+ import { Box, Button, FormControl, ScrollView } from 'native-base';
  import React, { useEffect, useState } from 'react';
  import { NativeModules } from 'react-native';

  import Loading from '../utilities/loading';
+ import Alert from '../utilities/alert';
+ import Password from './password';
+ import Text from './text';
+ import Unknown from './unknown';

@@ collapsed @@Now, within the Form function body, create the function that maps these imported components
to their appropriate callbacks.
@@ collapsed @@

  export default function Form() {
    const [step, setStep] = useState(null);
    console.log(step);

@@ collapsed @@

+   function mapCallbacksToComponents(cb, idx) {
+     const name = cb?.payload?.input?.[0].name;
+     switch (cb.getType()) {
+       case 'NameCallback':
+         return <Text callback={cb} inputName={name} key="username" />;
+       case 'PasswordCallback':
+         return <Password callback={cb} inputName={name} key="password" />;
+       default:
+         // If current callback is not supported, render a warning message
+         return <Unknown callback={cb} key={`unknown-${idx}`} />;
+     }
+   }

    return <Loading message="Checking your session ..." />;
}Finally, return the appropriate component for the following states:
-
If there is no
stepdata, render theLoadingcomponent to indicate the request is still processing. -
If there is
stepdata, and it is of type'Step', then map overstep.callbackswith the function from above. -
If there is
stepdata, but the type is'LoginSuccess'or'LoginFailure', render an alert.
@@ collapsed @@
+ if (!step) {
return <Loading message='Checking your session ...' />;
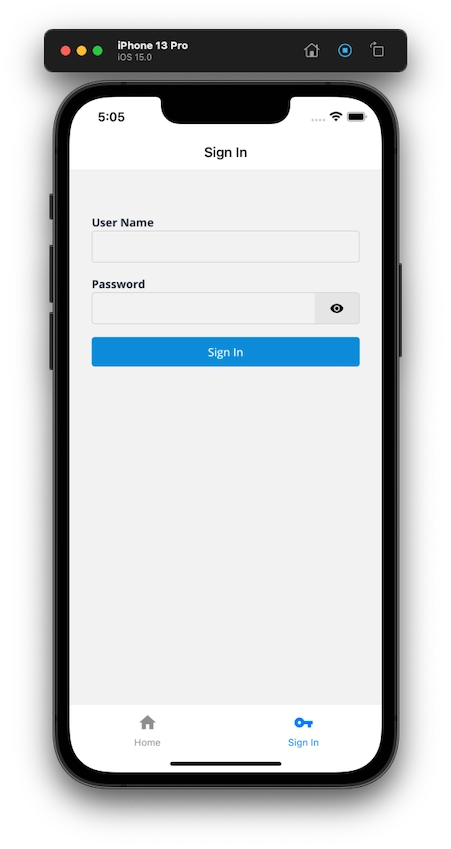
+ } else if (step.type === 'Step') {
+ return (
+ <ScrollView>
+ <Box safeArea flex={1} p={2} w="90%" mx="auto">
+ <FormControl>
+ {step.callbacks?.map(mapCallbacksToComponents)}
+ <Button>Sign In</Button>
+ </FormControl>
+ </Box>
+ </ScrollView>
+ );
+ } else {
+ // Handle success or failure of the journey/tree
+ return (
+ <Box safeArea flex={1} p={2} w="90%" mx="auto">
+ <Alert message={step.message} type={step.type} />
+ </Box>
+ );
+ }Refresh the page, and you should now have a dynamic form that reacts to the callbacks returned from our initial call to ForgeRock.
Handle the login form submission
Since a form that can’t submit anything isn’t very useful,
we’ll now handle the submission of the user input values to ForgeRock.
First, add a second useState to track whether the user is authenticated or not,
and then edit the current Button element, adding an onPress handler with a simple, inline function.
This function should do the following:
-
Submit the modified
stepdata to the server with theFRAuthSampleBridge.next()method. -
Test if the response property
typehas the value of'LoginSuccess'. -
If successful, parse the
responseJSON. -
Call
setStep() with the new object parsed from the JSON (this is mostly just for logging the step to the console). -
Call
setAuthentication()to true, which is a global state method that triggers the app to react (pun intended!) to the new user state. -
Handle errors with a generic failure message.
@@ collapsed @@

  export default function Form() {
    const [step, setStep] = useState(null);
+   const [isAuthenticated, setAuthentication] = useState(false);
    console.log(step);

@@ collapsed @@

    return (
      <ScrollView>
        <Box safeArea flex={1} p={2} w="90%" mx="auto">
          <FormControl>
            {step.callbacks?.map(mapCallbacksToComponents)}
-         <Button>Sign In</Button>
+         <Button
+           onPress={() => {
+             async function getNextStep() {
+               try {
+                 const response = await FRAuthSampleBridge.next(
+                   JSON.stringify(step.payload),
+                 );
+                 if (response.type === 'LoginSuccess') {
+                   const accessInfo = JSON.parse(response.accessInfo);
+                   setStep({
+                     accessInfo,
+                     message: 'Successfully logged in.',
+                     type: 'LoginSuccess',
+                   });
+                   setAuthentication(true);
+                 } else {
+                   setStep({
+                     message: 'There has been a login failure.',
+                     type: 'LoginFailure',
+                   });
+                 }
+               } catch (err) {
+                 console.error(`Error: form submission; ${err}`);
+               }
+             }
+             getNextStep();
+           }}
+         >
+           Sign In
+         </Button>
        </FormControl>
      </Box>
    </ScrollView>
  );

@@ collapsed @@After the app refreshes, use the test user to login. If successful, you should see a success message. Congratulations, you are now able to authenticate users!
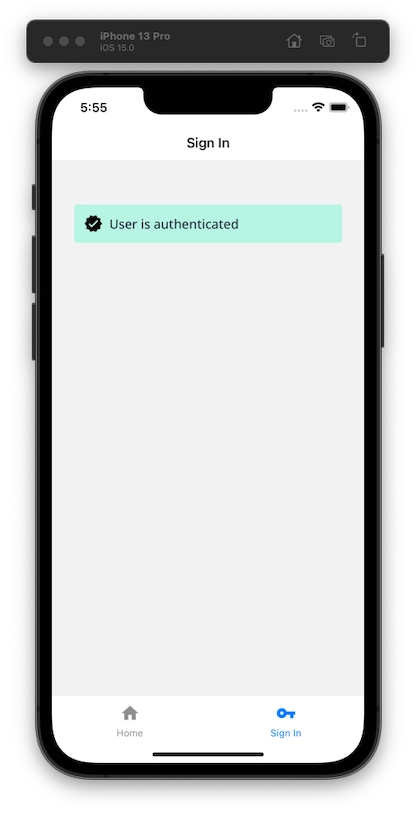
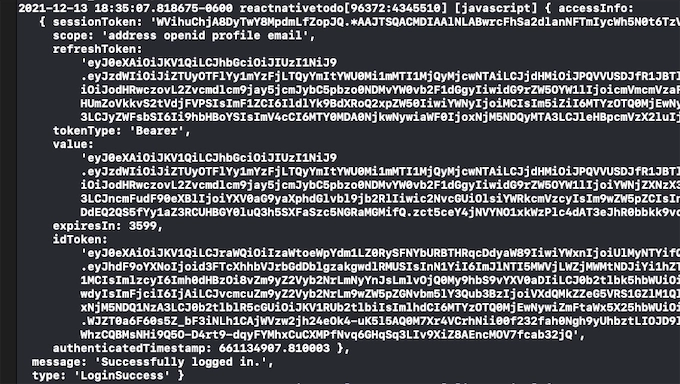
What’s more, you can verify the authentication details by going to the Xcode or Safari log
and observing the result of the last call to the server.
It should have a type of "LoginSuccess" along with token information.
| If you got a login failure, you can re-attempt the login by going to the Device menu on the Simulator and selecting "Shake". This will allow you to reload the app, providing a fresh login form. |
Handle the user provided values
You may ask, "How did the user’s input values get added to the step object?"
Let’s take a look at the component for rendering the username input.
Open up the Text component: components/journey/text.js.
Notice how special methods are being used on the callback object.
These are provided as convenience methods by the Ping SDK for JavaScript for getting and setting data.
@@ collapsed @@

  export default function Text({ callback }) {

@@ collapsed @@

    const error = handleFailedPolicies(
      callback.getFailedPolicies ? callback.getFailedPolicies() : [],
    );
    const isRequired = callback.isRequired ? callback.isRequired() : false;
    const label = callback.getPrompt();
    const setText = (text) => callback.setInputValue(text);
    return (
      <FormControl isRequired={isRequired} isInvalid={error}>
        <FormControl.Label mb={0}>{label}</FormControl.Label>
        <Input
          autoCapitalize="none"
          autoComplete="off"
          autoCorrect={false}
          onChangeText={setText}
          size="lg"
          type="text"
        />
        <FormControl.ErrorMessage>
          {error.length ? error : ''}
        </FormControl.ErrorMessage>
      </FormControl>
    );
}There are two important items to focus on
-
callback.getPrompt(): Retrieves the input’s label to be used in the UI. -
callback.setInputValue(): Sets the user’s input on the callback while they are typing (i.e.onChangeText).
Since the callback is passed from the Form to the components by "reference" (not by "value"),
any mutation of the callback object within the Text (or Password) component is also contained
in the step object in the Form component.
| You may think, "That’s not very idiomatic React! Shared, mutable state is bad." And, yes, you are correct, but we are taking advantage of this to keep everything simple (and this guide from being too long), so I hope you can excuse the pattern. |
Each callback type has its own collection of methods for getting and setting data in addition to a base set of generic callback methods. The SDK automatically adds these methods to the callback’s prototype. For more information about these callback methods, see our API documentation, or the source code in GitHub, for more details.
Request user info and redirecting to home screen
Now that the user can login, let’s go one step further and request information about the authenticated user
to display their name and other information.
We will now utilize the existing FRAuthSampleBridge.getUserInfo() method already included in the bridge code.
Let’s do a little setup before we make the request to the server:
-
Add
useContextto the import from React so that we have access to the global state. -
Import
AppContextfrom theglobal-statemodule. -
Call
useContextwith ourAppContextto provide access to the setter methods. -
Add one more
useEffectfunction to detect the change of the user’s authentication.
  import { FRStep } from '@forgerock/javascript-sdk';
  import { Box, Button, FormControl, ScrollView } from 'native-base';
- import React, { useEffect, useState } from 'react';
+ import React, { useContext, useEffect, useState } from 'react';
  import { NativeModules } from 'react-native';

+ import { AppContext } from '../../global-state';
@@ collapsed @@

  export default function Form() {
+   const [_, methods] = useContext(AppContext);
    const [step, setStep] = useState(null);
    const [isAuthenticated, setAuthentication] = useState(false);
    console.log(step);

    useEffect(() => {
      async function getStep() {
        try {
          await FRAuthSampleBridge.logout();
          const dataString = await FRAuthSampleBridge.login();
          const data = JSON.parse(dataString);
          const initialStep = new FRStep(data);
          setStep(initialStep);
        } catch (err) {
          console.error(`Error: request for initial step; ${err}`);
        }
      }
      getStep();
    }, []);

+   useEffect(() => {
+
+   }, [isAuthenticated]);

@@ collapsed @@It’s worth noting that the isAuthenticated declared in the array communicates to React
that this useEffect should only execute if the state of that variable changes.
This prevents unnecessary code execution since the value is initially false,
and continues to be false until the user completes authentication.
With the setup complete, implement the request to the server for the user’s information.
Within this empty useEffect, add an async function to make that call to FRAuthSampleBridge.getUserInfo()
and call it only when isAuthenticated is true.
@@ collapsed @@

    useEffect(() => {
+     async function getUserInfo() {
+       const userInfo = await FRAuthSampleBridge.getUserInfo();
+       console.log(userInfo);
+
+       methods.setName(userInfo.name);
+       methods.setEmail(userInfo.email);
+       methods.setAuthentication(true);
+     }
+
+     if (isAuthenticated) {
+       getUserInfo();
+     }
    }, [isAuthenticated]);

@@ collapsed @@In the code above, we collected the user information and set a few values to the global state to allow the app to react to this information. In addition to updating the global state, the React Navigation also reacts to the global state change and renders the new screens and tab navigation.
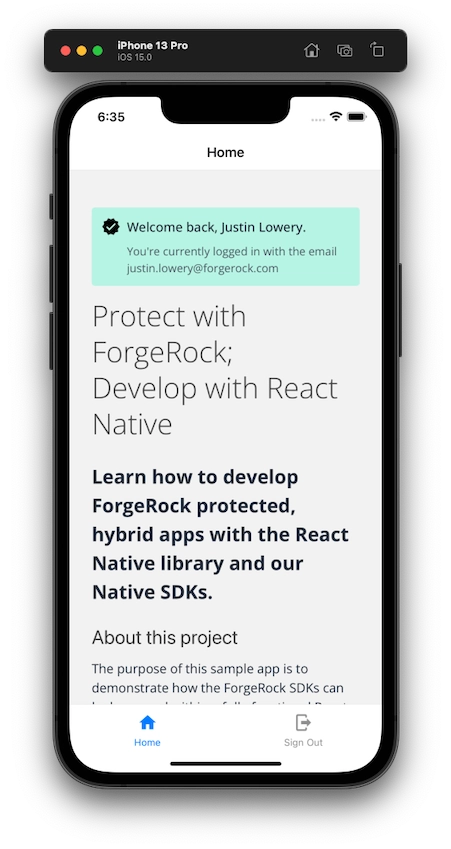
When you test this in the Simulator, completing a successful authentication results in the home screen being rendered with a success message. The user’s name and email are included for visual validation. You can also view the console in Safari and see the user’s information logged.
Add logout functionality to our bridge and React Native code
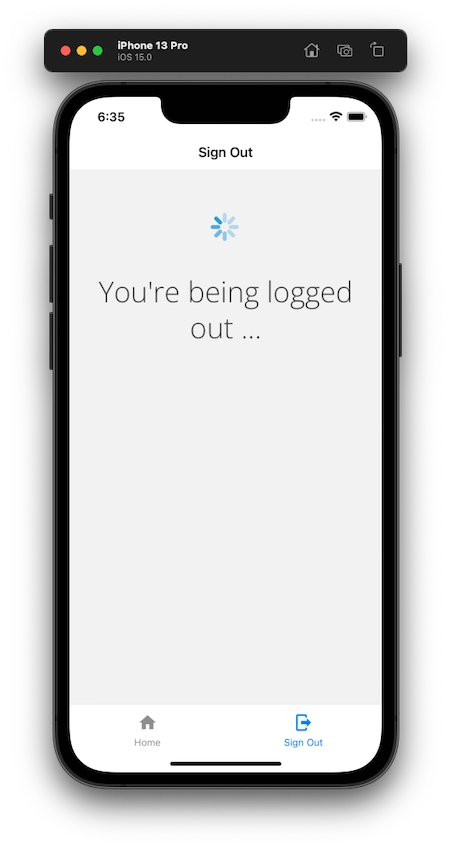
Clicking the Sign Out button within the navigation results in the logout page rendering with a persistent "loading" spinner and message. This is due to the missing logic that we’ll add now.
To add the logic into the view to call this new Swift method:
-
Open up the
screens/logout.jsfile and import the following:-
useEffectanduseContextfrom React -
useHistoryfrom React Router -
AppContextfrom the global state module
- import React from 'react';
+ import React, { useContext, useEffect } from 'react';
+ import { NativeModules } from 'react-native';

+ import { AppContext } from '../global-state';
  import { Loading } from '../components/utilities/loading';

+ const { FRAuthSampleBridge } = NativeModules;

@@ collapsed @@
diff -
-
Since logging out requires an
async, network request, we need to wrap it in auseEffectand pass in a callback function with the following functionality:@@ collapsed @@ export default function Logout() { + const [_, { setAuthentication }] = useContext(AppContext); + + useEffect(() => { + async function logoutUser() { + try { + await FRAuthSampleBridge.logout(); + } catch (err) { + console.error(`Error: logout; ${err}`); + } + setAuthentication(false); + } + logoutUser(); + }, []); + return <Loading message="You're being logged out ..." />; }diffSince we only want to call this method once, after the component mounts, we will pass in an empty array as a second argument for
useEffect(). The use of thesetAuthentication()method empties or falsifies the global state to clean up and re-renders the home screen. -
Revisit the app within the Simulator, and tap the Sign Out button.
You should see a quick flash of the loading screen, and then the home screen should be displayed with the logged out UI state.