Step 2. Configure connection properties
In this step, you configure the "kotlin-ui-prototype" sample to connect to your server.
-
In Android Studio, open the
sdk-sample-apps/android/kotlin-ui-prototypefolder you cloned in the previous step. -
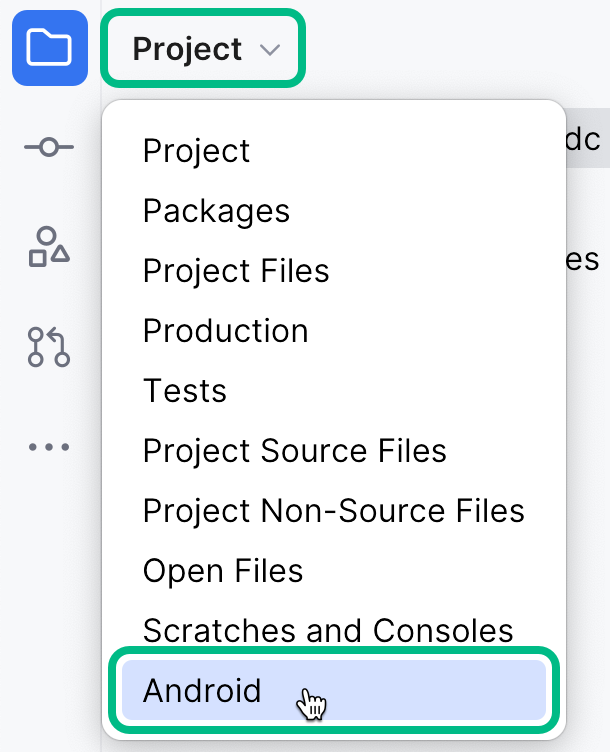
In the Project pane, switch to the Android view.
 Figure 1. Switching the project pane to Android view.
 -
In the Android view, navigate to app > kotlin+java > com.example.app > env, and open
EnvViewModel.kt.This file has the server environments the sample app uses. Each specifies the properties using the
FROptionsBuilder.buildmethod.// Example values for a PingAM instance val PingAM = FROptionsBuilder.build { server { url = "https://openam.example.com:8443/openam" realm = "root" cookieName = "iPlanetDirectoryPro" timeout = 50 } oauth { oauthClientId = "sdkPublicClient" oauthRedirectUri = "org.forgerock.demo://oauth2redirect" oauthScope = "openid profile email address" oauthSignOutRedirectUri = "org.forgerock.demo://oauth2redirect" } service { authServiceName = "sdkUsernamePasswordJourney" } } // Example values for a Ping Advanced Identity Cloud instance val PingAdvancedIdentityCloud = FROptionsBuilder.build { server { url = "https://openam-forgerock-sdks.forgeblocks.com/am" realm = "alpha" cookieName = "29cd7a346b42b42" timeout = 50 } oauth { oauthClientId = "sdkPublicClient" oauthRedirectUri = "org.forgerock.demo://oauth2redirect" oauthScope = "openid profile email address" oauthSignOutRedirectUri = "org.forgerock.demo://oauth2redirect" } service { authServiceName = "sdkUsernamePasswordJourney" } } -
Update the
PingAMorPingAdvancedIdentityCloudexample configuration values to match your server environment:- url
-
The URL of the server to connect to, including the deployment path of the Access Management component.
Identity Cloud example:
https://openam-forgerock-sdks.forgeblocks.com/amSelf-hosted example:
https://openam.example.com:8443/openam - realm
-
The realm in which the OAuth 2.0 client profile and authentication journeys are configured.
Usually,
rootfor AM andalphaorbravofor Advanced Identity Cloud. - cookieName
-
The name of the cookie that contains the session token.
For example, with a self-hosted PingAM server this value might be
iPlanetDirectoryPro.PingOne Advanced Identity Cloud tenants use a random alpha-numeric string.
To locate the cookie name in an PingOne Advanced Identity Cloud tenant, navigate to Tenant settings > Global Settings, and copy the value of the Cookie property.
- oauthClientId
-
The client ID of your OAuth 2.0 application in PingOne Advanced Identity Cloud or PingAM.
For example,
sdkPublicClient - oauthRedirectUri
-
The redirect URI or sign-in URL as configured in the OAuth 2.0 client profile.
This value must exactly match a value configured in your OAuth 2.0 client. For example,
org.forgerock.demo://oauth2redirect. - oauthScope
-
The scopes you added to your OAuth 2.0 application in PingOne Advanced Identity Cloud.
For example,
openid profile email address - oauthRedirectUri
-
The sign-out URL as configured in the OAuth 2.0 client profile.
This value must exactly match a value configured in your OAuth 2.0 client. For example,
org.forgerock.demo://oauth2redirect. - authServiceName
-
The authentication tree or journey you created earlier.
For example,
sdkUsernamePasswordJourney
The result will resemble the following:
// Example values for a Ping Advanced Identity Cloud instance val PingAdvancedIdentityCloud = FROptionsBuilder.build { server { url = "https://openam-forgerock-sdks.forgeblocks.com/am" realm = "alpha" cookieName = "ch15fefc5407912" timeout = 50 } oauth { oauthClientId = "sdkPublicClient" oauthRedirectUri = "org.forgerock.demo://oauth2redirect" oauthScope = "openid profile email address" oauthSignOutRedirectUri = "org.forgerock.demo://oauth2redirect" } service { authServiceName = "sdkUsernamePasswordJourney" } } -
Save your changes.
With the sample configured, you can proceed to Step 3. Test the app.