Ping (ForgeRock) Login Widget
Ping (ForgeRock) Login Widget
The Ping (ForgeRock) Login Widget for PingOne Advanced Identity Cloud and PingAM is an all-inclusive UI component to help you add authentication, user registration, and other self-service journeys into your web applications.
You can use the Ping (ForgeRock) Login Widget within React, Vue, Angular and a number of other modern JavaScript frameworks, as well as vanilla JavaScript.
It does not currently support server-side rendering (SSR), including Node.js.
The Ping (ForgeRock) Login Widget uses the Ping SDK for JavaScript internally, and adds a user interface and state management. This rendering layer helps eliminate the need to develop and maintain the UI components for providing complex authentication experiences.
This rendering layer uses Svelte and Tailwind, but these are "compiled away" resulting in no runtime dependencies.
The resulting Ping (ForgeRock) Login Widget is both library- and framework-agnostic.
Topics
Get started with the Ping (ForgeRock) Login Widget in the following sections:
Tutorial
Learn how to install the Ping (ForgeRock) Login Widget, add it to your applications and manage user authentication and self-service journeys.
Themes
Discover how to reconfigure the Ping (ForgeRock) Login Widget to use different colors, fonts, or sizing, or select between the light and dark modes.
Use cases
Find out how to achieve some common use case scenarios using the Ping (ForgeRock) Login Widget.
Integrations
Integrate the Ping (ForgeRock) Login Widget into various different frameworks.
API
Access a list of the modules included in the Ping (ForgeRock) Login Widget and the API they offer.
Functionality
The Ping (ForgeRock) Login Widget supports the following PingOne Advanced Identity Cloud and PingAM features:
| Supported | Unsupported |
|---|---|
|
|
Requirements
The Ping (ForgeRock) Login Widget is designed to work with the following:
-
An ECMAScript module or CommonJS enabled client-side JavaScript app
-
A "modern", fully-featured browser such as Chrome, Firefox, Safari, or Chromium Edge
The Ping (ForgeRock) Login Widget supports vanilla JavaScript and many frameworks. It is tested against the following:
| Tested | Unsupported |
|---|---|
|
|
The Ping (ForgeRock) Login Widget is not designed or tested for use with the following:
-
Internet Explorer
-
Legacy Edge
-
WebView
-
Electron
-
Modified, browser-like environments
Tutorial
This tutorial guides you through adding the Ping (ForgeRock) Login Widget to your application in the modal or inline form factor.
Prerequisites
You need to set up your PingOne Advanced Identity Cloud or PingAM instance with an authentication journey, and a demo user. To obtain access tokens, you also need to create an OAuth 2.0 client.
You may need to edit the CORS configuration on your server.
-
Advanced Identity Cloud
-
Self-managed PingAM server
Steps
- Step 1. Install the widget
-
In this step, you use
npmto add the Ping (ForgeRock) Login Widget to your project. It also covers how to download and build the Ping (ForgeRock) Login Widget to support custom requirements. - Step 2. Configure the CSS
-
In this step, you add the default CSS to your app, and learn how to use layers to control the CSS cascade.
- Step 3. Import the widget
-
In this step, you import the modules from the Ping (ForgeRock) Login Widget you want to use in your app.
- Step 4. Configure the SDK
-
In this step, you provide the configuration necessary for the Ping (ForgeRock) Login Widget to contact your server, such as which realm to use, and the server URL.
- Step 5. Instantiate the widget
-
In this step, you choose where in your app to mount the Ping (ForgeRock) Login Widget, and then instantiate an instance, choosing either the inline or modal form factor.
- Step 6. Start a journey
-
In ths step, you start a journey so that the Ping (ForgeRock) Login Widget can display the UI for the first callback.
- Step 7. Subscribe to events
-
In this step, you subscribe to observables to capture and react to events that occur during use of the Ping (ForgeRock) Login Widget.
Step 1. Install the widget
You can add the Ping (ForgeRock) Login Widget to your app by using Node Package Manager (npm), or you can download it from GitHub and build it yourself, adding results to your project directly.
- Install the Ping (ForgeRock) Login Widget with npm
-
The easiest way to add the Ping (ForgeRock) Login Widget to your project.
- Build a customized Ping (ForgeRock) Login Widget
-
If you want to customize the themes included in the Ping (ForgeRock) Login Widget, you need to download the Ping (ForgeRock) Web Login Framework source, make your modifications, and build a customized package.
Install the Ping (ForgeRock) Login Widget with npm
Add the Ping (ForgeRock) Login Widget to your project using npm as follows:
npm install @forgerock/login-widget
Next, you can Step 2. Configure the CSS.
Build a customized Ping (ForgeRock) Login Widget
The following steps show how to download the Ping (ForgeRock) Web Login Framework and build the Ping (ForgeRock) Login Widget:
-
Download the Ping (ForgeRock) Web Login Framework from the Git repository:
git clone https://github.com/ForgeRock/forgerock-web-login-framework.git -
In a terminal window, navigate to the root of the Ping (ForgeRock) Web Login Framework:
cd forgerock-web-login-framework -
Run
npmto download and install the required packages and modules:npm install -
Build the Ping (ForgeRock) Login Widget with
npm:npm run build:widget -
Copy the built
package/directory into your app project -
Import the
Widgetcomponent into your app:import Widget from '../path/to/package/index.js';The exact syntax for importing the widget into your app varies depending on the technologies your app uses.
Next
Next, you can Step 2. Configure the CSS.
Step 2. Configure the CSS
You can use any of the following methods to add the default Ping (ForgeRock) Login Widget styles to your app:
-
Import it into your JavaScript project as a module.
-
Import it using a CSS preprocessor, like Sass, Less, or PostCSS.
If you decide to import the CSS into your JavaScript, make sure your bundler is able to import and process the CSS as a module. If using a CSS preprocessor, configure your preprocessor to access files from within your package or from a directory.
Examples
Import the CSS into your JavaScript:
-
npm
-
Local
// app.js
import '@forgerock/login-widget/widget.css';// app.js
import '../path/to/widget.css';Import the CSS into your CSS:
-
npm
-
Local
/* style.css */
@import '@forgerock/login-widget/widget.css';/* style.css */
@import '../path/to/widget.css';Controlling the CSS cascade
How the browser applies styles to an app can depend on the order you import or declare CSS into it, referred to as the cascade.
You can use the @layer CSS rule to declare a cascade layer, ensuring Ping (ForgeRock) Login Widget styles apply separately from your own.
For more information, refer to @layer in the MDN docs.
|
The Ping (ForgeRock) Login Widget styles will not overwrite any of your CSS. They are namespaced to help prevent collisions and use a CSS selector prefix of |
To create a cascade layer for the Ping (ForgeRock) Login Widget styles:
-
Wrap your existing styles in a new layer, for example, "app":
@layer app {
    /* Your app's existing CSS */
}
css -
Declare the order of layers in your index HTML file before loading any CSS.
The Widget has multiple @layerdeclarations in its CSS files<style type="text/css"> /* Your existing "app" CSS layer first */ @layer app; /* List the Widget layers after your own styles */ @layer 'fr-widget.base'; @layer 'fr-widget.utilities'; @layer 'fr-widget.components'; @layer 'fr-widget.variants'; </style>htmlThe CSS imported for the Widget will not overwrite any of your app’s CSS. It’s all namespaced to ensure there are no collisions. To help achieve this, the Ping (ForgeRock) Login Widget uses a selector naming convention with a tw_prefix.
Next
Next, you can Step 3. Import the widget
Step 3. Import the widget
To use the Ping (ForgeRock) Login Widget, import the modules you want to use into your app:
// Import the Login Widget
import Widget, { configuration } from '@forgerock/login-widget';The exact syntax for importing the widget depends on the module system you are using.
The Ping (ForgeRock) Login Widget exports a number of different modules, each providing different functionality.
| Module | Description | API reference |
|---|---|---|
|
Use this main class to instantiate the Ping (ForgeRock) Login Widget, mount it into the DOM, and set up event listeners. |
|
|
Use this module to configure the Ping (ForgeRock) Login Widget. You can configure the settings it needs to contact the authorization server, styles, layout, and override content. |
|
|
Use this module to configure and start an authentication journey. |
|
|
Use this module to subscribe to events triggered by the Ping (ForgeRock) Login Widget and for controlling the modal form factor. |
|
|
Use this module for managing users in the Ping (ForgeRock) Login Widget, such as obtaining user or token information, and logging users out. |
Next
Next, you can Step 4. Configure the SDK.
Step 4. Configure the SDK
The Ping (ForgeRock) Login Widget requires information about the server instance it connects to, as well as OAuth 2.0 client configuration and other settings.
To provide these settings, import and use the configuration module and its set() method.
The Ping (ForgeRock) Login Widget uses the same underlying configuration properties as the main SDK. Add your configuration under the forgerock property:
// Import the modules
import Widget, { configuration } from '@forgerock/login-widget';

// Create a configuration instance
const myConfig = configuration();

// Set the configuration properties
myConfig.set({
  forgerock: {
    // Minimum required configuration:
    serverConfig: {
        baseUrl: 'https://openam-forgerock-sdks.forgeblocks.com/am',
        timeout: 3000,
    },
    // Optional configuration:
    clientId: 'sdkPublicClient', // The default is `WebLoginWidgetClient`
    realmPath: 'alpha',  // This is the default if not specified
    redirectUri: window.location.href,  // This is the default if not specified
    scope: 'openid profile email address', // The default is `openid profile` if not specified
  },
});|
Set your Ping (ForgeRock) Login Widget configuration at the top level of your application, such as its This ensures the Ping (ForgeRock) Login Widget has the configuration needed to call out to your PingOne Advanced Identity Cloud or PingAM server whenever and wherever you use its APIs in your app. For example, you must set the configuration before starting a journey with |
SDK configuration properties
The configuration properties available in both the SDK and the Ping (ForgeRock) Login Widget are as follows:
Server
| Property | Description |
|---|---|
|
An interface for configuring how the SDK contacts the PingAM instance. Contains |
|
The base URL of the server to connect to, including port and deployment path. Identity Cloud example:
Self-hosted example:
|
|
A URL to the server’s Use the Example:
Self-hosted example:
|
|
A timeout, in milliseconds, for each request that communicates with your server. For example, for 30 seconds specify Defaults to |
|
The realm in which the OAuth 2.0 client profile and authentication journeys are configured. For example, Defaults to the self-hosted top-level realm |
|
The name of the user authentication tree configured in your server. For example, |
OAuth 2.0
| Property | Description | ||
|---|---|---|---|
|
The |
||
|
The
For example, |
||
|
A list of scopes to request when performing an OAuth 2.0 authorization flow, separated by spaces. For example, |
||
|
A threshold, in seconds, to refresh an OAuth 2.0 token before the Defaults to |
Storage
| Property | Description |
|---|---|
|
The API to use for storing tokens on the client:
|
|
Override the default For example, the key used for storing tokens consists of the
|
Logging
| Property | Description |
|---|---|
|
Specify whether the SDK should output its log messages in the console and the level of messages to display. One of:
|
|
Specify a function to override the default logging behavior. |
General
| Property | Description |
|---|---|
|
Specify whether to include an The server can use the value of this header to alter the logic of an authentication flow. For example, if the value indicates a JavaScript web app, the journey could avoid device binding nodes, as they are only supported by Android and iOS apps. Defaults to |
Endpoints
| Property | Description |
|---|---|
|
Override the path to the authorization server’s Default: |
|
Override the path to the authorization server’s Default: |
|
Override the path to the authorization server’s Default: |
|
Override the path to the authorization server’s Default: |
|
Override the path to the authorization server’s Default: |
|
Override the path to the authorization server’s Default: |
|
Override the path to the authorization server’s Default: |
Next
Next, you can Step 5. Instantiate the widget.
Step 5. Instantiate the widget
To use the Ping (ForgeRock) Login Widget in your app you must choose an appropriate place to mount it. Then, you need to choose which form factor to implement, either inline, or modal.
With those decisions made, you can instantiate the Ping (ForgeRock) Login Widget in your app, ready for your users to start their authentication or self-service journey.
Choose where to mount the Ping (ForgeRock) Login Widget
To implement the Ping (ForgeRock) Login Widget, we recommend you add a new element into your HTML file.
For most single page applications (SPA) this is your index.html file.
This new element should be a direct child element of <body> and not within the element where you mount your SPA.
<!DOCTYPE html>
<html lang="en">
<head>
<!-- ... -->
</head>
<body>
    <!-- Root element for main app -->
    <div id="root"></div>

    <!-- Root element for Widget -->
    <div id="widget-root"></div>

    <!-- scripts ... -->
  </body>
</html>|
We recommend that you do not inject the element into which you mount the modal form factor in your app. This can cause virtual DOM issues. Instead, manually hard-code the element in your HTML file. |
Instantiate the modal form factor
To use the default Ping (ForgeRock) Login Widget modal form factor, import the modules into your app and instantiate the widget as follows:
// Import the Login Widget
import Widget, { configuration } from '@forgerock/login-widget';

// Configure SDK options
const myConfig = configuration();

myConfig.set({
  forgerock: {
    serverConfig: {
        baseUrl: 'https://openam-forgerock-sdks.forgeblocks.com/am',
        timeout: 3000,
    },
    // Optional but recommended configuration:
    realmPath: 'alpha',
    clientId: 'sdkPublicClient',
    redirectUri: window.location.href,
    scope: 'openid profile email address'
    },
  },
});

// Get the element in your HTML into which you will mount the widget
const widgetRootEl = document.getElementById('widget-root');

// Instantiate Widget with the `new` keyword
new Widget({
  target: widgetRootEl,
});This mounts the Ping (ForgeRock) Login Widget into the DOM. The modal form factor is the default and is hidden when first instantiated.
Top open the modal, import the component module, assign the function, and call its open() method:
// Import the Login Widget
import Widget, { configuration, component } from '@forgerock/login-widget';

// Configure SDK options
const myConfig = configuration();

myConfig.set({
  forgerock: {
    serverConfig: {
        baseUrl: 'https://openam-forgerock-sdks.forgeblocks.com/am',
        timeout: 3000,
    },
    // Optional but recommended configuration:
    realmPath: 'alpha',
    clientId: 'sdkPublicClient',
    redirectUri: window.location.href,
    scope: 'openid profile email address'
    },
  },
});

// Get the element in your HTML into which you will mount the widget
const widgetRootEl = document.getElementById('widget-root');

// Instantiate Widget with the `new` keyword
new Widget({
  target: widgetRootEl, // Any existing element from static HTML file
});

// Assign the component function
const componentEvents = component();

// Call the open() method, for example after a button click
const loginButton = document.getElementById('loginButton');

loginButton.addEventListener('click', () => {
  componentEvents.open();
});The modal form factor opens and displays a spinner graphic until you start a journey.
|
The modal form factor closes itself when a journey completes successfully. You can also close it by calling |
Instantiate the inline form factor
You override the default Ping (ForgeRock) Login Widget modal form factor and instead use the inline form factor. The inline form factor mounts within your application’s controlled DOM, so it is important to consider how your framework mounts elements to the DOM.
For example, the inline form factor cannot mount into a virtual DOM element, such as those used by React. In this scenario, you must wait until the element has been property mounted to the real DOM before instantiating the Ping (ForgeRock) Login Widget.
To use the inline form factor, instantiate the widget with a type: 'inline' property, as follows:
// Import the Ping (ForgeRock) Login Widget
import Widget, { configuration } from '@forgerock/login-widget';

import { useRef } from 'react';

// Configure SDK options
const myConfig = configuration();

myConfig.set({
  forgerock: {
    serverConfig: {
        baseUrl: 'https://openam-forgerock-sdks.forgeblocks.com/am',
        timeout: 3000,
    },
    // Optional but recommended configuration:
    realmPath: 'alpha',
    clientId: 'sdkPublicClient',
    redirectUri: window.location.href,
    scope: 'openid profile email address'
    },
  },
});

// Target needs to be an actual DOM element, so ref is needed with inline type
const widgetElement = useRef(null);

// Instantiate Widget with the `new` keyword
new Widget({
  target: widgetElement.current,
  props: {
    type: 'inline', // Override the default 'modal' form factor
  },
});The inline form factor loads into the specified DOM element and displays a spinner graphic until you start a journey.
Next
Next, you can Step 6. Start a journey.
Step 6. Start a journey
The Ping (ForgeRock) Login Widget displays a loading spinner graphic if it does not yet have a callback from the server to render.
You must specify and start a journey to make the initial call to the server and obtain the first callback.
To start a journey, import the journey function and execute it to receive a journeyEvents object. After you have this journeyEvents object, you can call the journeyEvents.start() method, which starts making requests to the server for the initial form fields.
You can call the journeyEvents.start() method anywhere in your application, or anytime, as long as it is after calling the configuration’s set() method and after instantiating the Widget.
// Import the Login Widget
import Widget, { configuration, journey } from '@forgerock/login-widget';

// Configure SDK options
const myConfig = configuration();

myConfig.set({
  forgerock: {
    serverConfig: {
        baseUrl: 'https://openam-forgerock-sdks.forgeblocks.com/am',
        timeout: 3000,
    },
    // Optional but recommended configuration:
    realmPath: 'alpha',
    clientId: 'sdkPublicClient',
    redirectUri: window.location.href,
    scope: 'openid profile email address'
    },
  },
});

// Get the element in your HTML into which you will mount the widget
const widgetRootEl = document.getElementById('widget-root');

// Instantiate Widget with the `new` keyword
new Widget({
  target: widgetRootEl,
});

// Assign the journey function
const journeyEvents = journey();

// Ensure you call `.start` *AFTER* instantiating the Widget
journeyEvents.start();This starts the journey configured as the default in your server and renders the initial callback.
To specify which journey to use and other parameters, refer to Configure start() parameters.
Configure start() parameters
If you do not pass any parameters when calling the start() method the Ping (ForgeRock) Login Widget will use whichever journey is marked as the default in your server.
The Ping (ForgeRock) Login Widget will also use the values configured in the last invocation of the configuration’s set() method.
You can override both of these behaviors by passing in JSON parameters:
| Parameter | Description |
|---|---|
|
Specify the name of the journey to use. If not specified, the Ping (ForgeRock) Login Widget uses whichever journey is marked as the default |
|
Override the current SDK configuration with any new or altered settings. For more information, refer to Step 4. Configure the SDK. |
|
Specify the full URL to visit if resuming a suspended journey. The server uses this to return your users to your application after clicking a "magic link" in an email, for example. The default is |
// Specify a different journey
journeyEvents.start({
  journey: 'sdkRegistrationJourney',
});For more information, refer to journey in the API reference.
Configure journey() parameters
If you do not pass any parameters when calling the journey() function the Ping (ForgeRock) Login Widget will attempt to retrieve OAuth 2.0 tokens and user information by default.
You can override this behavior by passing in the following JSON parameters:
| Parameter | Description |
|---|---|
|
Set to The default is |
|
Set to The default is |
const journeyEvents = journey({
    oauth: false,
    user: false,
});For more information, refer to journey API reference
Listen for journey completion
Use the journeyEvents.subscribe method to know when a user has completed their journey.
A summary of the events for a journey and their order is as follow:
-
Journey is loading
-
Journey is complete
-
Tokens are loading
-
Tokens are complete
-
Userinfo is loading
-
Userinfo is complete
Pass a callback function into this method to run on journey related events, of which there will be many, and each event object you receive contains a lot of information about the event.
You conditionally check for the events you are interested in and ignore what you do not need.
journeyEvents.subscribe((event) => {
  // Called multiple times, filtering by event data is recommended
  if (event.journey.successful) {
    // Only output successfull journey log entries
    console.log(event);
  }
});Next
Next, you can learn more information about observables and how to Step 7. Subscribe to events.
Step 7. Subscribe to events
The Ping (ForgeRock) Login Widget has a number of asynchronous APIs, which are designed around an event-centric observable pattern. It uses Svelte’s simplified, standard observable implementation called a "store".
|
These Svelte stores are embedded into the Ping (ForgeRock) Login Widget itself. They are not a dependency that your app layer needs to import or manage. |
For more information on Svelte stores, refer to the Svelte documentation.
This observable pattern is optimal for UI development as it allows for a dynamic user experience. You can update your application in response to the events occurring within the Ping (ForgeRock) Login Widget. For example, the Ping (ForgeRock) Login Widget has events such as "loading", "completed", "success", and, "failure".
Assign an observable
You can create a variable and assign the observable to it:
const userInfoEvents = user.info();Subscribe to observable events
An observable is a stream of events over time. The Ping (ForgeRock) Login Widget invokes the callback for each and every event from the observable, until you unsubscribe from it.
Use the subscribe() method on your variable to observe the event stream:
userInfoEvents.subscribe((event) => {
  if (event.loading) {
    console.log('User info is being requested from server');
  } else if (event.successful) {
    console.log('User info request was successful');
    console.log(event.response);
  } else if (event.error) {
    console.error('User info request failed');
    console.error(event.error.message);
  }
});For information on the events each observable returns, refer to the API reference.
Unsubscribe from an observable
Unlike a JavaScript promise, an observable does not resolve and then get cleaned up after completion.
You need to unsubscribe from an observable if it is no longer needed. This is especially important if you are subscribing to observables in a component that gets created and destroyed many times over. Subscribing to an observable over and over without unsubscribing creates a memory leak.
To unsubscribe, assign the function that is returned from calling the subscribe() method to a variable. Call this variable at a later time to unsubscribe from the obeservable.
const unsubUserInfoEvents = userInfoEvents.subscribe((event) => console.log(event));

// ...

// Unsubscribe when no longer needed
unsubUserInfoEvents();You do not need to unsubscribe from observables if you subscribe to observables in a top-level component of your app that is only initiated once, and is retained over the lifetime of your application.
A good location in which to subscribe to observables might be the central state management component or module of your application.
Get current local values
The Ping (ForgeRock) Login Widget stores a number of important values internally.
You can get the current values stored within the Ping (ForgeRock) Login Widget without subscribing to any future events or their resulting state changes by calling subscribe() and then immediately calling its unsubscribe method:
// Create variable for user info
let userInfo;

// Call subscribe, get the current local value, and then immediately call the returned function
userInfoEvents.subscribe((event) => (userinfo = event.response))(); // <-- notice the second pair of parenthesesGet updated values
You can ask the Ping (ForgeRock) Login Widget to request new, fresh values from the server, rather than just what it has stored locally, by calling the observable action methods, such as get.
userInfoEvents.get();When using the observable pattern, you can call this method and forget about it. The get causes any subscribe callback functions you have for the observable to receive the events and new state.
The subscribe can exist before or after this get call, and it will still capture the resulting events.
Use promises rather than observables
We recommend observables, but the choice is up to you.
All of the Ping (ForgeRock) Login Widget APIs that involve network calls have an alternative promise implementation that you can use.
The following example again shows userInfoEvents but converted to use promises:
// async-await
let userInfo;
async function example() {
  try {
    userInfo = await userInfoEvents.get();
  } catch (err) {
    console.log(err);
  }
}

// Promise
let userInfo;
userInfoEvents
  .get()
  .then((data) => (userInfo = data))
.catch((err) => console.log(err));Theme the widget
The Ping (ForgeRock) Login Widget provides a default theme with both light and dark modes.
You can alter these themes by using the Tailwind configuration file.
|
If your organization’s UX or brand requires pixel-perfect UIs developed in accordance to Photoshop, Figma or other "design mocks", Ping (ForgeRock) Login Widget might not be able to support such requirements. |
Switch between light and dark themes
To switch to the dark mode, you can manually add tw_dark to the <body> element:
<body class="tw_dark"></body>The Ping (ForgeRock) Login Widget defaults to the light mode if the class is not present.
You can programmatically apply the class if required:
const prefersDarkTheme = window.matchMedia('(prefers-color-scheme: dark)').matches;
if (prefersDarkTheme) {
    document.body.classList.add('tw_dark');
}Customize the theme
To reconfigure the theme to use different colors, fonts, or sizing you can provide new values to the Tailwind configuration file and rebuild the Ping (ForgeRock) Login Widget, as follows:
-
Download the Ping (ForgeRock) Web Login Framework from the GitHub repository:
git clone https://github.com/ForgeRock/forgerock-web-login-framework.git -
In a terminal window, navigate to the root of the Ping (ForgeRock) Web Login Framework:
cd forgerock-web-login-framework -
Run
npmto download and install the required packages and modules:npm install -
Run the development script:
npm run dev -
Run Storybook:
npm run storybookMake a note of the URLs to the Storybook UI listed in the terminal output:
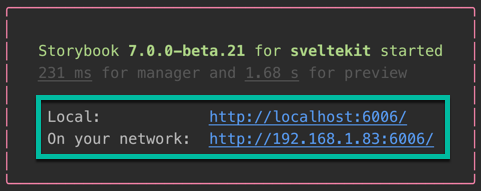 Figure 2. URLs to the Storybook UI
 -
Open the
tailwind.config.cjsfile in the root of the Ping (ForgeRock) Web Login Framework and adjust your theme by adding them under theextendproperty:// tailwind.config.cjs module.exports = { content: ['./src/**/*.{html,js,svelte,ts}', './.storybook/preview-head.html'], darkMode: 'class', presets: [require('./themes/default/config.cjs')], theme: { extend: { // Add your customizations here colors: { body: { light: 'darkblue', }, primary: { dark: 'darkorange', }, background: { light: "gainsboro", }, }, fontFamily: { sans: ['Impact'], }, }, }, };javascript -
Navigate to the Storybook UI provided in the terminal output earlier to view your changes:
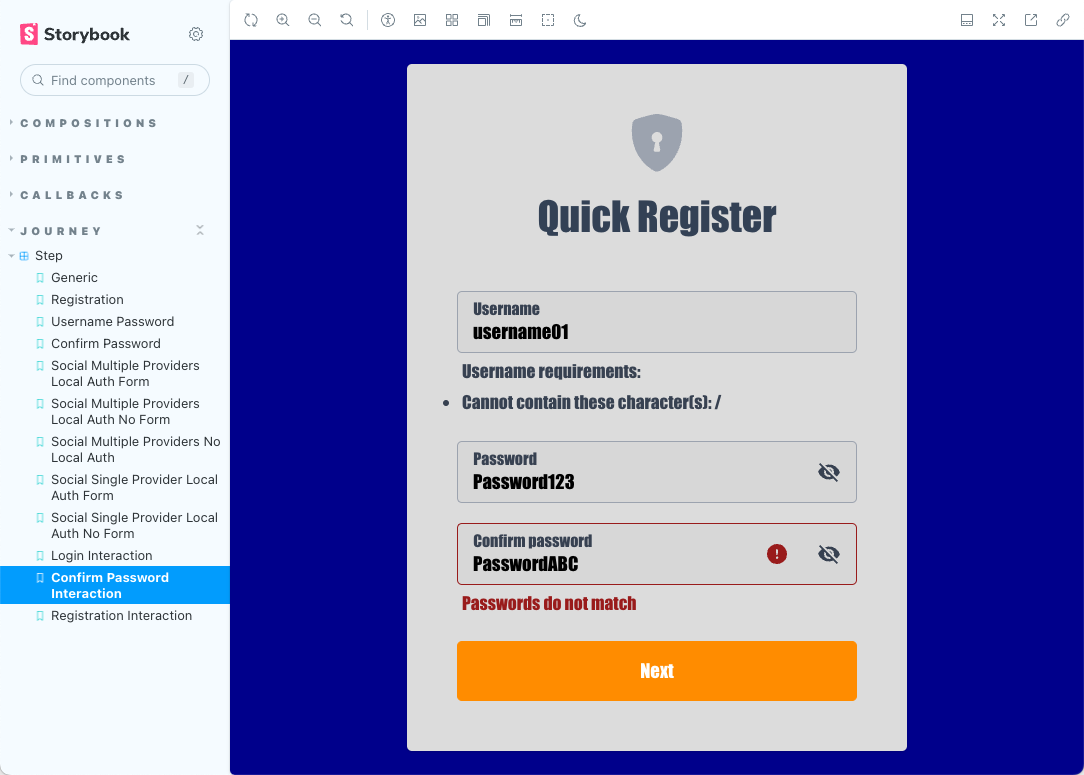 Figure 3. Customized registration modal in Storybook
Changes you make to the
tailwind.config.cjsfile are automatically reflected in the Storybook UI when you save them to disk.
Implement your use cases with the Ping (ForgeRock) Login Widget
Find out how to achieve some common use case scenarios using the Ping (ForgeRock) Login Widget.
- Log in with social authentication
-
Social authentication provides your users with a choice of ways to sign in that suits them.
Select from supported social providers in a journey to initiate an OAuth 2.0 flow to authenticate with the social provider, before returning to the original journey.
- Log in with OATH one-time passwords
-
If your users have registered the ForgeRock Authenticator for one-time passwords using a browser for example, then an app using the Ping (ForgeRock) Login Widget will be able to accept the one-time password from the authenticator app.
- Implement a CAPTCHA
-
Help to prevent automated scripts from attempting to authenticate to your servers by implementing a CAPTCHA in your Ping (ForgeRock) Login Widget app.
- Suspend journeys with "magic links"
-
You can use the Email Suspend Node within your journeys to support a number of authentication experiences, including verifying a user’s email address, building a "forgot password" flow, or using an email address for multifactor authentication.
Log in with social authentication
Social authentication provides your users with a choice of ways to sign in that suits them.
The Ping SDK for JavaScript supports social authentication with the following providers:
-
Apple
-
Facebook
-
Google
Selecting one of these providers in a journey initiates an OAuth 2.0 flow allowing them to authenticate themselves with the social provider before returning to the original journey.
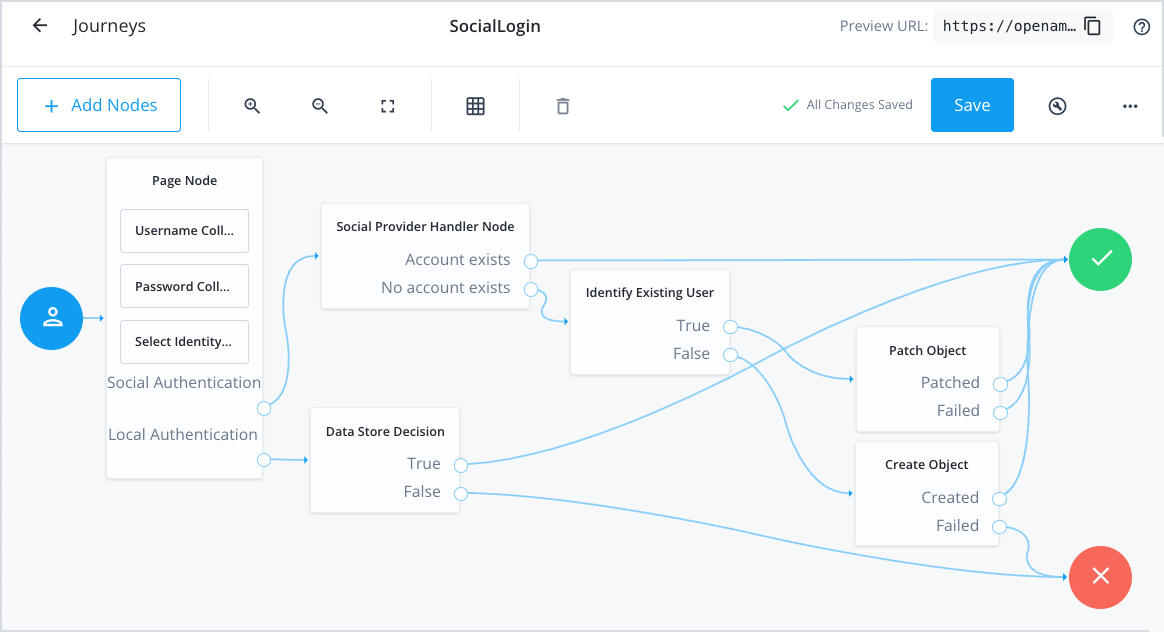
To enable this flow you need to:
-
Offer a choice of social identity providers using the Select Identity Provider node.
-
Optionally, you can allow users to skip social authentication and enter their credentials in the same form, provided nodes such as a username collector are also present.
-
-
Handle the OAuth 2.0 flow for your users using the Social Provider Handler Node.
-
Determine if the user signed in to the social provider maps to a known user by adding the Identify Existing User Node.
The following is an example journey for social authentication:
|
For a detailed guide covering the creation of social authentication journeys, refer to How do I create end user journeys for social registration and login in PingOne Advanced Identity Cloud? in the Backstage Knowledge Base. |
On the client side, the Ping (ForgeRock) Login Widget handles the selection of the identity provider and redirection to the provider.
You need to ensure your app manages the return back from the provider. To handle the return from a social provider, detect code, state and form_post_entry query parameters, as these instruct the Ping (ForgeRock) Login Widget to resume authentication using the current URL:
import { journey } from '@forgerock/login-widget';

const journeyEvents = journey();

const url = new URL(location.href);
const codeParam = url.searchParams.get('code');
const stateParam = url.searchParams.get('state');
const formPostEntryParam = url.searchParams.get('form_post_entry');

if (formPostEntryParam || (codeParam && stateParam)) {
    journey.start({ resumeUrl: location.href });
}The location.href value includes any query parameters returned from the social provider.
Without all the query parameters, the Ping (ForgeRock) Login Widget might not be able to rehydrate the journey and continue as needed.
Log in with OATH one-time passwords
The Ping (ForgeRock) Login Widget provides UI elements for the OATH Token Verifier node but not currently the OATH Registration.
If your users have registered the ForgeRock Authenticator for one-time passwords using a browser, for example, then an app using the Ping (ForgeRock) Login Widget will be able to accept the one-time password from the authenticator app.
The Ping (ForgeRock) Login Widget requires that the OATH Token Verifier node is contained within a Page node configured with a specific Stage property.
In the containing Page Node, set the Stage property to OneTimePassword:
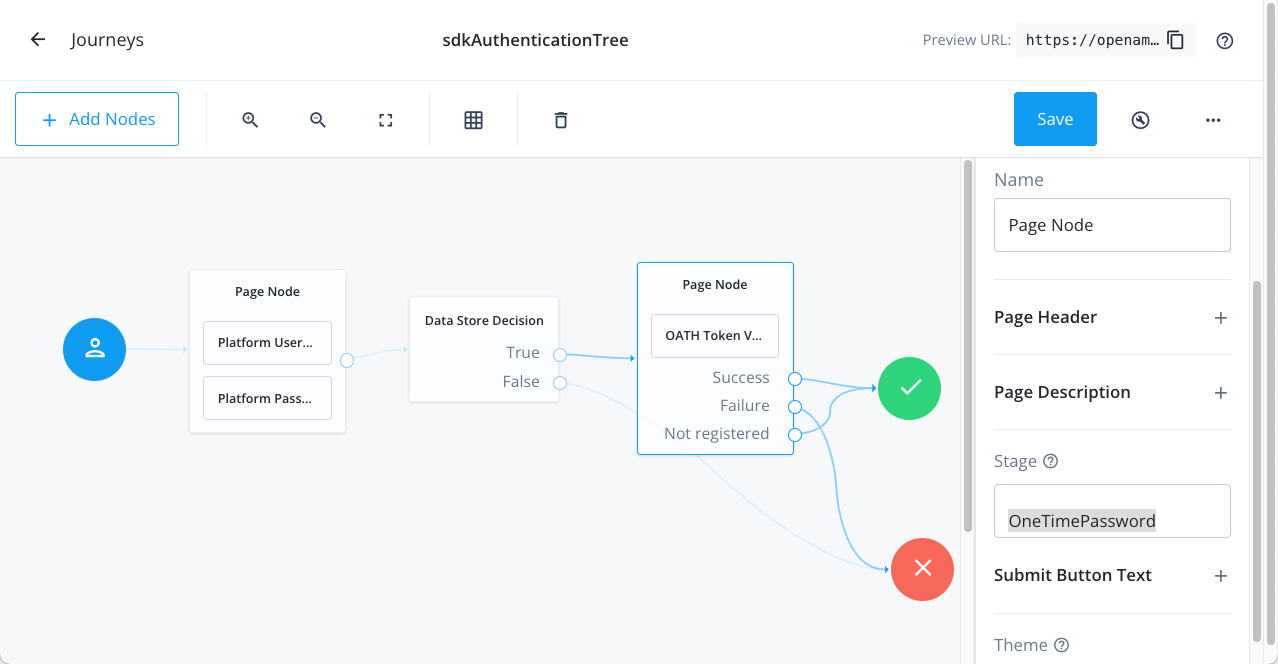
The Ping (ForgeRock) Login Widget detects that stage value as a special case and renders the appropriate UI:
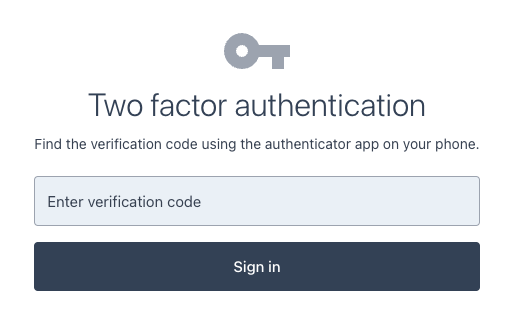
OneTimePassword stage propertyIf you do not put the OATH Token Verifier node within a Page node, the Ping (ForgeRock) Login Widget will not render the UI correctly:
Implement a CAPTCHA
The Ping (ForgeRock) Login Widget supports the use of a CAPTCHA (Completely Automated Public Turing test to tell Computers and Humans Apart), which helps to prevent automated scripts from attempting to authenticate to your servers.
To use a CAPTCHA in the Ping (ForgeRock) Login Widget, add the CAPTCHA node to your authentication journey.
Supported CAPTCHA variants
Ping (ForgeRock) Login Widget supports the following CAPTCHA variants:
| CAPTCHA variant | Support |
|---|---|
Active Passive / 99% Passive Invisible |
|
Full, except Invisible reCAPTCHA. |
|
Full |
|
Not currently supported |
Configure your app
The Ping (ForgeRock) Login Widget cannot inject the scripts necessary to use a CAPTCHA in your app.
You must add the relevant scripts yourself, usually to the <head> of the page:
- hCaptcha
-
If you are using hCaptcha with the Ping (ForgeRock) Login Widget, you must first have the JavaScript loaded into your app’s DOM:
<script src="https://js.hcaptcha.com/1/api.js" async defer></script>html - reCAPTCHA v2
-
If you are using Google reCAPTCHA v2 with the Ping (ForgeRock) Login Widget, you must first have the JavaScript loaded into your app’s DOM:
<script async src="https://www.google.com/recaptcha/api.js"></script>html - reCAPTCHA v3
-
If you are using Google reCAPTCHA v3, you must append your site key in a query string parameter named
render:<script async src="https://www.google.com/recaptcha/api.js?render={reCAPTCHA_site_key}"></script>htmlWhen calling a journey that uses reCAPTCHA v3 you can add a
recaptchaActionproperty with a custom value. That value tags the event in the reCAPTCHA console so that you can track different usage:journey.start({ journey: 'reCAPTCHAv3journey', // ….any other journey config required…. recaptchaAction: 'loginVIPArea', // reCAPTCHA v3 only, falls back to journey name });javascriptIf you do not provide a
recaptchaActionvalue, the SDK attempts to use the name of the journey instead, if available.
Test a CAPTCHA
With your app configured and the necessary scripts in place, you can visit any journey that contains a CAPTCHA node to test a CAPTCHA with the Ping (ForgeRock) Login Widget.
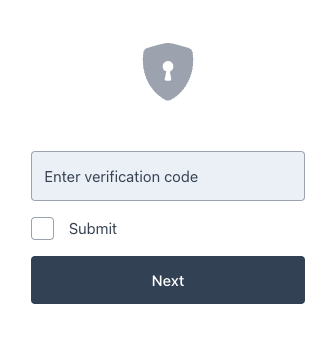
For example, the following image shows how the Ping (ForgeRock) Login Widget handles a CAPTCHA node alongside a platform username and platform password nodes, all within a single page node:
Troubleshooting
This section contains information on how to diagnose issues when using a CAPTCHA with the Ping (ForgeRock) Login Widget.
- Why does the reCAPTCHA display "ERROR for site owner: Invalid key type"?
-
Ensure the site key you have specified in the CAPTCHA node is configured for the version of reCAPTCHA type you want to use.
For example, the following image shows a configuration for v2 Tickbox:
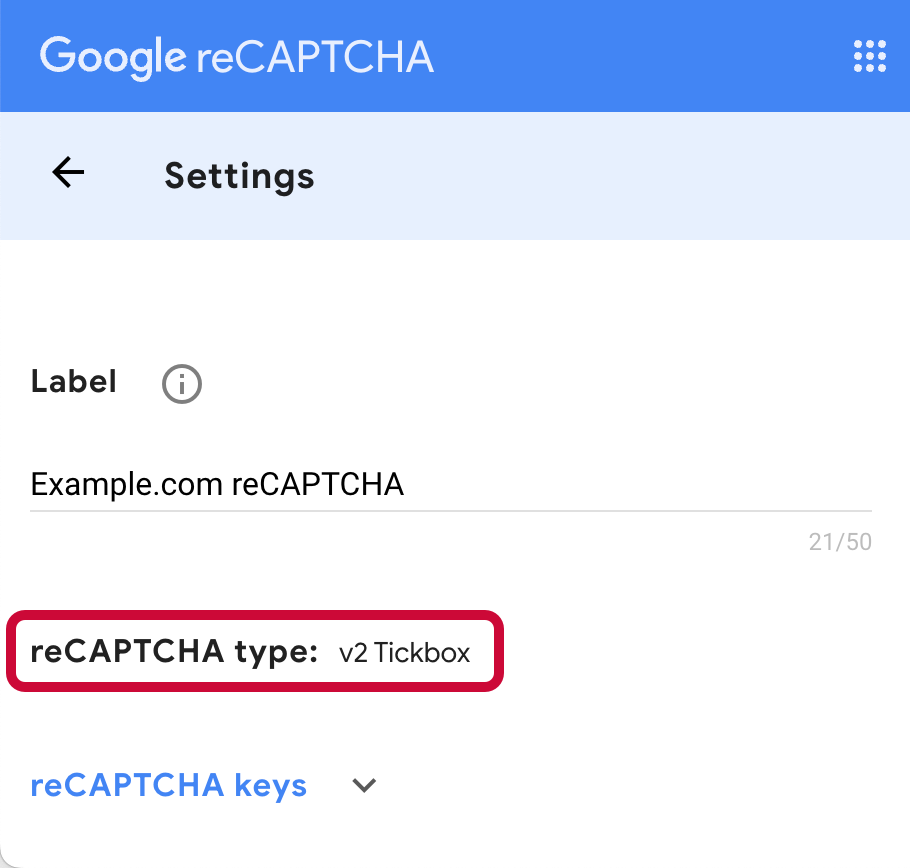
When using a v2 site key, do not select ReCaptcha V3 Node in the CAPTCHA node configuration.
- Why does the browser console display "Error: Invalid site key or not loaded in api.js"?
-
Ensure you have added the correct site key value as a
renderquery parameter of the Googleapi.jsscript.For example:
<script async src="https://www.google.com/recaptcha/api.js?render=1249672216234"></script>html - Why does the reCAPTCHA display "Localhost is not in the list of supported domains for this site key."?
-
The
localhostdomain is blocked from working with reCAPTCHA by default.You can add the domain to the site key configuration for testing purposes if required.
It can take several minutes for changes to the allowed domains to take effect. For more information, refer to Google’s reCAPTCHA documentation.
Suspend journeys with "magic links"
You can use the Email Suspend Node within your journeys to support a number of experiences, including verifying a user’s email address, building a "forgot password" flow or using an email address for multifactor authentication.
The node suspends the journey until the user clicks a link—referred to as a magic link--in their email. This link contains a generated unique code that can continue the suspended journey.
This page shows how to configure the Ping (ForgeRock) Login Widget to take advantage of this feature.
Configure the authentication server
-
Add the Email Suspend Node to the journey to suspend it until the user continues the journey from the link found in their email.
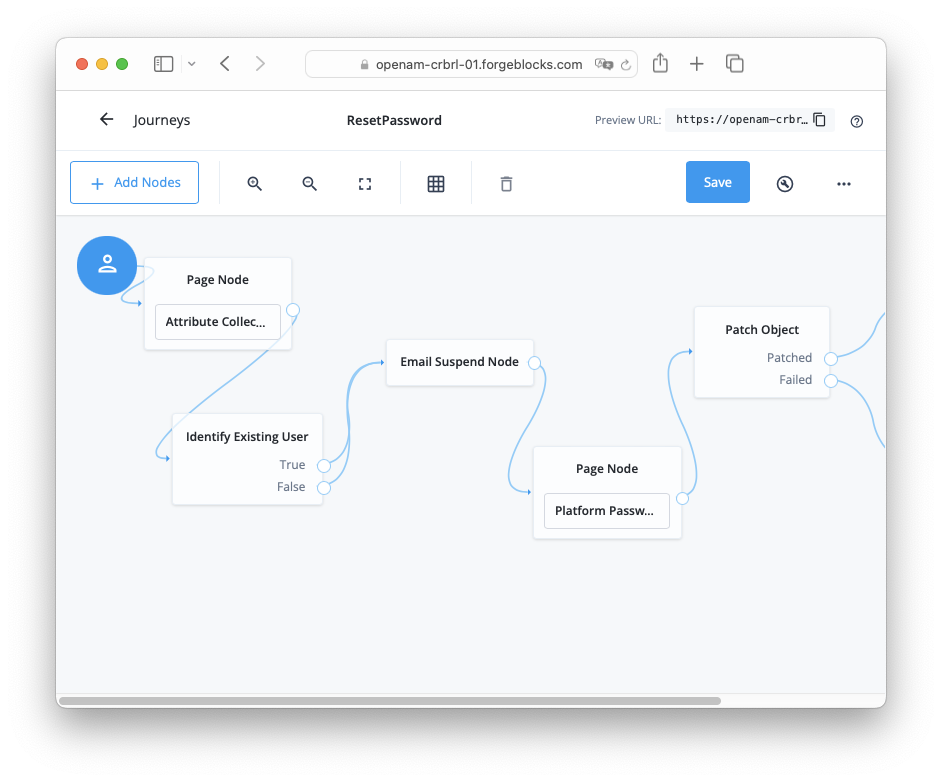 Figure 9. Insert the Email Suspend Node into your journey
 -
Configure the External Login Page URL property in the Access Management native console to match your custom app’s URL. This ensures the magic links are able to redirect users to your app to resume the journey. If not specified, the default behavior is to route users to the login page.
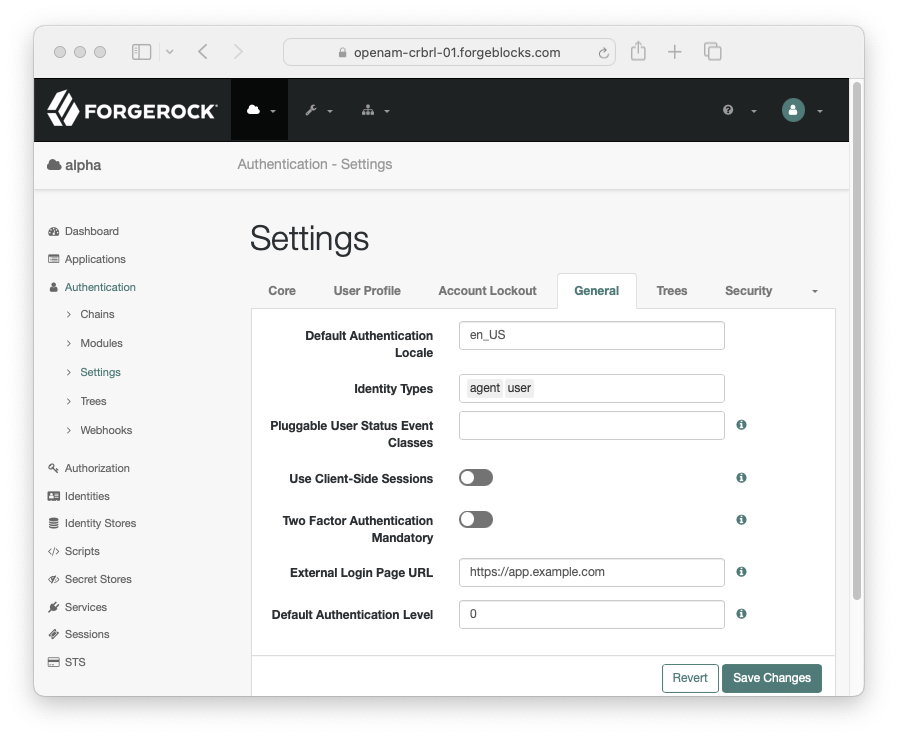 Figure 10. Configure external login URL in the PingAM native console
 -
When the Ping (ForgeRock) Login Widget encounters the Email Suspend Node, it renders the string configured in the Email Suspend Message property configured in the node. The user is not able to continue the journey until they click the link emailed to them.
Handle suspend IDs in your app
When your app handles a magic link, it needs to recognize it as a special condition and provide the Ping (ForgeRock) Login Widget with the full URL that the user clicked in their email.
Return this URL, including all query parameters, to the server as the value of the resumeUrl parameter:
import { journey } from '@forgerock/login-widget';

const journeyEvents = journey();

const url = new URL(location.href);
const suspendedId = url.searchParams.get('suspendedId');

if (suspendedId) {
  journeyEvents.start({ resumeUrl: location.href });
}The location.href value includes all query parameters included in the magic link.
Without all the query parameters, the Ping (ForgeRock) Login Widget might not be able to rehydrate the journey and continue as needed.
Integrating the Ping (ForgeRock) Login Widget
Find out how you can integrate the Ping (ForgeRock) Login Widget with different frameworks and libraries.
- Integrate with PingOne Protect for risk evaluations
-
The Ping (ForgeRock) Login Widget can integrate with PingOne Protect to evaluate the risk involved in a transaction.
Use PingOne Protect in your authentication journeys to help prevent identity fraud by incorporating advanced features and real-time detection.
- Integrate Login Widget into a React app
-
Learn how to integrate the Ping (ForgeRock) Login Widget into a simple React app that you scaffold using Vite.
Integrate with PingOne Protect for risk evaluations
The Ping (ForgeRock) Login Widget can integrate with PingOne Protect to evaluate the risk involved in a transaction.
|
PingOne Protect is supported in the following servers:
|

You can instruct the Ping (ForgeRock) Login Widget to use the embedded PingOne Signals SDK to gather information during a transaction. Your authentication journeys can then gather this information together and request a risk evaluation from PingOne.
Based on the response, you can choose whether to allow or deny the transaction or perform additional mitigation, such as bot detection measures.
You can use the audit functionality in PingOne to view the risk evaluations:

Steps
- Step 1. Set up the servers
-
In this step, you set up your PingOne Advanced Identity Cloud or PingAM server, and your PingOne instance to perform risk evaluations.
For example, you create a worker application in PingOne and configure your server to access it. You also create an authentication journey that uses the relevant nodes.
- Step 2. Configure the Ping (ForgeRock) Login Widget for PingOne Protect
-
With everything prepared, you can now configure the Ping (ForgeRock) Login Widget to evaluate risk by using PingOne Protect.
Step 1. Set up the servers
In this step, you set up your PingOne Advanced Identity Cloud or PingAM server, and your PingOne instance to perform risk evaluations.
Create a worker application in PingOne
To allow your server to access the PingOne administration API you must create a worker application in PingOne.
The worker application provides the client credentials your server uses to communicate with the PingOne admin APIs using the OpenID Connect protocol.
To create a worker application in PingOne:
-
In the PingOne administration console, navigate to , and then click Add ().
-
In the Add Application panel:
-
In Application name, enter a unique identifier for the worker application.
For example,
Ping SDK Worker. -
Optionally, enter a Description for the application and select an Icon.
These do not affect the operation of the worker application but do help you identify it in the list.
-
In Application Type, select Worker.
-
Click Save.
-
-
In the application properties panel for the worker application you created:
-
On the Roles tab, click Grant Roles.
-
On the Available responsibilities tab, select the Identity Data Admin row, and ensure the environment is correct.
-
Click Save.
-
On the Overview tab, ensure your worker application resembles the following image, and then enable it by using the toggle (1):
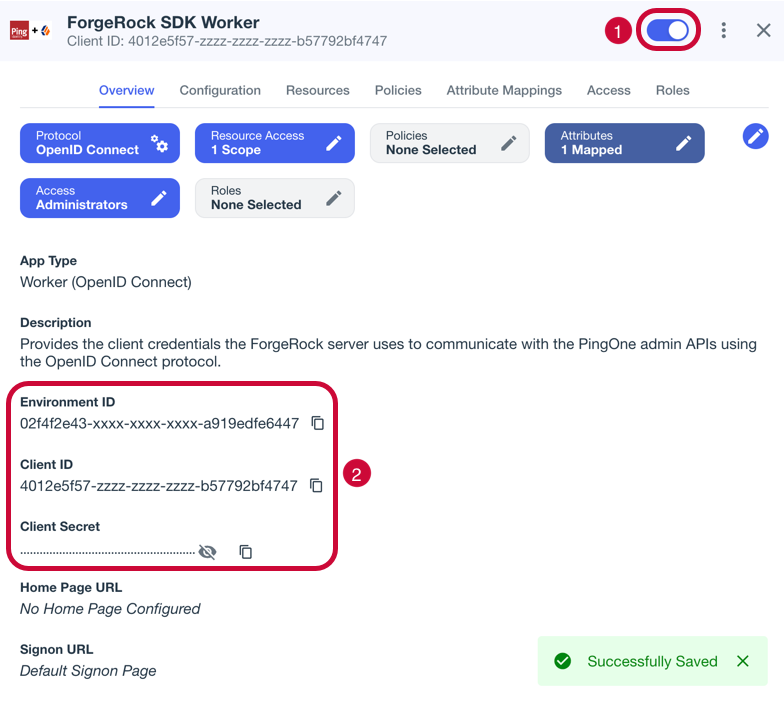 Figure 13. Example worker application in PingOne
 -
Make a note of the Environment ID, Client ID, and Client Secret values (2).
You need these values in the next step when you Configure the PingOne Worker service in your server.
-
Configure the PingOne Worker service in your server
After you create a worker application in PingOne, you must configure the PingOne Worker service in your server with the credentials.
Prerequisites
You need the following values from the PingOne Worker application you created in PingOne:
- Client ID
-
Client ID of the worker application in PingOne.
Example:
6c7eb89a-66e9-ab12-cd34-eeaf795650b2 - Client Secret
-
Client secret of the worker application in PingOne.
Use the Secret Mask () or Copy to Clipboard () buttons to obtain the value in the PingOne administration console. Example:
Ch15~o5Hm8N4_eS_m8~ARrV0KQAIQS6d.sJWe8TMXurEb~KWexY_p0gelR - Environment ID
-
Identifier of the environment that contains the worker application in PingOne.
Example:
3072206d-c6ce-ch15-m0nd-f87e972c7cc3
|
The PingOne Worker Service requires a configured OAuth2 provider service in your server.
|
Register the client secret in the server
You need to make the client secret of the worker application in PingOne available for use in the PingOne worker service.
- Advanced Identity Cloud
-
If you are using Advanced Identity Cloud you will need to create an environment secret to hold the client secret value, as follows:
-
In the PingOne Advanced Identity Cloud admin UI, go to Tenant Settings > Global Settings > Environment Secrets & Variables.
-
Click the Secrets tab.
-
Click + Add Secret.
-
In the Add a Secret modal window, enter the following information:
Name
Enter a secret name. For example,
ping-protect-client-secret.Secret names cannot be modified after the secret has been created. Description
(optional) Enter a description of the purpose of the secret.
Value
Enter the Client Secret value you obtained when creating the worker application in PingOne.
For example,
Ch15~o5Hm8N4_eS_m8~ARrV0KQAIQS6d.sJWe8TMXurEb~KWexY_p0gelR.The field obscures the secret value by default. You can optionally click the visibility toggle () to view the secret value as you enter it.
-
Click Save to create the variable.
-
Click View Update, check the details of the new secret, and then click Apply Update.
Advanced Identity Cloud displays a final confirmation page.
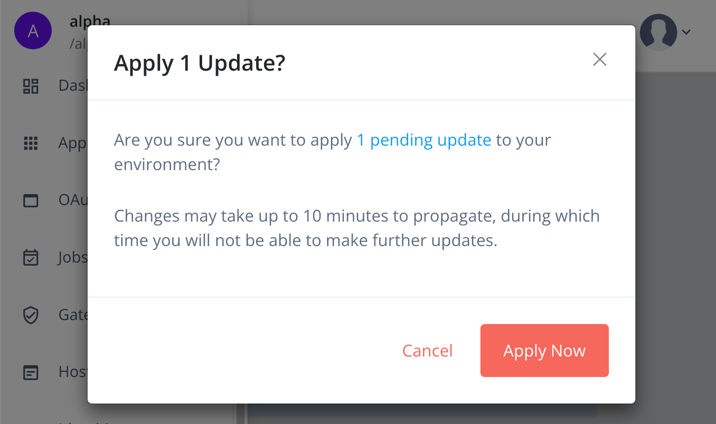 Figure 14. Apply updated secrets in Advanced Identity Cloud
 -
Click Apply Now.
Advanced Identity Cloud propagates the new secret and its value to all servers. You must wait until the secrets have propagated throughout the environment before attempting to use the secret.
The Environment Secrets & Variables page displays the following message while the update is in progress:
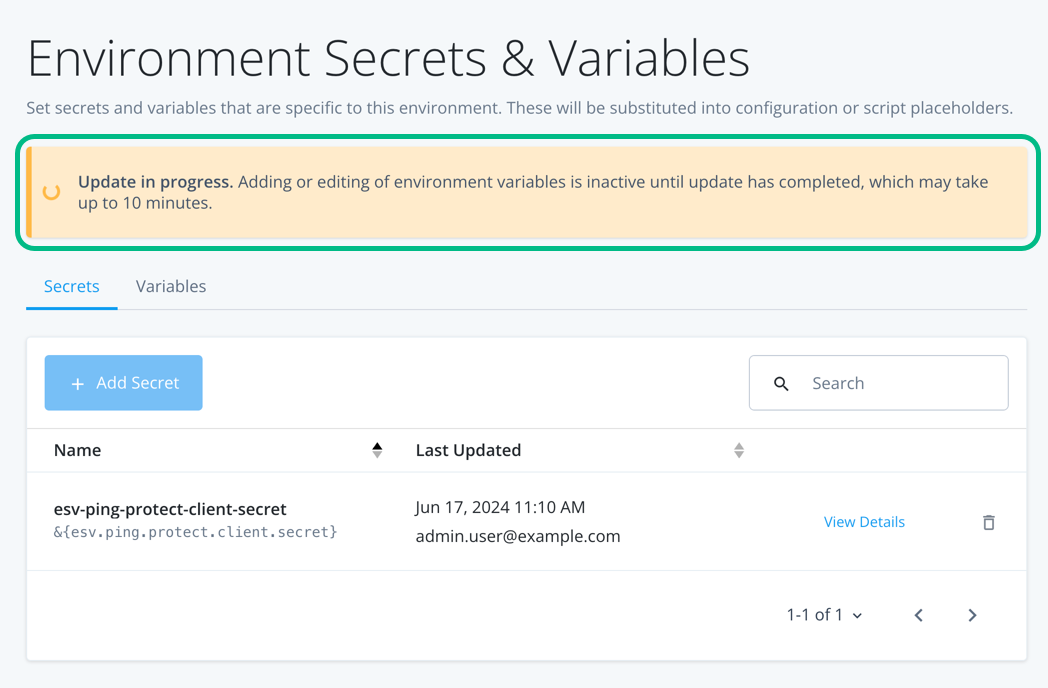 Figure 15. Propagating secrets in progress in Advanced Identity Cloud.
-
- Self-managed AM
-
For information on adding secret values for use in services in a self-managed AM instance, refer to Create key aliases in the AM documentation.
Configure the PingOne worker service
To configure the PingOne worker service:
-
If you are using PingOne Advanced Identity Cloud, in the administration console navigate to Native Consoles > Access Management.
-
In the AM admin UI, click Services.
-
If the PingOne Worker Service is in the list of services, select it.
-
If you do not yet have a PingOne Worker Service:
-
Click Add a Service.
-
In Choose a service type, select
PingOne Worker Service, and then click Create.
-
-
On the Secondary Configurations tab, click Add a Secondary Configuration.
-
On the New workers configuration page:
-
Enter a Name for the configuration.
For example,
SDK PingOne Worker.You use this value when you configure an authentication journey that performs risk evaluations.
-
In Client ID, enter the client ID of the PingOne Worker application you created earlier.
-
In Client Secret Label Identifier, enter an identifier to create a specific secret label to represent the client secret of the worker application.
For example,
workerAppClientSecret.The secret label uses the template
am.services.pingone.worker.identifier.clientsecretwhere identifier is the Client Secret Label Identifier value.This field can only contain characters
a-z,A-Z,0-9, and.and can’t start or end with a period. -
In Environment ID, enter the environment ID containing the PingOne Worker application you created earlier.
-
Click Create
-
-
On the Workers Configuration page, ensure that the PingOne API Server URL and PingOne Authorization Server URL are correct for the region of your PingOne servers:
PingOne URLs by region Region Authorization URL API URL North America
(Excluding Canada)
https://auth.pingone.comhttps://api.pingone.com/v1Canada
https://auth.pingone.cahttps://api.pingone.ca/v1Europe
https://auth.pingone.euhttps://api.pingone.eu/v1Asia-Pacific
https://auth.pingone.asiahttps://api.pingone.asia/v1 -
Confirm your configuration resembles the image below, and then click Save changes.
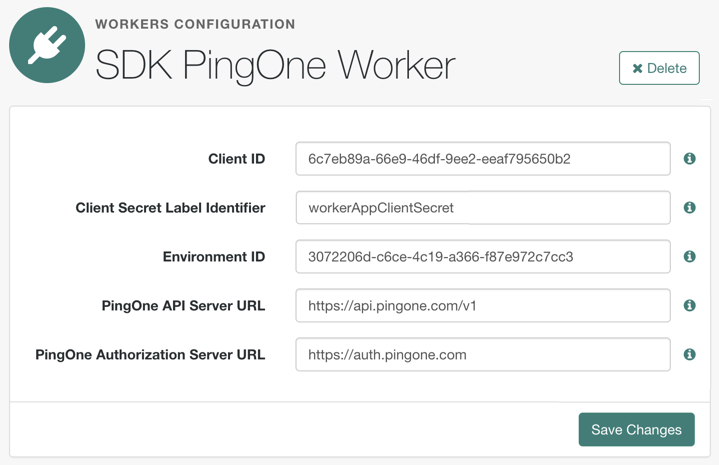 Figure 16. Example worker application in PingOne
Map the Client Secret Label Identifier to a secret
To make the client secret available to the PingOne Worker Service, you must map the secret to the ID created.
Map secrets in Advanced Identity Cloud
-
In the PingOne Advanced Identity Cloud admin UI, click Native Consoles > Access Management.
-
In the AM admin UI (native console), go to Realm > Secret Stores.
-
Click the ESV secret store, then click Mappings.
-
Click + Add Mapping.
-
In Secret Label, select the label generated when you entered the Client Secret Label Identifier previously.
For example,
am.services.pingone.worker.workerAppClientSecret.clientsecret. -
In aliases, enter the name of the ESV secret you created earlier, including the
esv-prefix, and then click Add.For example,
esv-ping-protect-client-secret
The result resembles the following:
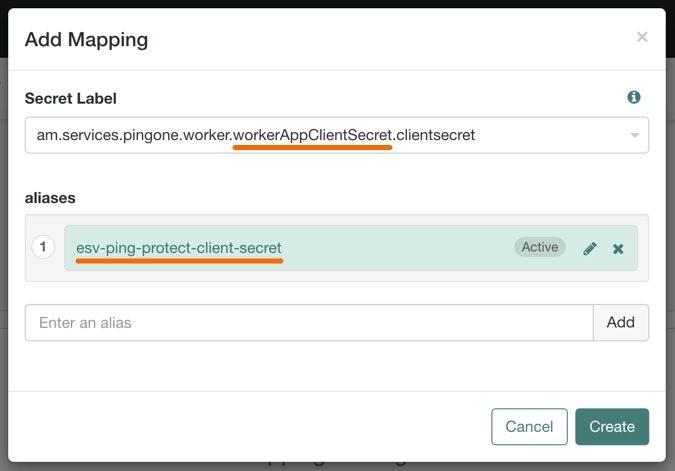
-
-
Click Create.
To learn more about mapping secrets and label identifiers in Advanced Identity Cloud, refer to Secret labels.
Map secrets in self-managed AM
To learn about mapping secrets in self-managed AM, refer to Map and rotate secrets.
You have now configured the PingOne Worker service in your server. You can now Configure a journey to perform PingOne Protect risk evaluations.
Configure a journey to perform PingOne Protect risk evaluations
To make risk evaluations in PingOne, you must configure an authentication journey in your server.
The following table covers the authentication nodes and callbacks for integrating your authentication journeys with PingOne Protect.
| Node | Callback | Description |
|---|---|---|
Instruct the embedded PingOne Signals SDK to start gathering contextual information. |
||
Returns contextual information that the server can send to your PingOne Protect instance to perform a risk evaluation. |
||
Non-interactive |
Inform the PingOne Protect instance about the status of the transaction. |
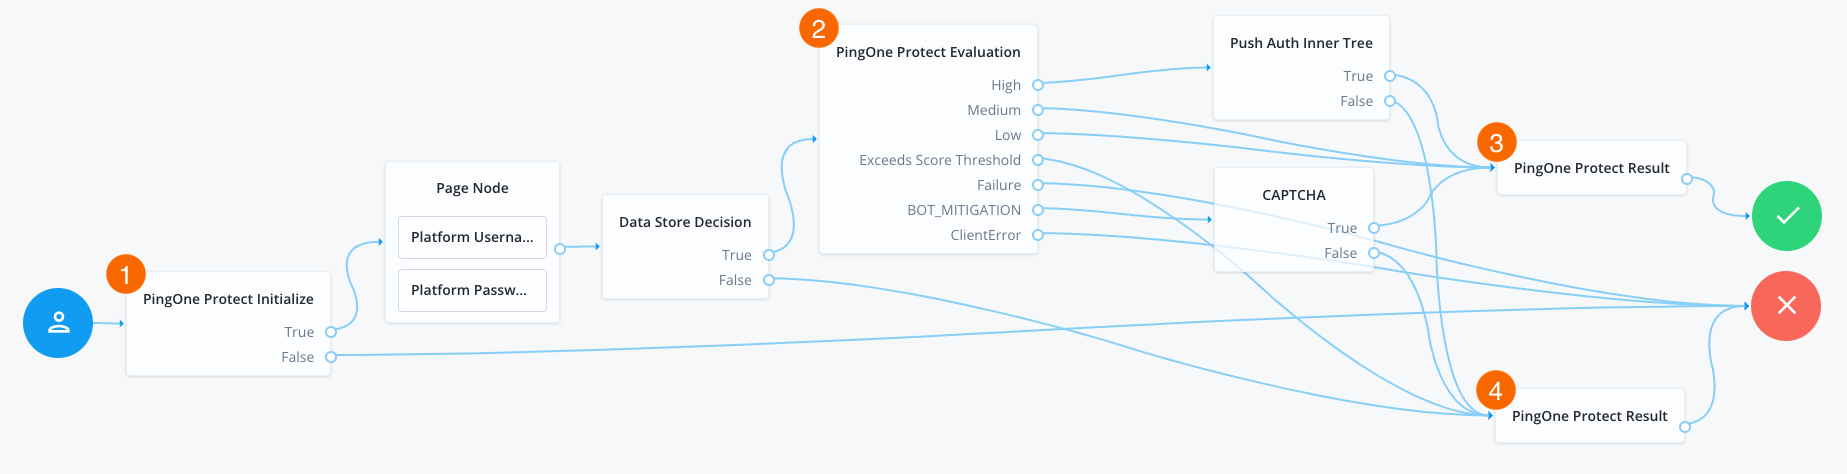
In your server, log in as an administrator and create a new authentication journey similar to the following example:
-
The PingOne Protect Initialize node 1 instructs the SDK to initialize the PingOne Protect Signals API with the configured properties.
Initialize the PingOne Protect Signals API as early in the journey as possible, before any user interaction.
This enables it to gather sufficient contextual data to make an informed risk evaluation.
You can initialize the PingOne Protect Signals API whenever you want to start collecting data. This could be at application startup, or when a particular page or view is visited.
Learn more at initializing data collection.
-
The user enters their credentials, which are verified against the identity store.
-
The PingOne Protect Evaluation node 2 performs a risk evaluation against a risk policy in PingOne.
The example journey continues depending on the outcome:
High-
The journey requests that the user respond to a push notification.
MediumorLow-
The risk is not significant, so no further authentication factors are required.
Exceeds Score Threshold-
The score returned is higher than the configured threshold and is considered too risky to complete successfully.
Failure-
The risk evaluation could not be completed, so the authentication attempt continues to the Failure node.
BOT_MITIGATION-
The risk evaluation returned a recommended action to check for the presence of a human, so the journey continues to a CAPTCHA node.
ClientError-
The client returned an error when attempting to capture the data to perform a risk evaluation, so the authentication attempt continues to the Failure node.
-
An instance of the PingOne Protect Result node 3 returns the
Successresult to PingOne, which can be viewed in the audit console to help with analysis and risk policy tuning. -
A second instance of the PingOne Protect Result node 4 returns the
Failedresult to PingOne, which can be viewed in the audit console to help with analysis and risk policy tuning.
You have now configured a suitable authentication journey in your server. You can now proceed to Step 2. Configure the Ping (ForgeRock) Login Widget for PingOne Protect.
Step 2. Configure the Ping (ForgeRock) Login Widget for PingOne Protect
Integrating the Ping (ForgeRock) Login Widget with PingOne Protect enables you to perform risk evaluations during your customer’s journey.
Complete the following tasks to fully integrate with PingOne Protect:
Initialize data collection
You must initialize the PingOne Signals SDK so that it collects the data needed to evaluate risk.
The earlier you can initialize the PingOne Signals SDK, the more data it can collect to make a risk evaluation.
There are two options for initializing the PingOne Signals SDK in the Ping (ForgeRock) Login Widget:
-
The Ping (ForgeRock) Login Widget automatically initializes the PingOne Signals SDK on receipt of a
PingOneProtectInitializeCallbackcallback from a journey you have started. -
Manually initialize the PingOne Signals SDK, import the module and pass in any configuration parameters you need, as follows:
import Widget, { configuration, journey, protect } from '@forgerock/login-widget'; new Widget({ target: widgetEl }); // Start PingOne Protect Signals SDK await protect.start({ envId: 3072206d-c6ce-ch15-m0nd-f87e972c7cc3, behavioralDataCollection: true, consoleLogEnabled: true, });jsThe PingOne Signals SDK supports a number of parameters which you can supply yourself, or are contained in the
PingOneProtectInitializeCallbackcallback.Show PingOne Signals SDK
startparametersParameter
Description
Android
iOS
JavaScript
envIDRequired. Your PingOne environment identifier.
deviceAttributesToIgnoreOptional. A list of device attributes to ignore when collecting device signals.
For example,
AUDIO_OUTPUT_DEVICESorIS_ACCEPT_COOKIES.isBehavioralDataCollectionbehavioralDataCollectionWhen
true, collect behavioral data.Default is
true.isConsoleLogEnabledconsoleLogEnabledWhen
true, output SDK log messages in the developer console.Default is
false.isLazyMetadatalazyMetadataWhen
true, calculate metadata on demand rather than automatically after callingstart.Default is
false.N/A
deviceKeyRsyncIntervalsNumber of days that device attestation can rely upon the device fallback key.
Default:
14N/A
disableHubWhen
true, the client stores device data in the browser’slocalStorageonly.When
falsethe client uses an iframe.Default is
false.N/A
disableTagsWhen
true, the client does not collect tag data.Tags are used to record the pages the user visited, forming a browsing history.
Default is
false.N/A
enableTrustWhen
true, tie the device payload to a non-extractable crypto key stored in the browser for content authenticity verification.Default is
false.N/A
externalIdentifiersOptional. A list of custom identifiers that are associated with the device entity in PingOne Protect.
N/A
hubUrlOptional. The iframe URL to use for cross-storage device IDs.
N/A
waitForWindowLoadWhen
true, initialize the SDK on theloadevent, instead of theDOMContentLoadedevent.Default is
true.
Return collected data for a risk evaluation
To perform risk evaluations, the PingOne server requires the captured data.
There are two options for returning data in the Ping (ForgeRock) Login Widget:
-
On receipt of a
PingOneProtectEvaluationCallbackcallback within a journey, the Ping (ForgeRock) Login Widget automatically returns the captured data. -
Use the
getData()method to manually return the captured data:import Widget, { configuration, journey, protect } from '@forgerock/login-widget'; new Widget({ target: widgetEl }); // Start PingOne Protect Signals SDK await protect.start({ envId: 3072206d-c6ce-ch15-m0nd-f87e972c7cc3, behavioralDataCollection: true, consoleLogEnabled: true, }); // Return gathered data to the server await protect.getData();js
Pause and resume behavioral data capture
The PingOne Protect Signals SDK can capture behavioral data, such as how the user interacts with the app, to help when performing evaluations.
There are scenarios where you might want to pause the collection of behavioral data. For example, the user might not be interacting with the app, or you only want to use device attribute data to be considered when performing PingOne Protect evaluations. You can then resume behavioral data collection when required.
There are two options for pausing and resuming behavioral data capture in the Ping (ForgeRock) Login Widget:
-
The
PingOneProtectEvaluationCallbackcallback can include a flag to pause or resume behavioral capture, which the Ping (ForgeRock) Login Widget automatically responds to. -
Use the
pauseBehavioralData()andresumeBehavioralData()methods to manually pause or resume the capture of behavioral data:import Widget, { configuration, journey, protect } from '@forgerock/login-widget'; new Widget({ target: widgetEl }); // Start PingOne Protect Signals SDK await protect.start({ envId: 3072206d-c6ce-ch15-m0nd-f87e972c7cc3, behavioralDataCollection: true, consoleLogEnabled: true, }); // Return gathered data to the server await protect.getData(); // Pause behavioral data collection protect.pauseBehavioralData(); // Resume behavioral data collection protect.resumeBehavioralData();js
Integrate the Ping (ForgeRock) Login Widget into a React app
In this tutorial, you will learn how to integrate the Ping (ForgeRock) Login Widget into a simple React app that you scaffold using Vite.
You install the Ping (ForgeRock) Login Widget using npm, add an element to the HTML file for mounting the modal form factor, and wrap the app’s CSS in a layer.
With the app prepared, you then import and instantiate various components of the Ping (ForgeRock) Login Widget to start a journey. You subscribe to the events the Ping (ForgeRock) Login Widget emits so that the app can respond and display the appropriate UI.
When you have successfully authenticated a user, you add code to log the user out and invalidate their tokens, as well as update the UI to alter the button state.
Configure your server
Configure your PingOne Advanced Identity Cloud or self-managed PingAM server by following the steps in the Ping (ForgeRock) Login Widget Tutorial.
-
When creating the OAuth 2.0 client, add the URL that you are using to host the app to the Sign-In URLs property.
The URL is output to the console when you run the
npm run devcommand, and defaults tohttp://localhost:5173/ -
If your instance has the default Login journey, you can use that instead of creating a new journey as described in the tutorial.
Create a Vite app
-
In a terminal window, create a Vite app with React as the template:
npm create vite@latest login-widget-react-demo -- --template reactshellFor more information, refer to Scaffolding Your First Vite Project in the Vite developer documentation.
-
When completed, change to the new directory, for example
login-widget-react-demo, and then install dependencies withnpm:npm installshell -
Run the app in developer mode:
npm run devshell -
In a web browser, open the URL output by the previous command to render the app. The URL is usually
http://localhost:5173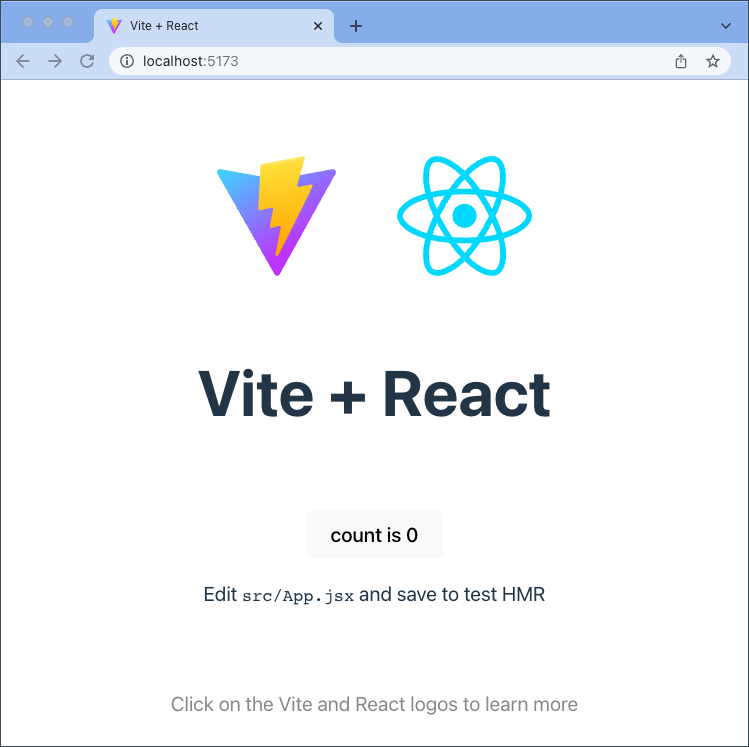 Figure 18. Example Vite + React app
|
Use a different browser for development testing than the one you use to log into PingOne Advanced Identity Cloud or PingAM. This prevents admin user and test user sessions colliding and causing unexpected authentication failures. |
Install the Ping (ForgeRock) Login Widget
In a new terminal window, install the Ping (ForgeRock) Login Widget using npm:
npm install @forgerock/login-widgetPrepare the HTML
In your preferred IDE, open the directory where you created the Vite app, and then open the index.html file.
To implement the modal form factor, create a root element to contain the Ping (ForgeRock) Login Widget.
Add <div id="widget-root"></div> toward the bottom of the <body> element but before the <script> tag:
<!DOCTYPE html>
<html lang="en">
  <head>
    <meta charset="UTF-8" />
    <link rel="icon" type="image/svg+xml" href="/vite.svg" />
    <meta name="viewport" content="width=device-width, initial-scale=1.0" />
    <title>Vite + React</title>
  </head>
  <body>
    <div id="root"></div>
    <!-- Widget mount point -->
    <div id="widget-root"></div>
    <script type="module" src="/src/main.jsx"></script>
  </body>
</html>Prepare the CSS
You should wrap the app’s CSS using @layer. This helps control the CSS cascade.
To wrap the app’s CSS, in your IDE, open src/index.css and src/App.css and wrap them both with the following code:
@layer app {
    /* existing styles */
    #root {
        max-width: 1280px;
        margin: 0 auto;
        padding: 2rem;
        text-align: center;
    }

    .logo {
        height: 6em;
        padding: 1.5em;
        will-change: filter;
        transition: filter 300ms;
    }
    /* ... */
}You can then specify the order of the various layers as follows:
<style>
  @layer app;
  /* List the Widget layers last */
  @layer 'fr-widget.base';
  @layer 'fr-widget.utilities';
  @layer 'fr-widget.components';
  @layer 'fr-widget.variants';
</style>Import and configure the Ping (ForgeRock) Login Widget
In your IDE, open the top-level application file, often called App.jsx.
Import the Widget class, the configuration module, and the CSS:
import Widget, { configuration } from '@forgerock/login-widget';
import '@forgerock/login-widget/widget.css';Add a call to the configuration method within your App function component and save off the return value to a config variable for later use.
This internally prepares the Widget for use.
function App() {
  const [count, setCount] = useState(0);

  // Initiate all the Widget modules
  const config = configuration();

// ...Instantiate and mount the Ping (ForgeRock) Login Widget
To continue, you need to import useEffect from the React library. This is to control the execution of a number of statements you are going to write.
After importing useEffect, write it into the component with an empty dependency array:
import React, { useEffect, useState } from 'react';

// ...

function App() {

  // ...

  useEffect(() => {}, []);

// ...|
The empty dependency array is to tell React this has no dependencies at this point and should only run once. |
Now that you have the useEffect written, follow these steps:
-
Instantiate the
Widgetclass withinuseEffect -
In the arguments, pass an object with a
targetproperty that specifies the DOM element you created in an earlier step -
Assign its return value to a
widgetvariable -
Return a function that calls
widget.$destroy()
useEffect(() => {
  const widget = new Widget({ target: document.getElementById('widget-root') });

  return () => {
    widget.$destroy();
  };
}, []);|
The reason for the returned function is for proper clean up when the React component unmounts. If it remounts, you do not get two widgets added to the DOM. |
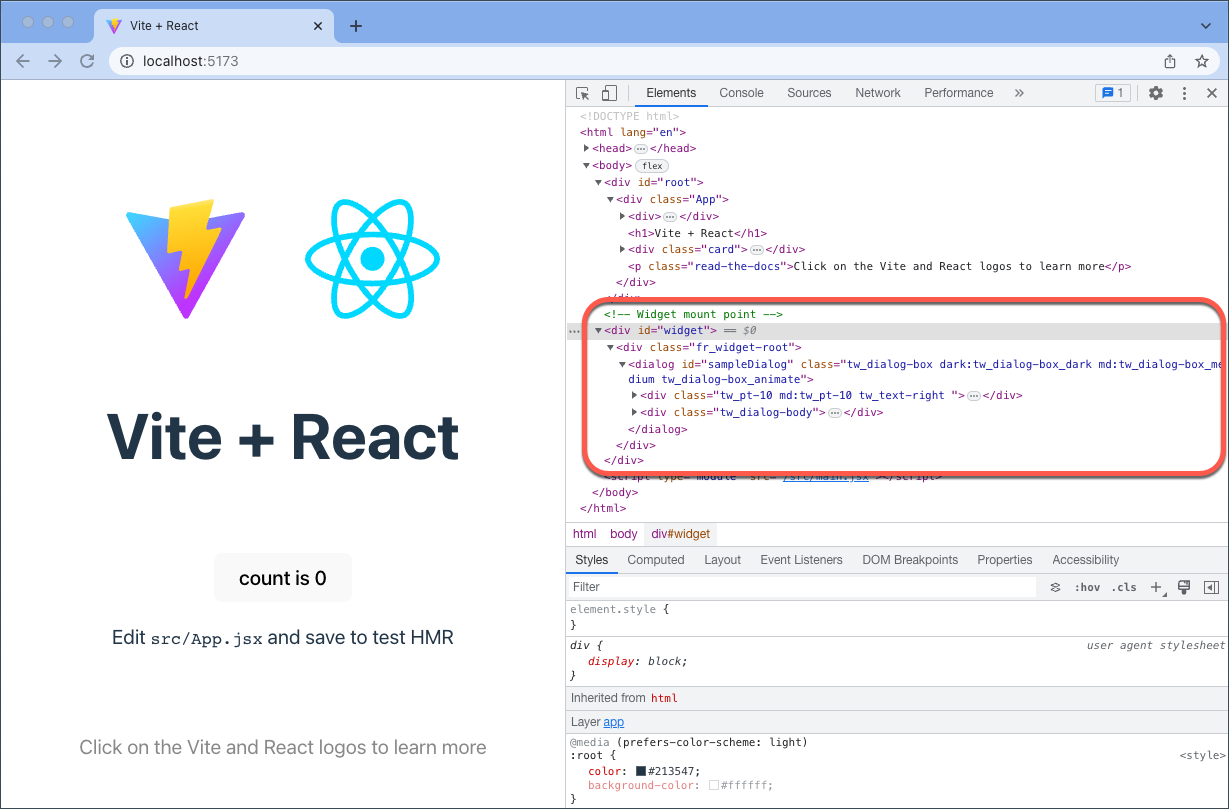
In your browser, the app doesn’t look any different. This is because the Widget, by default, is invisible at startup.
To ensure it is working as expected, inspect the DOM in the browser developer tools.
Open the <div id="widget-root"> element in the DOM, and you should see the Ping (ForgeRock) Login Widget mounted within it:
Controlling the component
An invisible Ping (ForgeRock) Login Widget is not all that useful, so your next task is to pull in the component module to manage the component’s events.
-
Add the
componentmodule to the list of imports from the@forgerock/login-widget -
Call the
componentfunction just under theconfigurationfunction -
Assign its return value to a
componentEventsvariable:
import Widget, { component, configuration } from '@forgerock/login-widget';

// ...

function App() {
  // ...

  const config = configuration();
  const componentEvents = component();

// ...Now that you have a reference to the component events observable, you can trigger an event such as open, and you can also listen for events.
Before calling the open method, repurpose the existing count is 0 button within the App component.
-
Within the button’s
onClickhandler, change thesetCountfunction tocomponentEvents.open -
Change the button text to read "Login"
The result resembles the following:
<button
  onClick={() => {
    componentEvents.open();
  }}>
  Login
</button>You can now revisit your test browser and click the Login button. The modal opens and displays a "spinner" animating on repeat.
This is expected, because the Ping (ForgeRock) Login Widget does not yet have any information to render.
Click the button in the top-right to close the modal. The modal should be dismissed as expected.
Now that you have the modal mounted and functional, move on to the next step which configures the Ping (ForgeRock) Login Widget to be able to call the authorization server to get authentication data.
Calling the authorization server
Before the Ping (ForgeRock) Login Widget can connect you need to use the config variable you created earlier.
Call its set method within the exiting useEffect, and provide the configuration values for your server:
useEffect(() => {

  config.set({
    forgerock: {
      serverConfig: {
        baseUrl: 'https://openam-forgerock-sdks.forgeblocks.com/am',
        timeout: 3000,
      },
    },
  });

  const widget = new Widget({ target: document.getElementById('widget-root')});

// ...Now that you have the Ping (ForgeRock) Login Widget configured, add the journey module to the list of imports so that you can start the authentication flow:
import Widget, {
  component,
  configuration,
  journey,
} from '@forgerock/login-widget';Execute the journey function and assign its returned value to a journeyEvents variable.
Do this underneath the other existing "event" variables:
import Widget, { component, configuration, journey } from '@forgerock/login-widget';

// ...

function App() {
  // ...

  const config = configuration();
  const componentEvents = component();
  const journeyEvents = journey();

// ...This new observable provides access to journey events. Within the Login button’s onClick handler add the start method.
Now, when you open the modal, you also call start to request the first authentication step from the server.
<button onClick={() => {
    journeyEvents.start();
    componentEvents.open();
  }>
  Login
</button>You are now capable of authenticating a user. With an existing user, authenticate as that user and see what happens.
If successful, you’ll notice the modal dismisses itself but your app is not capturing anything from this action. Proceed to the next step to capture user data.
Authenticating a user
There are multiple ways to capture the event of a successful login and access the user information.
In this guide, you use the journeyEvents observable created previously.
Within the existing useEffect function:
-
Call the
subscribemethod and assign its return value to an unsubscribe variable -
Pass in a function that logs the emitted events to the console
-
Call the unsubscribe function within the return function of
useEffect
// ...

useEffect(() => {
  // ...

  const widget = new Widget({ target: document.getElementById('widget-root') });

  const journeyEventsUnsub = journeyEvents.subscribe((event) => {
    console.log(event);
  });

  return () => {
    widget.$destroy();
    journeyEventsUnsub();
  };
}, []);|
Unsubscribing from the observable is important to avoid memory leaks if the component mounts and unmounts frequently. |
Revisit your app in the test browser, but remove all of the browser’s cookies and Web Storage to ensure you have a fresh start.
|
In Chromium browsers, you can find it under the "Application" tab of the developer tools. In Firefox and Safari, you can find it under the "Storage" tab. |
Once you have deleted all the cookies and storage, refresh the browser and try to log in your test user.
You will notice in the developer tools console that a lot of events are emitted.
Initially, you may not have much need for all this data, but over time, this information might become more valuable to you.
To narrow down all of this information, capture just one piece of the event: the user response after successfully logging in.
To do that, you can add a conditional, as follows:
-
Add an
ifcondition within thesubscribecallback function that tests for the existence of the user response.const journeyEventsUnsub = journeyEvents.subscribe((event) => { if (event.user.response) { console.log(event.user.response); } });javascript
With the above condition, the Ping (ForgeRock) Login Widget only writes out the user information when it’s truthy. This helps narrow down the information to what is useful right now.
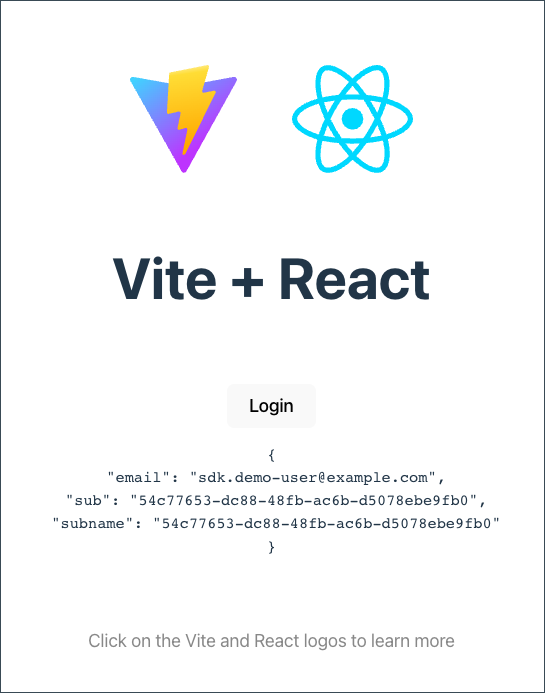
Remove all the cookies and Web Storage again and refresh the page. Try logging in again, and you should see only one log of the user information when it’s available:
user.event.response output{
email: 'sdk.demo-user@example.com',
sub: '54c77653-dc88-48fb-ac6b-d5078ebe9fb0',
subname: '54c77653-dc88-48fb-ac6b-d5078ebe9fb0'
}Next, repurpose the useState hook that’s already used in the component to save the user information.
-
Change the zeroth index of the returned value from
counttouserInfo -
Change the first index of the returned value from
setCounttosetUserInfo -
Change the default value passed into the
useStatefrom0tonull -
Change the condition from just truthy to
userInfo !== event.user.response -
Replace the
console.logwith thesetUserInfofunction -
Add the
userInfovariable in the dependency array of theuseEffect
The top part of your App function component should resemble the following:
function App() {
  const [userInfo, setUserInfo] = useState(null);

  // Initiate all the Widget modules
  const config = configuration();
  const componentEvents = component();
  const journeyEvents = journey();

  useEffect(() => {
    // Set the Widget's configuration
    config.set({
      forgerock: {
        serverConfig: {
          baseUrl: 'https://openam-forgerock-sdks.forgeblocks.com/am',
          timeout: 3000,
        }
      }
    });

    // Instantiate the Widget and assign it to a variable
    const widget = new Widget({ target: document.getElementById('widget-root') });

    // Subscribe to journey observable and assign unsubscribe function to variable
    const journeyEventsUnsub = journeyEvents.subscribe((event) => {
      if (userInfo !== event.user.response) {
        setUserInfo(event.user.response);
      }
    });

    // Return a function that destroys the Widget and unsubscribes from the journey observable
    return () => {
      widget.$destroy();
      journeyEventsUnsub();
    };
  }, [userInfo]);

// ...|
The condition comparing |
Now that you have the user data set into the React component, print it out into the DOM.
-
Replace the paragraph tag containing the text
Edit <code>src/App.jsx</code> and save to test HMRwith a<pre>tag -
Within the
<pre>tag, write a pair of braces:{} -
Within these braces, use the
JSON.stringifymethod to serialize theuserInfovalue
Your JSX should now look like this:
<pre>{JSON.stringify(userInfo, null, ' ')}</pre>|
The |
After clearing the browser data, try logging the user in and observe the user info get rendered onto the page after success.
Logging a user out
The final step is to log the user out, clearing all the user-related cookies, storage, and cache.
To do this, add the user module to the list of imports from the Ping (ForgeRock) Login Widget:
import Widget, {
  configuration,
  component,
  journey,
  user,
} from '@forgerock/login-widget';Next, configure the app to display the button as a Login button when the user has not yet authenticated and a Logout button when the user has already logged in:
-
Wrap the button element with braces containing a ternary, using the falsiness of the
userInfoas the condition -
When no
userInfoexists—the user is logged out—render the Login button -
Write a Logout button with an
onClickhandler to run theuser.logoutfunction
The resulting JSX should resemble this:
import Widget, { user, component, configuration, journey } from '@forgerock/login-widget';

// ...

<h1>Vite + React</h1>
<div className="card">
  {
    !userInfo ? (
      <button
        onClick={() => {
          journeyEvents.start();
          componentEvents.open();
        }}>
        Login
      </button>
    ) : (
      <button
        onClick={() => {
          user.logout();
        }}>
        Logout
      </button>
    )
  }
  <pre>{JSON.stringify(userInfo, null, ' ')}</pre>
</div>
// ...|
You do not have to add code to reset the |
If your app is already reacting to the presence of user info, it should be rendering the Logout button already. Click it and observe the application reacting.
You should now be able to log a user in and out, with the app reacting to the changes in state.
API reference
This page lists the modules that the Ping (ForgeRock) Login Widget provides for use in your apps.
Widget
This is a compiled Svelte class. This is what instantiates the component, mounts it to the DOM, and sets up all the event listeners.
import Widget from '@forgerock/login-widget';

// Instantiate Widget
const widget = new Widget({
  target: widgetRootEl, // REQUIRED; Element mounted in DOM
  props: {
    type: 'modal', // OPTIONAL; "modal" or "inline"; "modal" is default
  },
});

// OPTIONAL; Remove widget from DOM and destroy component listeners
widget.$destroy();|
Call We strongly encourage you to instantiate the modal form factor of the Ping (ForgeRock) Login Widget high up in your application code. Instantiate it close to the top-level file in a component that is created once and preserved. |
Configuration
The Ping (ForgeRock) Login Widget requires information about the server instance it connects to, as well as OAuth 2.0 client configuration and other settings.
For information on setting up your server for use with the Ping (ForgeRock) Login Widget, refer to Prerequisites.
To provide these settings, import and use the configuration module and its set() method.
The Ping (ForgeRock) Login Widget uses the same underlying configuration properties as the main SDK.
import { configuration } from '@forgerock/login-widget';

const myConfig = configuration();
myConfig.set({
  forgerock: {
    /**
     * REQUIRED; SDK configuration object
     */
    serverConfig: {
      baseUrl: 'https://openam-forgerock-sdks.forgeblocks.com/am',
      timeout: 3000, // Number (in milliseconds); 3 to 5 seconds should be fine
    },
    /**
     * OPTIONAL, *BUT ENCOURAGED*, CONFIGURATION
     * Remaining config is optional with fallback values shown
     */
    clientId: 'sdkPublicClient', // String; defaults to 'WebLoginWidgetClient'
    realmPath: 'alpha', // String; defaults to 'alpha'
    redirectUri: window.location.href, // URL string; defaults to `window.location.href`
    scope: 'openid profile email address', // String; defaults to 'openid email'
  },
  /**
   * OPTIONAL; Pass custom content
   */
  content: {},
  /**
   * OPTIONAL; Provide link for terms and conditions page
   */
  links: {},
  /**
   * OPTIONAL; Provide style configuration
   */
  style: {},
  /**
   * OPTIONAL; Map HREFs to journeys or trees
   */
  journeys: {},
});Content configuration options
Use the content configuration element to pass custom text content to the Ping (ForgeRock) Login Widget, replacing its default values.
content configurationconst myConfig = configuration();
myConfig.set({
content: {
"userName": "Identifier",
"passwordCallback": "Passphrase",
"nextButton": "Let's go!",
},
});
For a list of the content you can override, refer to the en-us locale file in the Ping (ForgeRock) Web Login Framework repository.
Links configuration options
Use the links configuration element to set the full canonical URL to your terms and conditions page.
This should be a page hosted on your website or elsewhere within your app. Users are sent to this URL if they click to view the terms and conditions in the Ping (ForgeRock) Login Widget.
This supports the TermsAndConditionsCallback often used in registration journeys.
links configurationconst myConfig = configuration();
myConfig.set({
links: {
termsAndConditions: 'https://example.com/terms',
},
});Style configuration options
Use the style configuration element to configure the look and feel of the Ping (ForgeRock) Login Widget. This allows you to choose the type of labels used or provide a logo for the modal.
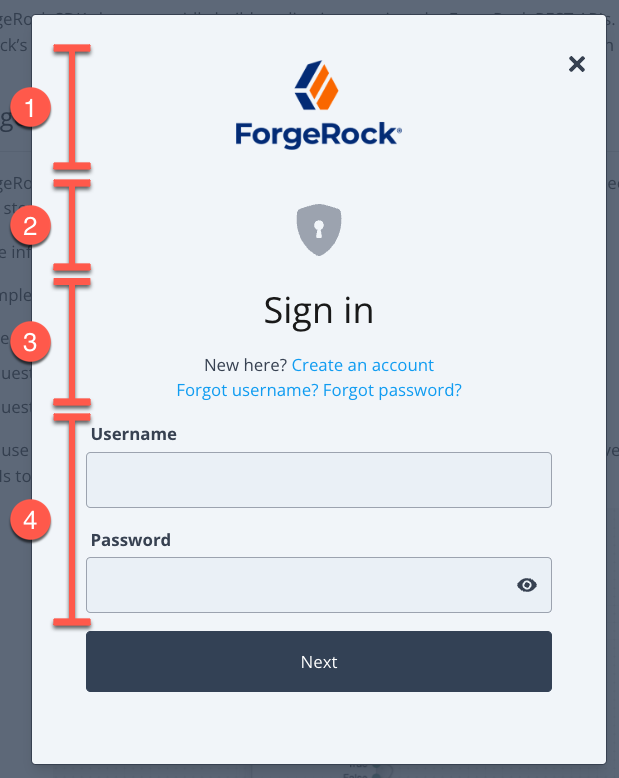
style property to control aspects of the displayKey:
-
Use
style/logoto add images for use in dark or light modes -
Set
style/stage/icontotrueto render UI specific to certain stage parameter values. Supported stage values are:-
OneTimePassword- enable the Ping (ForgeRock) Login Widget to display one-time password entry forms correctly. -
DefaultRegistration- adds UI elements to the display most suitable for user self-registration forms. -
DefaultLogin- adds UI elements to the display most suitable for user log in forms.
-
-
A section that displays the Page Header and Page Description fields from the page node configuration
-
To float labels above their respective fields, set
style/labelstofloating
const myConfig = configuration();

myConfig.set({
  style: {
    checksAndRadios: 'animated', // OPTIONAL; choices are 'animated' or 'standard'
    labels: 'floating', // OPTIONAL; choices are 'floating' or 'stacked'
    logo: {
      // OPTIONAL; only used with modal form factor
      dark: 'https://example.com/img/white-logo.png', // OPTIONAL; used if theme has a dark variant
      light: 'https://example.com/img/black-logo.png', // REQUIRED if logo property is provided; full URL
      height: 300, // OPTIONAL; number of pixels for providing additional controls to logo display
      width: 400, // OPTIONAL; number of pixels for providing additional controls to logo display
    },
    sections: {
      // OPTIONAL; only used with modal form factor
      header: false, // OPTIONAL; separate the logo section from the rest of the modal
    },
    stage: {
      icon: true, // OPTIONAL; displays generic icons for the provided stages
    },
  },
});|
The |
Add a header section
Enabling the header section separates the logo or branding from the journey form.
If you set header: true within the style/sections property, the modal uses a section with a separating line, and extra space:
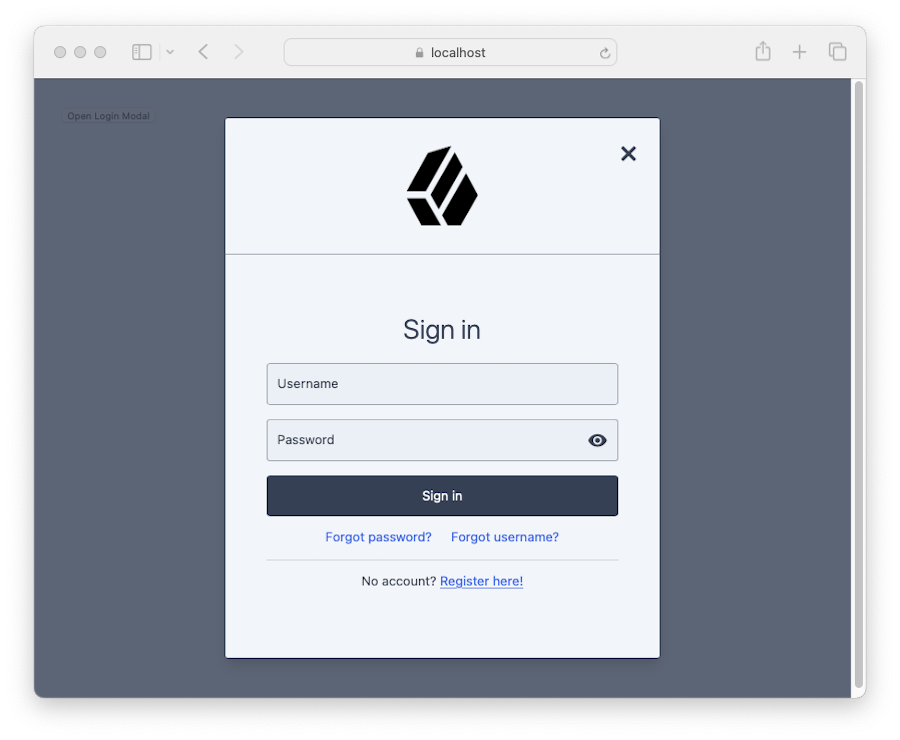
By default, the separating section is not enabled:
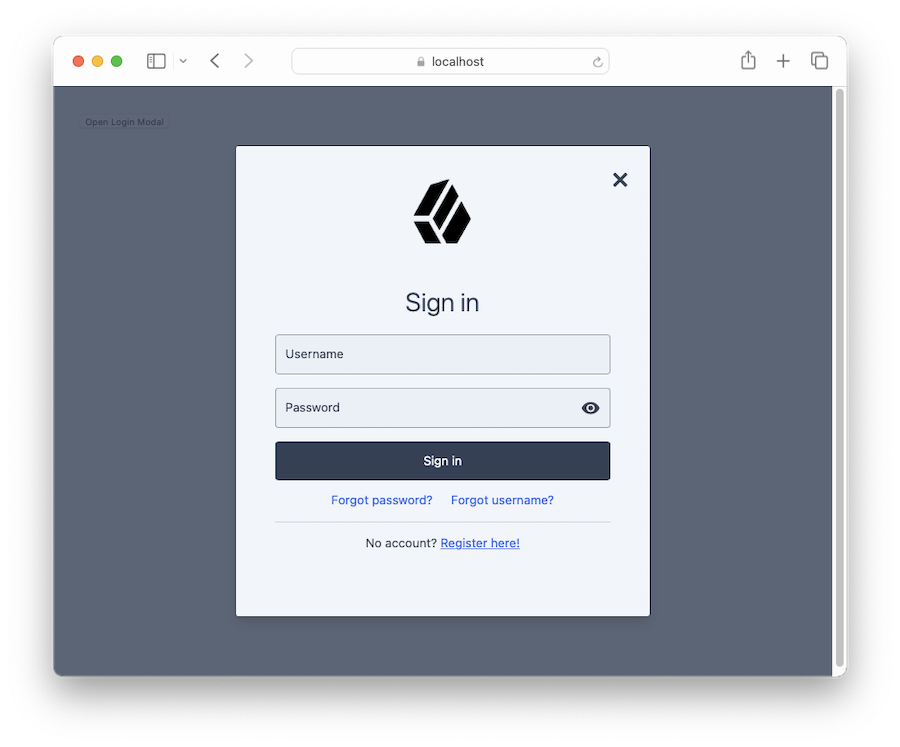
Journeys configuration options
Use the journeys configuration element to map HREF values rendered within the Ping (ForgeRock) Login Widget to start a journey or authentication tree instead of visiting the URL.
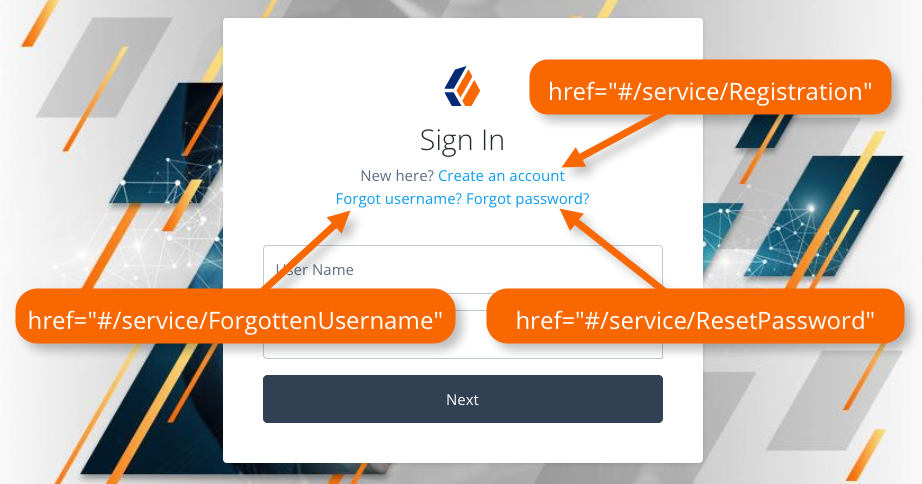
The Ping (ForgeRock) Login Widget listens for click events on elements rendered within its container and compares the HREF to the configured mappings. If there is a match, it prevents the default action of visiting the URL and starts the journey configured in the mapping.
config.set({
  forgerock: {
    // SDK config
  },
  journeys: {
    forgetCookie: { // Any string, as long as it's not overriding a default mapping
      journey: 'ForgetCookie', // Must match actual journey name in the {fr_server}
      match: [ '#/service/ForgetCookie' ], // Array of strings that match `HREF` values (case-sensitive)
    }
  }
});The Ping (ForgeRock) Login Widget has mappings configured internally to handle the links displayed in page nodes by default. These map the HREF values that are displayed by an out-of-the-box page node to corresponding journeys in an PingOne Advanced Identity Cloud tenant. You can override the mappings if required or add your own.
forgotPassword: {
    journey: 'ResetPassword',
    match: ['#/service/ResetPassword', '?journey=ResetPassword'],
},
forgotUsername: {
    journey: 'ForgottenUsername',
    match: ['#/service/ForgottenUsername', '?journey=ForgottenUsername'],
},
login: {
    journey: 'Login',
    match: ['#/service/Login', '?journey', '?journey=Login'],
},
register: {
    journey: 'Registration',
    match: ['#/service/Registration', '?journey=Registration'],
},Component
Use the component module for subscribing to modal and inline form factor events and for opening and controlling the modal form factor.
Call the component() method and assign the result to a variable to receive the observable. Subscribe to the observable to listen and react to the state of the Ping (ForgeRock) Login Widget component.
import { component } from '@forgerock/login-widget';

// Initiate the component API
const componentEvents = component();

// Know when the component, both modal and inline has been mounted.
// When using the modal type, you will also receive open and close events.
// The property `reason` will be either "auto", "external", or "user"

const unsubComponentEvents = componentEvents.subscribe((event) => {
    /* Run anything you want */
});

// Open the modal
componentEvents.open();

// Close the modal
componentEvents.close();

// Recommended: call when your UI component is destroyed
unsubComponentEvents();Schema for component events
The schema for component events is as follows:
component events{
lastAction: null, // null or the most recent action; one of `close`, `open`, or `mount`
error: null, // null or object with `code`, `message`, and `step` that failed
mounted: false, // boolean
open: null, // boolean for the modal form factor, or null for inline form factor
reason: null, // string to describe the reason for the event
type: null, // 'modal' or 'inline'
}Use the reason value to determine why the modal has closed.
The possible reason values are:
user-
The user closed the dialog within the UI
auto-
The modal was closed because the user successfully authenticated
external-
The application called the
close()function
Journey
Use the journey module to manage interaction with authentication and self-service journeys.
import { journey } from '@forgerock/login-widget';

// Call to start the journey
// Optional config can be passed in, see below for more details
const journeyEvents = journey({
  oauth: true, // OPTIONAL; defaults to true; uses OAuth flow for acquiring tokens
  user: true, // OPTIONAL; default to true; returns user information from `userinfo` endpoint
});

// Start a journey
journeyEvents.start({
  forgerock: {}, // OPTIONAL; configuration overrides
  journey: 'Login', // OPTIONAL; specify the journey or tree you want to use
  resumeUrl: window.location.href, // OPTIONAL; the full URL for resuming a tree
  recaptchaAction: 'myCaptchaTag', // OPTIONAL; tag v3 reCAPTCHAs. Fallback to journey name.
  pingProtect: { // Set manually, or obtain from `PingOneProtectInitializeCallback` callback.
    // REQUIRED; Your {p1_name} environment identifier.
    envId: '3072206d-c6ce-4c19-a366-f87e972c7cc3',
    // OPTIONAL; When `true`, collect behavioral data.
    behavioralDataCollection: true,
    // OPTIONAL; When `true`, output SDK log messages in the developer console.
    consoleLogEnabled: false,
  },
});

// Subscribe to journey events
const unsubJourneyEvents = journeyEvents.subscribe((event) => {
  /* Run anything you want */
});

// Recommended: call when your UI component is destroyed
unsubJourneyEvents();Schema for journey events
The schema for journey events is as follows:
journey events{
journey: {
completed: false, // boolean
error: null, // null or object with `code`, `message`, and `step` that failed
loading: false, // boolean
step: null, // null or object with the last step object from the server
successful: false, // boolean
response: null, // null or object if successful containing the success response from the server
},
oauth: {
completed: false, // boolean
error: null, // null or object with `code` and `message` properties
loading: false, // boolean
successful: false, // boolean
response: null, // null or object with OAuth/OIDC tokens
},
user: {
completed: false, // boolean
error: null, // null or object with `code` and `message` properties
loading: false, // boolean
successful: false, // boolean
response: null, // null or object with user information driven by OAuth scope config
},
}User
Use the user module to access methods for managing users:
-
user.info -
user.tokens -
user.logout
The user.info and user.tokens methods requires use of OAuth 2.0. The user.info method also requires a scope value of openid.
The Ping (ForgeRock) Login Widget is configured to use both requirements by default.
You can use the user.logout method with both OAuth 2.0 and session-based authentication.
import { user } from '@forgerock/login-widget';

/**
 * User info API
 */
const userEvents = user.info();

// Subscribe to user info changes
const unsubUserEvents = userEvents.subscribe((event) => {
  // Return current, *local*, user info and future state changes
  console.log(event);
});

// Fetch/get fresh user info from the server
userEvents.get(); // New state is returned in your `userEvents.subscribe` callback function

/**
 * User tokens API
 */
const tokenEvents = user.tokens();

// Subscribe to user token changes
const unsubTokenEvents = tokenEvents.subscribe((event) => {
  // Return current, *local*, user tokens and future state changes
  console.log(event);
});

// Return existing user tokens if available and not expired or about to expire
// Otherwise obtain fresh ones from the server
tokenEvents.get(); // State is returned in your `tokenEvents.subscribe` callback function

/**
 * Logout
 * Log user out and clear user data (info and tokens)
 */
user.logout(); // Resets user and emits event to your info and tokens' `.subscribe` callback function

// Recommended: call when your UI component is destroyed
unsubUserEvents();
unsubTokenEvents();You can use get() with both user.info and user.tokens to obtain the user’s profile or OAuth 2.0 tokens. The get() function maps to the following methods in the Ping SDK for JavaScript, and support the same parameters:
-
userEvents.get()=UserManager.getCurrentUser() -
tokenEvents.get()=TokenManager.getTokens()
For example, when getting a user’s tokens you can force the Ping (ForgeRock) Login Widget to obtain fresh tokens from the server as follows:
tokenEvents.get({forceRenew: true});Refer to the Ping SDK for JavaScript API reference for more information.
Schema for user.info events
The schema for user.info events is as follows:
user.info events{
completed: false, // boolean
error: null, // null or object with `code`, `message`, and `step` that failed
loading: false, // boolean
successful: false, // boolean
response: null, // object returned from the `/userinfo` endpoint
}Schema for user.tokens events
The schema for user.tokens events is as follows:
user.tokens events{
completed: false, // boolean
error: null, // null or object with `code`, `message`, and `step` that failed
loading: false, // boolean
successful: false, // boolean
response: null, // object returned from the `/access_token` endpoint
}Request
The Ping (ForgeRock) Login Widget has an alias to the Ping SDK for JavaScript’s HttpClient.request method, which is a convenience wrapper around the native fetch. This method will auto-inject the access token into the Authorization header and manage some of the lifecycle around the token.
import { request } from '@forgerock/login-widget';

const response = await request({ init: { method: 'GET' }, url: 'https://protected.resource.com' });The full options object:
{
  bypassAuthentication: false, // Boolean; if true, the access token is not injected into the `Authorization` header
  init: {
    // Options object for `fetch` API: https://developer.mozilla.org/en-US/docs/Web/API/fetch
  },
  timeout: 3000, // Fetch timeout in milliseconds
  url: 'https://protected.resource.com', // String; the URL of the resource

  // Unsupported properties
  authorization: {},
  requiresNewToken: () => {},
}For more information, refer to the HttpClient reference documentation.