Step 5. Start an OAuth 2.0 flow
At this point, the user is authenticated. The session has been created and a session cookie has been written to the browser. This is "session-based authentication", and is viable when your system (apps and services) can rely on cookies as the access artifact.
However, there are increasing limitations with the use of cookies. In response to this, and other reasons, it’s common to add a step to your authentication process; the "OAuth" or "OIDC flow".
The goal of this flow is to attain a separate set of tokens, replacing the need for cookies as the shared access artifact. The two common tokens are the Access Token and the ID Token. We will focus on the access token in this guide. The specific flow that the SDK uses to acquire these tokens is called the Authorization Code Flow with PKCE.
To start, import the TokenManager object from the Ping SDK into the same form.js file.
reactjs-todo/client/components/journey/form.js- import { FRAuth } from '@forgerock/javascript-sdk';
+ import { FRAuth, TokenManager } from '@forgerock/javascript-sdk';
@@ collapsed @@Only an authenticated user that has a valid session can successfully request OAuth/OIDC tokens. Make sure we make this token request after we get a 'LoginSuccess' back from the authentication journey. This is an asynchronous call to the server. There are multiple ways to handle this, but we’ll use the useEffect and useState hooks.
Add a useState to the top of the function body to create a simple boolean flag of the user’s authentication state.
reactjs-todo/client/components/journey/form.js@@ collapsed @@
export default function Form() {
const [step, setStep] = useState(null);
+ const [isAuthenticated, setAuthentication] = useState(false);
@@ collapsed @@Now, add a new useEffect hook to allow us to work with another asynchronous request. Unlike our first useEffect, this one will be dependent on the state of isAuthenticated. To do this, add isAuthenticated to the array passed in as the second argument. This instructs React to run the useEffect function when the value of isAuthenticated is changed.
reactjs-todo/client/components/journey/form.js@@ collapsed @@
useEffect(() => {
async function getStep() {
try {
const initialStep = await FRAuth.start();
setStep(initialStep);
} catch (err) {
console.error(`Error: request for initial step; ${err}`);
}
}
getStep();
}, []);
+ useEffect(() => {
+ async function oauthFlow() {
+ try {
+ const tokens = await TokenManager.getTokens();
+ console.log(tokens);
+ } catch (err) {
+ console.error(`Error: token request; ${err}`);
+ }
+ }
+ if (isAuthenticated) {
+ oauthFlow();
+ }
+ }, [isAuthenticated]);
@@ collapsed @@Finally, we need to conditionally set this authentication flag when we have a success response from our authentication journey. In your form element’s onSubmit handler, add a simple conditional and set the flag to true.
reactjs-todo/client/components/journey/form.js@@ collapsed @@
<form
className="cstm_form"
onSubmit={(event) => {
event.preventDefault();
async function getStep() {
try {
const nextStep = await FRAuth.next(step);
+ if (nextStep.type === 'LoginSuccess') {
+ setAuthentication(true);
+ }
console.log(nextStep);
setStep(nextStep);
} catch (err) {
console.error(`Error: form submission; ${err}`);
}
}
getStep();
}}
>
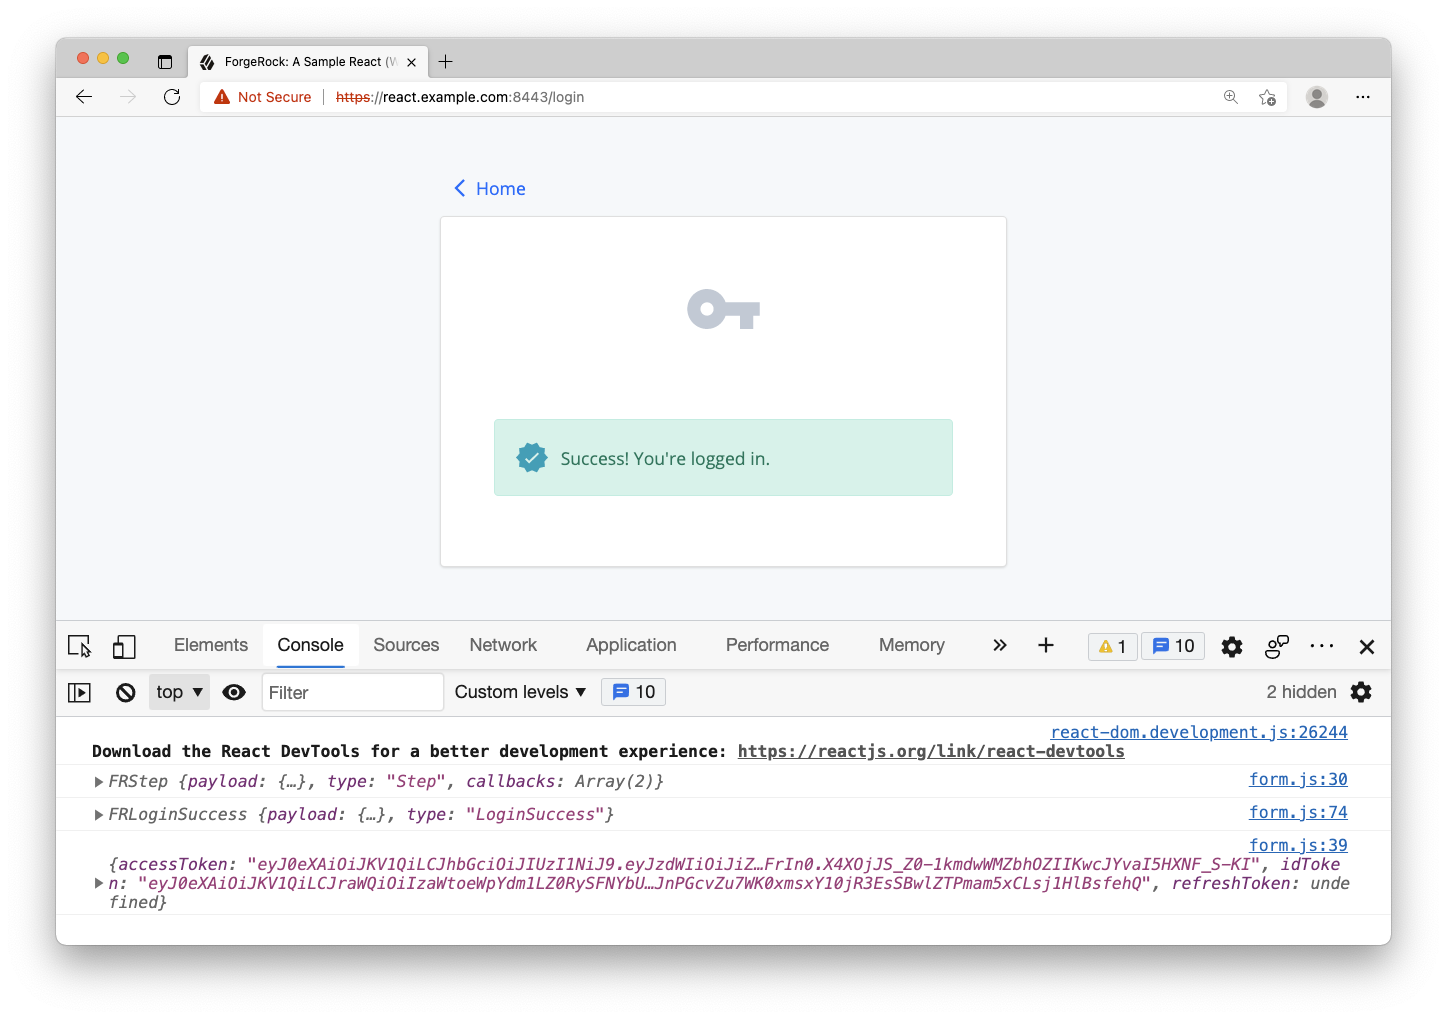
@@ collapsed @@Once the changes are made, return to your browser and remove all cookies created from any previous logins. Refresh the page and verify the login form is rendered. If the success message continues to display, make sure "third-party cookies" are also removed.
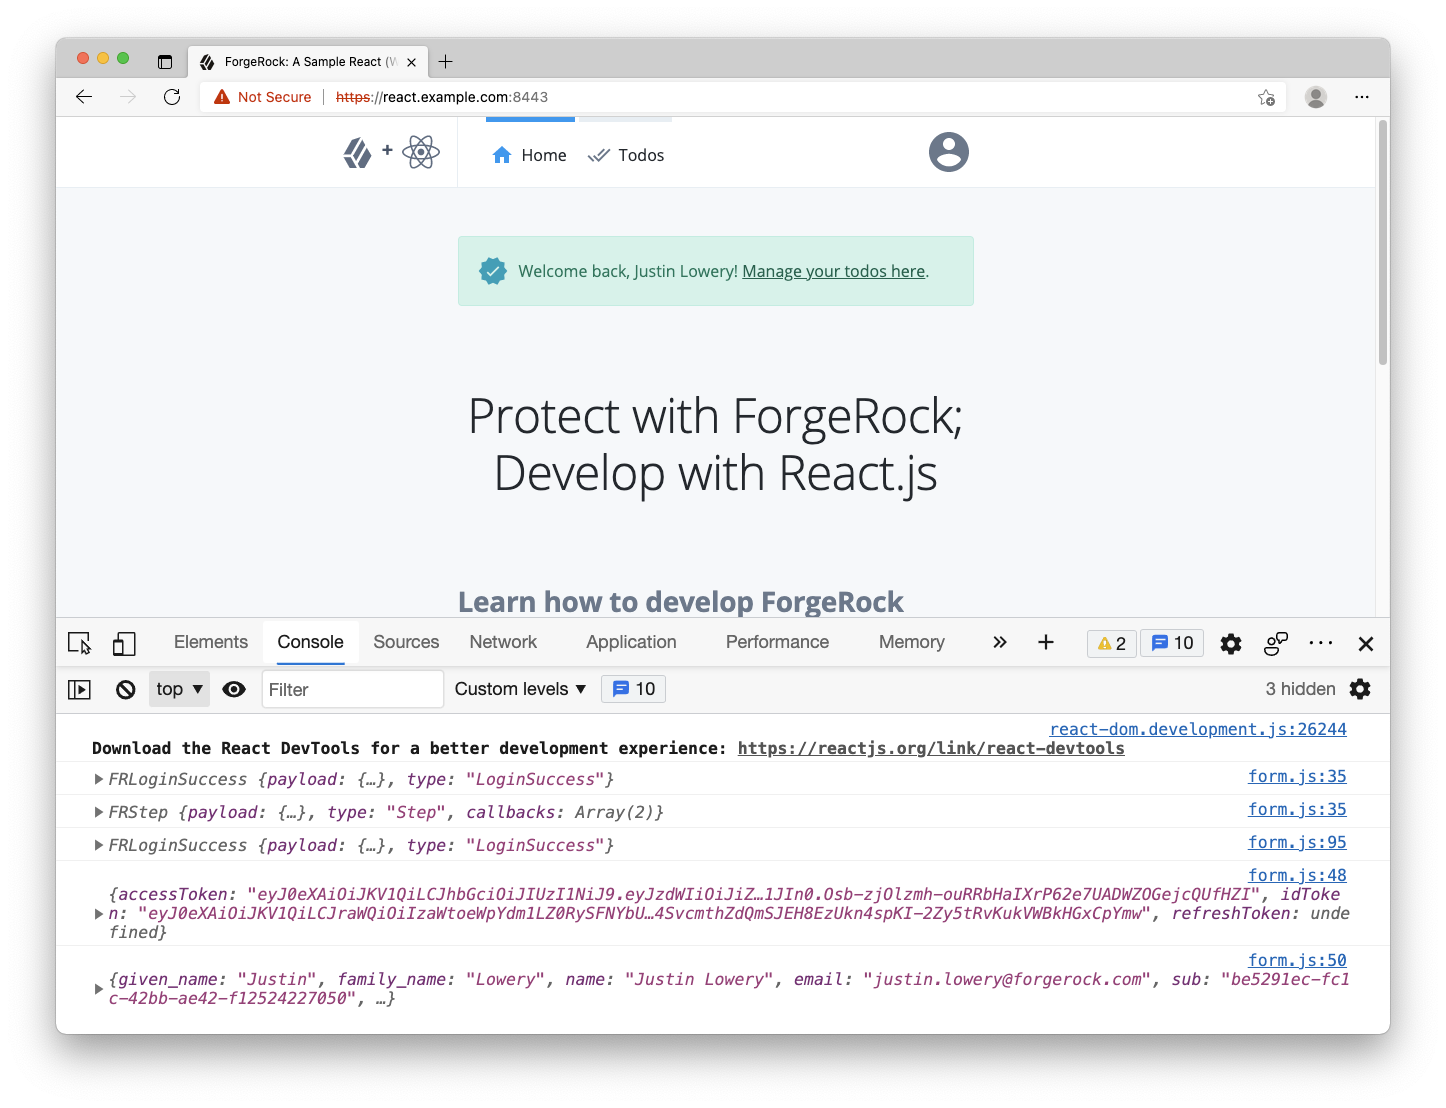
Login with your test user. You should get a success message like you did before, but now check your browser’s console log. You should see an additional entry of an object that contains your idToken and accessToken. Since the SDK handles storing these tokens for you, which are in localStorage, you have completed a full login and OAuth/OIDC flow.
Request user information
Now that the user is authenticated and an access token is attained, you can now make your first authenticated request! The SDK provides a convenience method for calling the /userinfo endpoint, a standard OAuth endpoint for requesting details about the current user. The data returned from this endpoint correlates with the "scopes" set within the SDK configuration. The scopes profile and email will allow the inclusion of user’s first and last name as well as their email address.
Within the form.js file, add the UserManager object to our Ping SDK import statement.
reactjs-todo/client/components/journey/form.js- import { FRAuth, TokenManager } from '@forgerock/javascript-sdk';
+ import { FRAuth, TokenManager, UserManager } from '@forgerock/javascript-sdk';
@@ collapsed @@The getCurrentUser() method on this new object will request the user’s data and validate the existing access token. After the TokenManager.getTokens() method call, within the oauthFlow() function from above, add this new method.
reactjs-todo/client/components/journey/form.js@@ collapsed @@
try {
const tokens = await TokenManager.getTokens();
console.log(tokens);
+ const user = await UserManager.getCurrentUser();
+ console.log(user);
@@ collapsed @@If the access token is valid, the user information will be logged to the console, just after the tokens. Before we move on from the form.js file, set a small portion of this state to the global context for application-wide state access. Add the remaining imports for setting the state and redirecting back to the home page: useContext, AppContext and useNavigate.
reactjs-todo/client/components/journey/form.js- import React, { useEffect, useState } from 'react';
+ import React, { useContext, useEffect, useState } from 'react';
+ import { useNavigate } from 'react-router-dom';
+ import { AppContext } from '../../global-state';
@@ collapsed @@At the top of the Form function body, use the useContext() method to get the app’s global state and methods. Call the useNavigate() method to get the navigation object.
reactjs-todo/client/components/journey/form.js export default function Form() {
const [step, setStep] = useState(null);
const [isAuthenticated, setAuthentication] = useState(false);
+ const [_, methods] = useContext(AppContext);
+ const navigate = useNavigate();
@@ collapsed @@After the UserManager.getCurrentUser() call, set the new user information to the global state and redirect to the home page.
reactjs-todo/client/components/journey/form.js@@ collapsed @@
const user = await UserManager.getCurrentUser();
console.log(user);
+ methods.setUser(user.name);
+ methods.setEmail(user.email);
+ methods.setAuthentication(true);
+ navigate('/');
@@ collapsed @@Revisit the browser, clear out all cookies, storage and cache, and log in with you test user. If you landed on the home page and the logs in the console show tokens and user data, you have successfully used the access token for retrieving use data. Notice that the home page looks a bit different with an added success alert and message with the user’s full name. This is due to the app "reacting" to the global state that we set just before the redirection.