Authorization code grant with PAR
- Endpoints
The pushed authorization request (PAR) endpoint provides enhanced security and cryptographic integrity when used with the authorization code grant flow, and optionally, in conjunction with PKCE.
PAR lets the authorization server authenticate the client before making an authorization request to enable early detection of invalid or illegal requests.
To further protect authorization details when passing through third-party applications, clients can use JWT-based request objects (as defined in RFC9101) to wrap confidential and potentially complex request parameters.
In response to this pre-authorization backchannel request, the client receives a request URI that’s used to reference the payload data in subsequent interactions with the server.
|
The authorization code grant with PAR flow

-
The client pushes a request to the PAR endpoint, providing both client and request details.
-
AM validates both client and request and, if successful, returns a request URI as a reference to the request payload and an expiry period for the request URI.
-
The client receives a request to access a protected resource. To access the resources, the client requires authorization from the resource owner.
-
The client redirects the resource owner’s user-agent to AM.
-
AM authenticates the resource owner, confirms resource access, and gathers consent if not previously saved.
-
The client requests an authorization code, typically through a web browser, by passing in the
request_uriandclient_id. -
AM validates the
client_idagainst the request and, if successful, returns the authorization code to the client. -
The client authenticates to AM using the received code in exchange for an access token.
This example assumes a confidential client. Public clients aren’t required to authenticate. -
If the authorization code is valid, AM returns an access token (and a refresh token, if configured) to the client.
-
The client requests access to the protected resources from the resource server.
-
The resource server contacts AM to validate the access token.
-
AM validates the token and responds to the resource server.
-
If the token is valid, the resource server lets the client access the protected resource.
Demonstrate the authorization code grant with PAR flow
Follow these steps to get a PAR request URI and an authorization code to exchange for an access token:
Prepare the demonstration
This demonstration assumes the following configuration:
-
AM is configured as an OAuth 2.0 authorization server. Ensure that:
-
The
codeplugin is configured in the Response Type Plugins field. -
The
Authorization Codegrant type is configured in the Grant Types field. -
The
PAR Request URI Lifetimeattribute is set to a value sufficient to cover the duration of the PAR request.
Find more information in Authorization server configuration.
-
-
A confidential client called
myClientis registered in AM with the following configuration:-
Client secret:
mySecret -
Scopes:
write -
Response Types:
code -
Grant Types:
Authorization Code
Find more information in Client application registration. Complete these steps to prepare the authorization code grant with PAR flow demonstration:
-
Get a PAR request URI
As the client, call AM’s /oauth2/par endpoint. Specify parameters directly in the request body. Alternatively, for large or sensitive data, AM supports the JWT-Secured Authorization Request (JAR) standard for PAR, which lets you wrap parameters in a signed and encrypted JWT. When using JAR, sign the request JWT with the client’s private key and encrypt it with the authorization server’s public key. You can obtain the authorization server’s public key from its JWKS URI.
Example parameters with a JWT:
-
client_id=your-client-id
-
client_secret=your-client-secret
-
request:signed-encrypted-jwt-value
Example parameters without a JWT:
-
client_id=your-client-id
-
client_secret=your-client-secret
-
redirect_uri=your-redirect-uri
-
scope=write
-
response_type=code,
-
code_challenge=QR1D-7w1-rOQvlFe1CeqZigqaIpmZXatDMVvZ50o
-
code_challenge_method=S256
Example PAR request with a JWT:
$ curl \
--request POST \
--data "client_id=myClient" \
--data "client_secret=mySecret" \
--data "request=eyJhbGciOiJIUzI1NiJ…mnRTwgPGTqkp5UBTVWaA_CifxWx1ikcZofOas" \
"https://am.example.com:8443/am/oauth2/realms/root/realms/alpha/par"Example PAR request without a JWT:
$ curl \
--request POST \
--data "client_id=myClient" \
--data "client_secret=mySecret" \
--data "response_type=code" \
--data "scope=write" \
--data "code_challenge=QR1D-7w1-rOQvlFe1CeqZigqaIpmZXatDMVvZ50o" \
--data "code_challenge_method=S256" \
--data "redirect_uri=https://www.example.com:443" \
"https://am.example.com:8443/am/oauth2/realms/root/realms/alpha/par"
On success, AM returns the following:
{
  "request_uri": "C2c3yhu2IApAELttmZtfPNPQaIJxvTCHk", (1)
  "expires_in": 90 (2)
}| 1 | request_uri: A reference to the PAR request payload. |
| 2 | expires_in: The validity period of the request URI in seconds. |
Get an authorization code using a browser
-
Ensure the client has retrieved a request URI by following the steps described in Get a PAR request URI.
-
The client redirects the resource owner’s user-agent to AM’s /oauth2/authorize endpoint, including the following parameters:
-
client_id=your-client-id
-
response_type=code
-
redirect_uri=your-redirect-uri
-
request_uri=the-PAR-request-uri
For example:
https://am.example.com:8443/am/oauth2/realms/root/realms/alpha/authorize \
?client_id=myClient \
&response_type=code \
&request_uri=C2c3yhu2IApAELttmZtfPNPQaIJxvTCHk
&scope=write \
&redirect_uri=https://www.example.com:443/callback
The URL is split and spaces added for readability purposes.
The
scopeparameter is optional if default values are configured in the authorization server or the client. -
-
The resource owner authenticates to AM. In this demonstration, they log in using the default tree configured for the realm.
-
On successful login, AM presents the consent screen unless it’s configured to use implied consent.
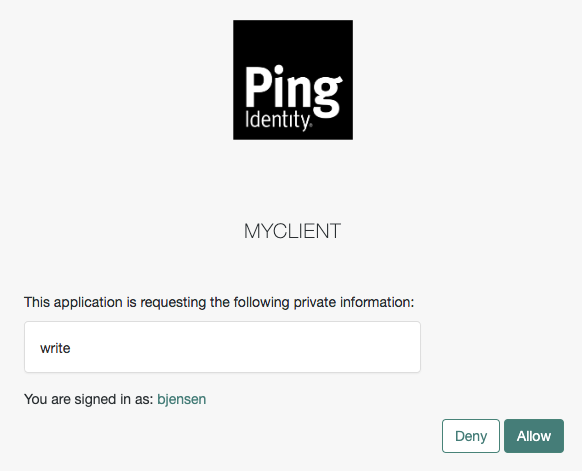 Figure 2. OAuth 2.0 consent screen
 -
Click Allow to consent.
AM redirects the resource owner to the URL specified in the
redirect_uriparameter. -
Inspect the URL in the browser.
It contains a
codeparameter with the authorization code AM issued.For example:
http://www.example.com/callback?code=g5B3qZ8rWzKIU2xodV_kkSIk0F4&scope=write&iss… -
The client performs the steps in Exchange an authorization code for an access token to exchange the authorization code for an access token.
Get an authorization code using REST
-
Make sure the client has retrieved a request URI by following the steps in Get a PAR request URI.
-
Authenticate as the resource owner (
bjensenin our example):$ curl \ --request POST \ --header "Content-Type: application/json" \ --header "X-OpenAM-Username: bjensen" \ --header "X-OpenAM-Password: Ch4ng31t" \ --header "Accept-API-Version: resource=2.0, protocol=1.0" \ 'https://am.example.com:8443/am/json/realms/root/realms/alpha/authenticate' { "tokenId":"AQIC5wM…TU3OQ*", "successUrl":"/am/console", "realm":"/alpha" } -
As the client, call the /oauth2/authorize endpoint to request the authorization code. Provide bjensen’s SSO token in a cookie and the following parameters:
-
client_id:myClient -
request_uri:par_request_uri -
csrf:bjensens-tokenId -
decision:allow
Find more information on the parameters supported by this endpoint in /oauth2/authorize.
For example:
$ curl --dump-header - \ --request POST \ --cookie "iPlanetDirectoryPro=AQIC5wM…TU3OQ*" \ --data "client_id=myClient" \ --data "request_uri=C2c3yhu2IApAELttmZtfPNPQaIJxvTCHk" \ --data "csrf=AQIC5wM…TU3OQ*" \ --data "decision=allow" \ "https://am.example.com:8443/am/oauth2/realms/root/realms/alpha/authorize"If AM can authenticate the user and the client, it returns an HTTP 302 response with the authorization code appended to the redirection URL:
HTTP/2 302 … location: https://www.example.com:443/callback?code=authorization-code&iss… … -
-
Perform the steps in Exchange an authorization code for an access token to exchange the authorization code for an access token.
Exchange an authorization code for an access token
As the client, call the /oauth2/access_token endpoint to exchange the authorization code for an access token. Provide the following parameters:
-
grant_type=authorization_code
-
code=your-authorization-code
-
redirect_uri=your-redirect-uri
-
code_verifier=your-code-verifier
Confidential clients can authenticate to the OAuth 2.0 endpoints in several ways. This example uses the following form parameters:
-
client_id=your-client-id
-
client_secret=your-client-secret
Find more information in OAuth 2.0 client authentication.
For example:
$ curl \
--request POST \
--data "grant_type=authorization_code" \
--data "code=g5B3qZ8rWzKIU2xodV_kkSIk0F4" \
--data "client_id=myClient" \
--data "client_secret=mySecret" \
--data "redirect_uri=https://www.example.com:443/callback" \
--data "code_verifier=082b7ab3042995bcb3163ec8…" \
"https://am.example.com:8443/am/oauth2/realms/root/realms/alpha/access_token"The client_id and redirect_uri parameters specified in this call
must match those used as part of the authorization code request, or the authorization server will not validate the code.
The authorization server returns an access token in the access_token property.
For example:
{
  "access_token": "sbQZuveFumUDV5R1vVBl6QAGNB8",
  "scope": "write",
  "token_type": "Bearer",
  "expires_in": 3599
}|
The authorization server can also issue refresh tokens at the same time the access tokens are issued. Find more information in Refresh tokens. |