Setting up an Amazon S3 deployment package store
Create and configure an Amazon Simple Storage Service (S3) bucket to allow the PingAuthorize Server to periodically retrieve deployment packages from the Policy Editor.
|
To configure an end-to-end deployment package store in embedded policy decision point (PDP) mode, follow the steps in Using the Deployment Manager. |
Creating an S3 bucket
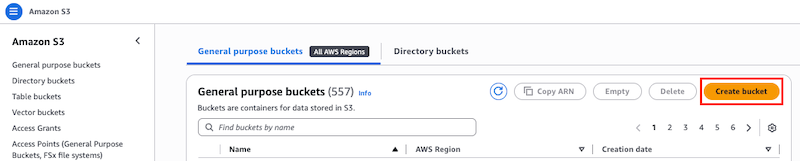
To store your deployment packages, create a new S3 bucket in the S3 dashboard of Amazon Web Services (AWS) Management Console.
Steps
-
In the AWS Management Console, on the S3 dashboard, click Create bucket.
-
Configure the bucket.
Learn more in Creating a bucket in the AWS documentation.
Configuring the IAM user policy
To manage your deployment package store, configure a new identity and access management (IAM) policy in the IAM dashboard of the AWS Management Console.
Steps
-
In the AWS Management Console, on the IAM dashboard, go to Access Management > Policies and click Create policy.

-
In the Policy editor section, click the JSON tab and enter these permissions:
{
    "Version": "<policy_creation_date>",
    "Statement": [
        {
            "Effect": "Allow",
            "Action": [
                "s3:PutObject",
                "s3:GetObject",
                "s3:ListBucket"
            ],
            "Resource": "*"
        }
    ]
}
Replace the asterisk wildcard character to restrict the access scope of the previous policy.
You can manage S3 bucket access in multiple ways, including IAM policies, S3 policies, or S3 access control lists (ACLs). We provide a working IAM policy example, but you should be aware of current AWS best practices, industry best practices, and your organization’s conventions when configuring S3 bucket access.
-
Click Next.
-
On the Review and create confirmation page, review your policy configuration and click Create policy.
Configuring the IAM user
To publish to your AWS deployment package store from the Policy Editor, configure a new IAM user to access the S3 bucket in accordance with the policy that you created in Configuring the IAM user policy.
Steps
-
In the AWS Management Console, on to the IAM dashboard, go to Access Management > Users and click Create user.

-
Define a username and click Next.
-
On the Set permissions page, select Attach policies directly, and then select the policy you created in Configuring the IAM user policy.
-
(Optional) Select Create policy to configure a different user policy.
-
-
Click Next.
-
On the Review and create confirmation page, review your configurations and click Create user to create the IAM user.
-
On the Users page, search for and click on the newly created user.
-
On the Security credentials tab, in the Access keys section, click Create access key.
-
Click Application running outside AWS. Click Next.
-
(Optional) In the Description tag value field, enter a description for the access key and click Create access key.
-
Copy both the Access key ID and Secret access key values to a secure location. Click Done.
These values will be used when configuring connections to the Policy Editor and PingAuthorize server.
You can’t recover these credentials at a later time.