Configuring PingID Proxy for the PingID desktop app (legacy)
|
This section documents the legacy PingID desktop app. Learn how to configure the most up-to-date version for a consistent PingID desktop app passwordless experience in PingID desktop app in the PingOne documentation. |
Configure the PingID desktop app (legacy) to support proxy for all enterprise internal communication to the internet on enterprise desktop and laptop machines.
Before you begin
To obtain the latest version of the SetProxyParams script, refer to https://github.com/pingidentity/pingid-desktop-application.
Steps
-
In the PingID admin portal, go to Setup > PingID > Configuration.
-
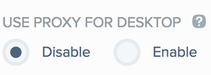
In the Use Proxy For Desktop field, select one of the following options, and then click Save.
Choose from:
-
Enable: Enable the use of PingID desktop app (legacy) with the enterprise proxy, according to the mode configured in the
SetProxyParamsscript. -
Disable (default): Disable use of PingID desktop app (legacy) with a proxy.
Even if the Use Proxy For Desktop setting is enabled enterprise-wide in the admin portal, administrators can require the PingID desktop app (legacy) installations on specific desktops and laptops to always work without a proxy.
-
-
If Use Proxy For Desktop is set to Enable, modify the
SetProxyParamsscript.The
SetProxyParamsscript is configured at machine level. If there are multiple instances of the PingID desktop app (legacy) installed on a machine, the setting of theSetProxyParamsis applied to all instances.Choose from:
-
Restrictive mode: Forces users to use the PingID desktop app (legacy) with the enterprise proxy. The proxy toggle does not appear on the desktop app menu.
-
Windows:
SetProxyParams.bat host port [username] [password] -r
-
Mac:
sudo sh SetProxyParams.sh host port [username] [password] -r
-
-
Permissive mode: Provides users an option to enable or disable use of the proxy from the PingID desktop app (legacy) menu, to accommodate authentication in different work modes, from within the enterprise network or externally. Learn more in Enabling or disabling your proxy for PingID desktop.
-
Windows:
SetProxyParams.bat host port [username] [password]
-
Mac:
sudo sh SetProxyParams.sh host port [username] [password]
-
-
Disabled mode: Disables use of the PingID desktop app (legacy) with a proxy on specific devices.
-
Windows:
SetProxyParams.bat disable
-
Mac:
sudo sh SetProxyParams.sh disable
Where:
Parameter Description hostProxy host IP address or host name.
portProxy port number.
usernameMandatory if the proxy requires credentials.
Empty if the proxy doesn’t require credentials.
passwordMandatory if the proxy requires credentials.
Empty if the proxy doesn’t require credentials.
-rMandatory for restrictive mode.
Empty for permissive mode.
-
To configure Proxy Auto Configuration (PAC) for the PingID desktop app (legacy), refer to Configuring Proxy Auto Configuration for the PingID desktop app (legacy).
To configure Kerberos proxy authentication for the PingID desktop app (legacy), refer to Configuring Kerberos proxy authentication for the PingID desktop app (legacy).
-
-
(Optional) To allow the PingID desktop app (legacy) to work with a proxy, using a self-signed certificate or local CA-signed certificate, complete the following steps:
-
Ensure that the Java Development Kit (JDK)
keytoolutility is installed. -
Download a copy of the certificate that’s installed on the proxy in DER format, and then save it to the local hard drive.
-
Open the integrated terminal and navigate to the Java Runtime Environment (JRE) security directory inside the PingID root directory.
The default paths are:
-
Windows:
C:\Program Files (x86)\Ping Identity\PingID\runtime\lib\security -
Mac:
/Applications/PingID.app/Contents/PlugIns/Java.runtime/Contents/Home/jre/lib/security-
Add the certificate to the JRE certificate trust store.
keytool -import -keystore cacerts -file <certificate file> -storepass changeit
-
-
Configuring Proxy Auto Configuration for the PingID desktop app (legacy)
Proxy Auto Configuration (PAC) enables you to manage networks that have multiple proxies, so that you can configure different proxy servers for different URLs, and replace proxies dynamically by editing and updating the PAC file.
Steps
-
On the relevant user’s machine, configure the PAC URL:
Choose from:
-
Windows:
-
Open the Internet Explorer configuration window and click the Network tab.
-
In the Use Automatic Configuration Script field, enter the URL of the PAC file you want to use. Click OK.
-
-
Mac:
-
Go to System Preferences → Network, click Advanced, and then go to the Proxies tab.
-
Select the Automatic Proxy Configuration check box.
-
In the Proxy Configuration File URL field, enter the URL of the PAC file that you want to use. Click OK.
-
-
-
On the relevant user’s machine, configure the PingID desktop app (legacy) to work with PAC according to your operating system.
Choose from:
-
Windows 32-bit: From the command line, enter
"C:\Program Files\Ping
Identity\PingID\ProxyHelperSetup.exe" -pac
. -
Windows 64-bit: From the command line, enter
"C:\Program
Files(x86)\Ping Identity\PingID\ProxyHelperSetup.exe" -pac
. -
Mac: In a terminal window, enter
sudo
/Applications/PingID.app/Contents/MacOS/ProxyHelperSetup -pac
, and then enter the admin password when prompted.
-
-
Test the communication with the proxy server.
-
Pair the PingID desktop app (legacy).
-
Open the PingID log file.
Result:
If the PingID desktop app (legacy) can communicate with PingID cloud server, the
Proxy configuration is PACentry appears during application startup. If there is no communication, indicated by anunknown errormessage when pairing the PingID desktop app (legacy), either the proxy is not working correctly, or there is a configuration problem.
-
Configuring Kerberos proxy authentication for the PingID desktop app (legacy)
The PingID desktop app (legacy) supports proxy authentication using the Kerberos protocol, delegating the machine credentials for authentication to the organizational proxy.
Before you begin
|
Install the PingID desktop app (legacy) 1.5.2 or later. |
About this task
The PingID desktop app (legacy) supports proxy authentication using the Kerberos protocol, delegating the machine credentials for authentication to the organizational proxy. The HTTP client uses Simple and Protected GSSAPI Negotiation Mechanism (SPNEGO) to negotiate the authentication method.
When Kerberos is the agreed protocol, the client uses a ticket generated by the Key Distribution Center (KDC) for the proxy authentication that can be used multiple times. The Kerberos ticket expiry period might vary according to the KDC configuration.
Steps
-
Ensure that a Kerberos token is initialized on the user’s operating system.
-
From the command line or terminal window, run
klistto verify that a valid Kerberos token is available.
-
-
From the command line or terminal window, enter the following command:
Choose from:
-
Windows:
"C:\Program Files(x86)\Ping Identity\PingID\ProxyHelperSetup.exe"
<host> <port> -kerberos
-
Mac:
sudo /Applications/PingID.app/Contents/MacOS/ProxyHelperSetup
<host> <port> -kerberos
-
-
From the command line or terminal window, enter the following command to test Proxy Auto Configuration (PAC) with Kerberos:
Choose from:
-
Windows:
"C:\Program Files(x86)\Ping Identity\PingID\ProxyHelperSetup.exe"
-pac -kerberos
-
Mac:
sudo /Applications/PingID.app/Contents/MacOS/ProxyHelperSetup -pac -kerberos
-