Customizing the enrollment page text by language locale
When the end user’s machine’s locale is set to one of PingID’s supported languages, the user receives enrollment messages in that locale’s language. PingID provides default text for each of the supported languages. You can customize the enrollment message text per language.
Customize the text using one of the following methods:
-
Using the Admin portal.
-
Editing the Localization files for the languages that you want to include. Learn more in Customizing the registration language files.
Use the same method every time you edit the language text. There are no text validation checks to verify that the text is in the selected language.
|
If the user’s locale isn’t a language supported by PingID, or no text is defined for a supported language, the enrollment page uses the English language text. |
To customize the enrollment message text using the Admin portal:
Steps
-
Go to Setup → PingID → BRANDING → ENROLLMENT.
-
For each language that you want to edit:
-
In the language selector list (
 ), select the language you want to edit.
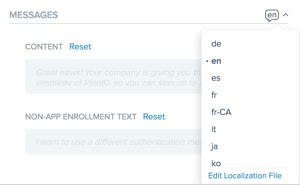
-
Enter the customized text:
- CONTENT
-
Customize the text you want to display in the main area of the Registration page Enrollment page.
- NON-APP ENROLLMENT TEXT
-
Customize the text to display on the link presented to users who want to enroll to PingID using an authentication method other than the mobile app for an iOS or Android device. The text is updated in the preview page for the selected language.
-
-
Repeat step 2 for each language that you want to customize.
-
To view a preview of the text for each language, from the language selector list (
), select the language you want to preview.The text updates automatically.
-
To restore the default text for a specific locale, select the locale and then next to the Content or Non-App Enrollment Text field, click Reset.
-
Click Save.
Customizing the registration language files
To localize the PingID registration messages in one or more languages, download the localization messaging template, customize the languages that you want to change, and then upload them through the Admin console enrollment configuration workflow.
When uploading a localization file:
-
Attempting to upload an invalid
.zipfile structure returns the error messageFile doesn’t contain any valid localizations. -
If a localization file doesn’t comply with the
Localization_<locale>.propertiesnaming convention, it’s ignored. -
You can include instruction and maintenance files, such as
readme.txt, in the.zipfile. -
Localization files for unsupported locales are ignored.
|
Customizations that you have implemented using the Admin portal Enrollment page are reset to the default text when you customize the localization For example, if you have an online customization for English messages, and you upload a |
Steps
-
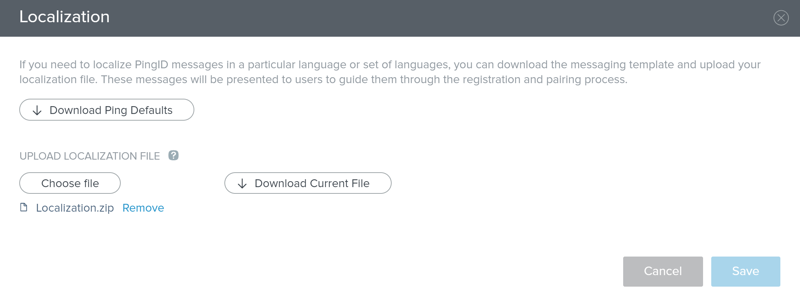
Go to Setup > PingID > Branding > Enrollment.
-
In the language selector list (
),
select Edit Localization File.
-
Choose a localization file to download:
Choose from:
-
Download Ping Defaults: Download a
.zipfile of the default text templates for each of the supported languages. -
Download Current File: Download the current version of the localization
.zipfile for further editing.This Download Current Fileoption isn’t available if the default localization file hasn’t been edited or the PingID localization message settings were restored to the default values.
-
-
Extract the localization template
.zipfile that you downloaded.The
.zipfile includes a separate text file for each locale. -
For each language file that you want to edit, open the relevant properties file in a text editor and edit the following text content.
-
pingid.enrollment.content.description=<CONTENT message text> -
pingid.non.app.enrollment.text=<NON-APP
ENROLLMENT TEXT link text>
Errors in the leading
pingid.enrollment.content.description…andpingid.non.app.enrollment.text…strings, or the absence of these leading strings in the localization file, causes the affected message to revert to the default text of its locale.
-
-
Create a
.zipfile including all of the custom localization properties files.By default, files are named
Localization_<locale>.properties. The.zipfile must be a flat structure containing only the desired files, without any folder structures.The
.zipfile must include files for all locales that do not contain the default text. If you don’t include the file for a specific locale, the default text is used for that locale. -
Upload the custom localization properties file:
-
In the Localization window, in the Upload Localization File section, click Choose File. Select the
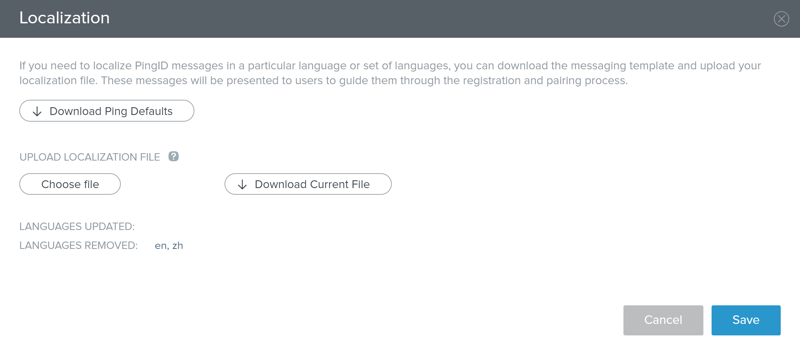
.zipfile that contains the customLocalization_<locale>.propertiesfiles.Result:
A summary of the language files that will be modified shows the following:
- Languages Updated
-
Lists the language locales whose messages will be changed.
- Languages Removed
-
Lists the language locales whose messages will be restored to the default messages.
-
-
Click Save.
Restoring localization file message defaults
If you have customized the language for one or more locale by editing the localization file, you can restore the defaults by deleting the existing localization file for that language. Deleting the localization file restores the system defaults for all languages.
|
You can also restore defaults per language from the Enrollment page. Select a specific language and click Reset next to the text you want to restore. Use only one method consistently, either through the localization file or using the Admin portal. The system doesn’t maintain a history of changes. |
Steps
-
Go to Setup > PingID > Branding > Enrollment.
-
In the language selector list, select Edit Localization File.
Result:
The Localization window opens.
-
To restore messages text:
Choose from:
-
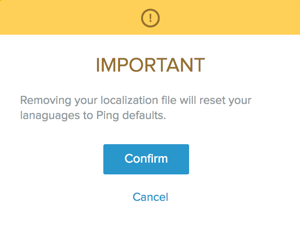
To restore message text to the original for all locales, next to Localization.zip, click Remove.
-
To restore message text for one or more languages:
-
Click Download Current File and extract the current localization template
.zipfile. A separateLocalization_<locale>.propertiesfile is included for each locale. -
Delete the files for the locales that you want to reset to default and then compress the remaining files.
-
In the Localization window, next to Localization.zip, click Remove.
-
Click Choose file and upload the new localization
.zipfile.The languages to be removed display in the Languages Removed section.
-
-
-
Click Save.
-
Click Confirm.
Result:
The following warning message displays.
Result
Your changes are applied and can be viewed in the relevant language selections in the Enrollment window.